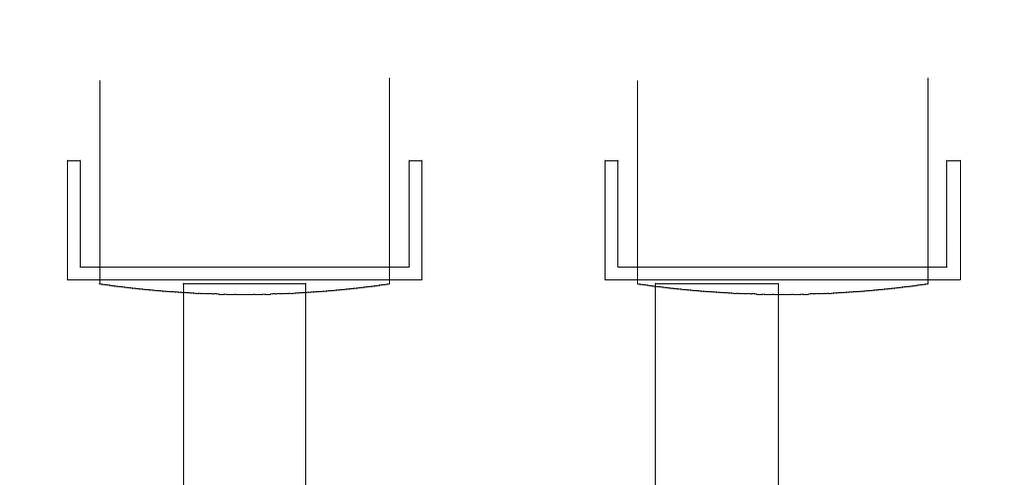
How do you get square 90deg. edges with a handplane?

UKworkshop.co.uk

Help Support UKworkshop.co.uk:

This site may earn a commission from merchant affiliate links, including eBay, Amazon, and others.
Hi Mike
The first question should be exactly how are the edges not square?
I have found when showing people that usually gives a square edge initially after a few strokes the edge where they start planing is normally tilting away from them and the finishing end is tilting towards them.

This is caused by their weight changing through the stroke. Initially their weight is over the plane and the tendency to weight the outside edge. As they move the plane forward their arms extend a little and they lean forward causing them to weight the inside of the plane.

If this is something you recognise the solution is to lock your upper body as you should and push with your legs only, walking down the length of the wood. It’s preferable to curl your fingers under the plane to act as a fence to stop you moving it inadvertently off the centre of the wood.
It takes practice but first you need to isolate what’s causing the problem

Good luck
 
Racers":2xbvfq5q said:
How about knocking up a long shooting board and using a straight blade in your plane?

That's a useful suggestion for smaller components. It's how I edge joint 8mm thick boards for drawer bottoms, because 8mm doesn't give the plane much stability for traditional edge jointing techniques. In fact I like this technique so much I prefer a longer shooting board, one that runs East-West along the bench rather North-South across it,

Shooting-Board-1.jpg


The only problem with relying on shooting for edge jointing is how do you edge joint the 8' boards you need for, say, a dining table?

Oak-Dining-Table.jpg


Actually an example like a dining table also illustrates the shortcomings in a another solution that was put forward, namely clamping two boards together and planing right across them in tandem. You'll usually be working with 1 1/4" or 30mm thick boards for a dining table, so two together is uncomfortably wide for any hand plane.

For someone who's just messing around in their shed then fine, any work around that gets the job done is okay. In fact plenty of hobbyists will edge joint crudely then rely on dominos, biscuits, or dowels to actually hold the boards together. They'll put up with horrible, gappy glue lines in order to avoid developing the necessary skill with a hand plane.

And edge jointing does require skill, there's just no getting around it. You're basically trying to get an edge precisely true in two axis at the same time, and you're working to extremely fine tolerances.

You need to get the mating components perfectly square as proven by testing at multiple points along the board like this,

Edge-Jointing-01.jpg


At the same time as ensuring the mating surfaces are perfectly straight (or with a minute hollow in the centre) as proven by testing with an accurate straight edge like this,

Edge-Jointing-02.jpg


When each of the two components have passed these tests you then need to bring them both together and check there are no gaps and absolutely no tendency to "tenting" (or else you'll be in trouble once they're glued up under sash cramp pressure),

Edge-Jointing-04.jpg


Most woodworkers can get one of the two axis correct, but then they'll generally screw up the first when attempting the second. Which means they have to start all over again. It's frustrating and, at least to begin with, very time consuming. But nothing worth having comes easy, and if you want the satisfaction of truly mastering a hand plane then you have to stick with it until you've got it sorted.
 

Attachments

  • Shooting-Board-1.jpg
    Shooting-Board-1.jpg
    139.5 KB
  • Oak-Dining-Table.jpg
    Oak-Dining-Table.jpg
    94.2 KB
  • Edge-Jointing-01.jpg
    Edge-Jointing-01.jpg
    98 KB
  • Edge-Jointing-02.jpg
    Edge-Jointing-02.jpg
    99.6 KB
  • Edge-Jointing-04.jpg
    Edge-Jointing-04.jpg
    80.9 KB
MrDavidRoberts":1k6gv8lr said:
Is it all about the technique/holding the plane or is there some sort of special trick (except messing up your finger/knuckle)?
When jointing edges ,however I try, I just can't get constantly totally 90deg. precise edges, without spending an awful amounts of time with a square.
It sounds like your using a no.4 to me?
I would get a nice, thick soled, Stanley no 5 1/2 as its a longer plane and wont let you scoop the work in areas as easily .. unless its a high spot.
You have to think of the plane as a tool not for scooping out stock...
To get a planed surface on a low spot/hollow, first you will need to take the entire area down to that plane to get to that spot where you intend to cut.

A good way to figure this out is having a flat surface like a composite fire door from a skip.
Its not gonna warp, deflect much, is flat for reference, easy to get and free
Get a long reach angle poise lamp for working with too.
The timber will only sit/rest on the high spots and these high spots will have to be planed in order
for the entire work to be sitting on the bench.
If there's gaps the lamp will be shining light underneath the work.

Use stop shavings when your close, as you will dive of the ends of the timber if you don't!
Before your last shaving, you want the timber to be sitting on the ends of each piece, like
1cm off each end to lick off with a smoother... if you don't take stop shavings the timber will not sit proud on the very ends of the lengths you are planing, so the timber will not sit properly/be an invisible joint.
Use an agreeable length of timber to work with starting off, as tearout wont be a problem later on.

If you fail to understand what I'm saying, can't get the hang of this with a wider board,
or afraid to remove too much material, but need a flat board...
Rub a dark crayon on the bench, the entire length of your work piece
rub the timber against the bench and look at the coloured in ]high spots[/u
These spots will give you an idea on where you need to remove...

Methods of use, where a flat reference (your composite fire door) is vital....
Shining the light underneath the work
Rocking the timber or pivoting the work to determine where the timber is touching on the bench... which are the high spots to plane off

Other reasons for the flat bench
Planing thin timber that would deflect in a vice, or unflat surface
Being able to assemble components with more accuracy etc

Good luck
 
Someone will need to explain to me what use a camber is when a board is only, say, 22mm wide. A 100% flat blade will do that perfectly.
 
Ttrees":3cc8pjzl said:
........A good way to figure this out is having a flat surface like a composite fire door from a skip.........

Methods of use, where a flat reference (your composite fire door) is vital.............

Oh my good god. Talk about complicating something unnecessarily. What a great way to put someone off woodwork.

No, you clamp your board/s in a vice and you plane them. You sight along them to see where they need more or less taking off. It really is that simple.
 
You can use either a flat blade or a cambered blade it’s a personal choice. A flat blade is I believe harder to set and more difficult to use to take out issues with an edge.

You would normally set a Cambered blade such that the very edges don’t take any shavings. That way you can move the plane to biase the cut either side by planning off centre. The same can be achieved with a flat blade but you have to weight the plane to achieve it.
 
deema":teaz4ybl said:
You can use either a flat blade or a cambered blade it’s a personal choice. A flat blade is I believe harder to set and more difficult to use to take out issues with an edge.

Edge of the plane cut, you mean? I completely agree when it comes to planing boards wider than the plane, but when planing an edge which might be less than a third of the width of the blade, I just can't see this applying.

You would normally set a Cambered blade such that the very edges don’t take any shavings. That way you can move the plane to biase the cut either side by planning off centre. The same can be achieved with a flat blade but you have to weight the plane to achieve it.

Indeed, that's a fair point. Having said that, adjusting the cut by putting a little extra weight on one side or the other is skill number one.....just about the first thing you learn when you pick up a plane for the first time in your life.
 
MikeG.":2zzzro8y said:
Someone will need to explain to me what use a camber is when a board is only, say, 22mm wide. A 100% flat blade will do that perfectly.
Due to the plane flexing and varying pressure you won’t get a straight flat edge.
If you do the DC etc method and mark the high points with a cambered blade you can remove a varying thickness shaving by using the camber, the middle will produce a even shaving and side tapered ones.

Pete
 
MikeG.":1shk3owz said:
Except I do. What am I doing wrong?

This is the problem with having these kind of discussions on the internet instead of at a bench.

There's no validation, no practical demonstrations, no nothing. It's all just keyboard clatter.

I've met some decent craftsmen who seem to get acceptable edge joints without much of a camber. Not many, but some. Having met hundreds of accomplished cabinet makers I know that the great majority edge joint with a cambered iron. I also think it's actually pretty difficult to sharpen a plane iron without producing at least some camber, so there's a possibility you do have a cambered iron but you don't recognise it. And of course there's the possibility that your definition of an acceptable edge joint is simply not the same as mine.

But unless you and I are standing together at a bench then we'll never make any progress with any of that. It's all just, "he said this and he said that".

But at least you've actually made some stuff (or at least I think you have). There are plenty of posters who elbow there way into these kind of conversations despite never having made a stick of furniture in their lives, heck some of them don't even own any timber, but none the less they feel their opinions are worth sharing.
 
All good info here, but in a sense, it's a bit like swimming.
You can't learn it from a book. Best to take a course if possible.
Also keep your blade very sharp. Most planing problems are a combo of
bad technique and blade needing to be sharpened.
 
skelph":3o7rjjn7 said:
If push comes to shove, why not get one of these from Dieter Schmid -
https://www.fine-tools.com/hobelzubehoer.html
Not cheap but it would work if you were edging boards 4"wide or more.
skelph

If you used that with a cambered blade it would take more off one side of the edge being planed than the other, because it doesn't hold the plane central. Use it with a straight blade and there are no such issues.
 
Mike clearly has a thing about cambered plane irons. But so many of these arguments are prety meaningless eg sharpening methods, cap iron position etc etc. In the end it's what works for you and everyones technique will be different. It's a bit pointless being pedantic about your way of doing things.

But then if we didn't have pedantry there would be few threads on UKW :D

Chris
 
dzj":1dy5y608 said:
All good info here, but in a sense, it's a bit like swimming.
You can't learn it from a book. Best to take a course if possible.
Also keep your blade very sharp. Most planing problems are a combo of
bad technique and blade needing to be sharpened.

I'd say it's a bit more like golf. There's a whole industry set up to provide lots of shiny gear, but ultimately it's just you and the ball. Establishing good handplane technique seems to me not unlike establishing a good golf swing - it takes time and effort to create a whole-body muscle memory and even on good days you can still screw up! On the plus side, woodworkers don't need to wear zany plaid plus-fours etc. and there are usually fewer people watching...

Cheers, W2S
 
Mr T":27givxyq said:
Mike clearly has a thing about cambered plane irons. ........

No, I don't actually. I use a cambered iron, albeit with the merest tickle taken off the outer parts of the blade. What I have a thing about is weak arguments. If you have a curved blade, and that curve isn't centred on the centre of the edge you are planing, you will remove more from one side of the wood than the other meaning you won't end up with a right angle. That's just obvious. However, you should note my first post in this thread in which I said that you don't need a right angle anyway for edge-jointing.

OWoGUdR.jpg
 
When I first started, I tended to be too enthusiastic with the plane, and not careful enough with the testing tools. I'd take several shavings, biasing the plane where I thought the 'ups' where, then check and find that where the 'ups' had been, were now substantial hollows. More planing - several strokes. Then test again, and the ups and downs were now in different places again...

Things improved when I took just one shaving, then tested and marked the high points in pencil, and took one more shaving, tested again...

I think it's also worth breaking the job into separate parts, and it's also worth setting the plane up with not too heavy a cut; you want to concentrate on accuracy of plane positioning rather than having to power the plane through the cut.

Thus - step 1 - clamp board in vice, plane off saw-marks and roughness, getting it 'straightish' and 'squarish' by eye only.

Step 2 - pick up your straightedge (long spirit level, proper metal one, whatever) and test for straight. Mark the humps, take one shaving from the high points, test again and note how much that one shaving has removed, take another shaving if necessary, and so on until the board edge is straight. Only correct gross errors in square that you can see by eye at this stage - concentrate on straight.

Step 3 - put down the straightedge and pick up the square. Test along the edge and mark the high spots. Now take one shaving, biasing the plane position (cambered iron) or weight on side of plane (straight iron). Test again with the square, and note how much one shaving has removed, mark high spots again. Take one more shaving, test again, and so on until you're happy with squareness all along.

Step 4 - check again for straight (it should be pretty close, but may have gone off straight a smidgen). Mark high spots, plane off, taking care to keep plane central and upright.

Keep going alternately checking straight and square until you've nailed it. This may take some time, but with practice, you start to get a feel for how many strokes will remove the inaccuracies you find in testing on that particular timber (it does vary a bit!). Yes - you do spend longer with a straightedge or square in your hand than with the plane, but you're trying to find out WHERE to use the plane to best effect.

Finally, take one or two passes starting just inside the near end and ending just inside the far end, taking care to keep the plane central and upright, and then one careful pass right through from end to end. A final check with square and straightedge should show both to be acceptable.

Yes - it's all a bit of a faff, but if you're slow and methodical, you get there. As others have said, it does get a bit quicker with practice. It's still worth taking the time to get it right, especially if later stages of the project rely on accurately prepared stock for successful results.

Slow, patient, methodical, lots of testing. It's one example of the tortoise beating the hare, very often.
 
MikeG.":3c4o3rhi said:
However, you should note my first post in this thread in which I said that you don't need a right angle anyway for edge-jointing.
The 'don't need a right angle' point you make has its adherents, and up to an extent it's valid. One problem with match planing as many call it is, as has been pointed out, is that the two pieces can become too wide to plane true comfortably. The second issue is that the complimentary angle of two otherwise suitably (or is it perfectly?) matched boards can result in unacceptable and uncontrollable slippage at glue up so that the surface of the two boards end up significantly out of line. Simply put, pressure at the outer edges of the assembly cause the the pieces to slide, one up and one down at the joint, and how likely and severe the sliding is depends to a great extent on how much out of square the two edges are.

I'm one of those that uses a slightly curved cutting edge for straightening edges, and when I teach learners how to prepare edge joints using my methodology I get them at first to do something very similar to what Cheshirechappie said in his post, basically for the learner, it's along the lines of 'take one shaving, check, then another, check, and so on. As confidence builds the number of strokes increases between checks, until eventually it becomes almost automatic. I agree with custard in that learning how to prepare an edge joint by hand is not something learnt quickly. There are a lot of skills and knowledge to take on board such as, to name just a few, knowing when a plane is capable of doing the job, i.e., is it true enough (and if it's not, do you have the skill to fix it[?]), to knowing how to sharpen and set an iron, to being able to apply the subtle skills required to manipulate the tool in use, to checking your progress and making corrections. It just takes a lot of practice, and there really aren't any short-cuts I can think of to sidestep skill development. Slainte.
 
As a teenager, I would use my father's hand tools(and his timber) and just make things. Boxes for home made wireless sets, a playable electric guitar. I had no concept of how difficult woodwork was, or how incompetent I was.
Now, I have a router table, a bandsaw, a table saw of sorts, planes, chisels, a drill press, and I read these forums and spend hours watching YouTube tutorials, and I'm too scared to try and make anything more complicated than a door wedge. Have I become stupider, or has woodwork become way more difficult over the past 50 years?
 

Latest posts

Back
Top