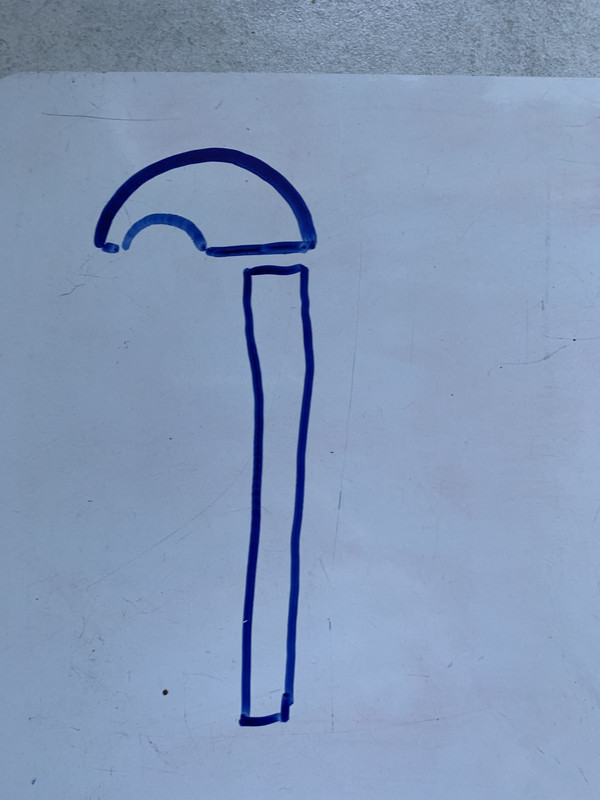
How do I make this half-curved piece of wood

UKworkshop.co.uk

Help Support UKworkshop.co.uk:

This site may earn a commission from merchant affiliate links, including eBay, Amazon, and others.

sams93

Established Member
Joined
3 May 2022
Messages
665
Reaction score
353
Location
East Sussex
As part of something i've been asked to make from oak, I need to make 2 pieces like this (the bits at the top). I have a decent range of power and hand tools, what is the most economical/effiecient way of making the curved top piece that stretches from end to end? It isn't solid to my knowledge - although I suppose if I can't come up with a simple enough way to do it then it might end up being solid!

1740348217582.png
 
I would cove cut the inside with my tablesaw.
Then saw the corners off the outside, finish shaping it with a spokeshave or hand plane followed by sandpaper.

Pete
 
Probably easiest from solid, start off with a rectangular section and draw a semicircle on the end, then keep pushing it through a table saw altering the tilt of the blade till most of waste is removed. Screw a temporary block to the bottom to hold it in the vice and hand plane all the peaks off then a bit of a sand.
You could glue pieces to form a barrel type structure but that would take longer imo.
Ian
 
You could make several strips each cut with a given angle and then joined together, ie with a 15° cut you need 24 pieces for a circle so using 12 would give you the 180° semi circle. You would need to sand afterwards to smooth out the transitions. Another way would be to find someone with a lathe to turn you a round blank and then cut in half.
 
Faced with something like that I would buy some large section dowel and simply cut it in half. If you really need a hollow in the underside then do that on the router table but I dont really see it as that important. Who would be looking under there.
There are many other ways so It depends on how much time you want to put in.
Regards
John
 
One issue with hollowing out the underside of a piece made from solid is grain direction. At some point on a 180 degree curve, there will be a short grain (weak) section.

That issue would be reduced by the segmented approach but the top of the finished item might look 'unnatural'.

If it did need to be hollow, as the end of the piece is not seen, perhaps stack veneers over a former and restrain while the glue dries.
 
Kerf cut a long section to give the(are we calling this a 'barrel' ?) ,the ends of the flat board will hide the kerfed ends.
 
Last edited:
The parts are in a prominent position so appearance and finish are important. It looks as though you'll be making this out of 1" boards so I think the kerfing method mentioned above would be the most economic and give a good result.
The curve is quite tight so it would be worth experimenting with a short length first. Choose good straight grained stock. Make a couple of formers and use steam or a heat gun to gently wrap the kerfed timber over them. Leave to set for a while then glue with a a gap filler such as cascamite.
A nice little woodworking exercise.
B
 
Just a few ideas:

If I was doing it I would shape it on my spindle moulder out of the solid but you may not have that equipment.

If I did not have a spindle moulder I would turn it on my lathe leaving the ends square then pass it through a table saw to cut it in two halves.

Failing both of the above I'd shape it first with an electric plane then with a hand plane and finish with sanding.
 
I did this to make a bath panel corner out of oak. I used used a handplane from memory and then sanded to get the final finish.
 
Although the piece looks decorative, I reckon it's almost certain that it will be used like a handle to lift the cot. So I'd buy or make a large oak dowel and then halve it. I think I'd hollow it just a little, to make it easier to grip when used to lift the cot.
 
Time and accuracy is one approach.

That's interesting.
If you don't have a hollow plane of the right radius, no worries, it's perfectly easy without one.
In fact probably easier if it's a nice No7 or 8, or a long woody even better, being lighter and less work.
You could mark up in the same way but it's simpler to mark up the circle at each end, with a pencil and pair of compasses, or draw around something of the right diameter.
Then plane off the 4 corners of your blank at about 45º, to just nearly touch the circle marks.
You now have 8 corners and you plane these off in the same way, just a gnat's clear of the circle marks.
You now have 16 corners and could carry on planing, or spoke shaving, or sanding. to finish off.
PS you can see the accuracy of your planing by looking at the corners (what's the plural of arris?) which should be parallel with no variation of the flat between them. If you are going off a bit it can be corrected if you haven't gone too far.
Sanding with a sheet of paper held in both hands pulled over the profile, like you'd dry your back with a bath towel.
PPS it's quick and easy once you've got it, and can be done with a short plane but needs more care and attention.
 
Last edited:
I very much doubt that this particular feature would be anything other than solid wood with just the top being semicircular . I seem to recall their being a vogue for "Lit Bateaux" that invariably had this type of feature, on the head and foot board. The cot shown in the photo seems to be a "riff" on one of these. And, I can't see the original manufacturers wanting to make things needlessly complicated for themselves, if they didn't have to.

It is a straightforward task to plane up a round by hand as has been mentioned by others. And, I think one often needs to resist overcomplicating things despite the temptation at times.
 
Last edited:
IMG-6778.jpg
Can I play?

I think if it was me I would just go for that solid piece but use the router to put a slight dip, offset to the centre down the length.
 

Latest posts

Back
Top