Cutting the sides of dovetail pin boards

UKworkshop.co.uk

Help Support UKworkshop.co.uk:

This site may earn a commission from merchant affiliate links, including eBay, Amazon, and others.

LuptonM

Established Member
Joined
2 Sep 2010
Messages
460
Reaction score
0
Location
Callington
My sawing isn't 100% so when cutting the sides of dovetail pin boards (the waste at either ends) sometimes it causes gaps.

What are the best methods to make sure this doesn't happen? Cut just to the right of the marking gauge line and chisel the waste? Cut the shoulder at a deliberate slight angle and then pare the waste?
 
LuptonM":292l4swv said:
My sawing isn't 100% so when cutting the sides of dovetail pin boards (the waste at either ends) sometimes it causes gaps.

What are the best methods to make sure this doesn't happen? Cut just to the right of the marking gauge line and chisel the waste? Cut the shoulder at a deliberate slight angle and then pare the waste?

Hello,

Cutting shy of the line and then paring is something that should be avoided when doing dovetails. Inevitably, everyone inadvertantly cuts a little shy from time to time, but cutting to the line is what you should aim to do every time. With practice, you get there, whereas avoiding the issue, you'll never do it.

If you chisel a little furrow up to the gauge/knife line, then you have somewhere to accurately sit the saw blade, right where you want it, then it is just a matter of sawing straight.

Mike.
 
What I tend to do is cut dead on the line but angle the saw a little away from the shoulder (maybe 5 degrees) and then pare that final bit. In an ideal world you would do it off the saw but I would rather pare a little than ruin the board. Paul Sellers has some youtube videos on dovetailing I would suggest you go watch him do it then try to emulate it, that is how I learnt.


Matt
 
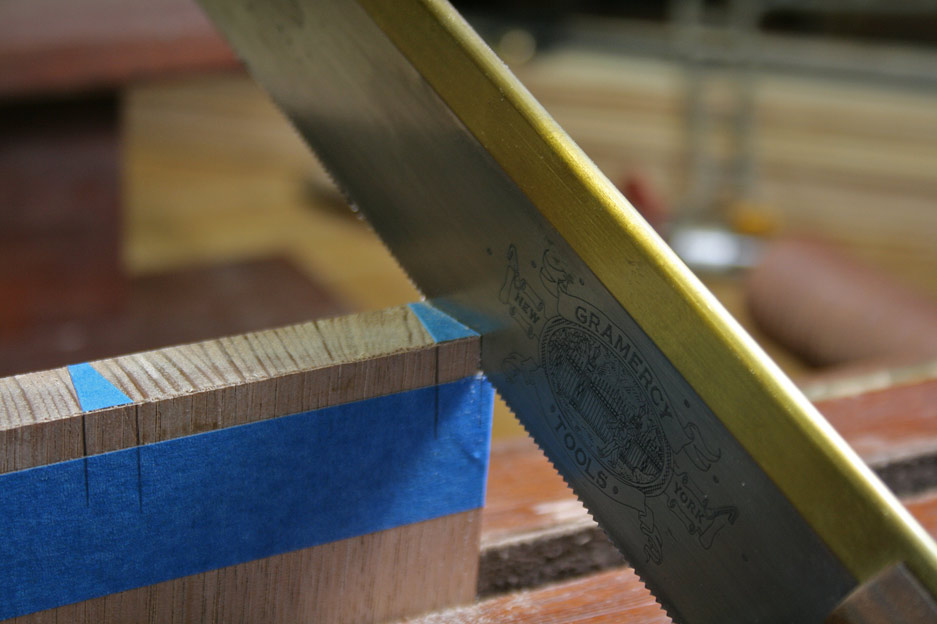
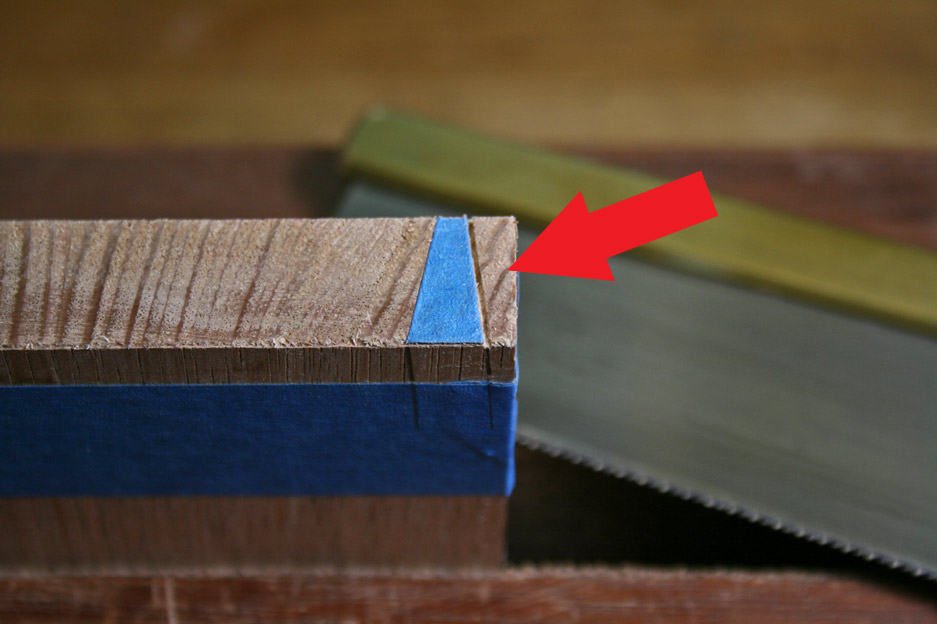
I saw right against the line. I do not want to do any paring, ever. I can get away with a saw-to-saw fit about 95% of the time. One must cultivate a "go-for-it" attitude.

To transfer the tails to the pin board I score into blue tape. This helps define the line well for my ageing eyes ...

ThroughDovetails3_html_m254d06bf.jpg


ThroughDovetails3_html_1176da80.jpg


A couple of article I wrote may help:

http://www.inthewoodshop.com/Furniture/ ... ails3.html

http://www.inthewoodshop.com/Furniture/ ... eTape.html

Regards from Perth

Derek
 
I was under the impression the OP was refering to the crossgrain cut not the rip cuts to create the pins. If it is in fact the rip cuts then the fit should be off the saw no paring.

Matt
 
Either of the methods you suggest work. A sharp chisel and paring thin slices is the way to work. The marking gauge/knife line gives you a clear datum to work to. The other part of the process is practice. They say the first 1000 dovetails are the hardest.
 
PAC1":3mbhrenr said:
Either of the methods you suggest work. A sharp chisel and paring thin slices is the way to work. The marking gauge/knife line gives you a clear datum to work to. The other part of the process is practice. They say the first 1000 dovetails are the hardest.
Saw away most of the waste with a rough cut, pare away remaining waste gradually with chisel cuts, leaving a full 1/16". The last cut (and only cut that matters) is made by placing the chisel IN the mark. The mark should be made with a cutting gauge or marking knife.

You don't even need good eyesight, just a sense of touch.

BugBear
 
It depends.

As a generalisation, I'd regard dovetails as a functional joint, to be made quickly and efficiently. So saw at the line and leave it at that.

But while that would be perfectly good for a useful box or a concealed carcase joint, especially if made in softwood, it's not necessarily the best way for a jewellery box in hardwood, with the joints on show as a decorative feature under a polished finish. There I would do what BugBear has described - saw near, then pare with a chisel located in the marked line.

It's a similar case to tenon shoulders - most of the time, straight from the saw is fine, but for the finest work, the shoulder plane makes the final shavings up to the mark.

So, from a skill development angle, you need to practise until you can do both, consistently.
 
LuptonM":2bbn2puy said:
Sorry I mean the cross grain part when you saw the sides
Given that you're cutting the shoulders next to the end tails, once you've cut the knife line in, you can make use of the reflection of the wood in the saw blade. Because the cut has to be square, the reflection must run in a straight line "through" the blade. I find that it really does help in keeping that particular cut where it should be.
 
LuptonM":p7epfiqe said:
Sorry I mean the cross grain part when you saw the sides

I still saw to the line as much as possible. Undercut the gauge line to register the saw, and cut along the line. The "fence" should aid here, and the cut is short. Use a chisel to remove anything stray.

Regards from Perth

Derek
 
Three things.

First, I agree with AndyT about the amount of work a joint needs - for something like a drawer back, just cut 'em and whack 'em together; for the fronts, which will be seen quite a lot, take more care - and Mike's (woodbrains) technique of cutting a little wedge of wood out with a chisel to leave a vertical cut right on the gauge line is a good one here, and for tenon shoulders.

Second, it's worth a think about saw technique. A good, firm, comfortable stance helps, feet slightly apart and well planted, body not too near the job so that the sawing arm can swing freely without the elbow catching on your side, off hand on the work to give you thumb support for the side of the blade and a third point of contact so you're like a tripod, work at a comfortable height so you can saw easily without getting backache, and head still over the job so your dominant eye is right over the saw. Then saw fairly slowly, with as relaxed a grip as you can without actually losing control of the saw. The idea is to be still, relaxed, nicely positioned to see where the cut is going, slow enough to be able to control direction in the early part of the cut, and with only your sawing arm moving - nothing else.

Third, the end cuts being cross-grain means the saw behaves very slightly differently to the other long-grain cuts, which I think affects the 'feel' you get from the saw, and slightly puts you off. To overcome that, it's worth doing a couple of practice joints using two pieces of scrap before tackling a critical 'show' joint, especially if you don't cut them often, just to get the 'feel' of things and get into the groove, as it were. Don't bother so much for anything less important, though.
 
I have found that there are four causes for people to not saw straight.

1. Stance, Cheshirechappie has covered this problem.
2. Not look directly down the blade when sawing. With a backed Saw it's very tempting to start looking to one side as the back of the saw slightly obscures the vision of where the saw is cutting. Unless your nose is vertically above the saw, you will Saw to which ever side your head is biased away from top dead centre. So, if you look to the left of the saw, which is normally for a right handed person, the saw will tend to veer off to the right. By looking to one side the brain tries to make the Saw appear vertical so pulls your hand subconsciously towards your head. Hope that makes sense.
3. Trying to cut with a dull saw, a dull Saw will never cut straight.
4. A saw with too much set / uneven set. This affects almost 90% of the saws I see. You want as little set on a saw as you can get away with. Once you have established a kerf, and the blade has started to Saw into the stuff, you want to then be able to concentrate on the sawing action, and have the saw take care of keeping itself straight. With too much set, the saw can wobble about in the kerf and go off line. If the saw just fits in the kerf it has little ability to Saw off line. A dovetail Saw should have virtually no kerf and so care has to be taken when starting the cut that the saw is vertical, after this it should then cut perfectly to the line with no further guidance necessary. I know I'm rather controversial when I say, that apart from a new high quality saw (Pax, Skelton.....only two quality British Saw makers I know.....there are others....but their not British!) I would always advocate stripping off all of the teeth and hand sharpening it again. Getting rid of too much set is very very difficult and with second hand saws they can have been 'stoned' down the sides to 'correct' and uneven set that causes the Saw to 'walk' to one side, which can not be fixed other than by re-sharpening.
 
bugbear":4oy5yv3s said:
PAC1":4oy5yv3s said:
Either of the methods you suggest work. A sharp chisel and paring thin slices is the way to work. The marking gauge/knife line gives you a clear datum to work to. The other part of the process is practice. They say the first 1000 dovetails are the hardest.
Saw away most of the waste with a rough cut, pare away remaining waste gradually with chisel cuts, leaving a full 1/16". The last cut (and only cut that matters) is made by placing the chisel IN the mark. The mark should be made with a cutting gauge or marking knife.

You don't even need good eyesight, just a sense of touch.

BugBear

Hello,

So you'll saw all the tails and pins right to the line, because that is the best way to get a fit, off the saw. But you'll (purposely) fudge the edge cuts and pare away the waste. It doesn't make much sense to me! Did we forget how to cut straight just on these cuts. If the saw isn't up to the job, get a better saw. If the saw is up to the job, just go for it and get better with practice. Leave the paring for the odd mistaken undercut, which get less and less, the more dovetails you cut.

Mike.
 
woodbrains":1ns73b5y said:
bugbear":1ns73b5y said:
PAC1":1ns73b5y said:
Either of the methods you suggest work. A sharp chisel and paring thin slices is the way to work. The marking gauge/knife line gives you a clear datum to work to. The other part of the process is practice. They say the first 1000 dovetails are the hardest.
Saw away most of the waste with a rough cut, pare away remaining waste gradually with chisel cuts, leaving a full 1/16". The last cut (and only cut that matters) is made by placing the chisel IN the mark. The mark should be made with a cutting gauge or marking knife.

You don't even need good eyesight, just a sense of touch.

BugBear

Hello,

So you'll saw all the tails and pins right to the line, because that is the best way to get a fit, off the saw. But you'll (purposely) fudge the edge cuts and pare away the waste. It doesn't make much sense to me! Did we forget how to cut straight just on these cuts. If the saw isn't up to the job, get a better saw. If the saw is up to the job, just go for it and get better with practice. Leaves by paring for the odd mistaken undercut, which get less and less, the more dovetails you cut.

Mike.
But (viewed another way) I remove all the waste this way - rough cut near the line at the base of the waste, following by paring to the cutting-gauge-marked line, last cut with the chisel in the mark. So I am being consistent after all.

Other (many...) procedures for working dovetails are available. :D

BugBear
 
deema":3sw8jlc1 said:
I have found that there are four causes for people to not saw straight.

1. Stance, Cheshirechappie has covered this problem.
2. Not look directly down the blade when sawing. With a backed Saw it's very tempting to start looking to one side as the back of the saw slightly obscures the vision of where the saw is cutting. Unless your nose is vertically above the saw, you will Saw to which ever side your head is biased away from top dead centre. So, if you look to the left of the saw, which is normally for a right handed person, the saw will tend to veer off to the right. By looking to one side the brain tries to make the Saw appear vertical so pulls your hand subconsciously towards your head. Hope that makes sense.
3. Trying to cut with a dull saw, a dull Saw will never cut straight.
4. A saw with too much set / uneven set. This affects almost 90% of the saws I see. You want as little set on a saw as you can get away with. Once you have established a kerf, and the blade has started to Saw into the stuff, you want to then be able to concentrate on the sawing action, and have the saw take care of keeping itself straight. With too much set, the saw can wobble about in the kerf and go off line. If the saw just fits in the kerf it has little ability to Saw off line. A dovetail Saw should have virtually no kerf and so care has to be taken when starting the cut that the saw is vertical, after this it should then cut perfectly to the line with no further guidance necessary. I know I'm rather controversial when I say, that apart from a new high quality saw (Pax, Skelton.....only two quality British Saw makers I know.....there are others....but their not British!) I would always advocate stripping off all of the teeth and hand sharpening it again. Getting rid of too much set is very very difficult and with second hand saws they can have been 'stoned' down the sides to 'correct' and uneven set that causes the Saw to 'walk' to one side, which can not be fixed other than by re-sharpening.


Thanks for the tips guys.

Removing the teeth and recutting them to remove set seems a little extreme though. I was using a vertical dovetail saw and a S&P leap frog dovetail saw I had restored. I set the S&P saw with an eclipse saw set on the minimum set which is the twelve setting. I think this did give it too much set so had to remove some with a stone. I think it's mostly my sub standard sawing technique as a beginner though that has resulted in gaps. On some I had a little fluff left on the waste which was fine but on one or two I had slightly undercut it. I slightly prefer the old brass saws due to the weight of the back which makes finding vertical a little easier and the cut faster. I guess as a beginner it's difficult to determine whether the problem is the saw or you as no saw comes from the factory tuned to perfection, like chisels where they are just ground.
 

Latest posts

Back
Top