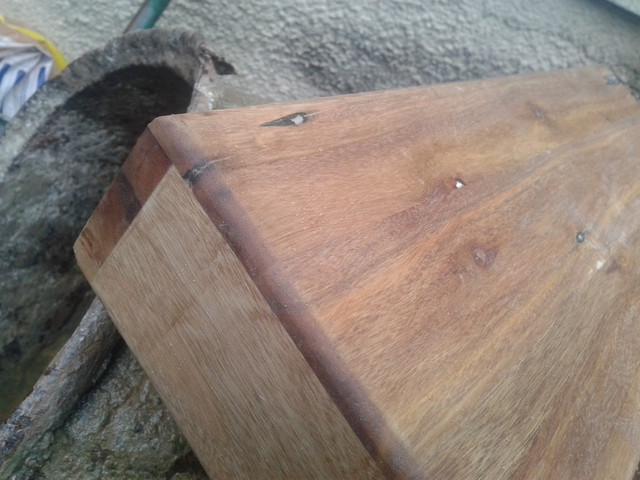
Can you critique these prototpe boxes please?

UKworkshop.co.uk

Help Support UKworkshop.co.uk:

This site may earn a commission from merchant affiliate links, including eBay, Amazon, and others.
julianf":1mo5gk44 said:
Im sorry to seem to disagree with you, but ive mentioned that i cant screw the top to the sides. I cant rely on the top to even be in place.

The top, when present (again, it cant be relied upon) needs to mount to the metal rails that are show in the photos. The metal rails always need to be in place.

Okay, just substitute "metal rails" for when I said "wooden battens" in my previous post.
 
Just to be clear for the OP. Solid wood will expand/contract across the grain, and this needs to be allowed for in your design otherwise you will get warping or splitting. Solid wooden bases would need to sit in a groove that allows them to move to avoid these problems.

MDF and plywood are both dimensionally more stable and you won’t have so many design considerations to take into account. So, if you want the aesthetic of the reclaimed wood, that is fine. Just make sure the grain runs round in a hoop (like in your first box) and attach a plywood base and that should be plenty strong enough. The tongue and groove joints at the corners look nicer and will add strength. And if you want to pretty up the base, add a veneer (to both sides, inside and out).
 
so this box is for a vintage drum machine? bespoke to fit, if that is the case then I'd be tempted with the rebate joints you've already shown, then for the top which is seen, some kind of mitred trim to hide the ugly rebates, you could use veneer over it, solid pine isn't that stable butt joinery, that's where MDF might be a good idea. Another idea might be a rustic look where you nail through the sides with blacksmith made wrought iron nails, but it might be a bit extreme, depends on what aesthetics you are trying achieve.
 
julianf":3u3jl569 said:
Brandlin":3u3jl569 said:
You're asking for advice.
You're being given sound advice about how almost all wooden boxes are made.
And you're doubting it.

Or a less aggressive way would be to suggest im trying to understand the advice being given.

I wouldn't be asking for advice if i knew what i was doing, would i?

The issue is you didn't ask how to make a box.
You asked for what you have already done to be critiqued.
There are a lot of people here trying to be helpful.
Almost all of them myself included have given you similar advice about grain direction, corner joints and a floating bottom or a plywood bottom.
 
Maybe it would help to expand on what thick_mike wrote, because most of the comments are about how wood moves with humidity.

Think of a plank of wood as a bunch of straws all running in the grain direction (this is how wood fibres do run).

As the humidity of the atmosphere changes, the straws get fatter or thinner (but hardly any longer). So if we go from low to high humidity, a board might get 4% or so wider.

Building your boxes with the grain running around the sides works well, because all the boards get roughly the same amount wider so they move together - no stresses and no-one even notices..

However, firmly glue or screw in a base of the same timber, and when that base gets wider or narrower the sides try to stop it moving. Over time, either it pushes the sides apart or (if it was attached when it was humid), the bottom board cracks.

This is why everyone is saying you need either to (a) cut grooves in the sides and make a matching tongue on the edges of the base, so that it can sit unglued in the groove (and you need to leave it space to expand or shrink), or (b) use plywood for the base, which doesn't really move with humidity, in which case you can attach it firmly to the sides.

If you don't know all this then the critiques might seem unjustified, but they are all aimed at helping you make boxes which don't fall apart.
 
Right,

After a few pms with people, im understanding this better now.

My next question is -

4.jpg


If i wanted to make the unit with these sides (as advised above) but use the same material for the base (ie not use ply, veneer, etc) how would i do that with the floating base, and still get it to look right?

These boxes may well be held on a stand at 45 or even 90 degrees - if so the base will be as visible as any of the rest of it, plus the fixing to the stand will be by the base.

With a floating base, are any of the sides (of the base) glued, or are all four left clear?

Thank you.
 
There is a brilliant shortcut to designing things like this - simply go out and buy the nearest equivalent and copy it, with your own modifications.
Or set about studying actual boxes in general - look closely at all and everything. Take a small camera with you and wander about a museum, craft shop, department store etc.
Getting us to design it for you is a bit of a cheat!
 
It would be difficult to get it to look like the picture and also allow for movement. You could machine a tongue on the top part of the bottom with the bottom half shaped as you show, the tongue engaging with a groove in the side. This would be a pain to achieve and is definately a less than optimal method. When the wood moves it will show as steps between the sides and bottom. Usually floating panels are glued at the mid point across the grain to distribute the movement on either side.

Just out of interest, why are you so against ply for the base? To me it seems the best option, especially if it's going to be subject to extreme temperature changes. It could be rebated or grooved into the sides so would not be showing.

Chris
 
Im not keen on ply as the base will be seen if theyre mounted on a frame, so i want a continuous finish.

This is reclaimed timber, and new timber would be easier and cheaper (in man hours) to work with, but then i loose an effect / marketing point with is of value to me. Ie its not a cost issue, but an aesthetics issue. If i use ply then veneer it, i still loose that aspect, even though it would be easier than using the reclaimed stock.

If i buy new stock and then 'fake' a finish on it - i dont know, im just not much into that idea.

Again the base will be visible if mounted in the frame - equally as visible as any of the rest of it, hence my desire for continuity.

I dont need to have the rounded edges - anything that looks pretty and works is fine. And is machinable, rather than by hand tools - remember im a CNC operator - im more used to using machine tools than hand tools.
 
I had a quick look for a piccy to show you a floating panel with no avail.
Basically think of the sides as being the structural part instead of the bottom panel.
So if you make the sides well, all you need is a rebate or groove for the panel to slide into, or assemble in sequence.
You wont see the edges of the panel so you could use plywood if you wanted

While you may think it might be a weaker design, Its not.
Try breaking a floating panel, even if it split it into multiple pieces it would still function the exact same.
Look at an exterior door construction (not a barn door)
Good luck
 
julianf":303kie1b said:
Im not keen on ply as the base will be seen if theyre mounted on a frame, so i want a continuous finish.

This is reclaimed timber, and new timber would be easier and cheaper (in man hours) to work with, but then i loose an effect / marketing point with is of value to me. Ie its not a cost issue, but an aesthetics issue. If i use ply then veneer it, i still loose that aspect, even though it would be easier than using the reclaimed stock.

If i buy new stock and then 'fake' a finish on it - i dont know, im just not much into that idea.

Again the base will be visible if mounted in the frame - equally as visible as any of the rest of it, hence my desire for continuity.

I dont need to have the rounded edges - anything that looks pretty and works is fine. And is machinable, rather than by hand tools - remember im a CNC operator - im more used to using machine tools than hand tools.

In that case you can have the bottom floating in a groove in the sides. By floating we mean fitted tightly but not glued into the groove with a gap at the bottom of the groove to allow for expansion, although shrinkage is more likely to be the case here. The box gets it's strength from the sides and corner joints but the bottom should also be firm if the fit in the groove thicknesswise is snug. Once the stuff is thicknessed you should be able to do all the jointing with the CNC.

Chris
 
Just smashing a drawer to pieces and thought of you.
9211b567d97b1057bea5c2845e466baa.jpg


7cc9fad4c2c8b35d951fb5d3865a4aab.jpg


Sent from my SM-G900F using Tapatalk
 
custard":3fvbrkqa said:
ColeyS1":3fvbrkqa said:
Just smashing a drawer to pieces and thought of you.

Line from a valentine card?
[SMILING FACE WITH OPEN MOUTH] Perhaps an ex lol

Sent from my SM-G900F using Tapatalk
 
Back
Top