Byrons Official Workshop Build Thread

UKworkshop.co.uk

Help Support UKworkshop.co.uk:

This site may earn a commission from merchant affiliate links, including eBay, Amazon, and others.
Day 14 - There is no day 13, as it's bad luck, might have burnt the place down.

Light drizzle all damned day!! However, seeing as I took the day off today, I didn't want to waste it, so I thought i'd do something a little more intresting today other than structural work.

I decided to make some nice trim around the doorframe, this will provide a neat edge for the shiplap to butt up against, and also give the doors a nice frame.

The 2x4 I have as a rounded edge to it, kind of like a mini-bullnose moulding. So, using the festool i've ripped three pieces into 20mm x 25mm dimensions, and hand-cut to size and mitred the ends. This was really enjoyable as I got to use some hand-tools and do some more delicate work, which makes a change from screwing everything together or constant to use of the SCMS.

I'm almost finished with that, and will hopefully have enough dry weather to start cladding the front, just wish the damned drizzle would blow over. Bah!

Summary and photo's to follow.
 
Day 14 (-1) Summary and Photos

Had a really good day today, done some nice delicate trim-work and some cladding, and also some painting. Things seem to be moving along nicely now despite the weather. I have a bit of a mental block regarding the roof though, really itching to get it done but I don't seem to have the weather on my side at the moment.

Pics:

1. Trim being attached, and a close up for the mitre - not too shabby, the cross-beam wasn't flush hence the small gap.
255712407_4d36872076.jpg

255712507_bfa620a05a.jpg


2. Cladding going on:
255712580_85a39455bf.jpg


3. Almost completed Cladding:
255712667_88ddc04c4a.jpg


4. Cladding complete and given a couple of coats:
255712758_a44c6496ca.jpg


I will be adding some corner-trim to protect the end-grain of the cladding, this will be painted cream as will the doors and facia boards to give a nice contract against the green. The paint if anyone is interested is; Ronseal Mint Green exterior wood preserver. About £8 per litre, and from B&Q.

So, a good day really, tomorrow should see the roof felted and the cladding complete assuming the weather holds - come on everyone, do me and Wizer a little sun-dance!!
 
Looking good byron ! Its a great feeling when the cladding starts to go in isn't it .
I see you have worked out the cladding so a full board will fit over the doorway (good man ) With the gap you have at the bottom why not put a drip mould rather than cutting a bit of cladding , you can buy it off the shelf or make it your first project in the workshop . A bit of 3x2 chamfered with a capillary grove on the underside will take the water away from your base and into your soak away .
Just a thought and something i've never done .
Anyway its all looking very good mate !
 
JFC":3vb8cjzk said:
I see you have worked out the cladding so a full board will fit over the doorway (good man

lol I dont think I would have thought of that!


Well done Byron, you had a better day than me. Looks snug inside there too.
 
I have to have a sneaky laugh to myself regarding the cladding across the doorway.

Basically, I took the cladding up as far as it finished around the doorframe, and the long-piece directly above it actually not flush with the lap, instead I had to cut a wide rebate into and slide it further down to get it to fit - I didn't plan for it at all, instead adjusted as I went :)

So, I can't really take credit for it :)
 
Day 14

The weather sort of held out today, not great, but kept dry long enough for me to get the roof done - AT LAST, GOD BE PRAISED!!!!

Here's the pics:

1. Black roofing membrane going on first:
256364329_2d9d42605e.jpg


2. Felting:
256364402_eea9393fb8.jpg


3. Guess what? It started raining whilest putting on the last piece!! Wet felt is nasty:
256364464_a0a5eb522e.jpg


4. Finished!
256364532_240ac693e1.jpg


Summary

I'm so relieved to finally have the roof covered. I didn't treat the OSB as I still had a lot of the black breathable membrane left, so I lined the sheets with that first, and then laid the felt.

The felt was over-lapped by about 6inches on each join to provide a nice water-tight seal. Another layer of felt is going to be laid, this will hide the joins at the far end and add an extra protective layer.

I was nervous about getting up there, but after a while confidence grows and it doesn't become an issue, I placed all my staples and clout nails along the beams, so I always know where to stand.

So, all that is left to do for the roof is to cut away any excess, and tuck the overhang underneath the sheeting and fasten. Facia boards will be installed allround to provide a nice finish, and a place for me to fix the guttering.

I'm finishing early today, as I want to chill out, and also for another very important reason:

New project!!!

SWMBO needs a greenhouse. We did have one at our previous place, but due to the size of the workshop we can't fit it in behind it as previously planned, short buy a couple of inches. The original greenhouse was 6'x6'. So, we are going to build a nice lean-to greenhouse on the back of the workshop, this will give Tracey more head-room and a longer greenhouse which will provide more room for her staging and beds.

So, if anyone has got any links to greenhouse building, I would be much obliged, it will be made from a wooden frame and polycarb glazing.
 
Looks better every day :D
Funny you mention a green house i was just going to post on a simular subject .
 
byron b
your not kidding about your fear of heights
your stuck to the roof like a rare earth magnet :lol: :lol:
looking good mate , its a good feeling to get it water tight
pm to follow
mel
 
JFC - Are you intending on building a greenhouse too, or have you already built one - would be interested to pick your brains on any plans you have made already.

Mel - nice comment! It does look like i'm stuck down like an octopus, but to be fair, I was only like that for a short-while I was doing the very edges, as there is only 1 joist towards the very edge, and wanted spread my considerble weight rather than load up one joist ;-)
 
looking great byron. some hanging baskets on the side in the summer be great. will be looking to do similar to your build, when i build next workshop.
11k hits on one thread thats gotta be a record???????
 
Before you get too much further with that felt, I thought I should mention...

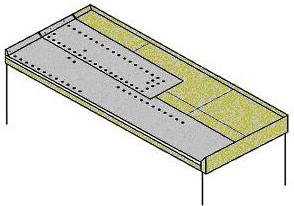
On larger flat rooves, it's normal to raise the verges with 45degree angled bit sof wood on three sides of the roof to stop the rain water sitting on the roof being blown over the edges without guttering.

feltfirst.jpg


Cheers,

Fecn
 
ByronBlack":33mto1ls said:
, I placed all my staples and clout nails along the beams, so I always know where to stand.

Please tell me that doesn't mean you nailed through the top layer [-o< which needs to be stuck down onto the intermediate layer.
Like Fecn says, a folded drip verge should be formed on the 3 "high" sides, see here for details.

Looking forward to the "internal" part of the thread, I trust you are going to show us what you do in there. :wink:

Cheers
Mark
 
MarkW so far there i only 1 layer of felt, subsequent layers will be stuck down. I'll be having gutting all round the roof, so not sure verges are totally nessacary?

I will be adding photo's and WIP with regards the inside and future projects, which there are plenty on my tuit list.
 
so let me get this straight (sorry to thread hog). You lay the underfelt with clouts, then you stick the top layer to it? What do you stick it with?
 
Wizer - your not thread hogging at all, it's nice to have cross builders asking questions, at the end of the day it will make the thread more useful to others in the future.

The link MarkW posted is an excellent tutorial on laying a felt roof:
http://www.diydata.com/projects/flatroof/flatroof.htm

I'm in two minds whether to continue with another two layers of felt, or to go for a corrugated steel roof, at the moment I really don't like the felt and thinking of going the steel route.
 
How so paul? Do you mean noise from the wind and rain, or noise reflected from machinery - the interior ceiling will be insulated and boared, so not sure what you mean..
 

Latest posts

Back
Top