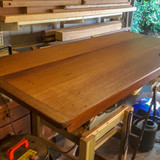
Basics - How to tidy up table-top end grain?

UKworkshop.co.uk

Help Support UKworkshop.co.uk:

This site may earn a commission from merchant affiliate links, including eBay, Amazon, and others.

Peri

Established Member
Joined
11 Jun 2012
Messages
495
Reaction score
631
Location
Shropshire
Hi,

Basic question - how can you hide or tidy up the end grain of a table top?

I have an old science desk top that I'm using for a new desk. I've cleaned it up, but the end-grain looks a bit shabby where they've joined the boards with some kind of floating tenon.

I'd like to add a 1/2" roundover to all the top edges, so ideally a frame around the top would be the way to go - but I don't think that's a good idea (no allowance for wood movement).

Whats the best way? Just fill the holes and leave the endgrain on show?

Thank you,

Steve.
 

Attachments

  • 20200830_114456.jpg
    20200830_114456.jpg
    42.3 KB
I'd guess that the top is at least 40 years old - would warping still be a problem?

Brilliant - I've just researched breadboard ends, I knew there must be a way but I just couldn't think what it might be. Thank you :)
 
I'd guess that the top is at least 40 years old - would warping still be a problem?

While wood does tend to get less volatile in it's movements over time it does still move, especially if it's machined again. It shouldn't really warp too much but I think breadboarding is just a nice detail anyway.
 
Sorry Trevanian but I just can’t agree, the inventor of breadboard ends should’ve been strangled at birth, the number of tables I’ve seen with splits up the middle! I think the easiest thing to do is make some very fine small wedges and glue them into the holes, then just plane the ends with a nice sharp plane.
 
the inventor of breadboard ends should’ve been strangled at birth, the number of tables I’ve seen with splits up the middle!

A very fair point! Fixed in place with modern glues a breadboard end probably don't give too much allowance for movement so it's gotta give somewhere if it gets too extreme... Probably wasn't too much of an issue with the old-timers who drawbored their ends in place and perhaps used a little hide glue.
 
Sorry Trevanian but I just can’t agree, the inventor of breadboard ends should’ve been strangled at birth, the number of tables I’ve seen with splits up the middle! I think the easiest thing to do is make some very fine small wedges and glue them into the holes, then just plane the ends with a nice sharp plane.

Done properly, breadboard ends don't cause this problem. The issue is they're often not done properly. They should only be fixed in the middle. The outside boards should have a dry joint, and an elongated hole for the pegs. Then they work a treat.
 
Ok, yes if it’s taken into account when it’s being built. I think the technical term for it by the way is a clamp, as opposed to a cramp, as in G cramp. Now I just wait for the sky to fall on my head. We all have our little bees in our bonnets don’t we.
Yes Mike that’s how I do my panels in frames just a dob of glue at the centre of the end of the panels
 
I got them done, and for my first attempt they came out looking - to me at least - the dogs danglies :)

Glued and doweled in the middle, push fit and dry dowel in the ends, into elongated dowel holes in the table top.

They were thinner than I'd have liked, only about 3" wide - it was all I had of the same timber that the table is made of - so maybe not great structurally, but aesthetically I think they finish the top off nicely.

(I'd post a pic but it's in the shed with a coat of finish on it).
 
Sorry Trevanian but I just can’t agree, the inventor of breadboard ends should’ve been strangled at birth, the number of tables I’ve seen with splits up the middle!


Like MikeG said, do the job right and breadboard ends are 100% reliable.

I've lost count of the number of tables I've made with breadboard ends. From small ones up to absolute whoppers, and in more timbers than you can shake a stick at. Never had a single problem and I don't expect I ever will.

Only thing to be aware of is that if/when the table shrinks it can leave the breadboard end fractionally proud. Here's an illustration on one of my tables,

Oak-Dining-Table.jpg


Breadboard-End.jpg


I give clients the option of planing it flush after a year or two, but the great majority sensibly conclude that it's part of the constructional heritage of the piece, and leave it as nature intended! If the OP's science desk has been around for a while then even this may not be an issue.
 
Last edited:
(Snip)
Only thing to be aware of is that if/when the table shrinks it can leave the breadboard end fractionally proud.
(snip)

I give clients the option of planing it flush after a year or two, but the great majority sensibly conclude that it's part of the constructional heritage of the piece, and leave it as nature intended! If the OP's science desk has been around for a while then even this may not be an issue.

Breadboard ends are fine things. I've used traditional tongue and groove in the past, with the tongue notched and also confined so it doesn't show at the ends of the breadboard. Another approach is to have a decorative plug to fill the ends of the groove.

It helps to plane the inside edge of the breadboard to have a slight concavity so that it has to be pulled up to the table top edge where it's then glued and pinned. This ensures the unglued ends at either extremity don't show a gap between the breadboard and the table top. The pins can be made decorative rather than just be bog-standard dowels.

As you say, it's best to stick the breadboards out from the tabletop by a "a bit" at the bread board ends. Personally I learnt that "a bit" should be up to 5 or 6mm at each end with a dining table, after a friend I made a large dining table for put it in a damp cellar, where the 3mm extra breadboard length I'd added was soon expanded beyond by the cross-grain of the tabletop. I had to plane off the edges of the table top to make them flush with the bead board ends, then refinish the thing.

Another breadboard type is that which is thicker than the table top, providing a ledge at each long end of the table to prevent things slipping off. This is good for desks and worktables that have stuff strewn across them.

Breadboard ends can also be made something of a feature by being shaped or having the joints pinning the bread board to the top as "honest" (i.e. showing).

For a simple bread board attachment, dominos are good, with a couple glued in the middle and those at the sides in domino slots made with the machine set to wider-hole than the exact domino width. It helps if one end of all the dominos are glued in whilst the ends floating in their wider slots are waxed.

Eshmiel
 

Attachments

  • Bread board plug-1.jpg
    Bread board plug-1.jpg
    169.1 KB
  • Greene & Greene BB cloudlift plug-1.jpg
    Greene & Greene BB cloudlift plug-1.jpg
    123.3 KB
  • Greene & Greene pinned bread board-1.jpg
    Greene & Greene pinned bread board-1.jpg
    163.7 KB
  • Pinned and plugged bread board-1.jpg
    Pinned and plugged bread board-1.jpg
    412.3 KB
  • Pinned and plugged bread board-2.jpg
    Pinned and plugged bread board-2.jpg
    233.4 KB
  • Sewing table-1.jpg
    Sewing table-1.jpg
    213 KB
  • Shaped Bread board-1.jpg
    Shaped Bread board-1.jpg
    177 KB
  • Bread board through plugs - two floating-1.jpg
    Bread board through plugs - two floating-1.jpg
    187.8 KB
OK Custard and Eshmiel! You have a point, and yes, you both make it look very well-made, desirable and perfectly acceptable, love the detail work Eshmiel. I know what you mean by having to go back in after a couple years to plane a bit off, that’s the sort of business we’re in, it’s up to us to design it so that as Custard said ( you planted that thought in their mind nicely) we only have to plane a little bit of the end instead of the whole side of the table – Ish.
So what do I say, if a customer wanted it I suppose I would do it. But it just doesn’t seem right to me somehow. It goes against the grain – literally, but Heyhoe were are all different. Thanks for your input. Ian
 
To add to Custard's offerings, here is a sycamore and walnut blanket box I made some years back:

Hinge close-up 3.jpg


The spalted sycamore was what turners call "punky", so just about completely inert. It hasn't moved a millimetre since.but the breadboard ends would allow it to if it wanted to.
 
Last edited:
Love that hinge Mike, I like doing what I call "engineering in wood" like that, the last one I did was a mechanism for a tilting bed head complete with nylon bushes. Ian
 
Bit hesitant to post my strictly amateur, weekend wood working efforts here, but I am actually quite proud of how things turned out.

I am NOT a carpenter (I teach CAD and CNC), and this is only my second project bigger than a trinket box or pencil case :)

(sorry about the pic quality - old camera phone and low light)

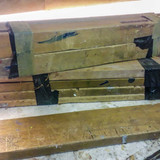
Started with these skip finds - about a dozen desk legs and some runners, and the desk top from the original post.


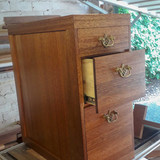
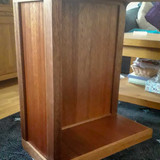
Ended up with the two pedestals

Right Left

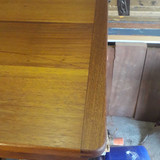
The top


There is a modesty panel as well, but no pic of that at the mo.

It's definitely not proper joinery. I didn't have a lot of timber to start with, so the pedestals are actually 3/4" ply 'clad' in 3-4mm veneers I cut from the runners, and because the legs all had big mortises cut out of them on two sides, I resawed those into 50x15mm strips which were also glued to the ply.

It's for my office, thats why the left side is open - it's where the computer sits.
 
Back
Top