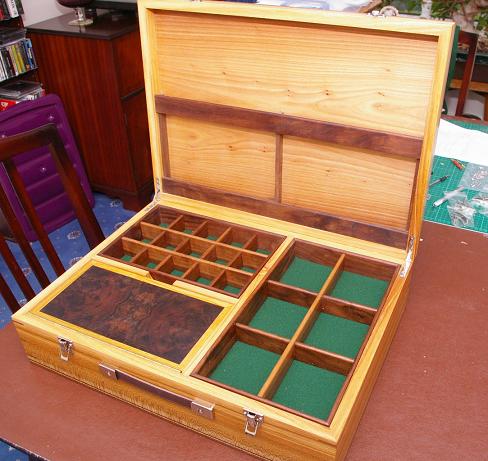
Another one of those 'Fly-tying-boxes'

UKworkshop.co.uk

Help Support UKworkshop.co.uk:

This site may earn a commission from merchant affiliate links, including eBay, Amazon, and others.

andersonec

Established Member
Joined
25 Jun 2010
Messages
1,443
Reaction score
0
Location
Lincolnshire
Delivered the other one (in exchange for some timber Black Walnut) and now asked if I would do another to be used as a gift.
Some folks asked forsome WIP piccies which I didn't do for the last one so this is my offering.

1; The eagle eyed of you will notice the change of timbers half way through, it originally started life as a piece of Cherry but I had a change of mind and wanted to do something a little different with the lid, I had some Elm veneer with quite straight grain and also a nice piece of quarter-sawn Elm so changed the timber mid stream so to speak, the work was carried out the same way so the photo's are relevant.
Strip of Walnut being glued to Cherry which has had one edge straightened and then paralleled, this is important as it will be required to cut the Walnut down when the glue is dried, I glue it thick so that I can get more clamping pressure spread along the wood when clamping
Elm box 1.jpg

2; Walnut cut and sides thicknessed then cut to length, plus a few mm.
Elm box 2.jpg

3; Inlaid some1.5mm black lines top and bottom, had to leave space at the top because it is going to have a Walnut edge, Here it is being cleaned up with a scraper.
Elm box 3.jpg

4; Cutting the mitres on my little mitre sled, the little pad the toggle clamp is mounted on slides forward to hold the work in place, tightened down, then the toggle clamp holds the work securely in place with no need to hold the work or place hands anywhere near it.
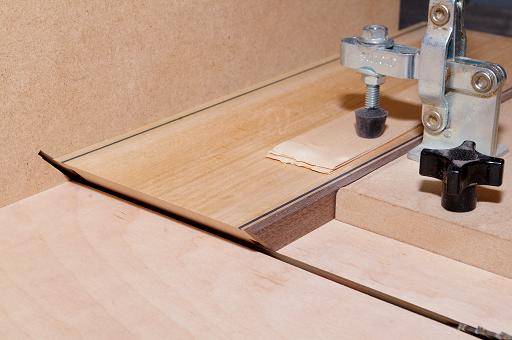
Elm box 4.jpg

5; Here you can see the sort of corner I get with my sled, this is not clamped but just free standing and held up with the square. Just to say, it is imperative that the fence on the sled is set to exactly 90deg to the cut and I set my 45deg with a Wixey digital angle finder.
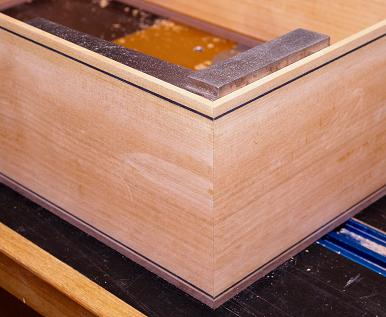
Elm box 5.jpg

6; Slot for base has been routed and rebate for lid (9mm thick) has been routed so getting ready for glue-up, the inside is finished, plane only, I do not use sandpaper for this and you can see the shavings produced, it leaves a nice shiny finish which really highlights the grain
Elm box 6.jpg

7; Box glued up and while it is drying Ill get on with the lid, this is the design I have in mind for the lid, all will become clear. Remember, the wood for the box has now changed and it is now Elm.
Elm box 7.jpg

8; The elm veneer I had being cut to accept some four-matched Burr walnut
Elm box 8.jpg

9; The Burr Walnut matched with a fly insert being cut into the Elm veneer
Elm box 9.jpg

10; The lid glued on, Walnut edging applied and the veneer cleaned up, now it looks a lot better.
Elm box 10.jpg

Part two to follow..........
 

Attachments

  • Elm box 1.jpg
    Elm box 1.jpg
    61.4 KB
  • Elm box 3.jpg
    Elm box 3.jpg
    46 KB
  • Elm box 2.jpg
    Elm box 2.jpg
    33.7 KB
  • Elm box 4.jpg
    Elm box 4.jpg
    38.4 KB
  • Elm box 5.jpg
    Elm box 5.jpg
    39.9 KB
  • Elm box 6.jpg
    Elm box 6.jpg
    40.3 KB
  • Elm box 7.jpg
    Elm box 7.jpg
    45.2 KB
  • Elm box 8.jpg
    Elm box 8.jpg
    54.6 KB
  • Elm box 9.jpg
    Elm box 9.jpg
    49.5 KB
  • Elm box 10.jpg
    Elm box 10.jpg
    46.1 KB
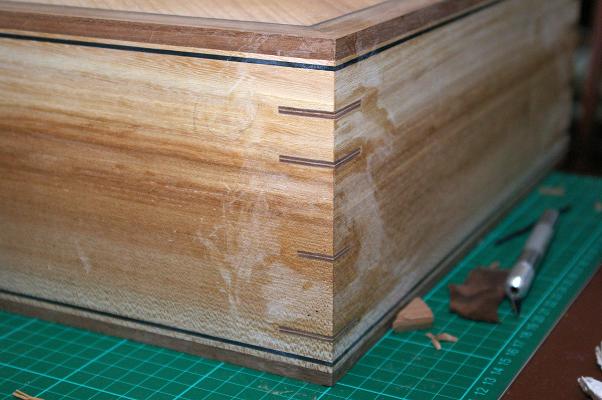
11; This is why I like mitred corners, see how the grain goes round the box corner, now it is the Elm I was speaking of, still not yet cleaned up as can be seen by the pencil marks. Next thing is inserting some keys which are being made at the moment, these will be a strip of Elm veneer with two strips of Walnut veneer either side.
Elm box 11.jpg


Not a very long part two but the next installment will soon be forthcoming.

Andy
 

Attachments

  • Elm box 11.jpg
    Elm box 11.jpg
    43.3 KB
I still say you wouldn't get even my travelling kit in that! :mrgreen:

BTW, I'll shortly be sending you another PM about our recent exchanges.
 
Looking good and I'm interested to see the completion.

More pictures with greater detail of your mitre sled I would also find interesting.
 
Tony, I think maybe what you need is a 'fly-tying-trunk' or should that be 'trailer?'

Woody,
some details of the mitre sled.

It is quite small really 600mm x 500mm, doesn't need to be any bigger as it's just for mitres and it would still do stuff to about 300mm.
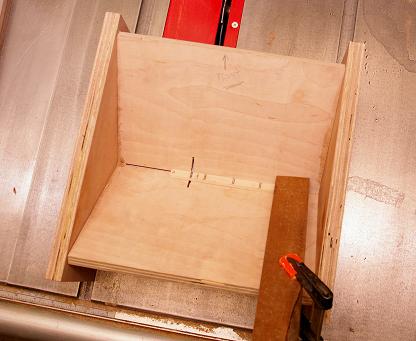
As you can see the ends are quite high, this is just an added safety feature and the little clamping feature which slides to and fro to clamp the work, it will slide forward to hold the work tightly against the fence, this is for two reasons, one is for safety and two is because when the blade enters the wood at and angle, it tends to push the wood away in the direction of the cut and you end up with a curved mitre, the clamp holds it firm.

The fence must be fitted exactly 90 deg to the cut and this is achieved by making a cut in the sled base and fitting it pretty square with two small screws from underneath, cut a piece of scrap wood/ply and check the 90deg angle with an accurate square, if it is out, clamp a piece of wood against the fence at one end, remove the screw at the same end,
put a shim between the fence and clamped piece of wood, rescrew the fence but use a different hole and keep doing this until you have an exact 90deg cut across you piece of scrap, obviously a wide piece (150mm) will give you a more accurate measure, when you are satisfied, screw the fence securely.

The little platform thingy on the front of the fence is just to cover the blade if you push it far enough for the blade to exit the front of the fence, obviously you can add as many safety features as you wish.

The slots for the bolts was cut using two different size router bits, drill a hole the size of the bolts and route a slot the same size, with the router fence in the same setting rout another slot to take the flat end of the bolt, see picture.

Mitre sled 1.jpg

Mitre sled 2.jpg

Mitre sled 3.jpg


Andy
 

Attachments

  • Mitre sled 1.jpg
    Mitre sled 1.jpg
    44.9 KB
  • Mitre sled 2.jpg
    Mitre sled 2.jpg
    37.5 KB
  • Mitre sled 3.jpg
    Mitre sled 3.jpg
    40 KB
  • Mitre sled 3.jpg
    Mitre sled 3.jpg
    40 KB
Andy thanks for sled details, you have gone a different route to mine with the clamping set up.

Mine sends up chips occasionally but your blade goes through the sled and perhaps provides better support, but a mobile perspex shield on top would not go amiss?
 
devonwoody":xfo927xw said:
Andy thanks for sled details, you have gone a different route to mine with the clamping set up.

Mine sends up chips occasionally but your blade goes through the sled and perhaps provides better support, but a mobile perspex shield on top would not go amiss?


Sure, as long as it doesn't interfere with your wood but any safety feature will help, don't forget you are only cutting 10 - 15mm thick stock and therefore the blade only needs to be a tadd higher, remember the wood is clamped so there is no need for any part of your hands to be anywhere past the fence and I don't remove the wood until the blade has stopped revolving in-case I drop it onto the blade plus I need to set the next piece.
 
Lovely work Andy. Can you give a little more detail on your method of inlaying the black lines (ebony?). Do you use a router or scratch stock? Also some info on how you get a precise fit for the veneer on the top would be welcome please.
 
RogerM":26lg6fdi said:
Lovely work Andy. Can you give a little more detail on your method of inlaying the black lines (ebony?). Do you use a router or scratch stock? Also some info on how you get a precise fit for the veneer on the top would be welcome please.

Roger.
these are just black lines bought from Original Marquetry, they do them in various thicknesses, I use quite a few and can't afford Ebony.
Usually use a scratch stock as they are so easy to make from any old bit of scrap and a bit of an old bandsaw blade but in this case I did it on the router table as they were just straight bits of wood which were to make up the sides.
On the lid (see below) I have cross grain touching straight grain and didn't want to tear out any of the Elm veneer so used a small hand held router, you have to make a guide for the router and a perfect lesson on how to make one is here
http://www.youtube.com/watch?v=Cb6hcr86 ... ure=relmfu

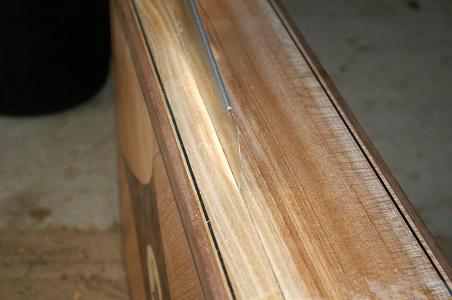
The veneer is cut in using the 'window method' and there is a good lesson here, http://www.youtube.com/watch?v=MC6CBjVIOR0 the only thing I would advise is when cutting the piece to be inserted, the cuts must me made using short 'chopping' cuts so that the cut grows away from you (a tip given to me by Quentin Smith at QJS Marquetry) also use a scalpel blade as most craft knife blades are too thick.


So, progress today,,,,,,,
Decided to inlay a line around the edge of the lid
Elm box 12.jpg

Elm box 13.jpg

And made a little story stick to cut the slots for the keys
Elm box 14.jpg

Elm box 15.jpg

Another jig which slides in the table slots and carries the box across the blade to cut the slots for the keys, see how the story stick is used to set the distance from the blade to the stop. I have a cheap Atkinson Walker blade which is a 16 teeth, rip blade which has just a 2.8mm kerf and has flat top ground teeth, I use this especially for cutting these slots and I find that five layers of veneer, when given a few whacks with a hammer (on their sides to make them a fraction thinner) gives a flawless fit.
Elm box 16.jpg

Elm box 17.jpg

Elm box 18.jpg

Elm box 19.jpg
 

Attachments

  • Elm box 12.jpg
    Elm box 12.jpg
    56.9 KB
  • Elm box 13.jpg
    Elm box 13.jpg
    52.8 KB
  • Elm box 14.jpg
    Elm box 14.jpg
    36.9 KB
  • Elm box 15.jpg
    Elm box 15.jpg
    37.3 KB
  • Elm box 16.jpg
    Elm box 16.jpg
    39.5 KB
  • Elm box 17.jpg
    Elm box 17.jpg
    47.9 KB
  • Elm box 18.jpg
    Elm box 18.jpg
    52.5 KB
  • Elm box 19.jpg
    Elm box 19.jpg
    49 KB
andersonec":t8mqocmm said:
RogerM":t8mqocmm said:
Lovely work Andy. Can you give a little more detail on your method of inlaying the black lines (ebony?). Do you use a router or scratch stock? Also some info on how you get a precise fit for the veneer on the top would be welcome please.

Roger.
these are just black lines bought from Original Marquetry, they do them in various thicknesses, I use quite a few and can't afford Ebony.
Usually use a scratch stock as they are so easy to make from any old bit of scrap and a bit of an old bandsaw blade but in this case I did it on the router table as they were just straight bits of wood which were to make up the sides.
On the lid (see below) I have cross grain touching straight grain and didn't want to tear out any of the Elm veneer so used a small hand held router, you have to make a guide for the router and a perfect lesson on how to make one is here
http://www.youtube.com/watch?v=Cb6hcr86 ... ure=relmfu

The veneer is cut in using the 'window method' and there is a good lesson here, http://www.youtube.com/watch?v=MC6CBjVIOR0 the only thing I would advise is when cutting the piece to be inserted, the cuts must me made using short 'chopping' cuts so that the cut grows away from you (a tip given to me by Quentin Smith at QJS Marquetry) also use a scalpel blade as most craft knife blades are too thick.

Thanks Andy. Just the info I was looking for. I'll give that a try when i've finished my kitchen, utility room, re-landscaping the garden, painted the house ....................
 
[/quote]Thanks Andy. Just the info I was looking for. I'll give that a try when i've finished my kitchen, utility room, re-landscaping the garden, painted the house ....................[/quote]

You'll be done by the weekend then Roger? :lol:

Andy
 
andersonec":3qqc569v said:
Tony, I think maybe what you need is a 'fly-tying-trunk' or should that be 'trailer?'
Andy

Quite possibly, but if you care to send me this one, I'll have a damn good try at getting my stuff into it! :mrgreen:
 
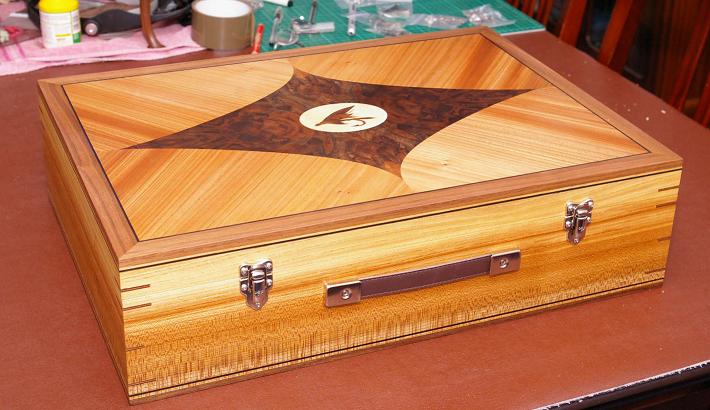
After a lot of fits and starts or should that be, a lot of fa*ts and sits, I got the beast finished........

I left you in this position, just about to part the lid using hand saw, I want a thin kerf to preserve the grain pattern between lid and box, see saw at top centre
Elm box 20A.jpg


A very very slight cut is made on the router table to straighten the cut edge, a trick learnt from Ian Hawthorne, the work is passed behind the cutter from left to right to avoid climb cutting.
Elm box 21A.jpg


The compartment for the Vice is made and dividers fitted
Elm box 22A.jpg


After which the trays are made, lined and the dividers fitted. The trays need to be finished before the baize is installed and therefore the dividers couldn't be glued in, I cut the heads off some brass pins, ground the cut flat and 'nailed' the dividers in the trays then used some filler wax to fill the pin-holes in the outside of the trays.

Applied sanding sealer then because the thing may be taken outdoors, applied two coats of Osmo hardwax oil, wasn't happy with the tactile qualities so cut it back with some wire wool and applied some wax, better, but wished I hadn't used the Osmo.
Elm box 20.jpg

Elm box 21.jpg

Elm box 22.jpg

Working on photo 23 when the electric went off and lost the photo, can't be ar**d to take another which was the box and all four trays displayed.
Elm box 24.jpg


Hinges used. I was unsure which hinges to use because the lid is quite heavy so e-mailed Ian Hathorne (again) and he suggested the normal nickel hinges but with 16mm machine screws, worked a treat and they are very solid, Ian has an offer on his hinges and lock at the moment, check here. http://hawthornecrafts.com/
Elm box 25.jpg


Next job is a blanket box for son number one, there is no number two so he enjoys the title, not for long though, wait till I tell him he was adopted.......

Andy

Can't get rid of this last picture.........
 

Attachments

  • Elm box 20A.jpg
    Elm box 20A.jpg
    31.9 KB
  • Elm box 21A.jpg
    Elm box 21A.jpg
    46.8 KB
  • Elm box 22A.jpg
    Elm box 22A.jpg
    33.8 KB
  • Elm box 22A.jpg
    Elm box 22A.jpg
    33.8 KB
  • Elm box 20.jpg
    Elm box 20.jpg
    69.2 KB
  • Elm box 21.jpg
    Elm box 21.jpg
    64 KB
  • Elm box 22.jpg
    Elm box 22.jpg
    65.7 KB
  • Elm box 24.jpg
    Elm box 24.jpg
    46.5 KB
  • Elm box 25.jpg
    Elm box 25.jpg
    47 KB
Lovely job Andy.

I still say you'd never get my kit in it, but the offer to try still stands!

What is supposed to be my home fly-tying station is a converted drop-front bureau (or it will be when I've actually finished converting it!) :oops:
 
Andy that is top class work. Beautiful veneers. The keys on the corner don't do it for me. But the rest is really really nice. Well done Andy
 
Back
Top