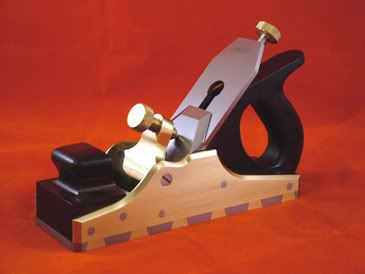
A pair of A13's but i need your help Bugbear

UKworkshop.co.uk

Help Support UKworkshop.co.uk:

This site may earn a commission from merchant affiliate links, including eBay, Amazon, and others.

Ian Dalziel

Established Member
Joined
13 May 2004
Messages
568
Reaction score
2
Location
Scotland
Finished this pair and currently working on a copy of a Norris 14 1/2” panel plane and a final A13.

Just cant get my photography right…this is where I need your input bugbear please.
I bought a light tent from ebay which has 4 different background colours. I am trying to use a couple of desk style lamps with 40w soft glow bulbs shining in from the side. I tried 60watts but they looked even worse. Do you think maybe I should get halogen or dayglow.I’m only trying to upgrade my photography a bit
I am using a Fuji S7000 digital camera without the flash I’ve tried it with but it’s too bright.
I wanted to try and get the wood to glow as it is beautiful as is but the photos don’t do it justice. I haven’t used photoshop or anything as yet as I was trying to show up my problems
Its almost similar setup I saw you do a few months back but I couldn’t find the link
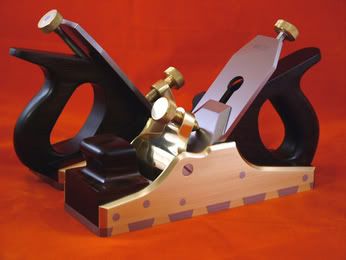
DSCF2480.jpg

DSCF2479.jpg


thanks in advance


Ian
 
Ian,

I cannot help with the lighting but I have just got to say they are wonderful looking planes. =P~

I just hope there will be another show that we meet up at and you bring them along so we can hold them even if we can't use them. [-o<
 
Ian
Do you have Photoshop? Playing with the "levels" control makes an amazing difference-you'd be gobsmacked!
Cheers
Philly :D
 
Cheers Dave and Philly,


I do have photoshop and could play a bit with it but i would rather try and get the photography right rather than cheat...if all else fails then i'll try that....thanks for the suggestion though


Ian
 
Ian
Lovely planes,
Have you tried taking a light reading from next to the plane with a lightmeter? It appears to me that the problem is that apeture isnt opening wide enough or the exposure time is too fast to get the right light level on the wood. The camera will close down the apeture if you have it set to automatic if the light in the tent is brighter than it expects. A workaround is to take your exposure reading off the palm of your hand in ambient light and then use that reading. It would also help to bracket the expected exposure by a stop or so either side. Having said all that Im sure a better photographer than me will be along shortly to help.
 
Ian,

I wonder if the pictures don't have enough light coming flat at table level. For example, its difficult to see inside the handles at the top underneath. Does that make sense?

What I'm trying to say is (for example) having a light immediately under where the camera is positioned, at table height, angled amost 10 degrees upwards so it provides some light up and under the handles.

Also, have you considered using bright white LEDs? I've even seen someone use a string of Christmas lights (white ones) to provide a blanket coverage of light. Personally I think a bank of white LEDs might provide some additional brightness. I'd steer away from any flash.

Have you tried it with loads more light - e.g. with a floodlight?

Just a few thoughts.

The planes, by the way, look absolutely fabulous! You must be very proud how they turned out!

Adam
 
Thanks Adam


never thought of christmas lights....its still all setup so i'll give it a try tomorrow. not sure if we have white christmas lights. I havent been home for christmas since 1995 :(

The low level light does make sense i'll try that as well

Ian
 
Ian

Try reflecting some of the light around with some white card and/or silver foil as home made reflectors. this may direct the light to where you want it to go.

Also if your camera can shoot in RAW mode ( Fuji's usually do I think) this is much better for post shot 'tweaking' when you have it on the 'puter.

Do you have a tripod? If so try a longer exposure with the auto timer function (eliminating shaky hands) and as mr said, bracket the shots each time to give you variances with each shot.Try varying the angle of the lamps as Adam suggests too - one low, one high. And with just one low for a glow. It may stop the over exposure on the brass adjusters.

Just my two-penn'th. :D but i'm no expert

HTH

Gary
 
Forgot to say that if youre experimenting with exposure, you should probably adjust your exposure times rather than your apeture setting, reason being that as you open the apeture you will lose depth of field in the image. Larger f stop, smaller hole greater depth of field - longer exposure sort of thing.
Mike
 
I'd go the tripod route too. Also... see if your camera has the option to manually set the light type. If it does, set it to tungsten initiallly but don't rule out experimenting with other settings too. Finally, assuming you try the tripod route, try moving the lights away from the subject to give a more even light. Finally (mkII...), use spot metering and take a reading from a wooden bit in "average" light. Keep the shutter half depressed while re-composing the shot then push it all the way.
 
Wow guys,
I didnt realise there were so many photography enthusiasts on here.
I forgot to mention i have the camera set on the tripod and i was using time delay for taking the pics. the camera was set on auto.
I really dont know how to set the camera for different light settings and i really should read the manual...which i will do after college tomorrow.
i'll play about with it tomorrow night

I dont have a light meter is there anything else i can measure it with

phew this photography bits hard i should really stick to something simple

thanks guys for all your helpful replies

Ian
 
What sort of camera is it and does it have an inbuilt meter at all? Most cameras will take a reading at some point during the button press, if you can find that point and on some cameras theres a definite de-tent you should be able to take a "reading" from the palm of the hand under ambient light or from a brick wall or piece of grey card which all reflect similar light levels unless Im mistaken. then having taken that reading and holding the shutter release, recompose and take the picture. The obvious problem is the use of self timer and taking the measurement. THe principal involved is that I think that the light level in your tent while nice to look at and visually correct is too bright for the camera and fools it into closing down the amount of light allowed through to the chip or film. You need to correct this by increasing the light getting through, but stopping before you hit the point where it all burns out. Its a balancing act between exposure and lighting probably. If the cameras digital at least you can experiment.
 
Thanks MR

I'll definately read the manual and see what it says about the exposure...i can also try and see if there is a photography department at college they might have something. although i dont really know what kinda exposure to look for or what kind of reading to expect


thanks for your reply.

Ian
 
Sheesh, Ian, when are you gonna stop with these practice planes and start making an effort...? :roll: :D Bootiful. =D>

Cheers, Alf
 
Ian Dalziel":32uzceoe said:
Just cant get my photography right…this is where I need your input bugbear please.

I'm no expert, just a book-learnin' dabbler, but I'll try. I will point out that Alice gets excellent photos without using half of my tricks, by using the world's biggest light tent (a workshop with a translucent white roof, and the right time of day!)

I bought a light tent from ebay which has 4 different background colours. I am trying to use a couple of desk style lamps with 40w soft glow bulbs shining in from the side. I tried 60watts but they looked even worse. Do you think maybe I should get halogen or dayglow.I’m only trying to upgrade my photography a bit
I am using a Fuji S7000 digital camera without the flash I’ve tried it with but it’s too bright.

Right. Your camera's just fine.

http://www.dpreview.com/reviews/specs/F ... xs7000.asp

Recent, highly capable, and enough manual controls to pull any trick we want, including custom white balance.

I think photographing your planes will be very difficult, because of the mixture of materials. The shiny metal parts will be prone to flare and glare, while the wood parts need lots of light. pipper.

A light tent should help. The actual amount of light shouldn't matter, since your camera will simply expose for longer to compensate. Multiple light sources help - you can manipulate highlights and shadows. Get a few (3-4?) ultra-cheap desk lamps.

The type of light (daylight etc) shouldn't matter - read you camera's manual, and use "custom white balance". For most cameras this comes down to sticking a piece of white cardboard in front of the camera (under the light conditions you're planning to use) and telling the camera "oy! This is what white looks like". Much cheaper than buying funny bulbs.

If you have the time, can you send me the original picture (JPEG or TIFF - I can't handle raw) and I'll have a look over it with Gimp or something.

Post-processing of digital photo's is normal - you could easily (for example) colour-correct a photo shot in tungsten light witht he camera set for sunlight. This is NOT cheating.

Look around the web for inspiration and possible tricks.

I know Holtey uses a pro (John Credland)

http://www.holteyplanes.com/a13_7.htm
http://www.holteyplanes.com/A13_1.htm
(nice!)

Wayne Anderson varies, but his best are good:
http://www.andersonplanes.com/
http://www.andersonplanes.com/gallery/i ... 19_jpg.jpg

Sauer and Steiner are "OK":
http://www.sauerandsteiner.com/noa6.htm

Lie-Nielsen do ugly cutouts, but the photos are good:
http://www.lie-nielsen.com/images/4_5_lg.jpg
http://www.lie-nielsen.com/images/073_lg.jpg

I have never tried to photograph a metal plane, so I have little specific advice in that regard.

BugBear
 
Personally I'd use flashguns, several of them triggered by slave units.
Benefit of that is that the light is already daylight balanced and so you don't have to worry about messing with balances.
You can also diffuse and soften the output by putting something over the flash, a piece of muslin, cellophane, even a smearing of vaseline.
The colour of the light can also be modified by using coloured cellophanes, sweet wrappers are fine.
I'd also direct flashes at different parts of the image. You should have one to light the background only then others to light the subject although you will have to be careful of where the shadows go.
You can also direct light at different parts of the subject, the handles will require a lot more light than the sides as they absorb a lot more, looks like at least one stop, maybe two.
When you light the subject try to get the spread of light so that it doesn't overlap with other flashguns too much as they will reinforce each other.
You can close down the flash's spread by cutting apertures in cards.
Ideally you would have flashguns that you can control the power output with but you can achieve this by moving them back and forth to change the flash to subject distance.
Another thing you can then do is to fire all the flashes from the camera's inbuilt flash without it contributing to the exposure by covering the flash with an IR filter. You can make one of these from a piece of unexposed and developed slide film. This then give you the benefit of being able to hand hold the camera and allows multiple shots with different compositions to be tried quickly. But be careful here as if the shutter speed is slow, you may get blurring due to camera movement after the flashes fire and some ghosting.
One problem you may have is setting the aperture on the camera. You should set the shutter speed to that required for the flash. You then need to set the aperture to give the correct exposure. This is usually determined by the flash to subject distance and the guide number of the flashgun. guide number / distance = f stop value. Try to get the flashes to all be at a distance from the subject that will give the F-stop you need. However, with digital cameras the beauty is that you can experiment through trial and error and see the effect immediately.

I also think that it is better to get the lighting correct when you take the photo rather than twiddling around on a computer screen.


Hope that helps. I've used all these techniques to photograph a lot of underground stuff from formations up to big chambers and it does work.

I forgot to say that those are beautiful planes that I would be very proud to own. But to be able to make them would be fantastic, I'm in awe, honest.
 
Hi,

Its all about reflections and dark areas, you need to light certain parts and not others, have a look at http://www.ogormans.co.uk/dualit3.htm or http://www.ogormans.co.uk/dualit1.htm
The stainless steel shows the light sources and black areas help define the shape, but even Karl’s photos don’t show the grain very well, their is to much contrast between the dark wood and shiny metal on a plane to photograph both at the same time, photoshop might help.


pete
 
Personally I'd use flashguns, several of them triggered by slave units.
Benefit of that is that the light is already daylight balanced

Any reason to use flash, not table lamps? Lamps are cheap, readily available, provide their own modelling light (!) and can be used as table lamps later ;-)

Buying multiple slave flash units sounds spendy.

Given modern digital cameras the light balance thing is not a big issue. Correct in camera, or post-camera.

I like your thoughts on using/placing the light on the subject.

BugBear
 

Latest posts

Back
Top