Any SketchUp Aficionados In The House?

UKworkshop.co.uk

Help Support UKworkshop.co.uk:

This site may earn a commission from merchant affiliate links, including eBay, Amazon, and others.

El Barto

👍
Joined
20 Nov 2016
Messages
1,107
Reaction score
51
Location
North Hampshire
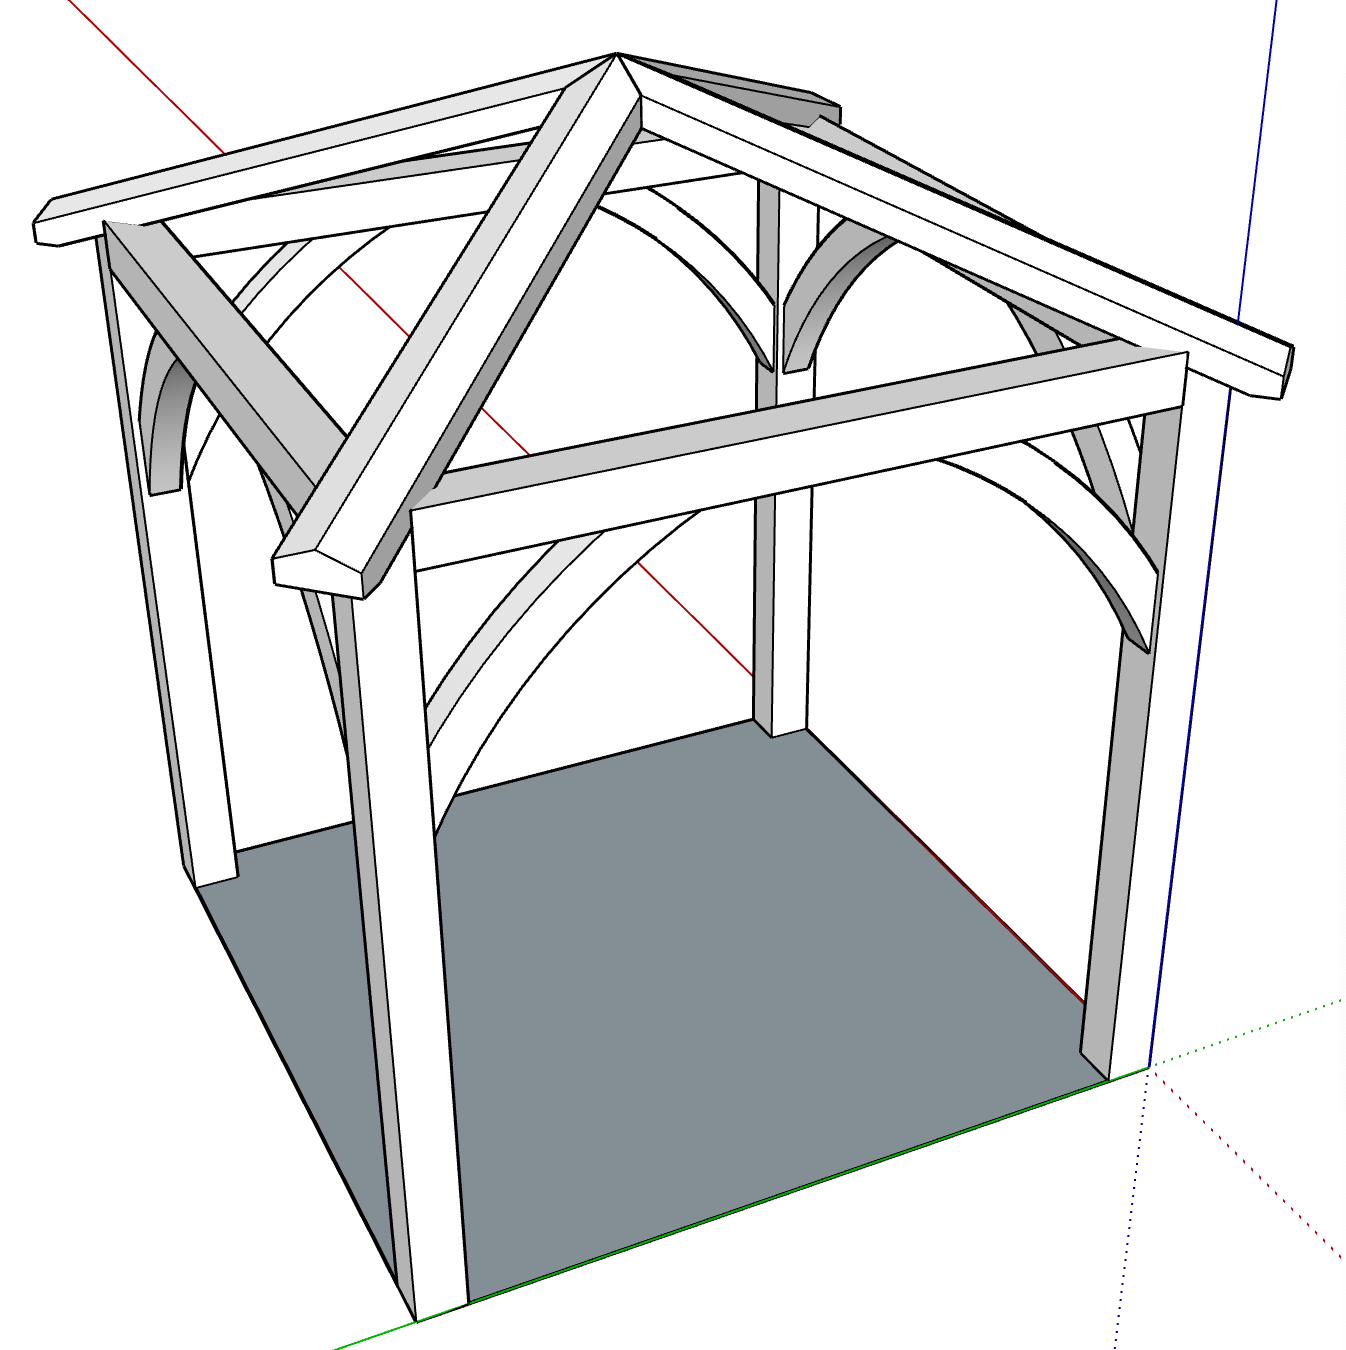
I've decided it's high time that I delved a little deeper into SketchUp so I've decided to create a fairly simple structure from scratch, basically this:
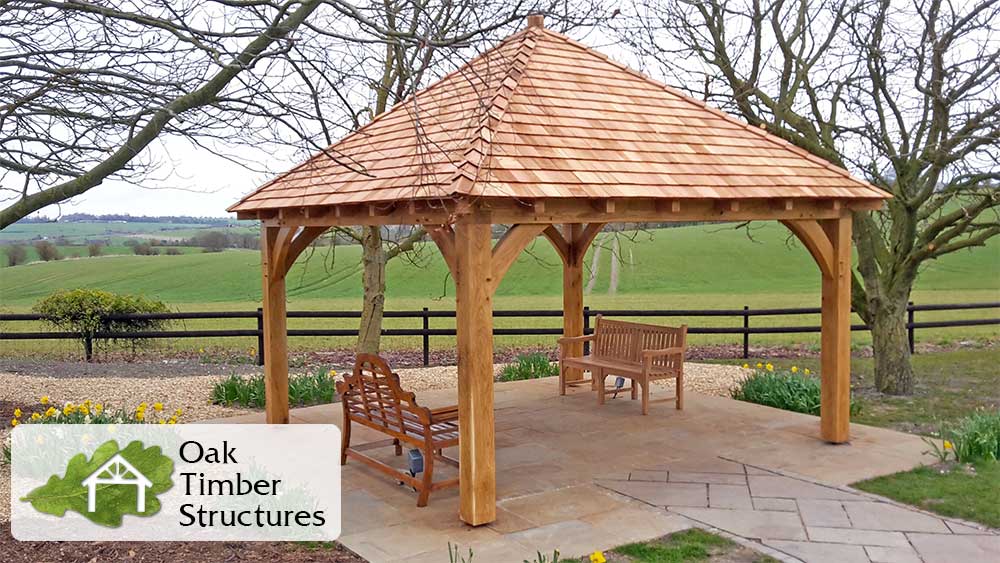
gazebos-1000-03.jpg


- I can't figure out how to create curved wind braces. Straight ones are fine but curved, not so much. I've tried a couple of different plugins but as yet haven't found a solution.

- Any tips on how to create the hipped roof? This is proving tricky. I'm focusing on the hips rather than the jacks at this point.

Thanks.
 
How I make curved braces involves no computers. I calculate the length within my frame. Typically I will not worry about the braces until I have made the frame. I decide where I want the braces and from the frame laid out on the ground I work out my brace lengths and mortice and tenons. I get a wide oak plank, 2 inches thick or so, and I draw the top curve on it by eye in chalk. I refine this and then mark the bottom curve using dividers. The width of plank I have available to me may well dictate the curve.

First brace is then template for the others. You could make a ply template if you wanted, but I don't.

There are several ways of designing the mortice and tenons, some easier to cut and fit than others.

The curve does not need be overly pronounced by the way to look good.

Each of my buildings at home is deliberately a bit different. I wanted a hand made look.

As for the roof design, a lot depends on what system you are using to support the Apex. I have done it three different ways here - will pop up photos later on if I remember.
 
Where are you based? You can come and see how I do it if you are anywhere near Kent. Will also explain mistakes and how to rectify!
 
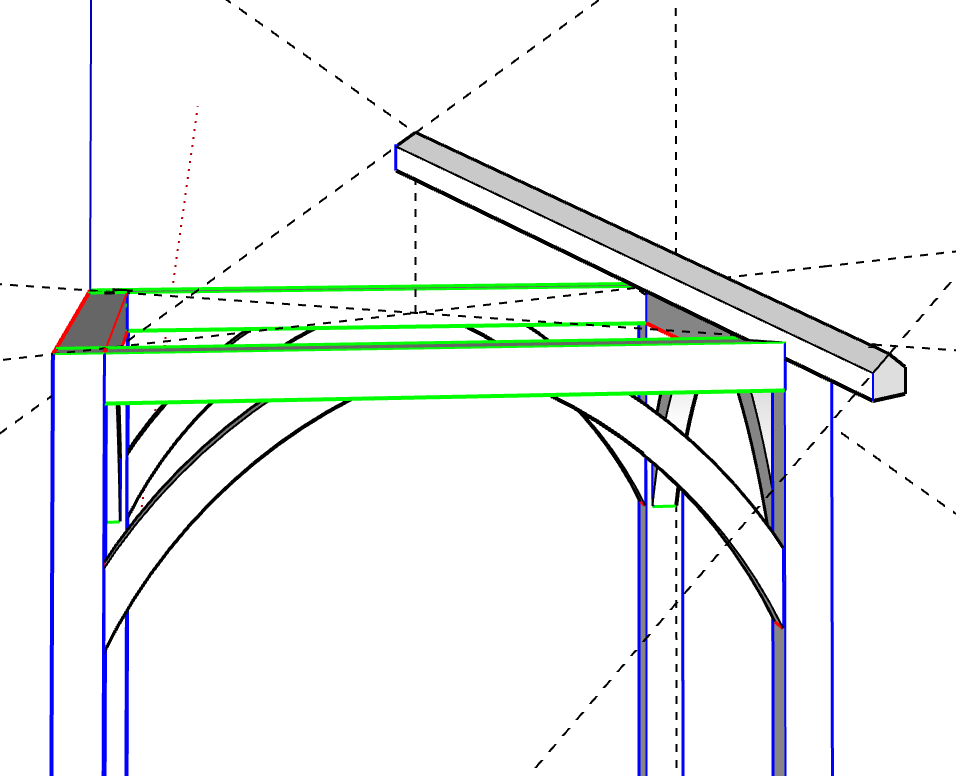
You mean something like this?

If yes, then (and I'm sure there are 99 better ways of doing this, but with Sketchup, any way that works is OK with me) the basic strategy is

draw horizontal and vertical beams as guides like in my diagram (as always, make these components)
use an Arc tool (I usually use the 2-point one) to draw an arc that suits(say between the end points of the beams)
draw a rectangle on the end face of one of the beams
select the arc
click the Follow-Me tool, and then click the rectangular face you drew. The emergent corner brace should appear
make your new corner brace a component.
Nearly there, but your corner brace extends "into" the beams. To get rid of the excess, edit the corner brace, and add lines where the beams & brace intersect - this should divide the face of the brace into sections. Push/Pull away the overlapping bits, et voila!
 

Attachments

  • Brace.png
    Brace.png
    49.2 KB
AJB Temple":3ettcix5 said:
Where are you based? You can come and see how I do it if you are anywhere near Kent. Will also explain mistakes and how to rectify!

Thanks. I know how to make it all practically speaking, but the point of the exercise is to make it in SketchUp to hone my skills a bit (hammer) (homer) .
 
boardgamer":39e8daek said:
You mean something like this?

If yes, then (and I'm sure there are 99 better ways of doing this, but with Sketchup, any way that works is OK with me) the basic strategy is

draw horizontal and vertical beams as guides like in my diagram (as always, make these components)
use an Arc tool (I usually use the 2-point one) to draw an arc that suits(say between the end points of the beams)
draw a rectangle on the end face of one of the beams
select the arc
click the Follow-Me tool, and then click the rectangular face you drew. The emergent corner brace should appear
make your new corner brace a component.
Nearly there, but your corner brace extends "into" the beams. To get rid of the excess, edit the corner brace, and add lines where the beams & brace intersect - this should divide the face of the brace into sections. Push/Pull away the overlapping bits, et voila!
Brilliant thanks so much!

Edit: That worked really well :wink:
 
Super. Pleased you were able to follow my dodgy instructions!

Follow-me is also one way to draw a hipped roof. Make a cube, draw a line from bottom corner to top-middle of the same face, select the top face of the cube, click Follow-me, then select the line. Bingo!
 
boardgamer":19m6nau9 said:
Super. Pleased you were able to follow my dodgy instructions!

Follow-me is also one way to draw a hipped roof. Make a cube, draw a line from bottom corner to top-middle of the same face, select the top face of the cube, click Follow-me, then select the line. Bingo!

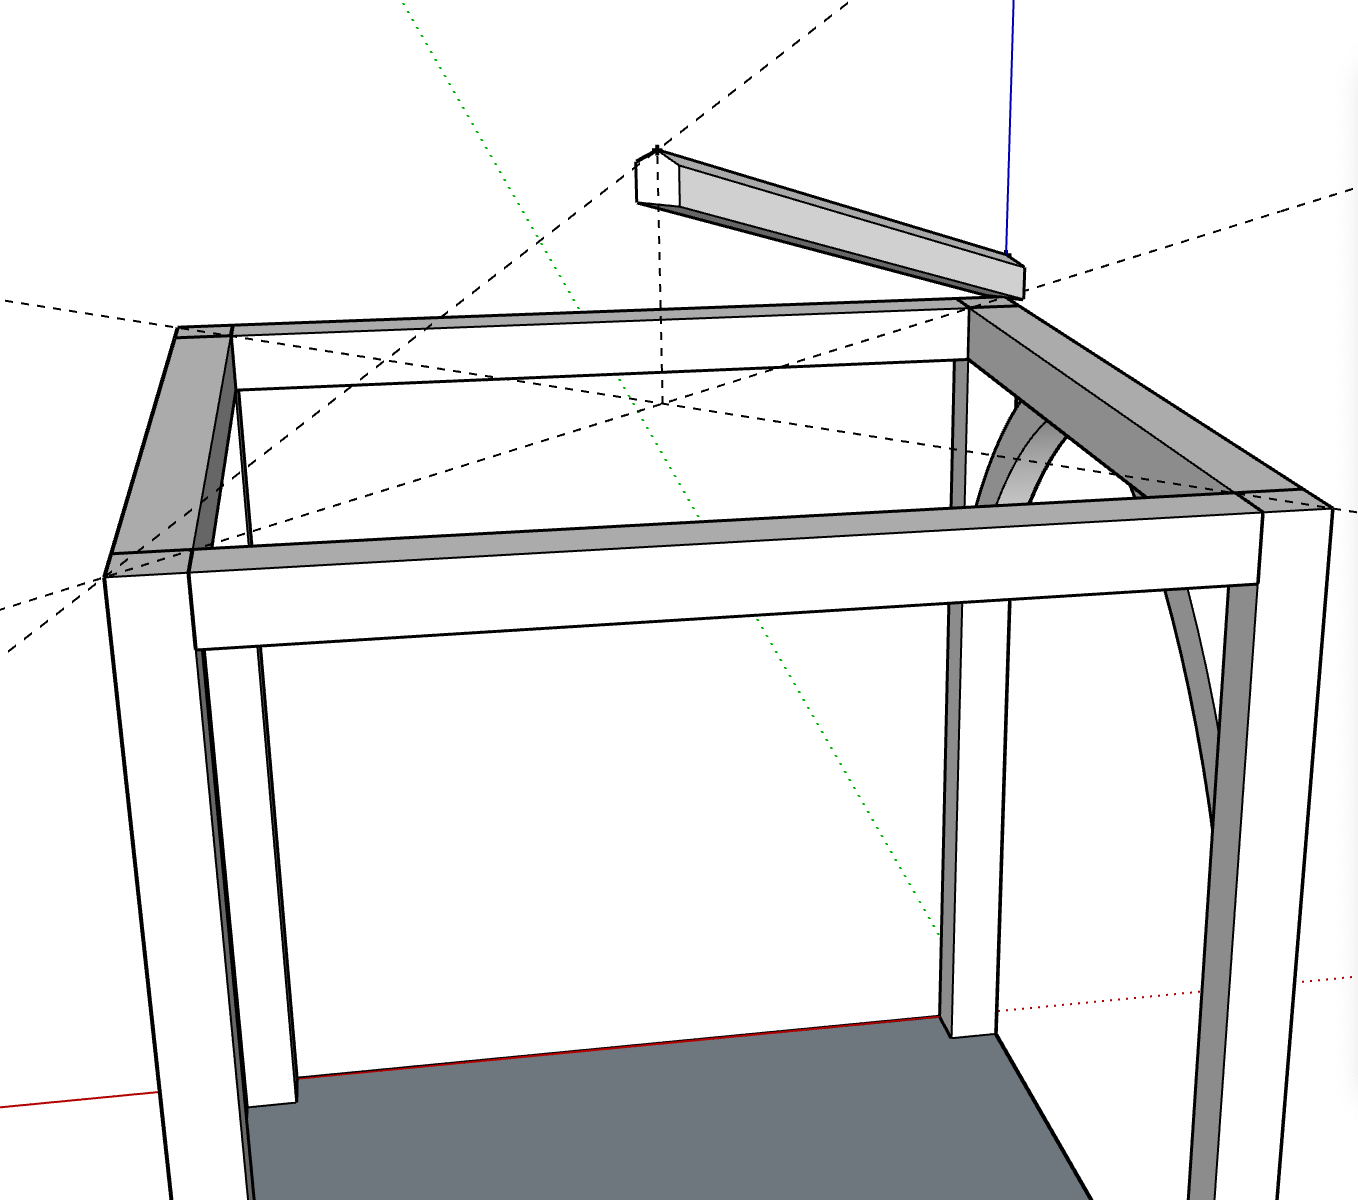
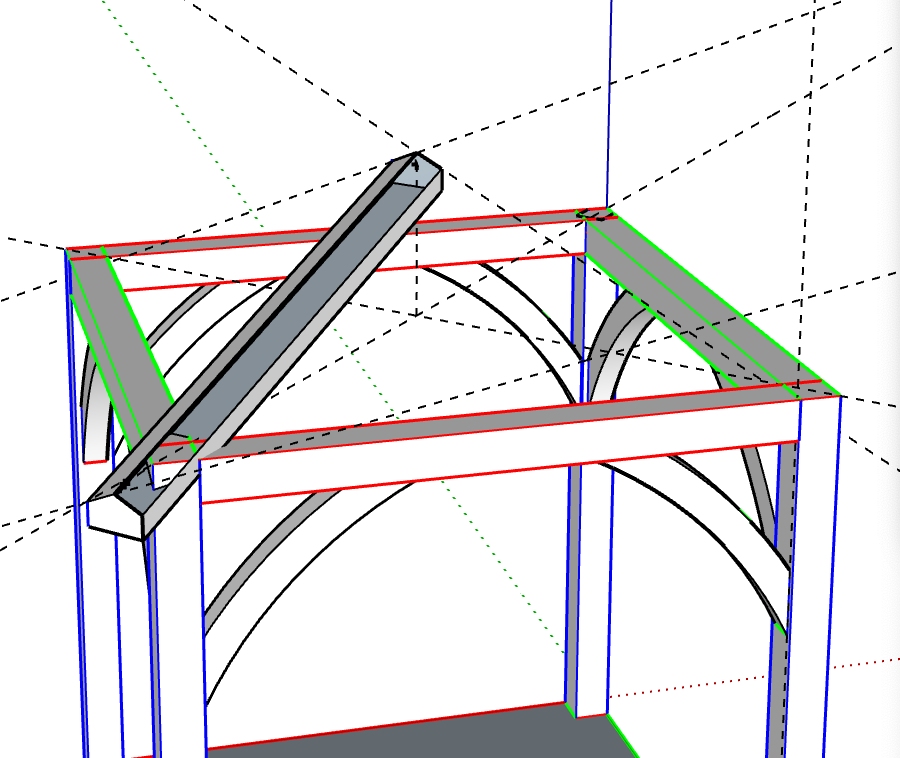
Yes 'follow me' seems really useful but I can't quite get it to work (yet) for the hips - there is a good chance I'm doing something wrong. I want something like the rafter I made in this screen shot, except I want it to sit correctly on the post and also follow the guide of the rise and run - as you can see it's not quite right.

Hopefully some of that makes sense!

FL6dB49.png
 
Aha, I misunderstood. I thought you just wanted the overall outline, but you're doing it properly :)

OK, there must be a good way to do this, but I can't work it out. A tedious way is;
From each corner of your "base" square, draw a line to the apex of your roof (so you end up with a "line pyramid")
Draw a square in one corner of your base (size of your beams)
Select the corresponding line to the apex, click the follow-me tool, then click your small rectangle

This gets you a beam towards the apex, but it isn't correct at the ends. To fix that;
At the lower end, add lines to make the beam solid, then *carefully* remove faces/lines that protrude beneath the "base"
For the upper end, um, tricky. I drew two big rectangles from the midpoints of each side of the base going vertically up to the apex (like cross sections of the pyramid). (The sides of the pyramid will fill in - get rid of them, you don't need them and they get in the way.) Where the rectangles' faces intersect with the beam, this shows where the other beams will touch. So (adding extra lines where necessary to keep the beam solid) *very carefully* go round deleting lines & faces so you end up with only the parts of the beam in one quadrant.
Then copy & rotate the beam to each of the other 3 corners, joining them up at the apex.

This isn't an elegant solution! And only works if your base is square. I think there would be an easier way if you had the solid tools in Visio Professional, but I'm guessing you don't. There are probably other better solutions out there!
 
boardgamer":24jugzi2 said:
Aha, I misunderstood. I thought you just wanted the overall outline, but you're doing it properly :)

OK, there must be a good way to do this, but I can't work it out. A tedious way is;
From each corner of your "base" square, draw a line to the apex of your roof (so you end up with a "line pyramid")
Draw a square in one corner of your base (size of your beams)
Select the corresponding line to the apex, click the follow-me tool, then click your small rectangle

This gets you a beam towards the apex, but it isn't correct at the ends. To fix that;
At the lower end, add lines to make the beam solid, then *carefully* remove faces/lines that protrude beneath the "base"
For the upper end, um, tricky. I drew two big rectangles from the midpoints of each side of the base going vertically up to the apex (like cross sections of the pyramid). (The sides of the pyramid will fill in - get rid of them, you don't need them and they get in the way.) Where the rectangles' faces intersect with the beam, this shows where the other beams will touch. So (adding extra lines where necessary to keep the beam solid) *very carefully* go round deleting lines & faces so you end up with only the parts of the beam in one quadrant.
Then copy & rotate the beam to each of the other 3 corners, joining them up at the apex.

This isn't an elegant solution! And only works if your base is square. I think there would be an easier way if you had the solid tools in Visio Professional, but I'm guessing you don't. There are probably other better solutions out there!

Thanks for this. I think it's about the same method as I used before you replied - not very elegant but it worked I think. However, I'm currently enjoying the fun of "closing faces" in objects. This is much more tedious than I first imagined. See the second photo... I can't get that one section to fill in despite it being identical to the opposite side. Infuriating.

xCZPUY4.png


zUnopkD.png
 
I've come to realise that you need to avoid missing faces in the first place, as trying to close them later almost always fails. In practice, this means as soon as you spot a missing face, undo commands until it reappears, no matter how much work you lose in the process. In the end, this saves time.
 
Ok noted, and I believe you're probably right as I've spent absolutely ages trying to fill this one in and work out what is out of which axis etc.
 
What is the idea of the chamfered angled tops on the four rafters? Fine if it is a drawing exercise, but not for the actual building. Adds complexity and reduces functionality.

Nice drawing though. I never found Sketch Up that useful for buildings. I make my timber structures in green oak (actually by the time I get round to using the wood it is usually far from green) and I have to take the dimensions from the wood on site, as it is usually all over the place. By far the hardest part for me is doing the lengths and angles on the rafters, where a drawing rarely matches the wood on site close enough.

Good luck with your building. Post pics when you do it! PS the one in the picture looks as if it is set on steel pegs to keep the timber clear of the slab. You can buy, relatively cheaply (about £30 each last time I bought stock), both straight and angled stone staddles, which you may feel looks more traditional for this kind of structure, and does a much better job of dealing with the water.
 
AJB Temple":1jej1k71 said:
What is the idea of the chamfered angled tops on the four rafters? Fine if it is a drawing exercise, but not for the actual building. Adds complexity and reduces functionality.

A chamfer on the hips is common in timber framing. It allows the jacks to sit flush against them and generally looks nicer. I don't why you wouldn't do it...

Unsure whether I'll actually make this structure, I just wanted to understand how to draw it in SketchUp.
 
Slight chamfer perhaps if the hip rafter is very wide, as you have drawn. That is wider than But if you look at yours the chamfer angle is quite extreme and when the jacks go in they will be below the level of the apex of the hip rafters. This will surely create a problem when you come to batten across the felt.

With your large hip rafters (which appear wider than that are deep) you may find that getting them up is quite a challenger. Typically a hip rafter is done at much the same width as the commons. In such cases it is not worth chamfering as you wont see it anyway once the tiles are on.

This is an example of what I mean.
 

Attachments

  • double-garage-hipped-catslide-Roof.png
    double-garage-hipped-catslide-Roof.png
    781.9 KB
By contrast, this is much more similar to what I build currently. Hip rafter is fairly narrow and uses square section commons that are not as deep. Very slight chamfer run off by hand with a power planer. (Takes ages doing it any other way as the wood is just too heavy to get near a band saw for me as I mostly work alone).
 

Attachments

  • Last-October-in-the-workshop.jpg
    Last-October-in-the-workshop.jpg
    240.1 KB

Latest posts

Back
Top