Yet another shedshop Mike's way. Ish

UKworkshop.co.uk

Help Support UKworkshop.co.uk:

This site may earn a commission from merchant affiliate links, including eBay, Amazon, and others.
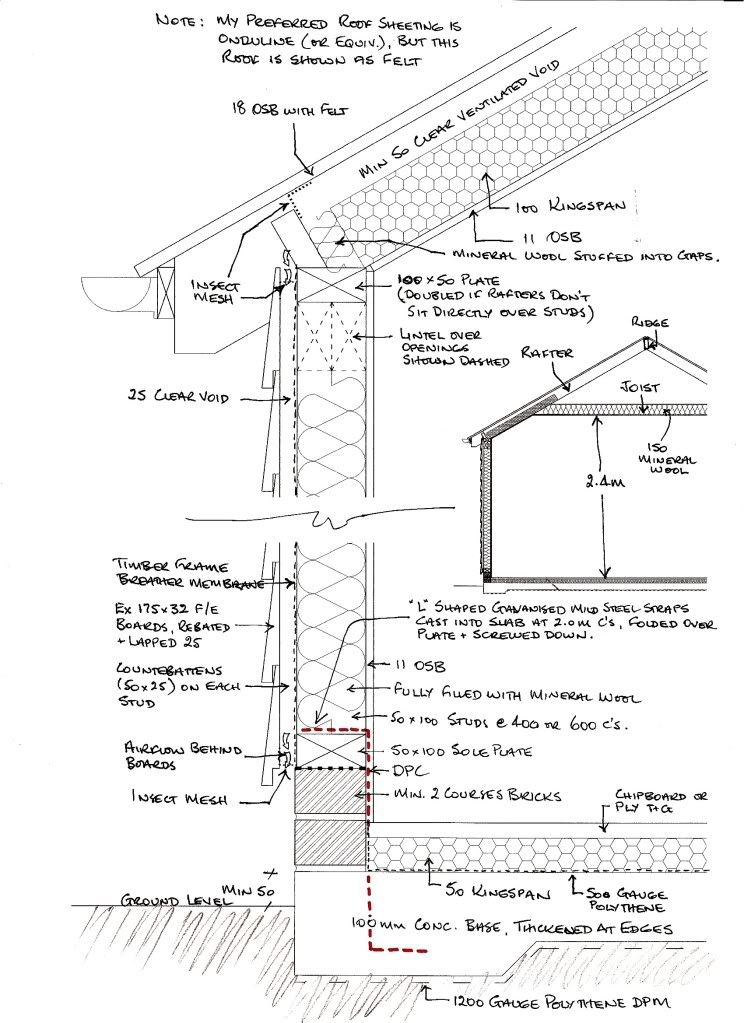
I'm following Mike's design. I'm planning on cutting the DPM at ground level and sealing it to the concrete. I couldn't really see any other way of finishing the DPM other than take it all the way up and over the outside of the bricks and under the DPC, which then exposes the DPM to UV. This is the problem with floating slabs.
It's not the raft that's the issue, but the way you've laid the DPM on the ground first. It should be slab - DPM - screed and lapped on the inside just like strip foundation, slab, screed and block.

Edit: So if you want it to work properly and keep the damp out, you need to fix it now before you go too far.
 
Last edited:
Shedscan1700x2338.jpg


I'm following this diagram so far. The DPM goes under the slab and is cut off at ground level, leaving the edge of the slab and brickwork exposed. Then an additional DPM is laid above the concrete and up the internal sides of the brickwork up to floor level. Is this no good? It's not too late to lift the frame in sections and lap DPM under.
 
No, that will be fine if you put the extra DPM down and create a bathtub by lapping it properly with the DPC in the wall, don't leave a gap. You need the Kingspan to protect the DPM, so it has to go down before you start walking on the visqueen.

You can protect the Kingspan with ply or something, if you're worried about scuffing it up.

Edit: But I would have put a screed down to protect the DPM and put the DPC down lower so that 100mm of Kingspan or 50 mm screed and 50mm of Kingspan covered it up completely on the inside. 6" above GL for a DPC is good enough.
 
Last edited:
Would it be an idea to arrange the rafters/roofing joists, to allow for some long storage. Maybe even have a couple of small doors on the outside to access the space. It would mean you could load long timbers into the space from outside.
Just a thought/idea that sprang to mind :)
 
lapping it properly with the DPC in the wall
Ok. Do I put the DPM on top or underneath the DPC? Or does it not matter? And what do I do with the ties? Bend them down over the top of the DPC/DPM combo and screw through it? Do I need to seal up the hole again after?

Thanks for your help btw
 
Would it be an idea to arrange the rafters/roofing joists, to allow for some long storage. Maybe even have a couple of small doors on the outside to access the space. It would mean you could load long timbers into the space from outside.
Just a thought/idea that sprang to mind :)
It probably would have been. But I built the trusses this weekend. I have a separate shed for timber storage so not really something I was worried about. I was more worried about head height and the ability to move longer items inside the workshop
 
i feel like you have mentioned previously but is your door already ordered?/ a set dimension? there is not much timber around it and i feel your whole wall is going to shake when you close the door, I would certainly look to beef up the surrounding even just extra noggins either side if your have no more timber would be a start.

Regarding DPM DPC situation, I am no expert, I am a carpenter so I'm sure many others can weigh in with more expertise on the matter but here is my take, the dpc ontop of your brick course is merely to prevent water passing up through the masonry into the plate of your wall, the dpm is to keep all moisture outside of the inhabited space, you need it to run continously above anywhere moisture will be present ie masonry and below anything inside your finished space, at this point the best you can do is lay it ontop of your slab and lap it up the brick, here is where someone else needs to weigh in as in my opinion this is the crucial point, i think the dpc should be turned down and the dpm lapped over it with radbar tape sealing the joint between them, if dpc goes over dpm i feel theres a chance for rising moisture in the bricks to run across the underside of the dpc over the dpm and into your workshop.

At this point its a pain in the arse but not impossible to lift the walls as they are and get you DPM to run under the plates to create a continuous seal.

if none of this sound appealing at this point do the following, take battens, can be cheap 2x1 roof battens if your budget is tight, run them down your studs outside trapping your excess dpc down over the bricks and extending the lowest point of your cladding over the bricks to hopefully keep them from getting wet, you need to have a clearance of 150mm below your cladding so you will probably need to excavate a little around the base of your workshop to get some extra height. i know when money is tight extra spending seems impossible but getting the structure and outer skin of this build correct is key the rest can be done when you can and is easier to upgrade later down the road. if i were you, at this stage i would really consider giving a decent overhang all the way around your building, the size of a roofs overhang and the maintenance required for a building like this are directly proportional - more overhang = less maintenance, not to mention keeping the immediate ground around your workshop dry.

I hope all this doesn't sound like I'm having a go, it all comes from a good place but you are a stage where some things can and should be corrected to save potential issues down the road when if cost a lot and hurts a lot more to correct any issues.
 
Bit concerned about the notches in your rafters, they would tend to indicate wider than depth, wrong way around for a spanning timber between rafters supporting a roof.
 
Ok. Do I put the DPM on top or underneath the DPC? Or does it not matter? And what do I do with the ties? Bend them down over the top of the DPC/DPM combo and screw through it? Do I need to seal up the hole again after?

Thanks for your help btw
You're welcome.

Just lap it the way that you can. It is recommended, and if you feel the need or if you can't lap it in some places, to seal the gap up with quality masking tape. It's best practice to not puncture the membrane, but if you have to, seal it up as best you can. There won't be much moisture coming in if it's punctured well above ground level and it's not worth loosing sleep over a couple of small holes, but protect it as best you can once it's laid. Scuffed up kingspan is better than a holey DPM.

I'll leave the other stuff to other people, otherwise you'll end up with too much conflicting advice. Just that rafter feet should be bearing on the wall plate.

Over and out!
 
I don't think Adam meant masking tape as we in the UK know it, but use a good quality waterproof tape such as "Gorrilla patch and seal tape".

Rafters should as Adam said be bearing on the wall plate and overhang the walls to provide water run off from the roof, too late now, but do put some kind of extra support under the ends of the rafters, perhaps a corbel of some kind, and re-consider the span between rafters, it looks excessive.
 
Bit concerned about the notches in your rafters, they would tend to indicate wider than depth, wrong way around for a spanning timber between rafters supporting a roof.
The gap is only wider than it is tall because I was using up some shorter offcuts. The only job that piece has is to support that span of roof OSB and I figured the extra 5cm gap would be fine. Not sure I'm explaining myself there...

Screenshot 2022-05-04 at 09.09.15.png
 
Extra gap will not be fine, beams/purlins fail by twisting either mid span or at the bearing, for the same reason noggins are needed between them, that gap needs filling, the depth of the purlins also looks inadequate, sorry to be so critical, but fifty years as a Structural Engineer does not go away just because I am now old and retired.

Have a look at these, very inexpensive for 3 sq m, don't know what delivery would be like, but no harm in asking: Katepal Super Katrilli Hexagonal Felt Roofing Shingles 3m2 - Green | Roofing Superstore®
 
No need to apologise, any advice is most welcome.

The design of the roof was essentially copied from my old shed. Probably (definitely) not the best design methodology and could be improved by those who know more than me, but my logic is 'it worked ok in the old shed for 10 years, should be fine in the new one'. No doubt it could be better and I'm happy to learn and tweak the design.

The beams will be captured on both sides with OSB, forming a torsion box, and so will have little opportunity to warp over time. Re the strength/span, the beam was 2x2 on the old shed and I've upped it to 3x2 (with the long side oriented vertically), and increased the number of beams (3 -> 4), reducing the span. I'm not sure there's much I can do to strengthen now without raising the roof line (which I can't really do, planning permission is restricting overall height) or starting from scratch, which I'm not excited about. I could run a ridge beam and rafters in between the trusses but my motivation for building this way rather than that more traditional ridge/rafters way was to keep it easy to install and reduce the amount I had to do up a ladder. The panels can be made on the ground and just lifted up and over. But obviously if it's going to fail, probably not a good shout. I'll have a think about it and come back with some updated designs
 
Its not warping thats the problem, when a beam is overloaded any sideways movement allows the beam to twist it is then taking the load on its minimum axis which it is not designed for this puts the compression and tension zones into a very small area and the beam will fail, hence the need for noggins between purlins or floor beams, I rue the day that herringbone noggins went out of fashion just because it took a carpenter to make them, solid noggins are now the norm and every trade that needs to get services from one side of the room to the other notches the beams instead of running though the spaces provided by the herringbone hence compromising the beam strength which has to be taken into account when calculating it's size for span and load, hence the cost and size of beam is increased and the poor old Structural Engineer gets the blame for the increase in cost and oversize structural elements, whinge over. 😇
 
i
Its not warping thats the problem, when a beam is overloaded any sideways movement allows the beam to twist it is then taking the load on its minimum axis which it is not designed for this puts the compression and tension zones into a very small area and the beam will fail, hence the need for noggins between purlins or floor beams, I rue the day that herringbone noggins went out of fashion just because it took a carpenter to make them, solid noggins are now the norm and every trade that needs to get services from one side of the room to the other notches the beams instead of running though the spaces provided by the herringbone hence compromising the beam strength which has to be taken into account when calculating it's size for span and load, hence the cost and size of beam is increased and the poor old Structural Engineer gets the blame for the increase in cost and oversize structural elements, whinge over. 😇
recently had the pleasure of working on an MF ceiling (the suspended metal lattice type of make up) hung below block and beam, no lack of space there, i think there was about 600mm of clear space for mvhr, low and high volt runs, sprinklers, plumbing etc. a very high end build, certainly not the usual home but boy did it make everyones lives easier!

@aphillippe many old houses had the roof made up of A-frames supporting a purlin or 2 and a ridge beam, from the wall plate over the purlins and onto the ridge they ran 2x2 rafters (if you could call them that 🤭) these roofs held up huge amounts of slates, prone to a bit of sagging but didn't fail for 100-150 year lifespans of scantle slate roofs. You could look to do similar using the small rafters to both reduce span, hopefully support some load on top of your walls as the trusses are incorrectly terminating inside the wall, provide some airflow and also create the overhang for your roof to keep water from the facade and immediate ground. its not what an engineer would suggest but it would be absolutely fine and solve some of your issues
 
Bit concerned about the notches in your rafters, they would tend to indicate wider than depth, wrong way around for a spanning timber between rafters supporting a roof.
I agree… I=bd^3 and all that. I’m also uneasy with the way the rafters are constructed. Seemingly a laminated design with the continuous element acting on a cantilevered “pad” rather than the sole plate. Not saying it won’t work but it’s an unconventional way of doing it.
 
At this stage of the game I would be re-making those truss's so they overhang the walls as shown in the OP's post No 62, I would also increase the number of them.
 
Last edited:
Right, new plan, aiming to keep as much of what I've already built as I can but beef it all up...

1) Take off the trusses and top plates, put new top plates in that span the joins in the framing panels. Should stiffen the walls up and help transfer loads from the roof more evenly. Take off the top row of timbers from the gable a-frames and replace with continuous beams to get to the right height

Screenshot 2022-05-06 at 11.36.20.png


2) Put the trusses back on, this time on top of the top plates rather than directly on the wall frames. And add some support to deal with that overhang. It's not shown in the design but there is at least one stud under each foot of the trusses.
Screenshot 2022-05-06 at 11.36.48.png


3) Run ridge beams between the gables and trusses, 100 x 47. I had some conversations with the local building merchants, a beam that would span the 6m was silly money. So approx 2m spans, hence keeping the trusses to support the ridge.
Screenshot 2022-05-06 at 11.44.16.png


4) Add rafters (2x4), birds mouth on to the top plates, rafter hangers at the ridge. Throw in some noggins or purlins.

Screenshot 2022-05-06 at 11.59.27.png


Better?
 

Attachments

  • Screenshot 2022-05-06 at 11.44.28.png
    Screenshot 2022-05-06 at 11.44.28.png
    1,017.6 KB
Oh, I forgot to add them to the design but ties across the rafters on at least 50% of the rafters
 

Latest posts

Back
Top