Workbench WIP sketchup drawing

UKworkshop.co.uk

Help Support UKworkshop.co.uk:

This site may earn a commission from merchant affiliate links, including eBay, Amazon, and others.

noddy67

Established Member
Joined
1 Feb 2006
Messages
253
Reaction score
5
Location
Nr. Tonbridge, Kent
I've just started building a workbench and at the same time started learning to use sketchup. Below is a sketchup WIP. I'm uploading it more to test my ability to load pictures onto this forum than anything else.


Fullframend.jpg


More to follow as and when there's progress.
 
HI Noddy,
Can I make a suggestion please? Consider turning your top tenons (on the top of the legs) through 90 degrees. The way you have them at the moment means that those tenons are being glued mainly on endgrain. If you turn them, you will have face-grain to face-grain joints, which will be much stronger.

Otherwise, it's a good start!
 
Hate to disagree with you Steve, but wedges in tenons should run across the grain of the mortice otherwise there is a tendency to split the grain of the morticed piece.
 
Very good Noddy. I think you got the hang of the stopped chamfers. I assume you made a component of the first leg and copied/moved it to make the other three?

Edited to add: Noddy, what are those short line segments crossing the chamfers? There appears to be two at the bottom and one near the top of the chamfer nearest the viewer?

FWIW, if you were going to use the same sized stopped chamfer elsewhere, you could copy one from a leg and move it to the other parts.
 
Yes, Nick, you are right. But I'm not suggesting rotating the wedges, just the tenons! Maybe I'm reading the drawing wrong, but it looks to me that there are twin tenons cutting across the grain of the top rail. I would prefer twin tenons in line with the grain, side by side.

Or am I missing something (again)?
 
I think all of the tenons are wedged tenons and the wedges are shown. At least I think that is the way Nick and I are reading the drawing.

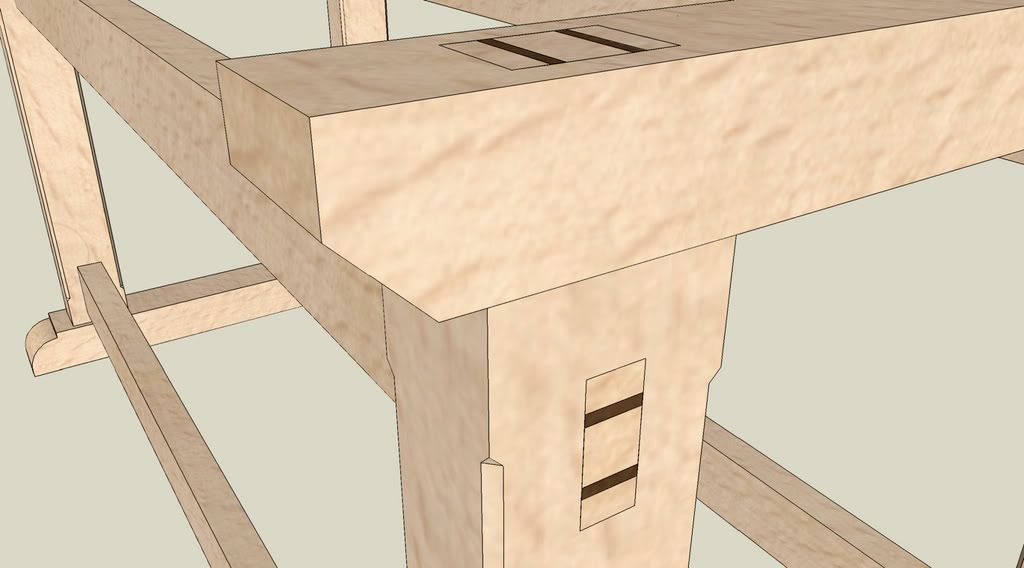
Can you see on the near one the lines running parallel to the edge of the rail between what look like two mortises? I think that's just a continuation of the edge of a single mortise instead.
 
Ah! :idea:

OK, I see now. Well in that case I still think that there is too much face-grain to end-grain contact - I wouldn't make the tenon that thick. If I were using a single tenon, I'd make it a third of the width of the top rail, but for that width I'd use two, side by side, each 20% of the width.

Does that make us all in agreement?
 
Steve and Dave,

Yup, I see all the joints as single tenons with two wedges each. I'm not sure that adding glue surface by making twin tenons would make much difference here though; if the wedges are well made/fitted the joints shouldn't be moving anyway. But I'm not prepared to fight over it.

Edit: I've just checked my bench. I made it with single wedged tenons (a bit narrower in proportion than the OP's drawing suggests) and that hasn't shown any weakness. But I'm not going to fight over it ... :roll:
 
Oh don't get me wrong, I think a single tenon is fine in such a situation (OK that's not quite what I said above, I'll admit), and I bet mine is just a single. I just think it is a bit fat for the section, that's all.

My thinking has been coloured by the fact that I originally thought I was seeing end-grain of twin tenons, whereas it is actually the wedges I was looking at.

OK, moving on, I'd make the long rails knock-down, like a bed, otherwise that looks as if it's going to be one big mother to move.

Also, consider EXACTLY where your vice is going to go. I didn't do that calculation accurately enough on my bench, and it fouls the frame a bit. When you come to add the top, either make the top overhang the end enough to accommodate the vice with clearance (a base like that should be able to support a cantilevered vice without much problem, I'd have thought), or keep the frame far enough towards the end of the top to allow the movement of the vice on the inside of the frame. My preference would be for the former.
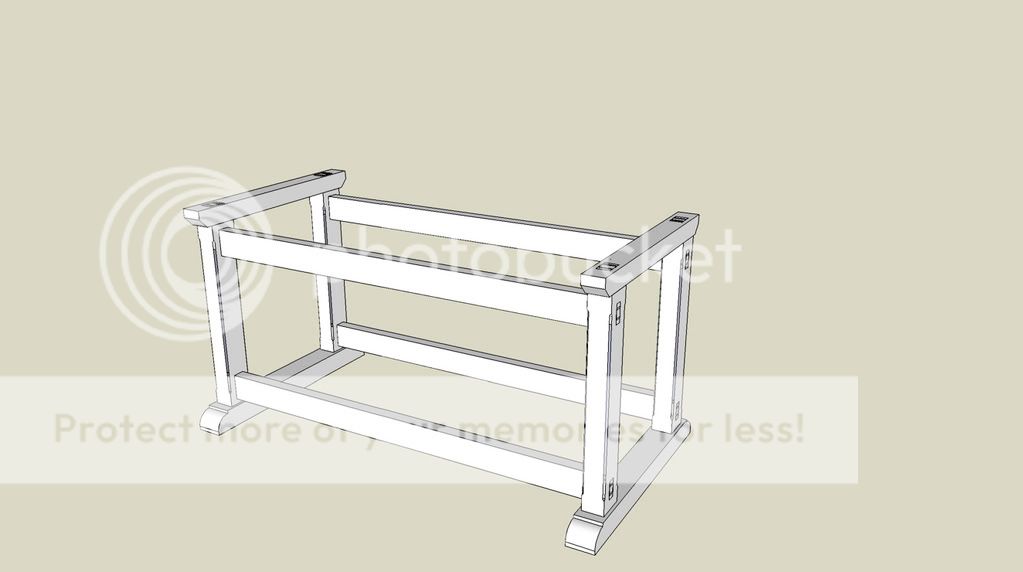
 
Another vote for making it K-D. Also relieve the central section of the underside of the feet to make four separate feet.
 
I'd vote for the knock down idea, too. I don't know how far along you are on the bench but if you could do it, I would use tusk tenons on the rails or bed bolts so they could be driven tighter if needed after the bench has been used a bit or to compensate for moisture changes.
 
Appreciate the thoughts guys.

As far as the tenon orientation is concerned it is a bit of a mute point as I have already built them. It is a single tenon and plan on having two wedges going into it. I would appreciate advice on how far down the tenons the wedges should go. The tenons are 60mm long, 60mm wide and 40mm thick.

Dave R the short lines across the chamfer should not still be there (left over from the stopped chamfer learning curve) and have now been removed.

With respect to the bench being breakdown or not I think it will probably end up being not. Space is not a problem (fortunate enough to have a pretty sizeable workshop), don't see us moving but most of all I particularly like the detail of the wedged tenons in Schleining's bench on page 158-159 of his book.

zoom in of the tenons

zoomwedges.jpg
 
noddy67":2x9jbiwj said:
I would appreciate advice on how far down the tenons the wedges should go.

I think the wedges go to the bottom of the tenon. A tip I read was to drill a hole at the bottom of the cut line through the tenon. This stopped the tendency of the tenon splitting as the wedge was driven in.
 
I think the tenons are right as they are but I agree the feet should be raised in the centre to make four contact points -unless you have a surface plate for a workshop floor!

My own bench is very similar but, despite the heft and beech timber I was worried about racking and glued/screwed a ply back onto the frame. I'm not sure this was entirely necessary but it makes me comfortable.
 
Back
Top