Work completed - Rectangular garden table in iroko

UKworkshop.co.uk

Help Support UKworkshop.co.uk:

This site may earn a commission from merchant affiliate links, including eBay, Amazon, and others.

oddsocks

Established Member
Joined
25 Jul 2007
Messages
663
Reaction score
0
Location
Haverhill Suffolk
This was going to be a WIP post but issues with my flickr photo account meant i've now completed it .....plenty of pictures!

Some years ago I built a round table in oak but this has gone black despite treatments. My wife also wanted a rectangular table (I walked into that one when I asked where the table had gone and why were the chairs spaced in a rectangle on the decking).

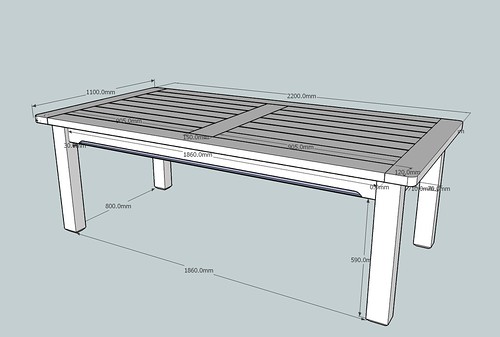
The brief was to seat 8 without them hitting the legs, so this sketchup...

3483125164_2f9d2a24cf.jpg

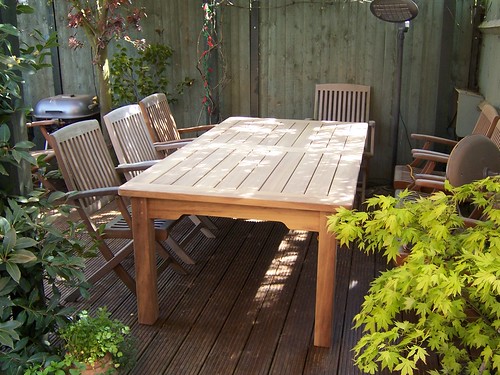
became this table after 7 days of work....
3483112104_baf4397edb.jpg


The number of slats increased from 7 to 8 based on appearance during the dry fit. Also an error on my part meant the length of the top became 2.1m not 2.2m (the leg frame stayed as intended).

Now for the build....

I sourced the timber from Thorogoods in Ardleigh nr Colchester at £45 p cu ft, total was £330 with VAT. I know SLhardwoods etc are showing £35 per cu ft, but Thorogoods were convenient and put out the 3 pallets of 4", 1" and 1.5" in their selection area for me to sort through, and the timber was excellent.

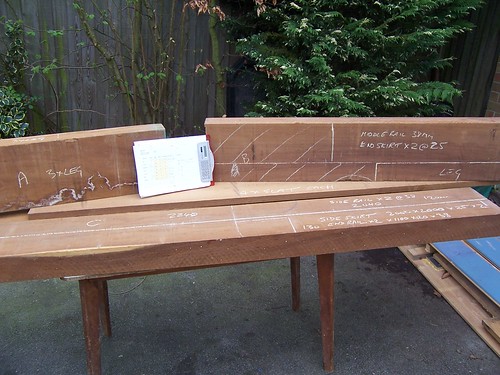
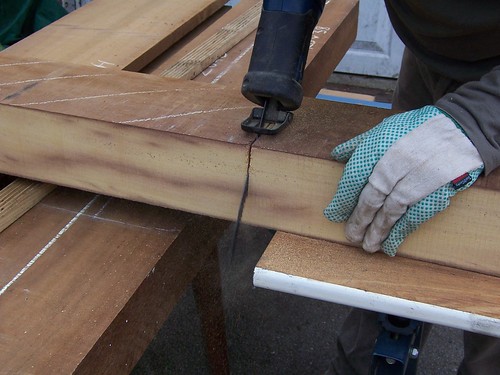
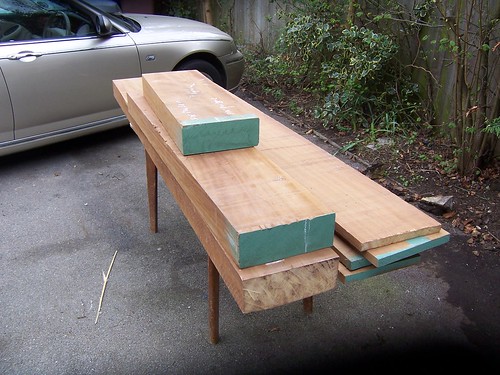
I had to buy the full boards so it was fun working out how to get most of it from a 4m x 260mm x 100mm single board (£200 + VAT ouch!) and then cut it to fit into the A6 estate. As well as the 4" board I also needed 2 boards at 4m x 260mm x 1" for the slats. Here's the boards as taken to the car (my ryobi oneplus alligator saw did the cutting at the timber yard)

3483109002_1aba22990f.jpg


marked up...
3483108816_91a1e49858.jpg


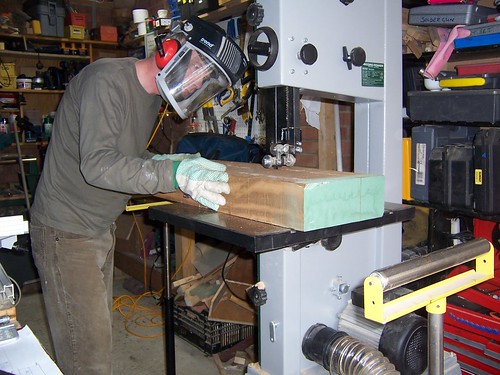
and cut on the bandsaw (record BAS350 with dragon sw M42 blade that was not new) - the use of rollers was essential to support the weight. By the end of all the resawing the blade was finally beginning to struggle -but I have used it for a year.
3483109146_d8fe94a4a0.jpg


Ryobi in use again

3483109252_17bc174bca.jpg


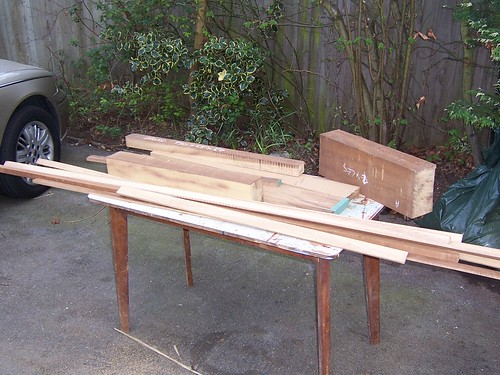
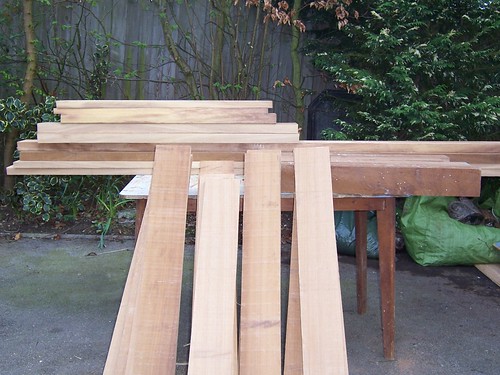
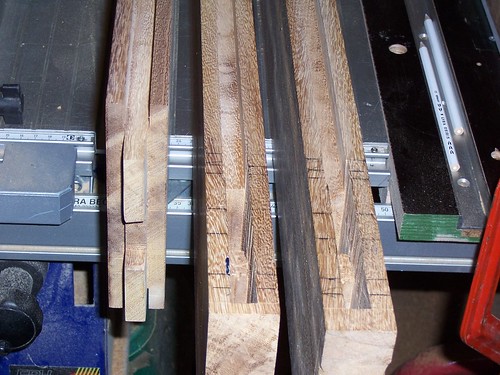
and the final stack 4 hours later waiting to be planned and jointed etc. The slats are in the vertical
3482293033_f5d86fa74f.jpg


Work calls, so i'll post more images later

EDIT - timeline and WIP pics at the end of page 1
 
That looks fantastic - I second his Lordship's concerns though... :wink:

On a serious note, the inclusion of timber source and, most importantly, price is very useful to me. I'm looking at starting my first project soon and it's good to get an idea of what the timber for a project tends to cost - not many people post that info!

Again, great piece of work! :D
 
ste_5150":3kxvf2zd said:
I'm looking at starting my first project soon and it's good to get an idea of what the timber for a project tends to cost - not many people post that info!

I think that's because most of us are too embarrassed to admit that we can't help buying far too much at times... Well, that's my excuse anyway! :D :wink:

Interesting project and a very good set of photo's so far. There are bound to be people reading this who have been asked to build something similar for the summer! :wink:

I'm liking the BS350 as well; that's something I've had my eye on for a while... Do you have any negative comments about it?
 
Thanks or the responses - i'll add the WIP photos later this evening when work finishes.

Re the timber cost, I first looked at using Oak but searches on the forum and my experience with the round table going black made me invest in iroko.

For oak I was going to go to UK OAK and costed it at about £120

http://www.uk-oak.co.uk/about-us

use their oak beam calculator.

I eventually went for iroko from Thorogoods :
http://www.thorogood.co.uk/,
I had phoned them before Easter and agreed to visit on 14th April and the three pallets were there with my name on it for me to sort through. Very friendly service. From memory the 4" Iroko was £48 +VAT, the thinner boards were £45 +VAT (can't remember the pence bit).
I actually found the hardest task was finding a board that was wide enough but not too wide (e.g there were 8", 10" and 12" wide boards).

After I had cut all the wood I was only left with this amount of wastage (and two of these gave me what i needed for the additional two slats):

3482292909_f29d407c59.jpg


More pics later.

Dave
 
OPJ":3vist8h6 said:
I'm liking the BS350 as well; that's something I've had my eye on for a while... Do you have any negative comments about it?

OPJ,

I posted a review some time ago.
https://www.ukworkshop.co.uk/forums/viewtopic.php?t=20001&highlight=

the only issue I have with it now is that the front wheels have partially collapsed (the metal frame is not strong enough that holds the axle - they look splayed and hence don't lift it as high as it should be.

Now I really must get back to work :)
 
Dave,

nice table! Shame about the small pile of left-over wood.......that'll mean another trip to Thorogoods for your next project!

I'll back up your comments re Thorogoods. I use them all the time. They are helpful, hold good stocks in big dry sheds, and will allow you to sort through great piles of wood to pick out what you want.

Where abouts in Suffolk are you?

Mike
 
Mike Garnham":1oe4s9zg said:
Dave,

nice table! Shame about the small pile of left-over wood.......that'll mean another trip to Thorogoods for your next project!

I'll back up your comments re Thorogoods. I use them all the time. They are helpful, hold good stocks in big dry sheds, and will allow you to sort through great piles of wood to pick out what you want.

Where abouts in Suffolk are you?

Mike

Thanks Mike - I live in Haverhill on the Suffolk/Cambridge border so always have to travel to get good timber :-( .
This was the first time I had used Thorogoods, but found that when I called other timber merchants that didn't stock iroko they all suggested Thorogoods.

I had the week after Easter as holiday so this was project to do then. I almost achieved it (bought the wood on Tuesday and put the table on the deck on the following Monday). I would have finished in time if it wasn't for the good weather letting me take a trip to the coast!

pics are coming (on the last conf call of the day now)
 
nice stuff oddsocks - i'm eargerly awaiting the pics (particularly the chairs) because i am building a patio set for the competition and hope to pic up some pointers.
 
big soft moose":2jna9m21 said:
nice stuff oddsocks - i'm eargerly awaiting the pics (particularly the chairs) because i am building a patio set for the competition and hope to pic up some pointers.

Sorry - didnt make the chairs....they are solid teak and were bought in the local high street market last year for £20 each (i bought all 8 he had left). They were from a discontinued homebase range at £99 each and just end of stock (I suspect there were no matching tables left in store). the were not seconds.

I did build some folding chairs a few years ago in cedar and discovered that that is not a good wood for that! A few months later the pivot joint split, so if making fold chairs use a good dense timber.

Right, now going to create the reply with the WIP pics - hopefully ready to post in next 30mins
 
oddsocks":fuxb7t6f said:
big soft moose":fuxb7t6f said:
nice stuff oddsocks - i'm eargerly awaiting the pics (particularly the chairs) because i am building a patio set for the competition and hope to pic up some pointers.

Sorry - didnt make the chairs....they are solid teak and were bought in the local high street market last year for £20 each (i bought all 8 he had left). They were from a discontinued homebase range at £99 each and just end of stock (I suspect there were no matching tables left in store). the were not seconds.

I did build some folding chairs a few years ago in cedar and discovered that that is not a good wood for that! A few months later the pivot joint split, so if making fold chairs use a good dense timber.

Right, now going to create the reply with the WIP pics - hopefully ready to post in next 30mins

oh well - maybe i can pick up some table pointers ;) - Mine is looking to be oak throughout , not least because ive got a shedload in the 'shop that needs to be used up - interested in what you were saying about yours round oak table going black through weathering - I might counter act that by blackening mine on purpose using iron or ammonia
 
So continuing on from the earlier pics...

First of all - the timeline for this project (being DIY out of a double garage workshop and using machines where possible. Pics and more explanation in my next post...

Day1 (14th April) 4 hrs - Purchased timber and cut to initial size - 4 hours, due to the resaw effort from the 4" thick to get the various 38mm (table top frame) and 25mm underskirt from the 100mm thickness. These actually ended up at 34mm for the top frame and 22mm for the skirt.

Day 2 4hrs -Swapped the bandsaw for the Dewalt 733 planer thicknesser and dimensioned all the parts. Sunny afternoon so trip to the coast...set the satnav to come back the rural route and found a gardencentre and sign for 'gastro pub of the year 2008' (see day 4!)

Day 3 10 hrs - Morticed the top frame (using old ebay 'ferm' morticer), tenoned the top frame, grooved the frame components to take the slats and glued in just the centre rail to the side frame. Polymite (ex cascamite) glue used for everything as I need an hour work time!!!

Day 4 4hrs - tenoned the slats to fit the grooves. The slats are 22mm thick and top aligned to top of 34mm frame. 'Persuaded' to go to the gastro pub and gardencentre found on day 2.

Day 5 10hrs - dry fitted the slats, decided they were too wide (118mm) so reduced to 102mm and made 2 more to give 8. gained management approval and glued up the first half. Mortised the legs

Day 6 10hrs - glued the second half of the slats and end frame. Cut the shape on the underskirt, tenoned the underskirt and glued up both end skirts to legs.

Day 7 4 hrs (back to work now :-( ) glued the side skirts to the legs, turned plenty of 10mm dowel lengths (using the 10mm spanner ground to work as a parting tool) and dowel pegged all the table top frame joints and leg-skirt joints. Took the leg assembly to the deck and put the top on it :))

Day 8-9 plenty of sanding and then coated with two coats of Teak Wonder (from yachting suppliers and is not teak oil).

Ok, posting this and moving onto the pics....
 
this thread should come with a SWMBO warning!

add me to the list!

Steve
 
Finally the WIP pics and detail

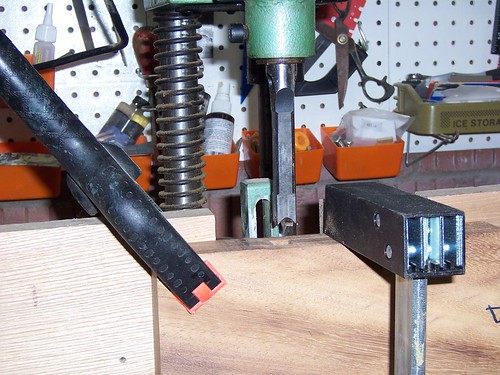
The frame and legs needed to be morticed. I only had an old ferm type morticer and in order to get the 120mm top end frames in needed to remove the MDF table top and use the drill press top. The Holddown was no use so I used a bessey clamp to hold the wood to the table and that to the bench. In practice this worked very well and I got into a rhythm. The mortices / tenons on the top were 60mm deep and on the legs 50mm. I also made life easier on the legs by doing a double tenon but not the haunch nor the 'bit in the middle' (it will be clear from the tenon pic!).
3483110174_a159be214b.jpg


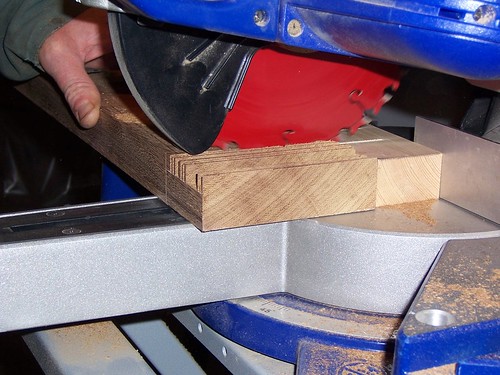
The tenons for the frame and underskirt were cut using my EB mitre saw which has a tenoning depth stop. In this mode a backing piece is needed so that the back edge of the wood is able to be cut but the full required depth. The offcuts in original thicknessed length were used as trial pieces. I used the saw up to approx 1mm from the marked tenon line and then finally chiselled to the line. A chisel quickly removed the thin remaining slices from the tenoning

3483109972_4ff440ea69.jpg


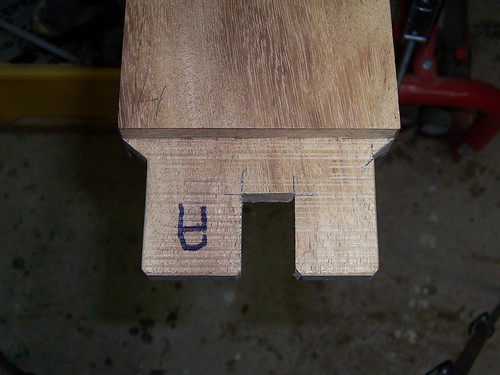
Frame tenon joint (the skirt ones were simplified). I made the tenons different widths so that in the heat of the glue up i didnt put them in upside down.
3482293625_5afb3d465e.jpg


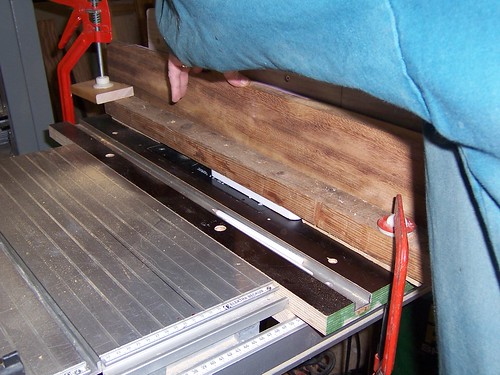
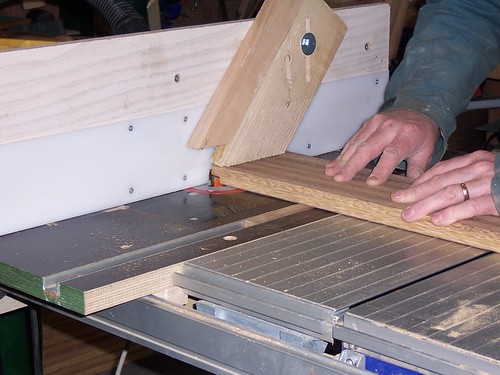
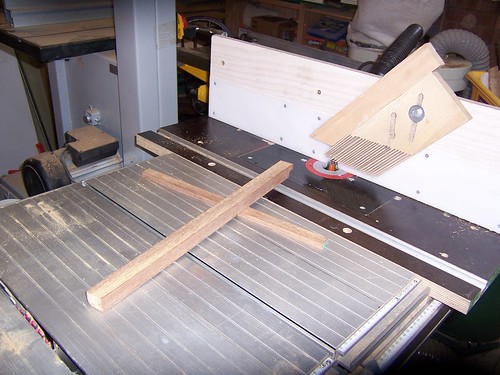
Routing the groove in the middle rail and end rails of the top to take the slats. the router cutter was set up to take 15mm (in multiple passes) and so that the lower edge of the groove was exactly 22mm from the top face (i.e the slat thickness). My router (trusty old ELU96e) is in a home made top that fits on the end of my Electra Beckum saw. A featherboard holds the wood tight to the fence.

3483110314_971c9ea598.jpg


the result of many hours jointing and grooving (top frame joints)...

3482293791_6e40282bb6.jpg


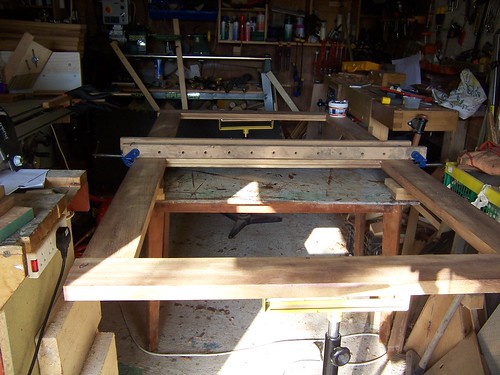
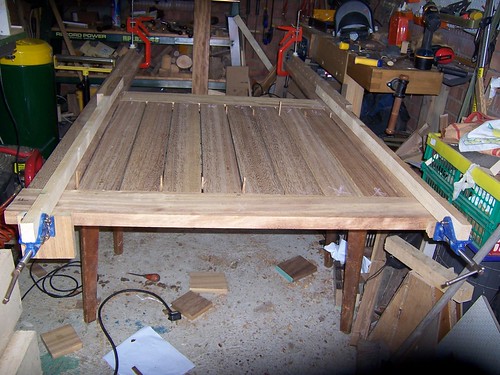
First glue up - only the middle rail has glue. The end rails are just to keep the sides stable and allow the whole to be supported (roller stands). Already the record clamps are dusted off and put to use as the bessey ones were too short (In case my wife reads this - you never have enough clamps!)

3483110736_9c6388e7d3.jpg


Next the slats. these bare faced tenons were done on the router table rather than chop saw (because i could man handle these as less than a meter long). Again an offcut was used to fine tune the setting. Only one end of each was done first, they were then dry fitted and measured off the side rail to get the exact length to stop the other end tenon.

3482294191_d5ef2fddcd.jpg


I'd lost my mitre guide that fitted the slot, so some of the iroko offcuts were used to make a simple but accurate sled..

3482294081_42b4d0e815.jpg


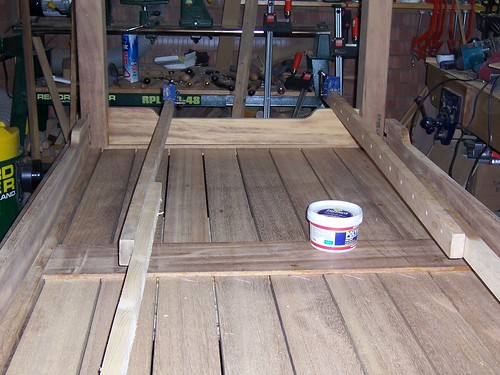
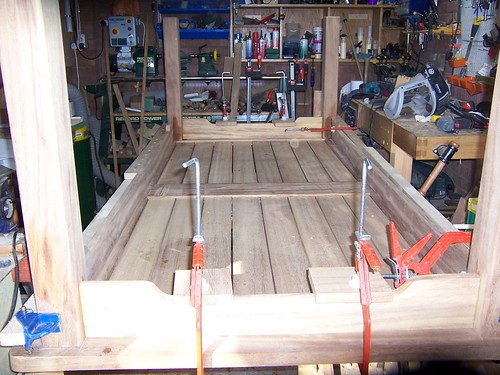
The first set of slats glued to the end frame (yet longer record clamps needed as i decided to clamp end to end). For this first end i made up spacers of 5mm but they were a pain, to keep in place so for the second half I glued the spacers to the slats (so that they were hidden in the frame grooves)

3482294597_b70987b9c9.jpg


Getting there.... leg ends to skirt glued, just setting up the clamps to join the legs to the side skirt. The table top is upside down to act as a worktop and you can see the difference in thickness of the slats v the frame.

3482294863_1966deb813.jpg


And the last big glue up.

3482295011_8e7c7d4192.jpg


No photo for this, but I then used the offcuts from the skirt cutouts, drilled and countersunk holes and fitted to the inside of the underskirt. This was then screwed through into the top once in situ

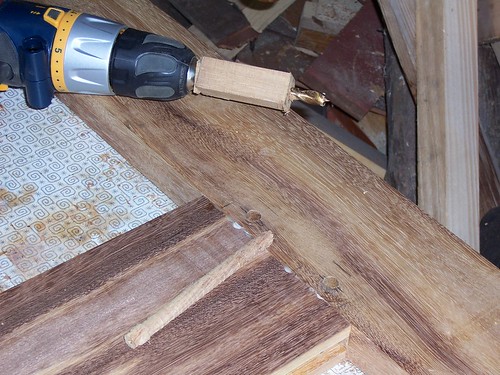
Simple depth stop on the 10mm drill bit for the dowel holes, and a length of the home made dowel in shot

3482294417_db76d22c21.jpg


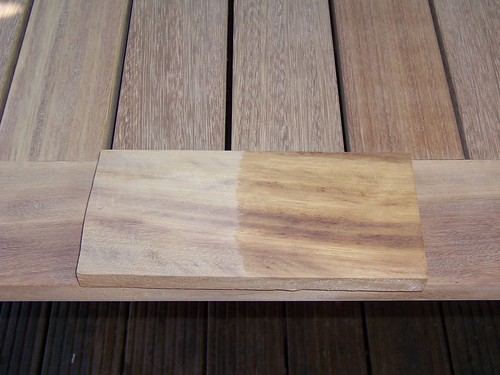
Final pic - this shows the test piece with no finish and two coats of teak wonder (£20.83 0.9l tin delivered from Bosuns locker falmouth). I did the red wine test on this and actually after20secs a paper towel soaked it all up from even the unfinished iroko, but i want the finish to stop the silver colour. Iroko is already durable.

3483108570_fdfa118fa1.jpg


Phew - thats the pics and text loaded. Hope you like them.
 
Back
Top