Wooden cross design would love some assistance please???

UKworkshop.co.uk

Help Support UKworkshop.co.uk:

This site may earn a commission from merchant affiliate links, including eBay, Amazon, and others.

gasman

Established Member
Joined
14 Nov 2006
Messages
1,011
Reaction score
337
Location
Near Oxford
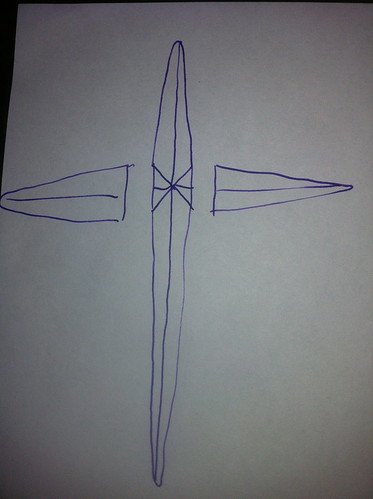
I have been commissioned to make a wooden cross. It will be about 1400 x 600, in oak and will be on an external wall
The design brief is a bit like this rough diagram
7205287596_1a8d16e954.jpg

Ideally the back looks exactly like the front
At the widest each limb needs to be about 125mm wide and about 62.5 thick. Each limb is bevelled almost to an edge. So in cross section each limb is a diamond shape - tapering down to about 30mm at the very 'tip' of each limb
It would be reasonably straightforward to make 4 separate limbs which fitted together at a complex 'x' joint in the centre but as it is going to be exposed to the elements it would surely move and the joints would open up.
So in an ideal world it would be just 2 pieces which fitted together but I cannot see how this is possible with the bevelled edges as they are.
The best I can think of is to do the long limb as one piece and then have the minor limbs attached to each side - and I could add a rebated joint at the back to increase the strength so I could get some fixation in there too - maybe a dowel or two
Anyone got any better ideas - it is doing my head in a bit. I have started mocking up a 1/3 scale version but it is still not very clear
Thanks a lot
Mark
 
Hi Mark
That is quite complex geometry. Not so bad if the back is flat, but definitely a challenge to have the back bevelled like the front.

If you want a straightforward halving joint, then consider re-designing it so that the bevels do not meet in the centre, but leave a flat. It will still be a challenge, but will at least be structurally more sound.
HTH
Steve
 
I wonder if a flat cruciform spine would be the way to go for strength and then apply the front and back bevels to completely hide the spine?
Just a thought - I've never made anything like this before so it might be rubbish!
Bob
 
was going to post exactly the same as above. leave 60+mm in the middle full thickness on the upright, and just mitre the arms in with a flat.

to secure them could have a 12mm threaded rod through the centre flat section^^ into the arms end grain with a reveal hole on the back side on each arm and nuts to pull it together, obviously glue too.

make the center piece square, cut the face on diamond shape, them mark centres of the bevels and plane down to the lines, cut the joints fot the arms and also square arms into the upright, then transfer the lines over to the arms, and plane down in a similar fashion not going below the lines on the joint. i think time and lots of checking will be required.
 
9fingers":2wt9hj8q said:
I wonder if a flat cruciform spine would be the way to go for strength and then apply the front and back bevels to completely hide the spine?
Just a thought - I've never made anything like this before so it might be rubbish!
Bob

I would agree with Bob here.
Make a spine and add the pieces to it front and back. Make spine with halving joint and glue and then add bevels and glue. good finish on it and bobs your uncle. hehehehe
Thats the way I would do it any way.

Teckel
 
It's a simple job for a scroller who can make accurate relief cuts.
 
Thanks for all your replies and suggestions I will think about them
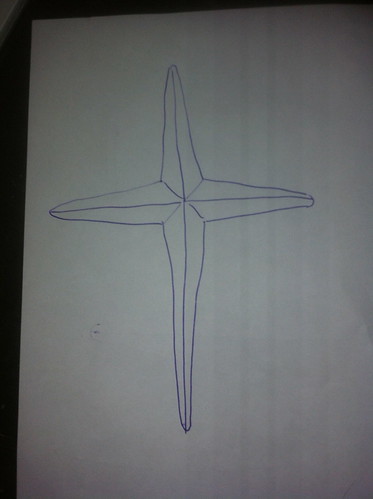
The only other way I thought I could do it is like this - making it in 3 pieces with the centre long limb with the entire complicated geometrical shape cut into it and then the side pieces attached to the sides.
7207617716_f28b5a19f6.jpg

I could domino / M&T these and then reinforce the back with brackets of some sort
Thanks again will ponder some more
Mark
 
I'd do it the "mason's mitre" way i.e. make up a simple cross with 125x 62.5mm rectangular sections half housed at the crossing, without gluing it up yet, then draw in the lines for the bevels and cut them with the 2 pieces separated.
Perhaps some fine finishing after they've been glued - paring chisel, scraper etc
 
Can't visualise the geometry well enough to be confident, but could you make the horizontal piece and spine to shape, but leave the crossing sections in the square? Make a halving joint in this, glue up, then finish the bevels by chiseling?
Or has someone already suggested this and I've misunderstood?
 
dickm":34jvd2j5 said:
Can't visualise the geometry well enough to be confident, but could you make the horizontal piece and spine to shape, but leave the crossing sections in the square? Make a halving joint in this, glue up, then finish the bevels by chiseling?
Or has someone already suggested this and I've misunderstood?
That's more or less what I'm suggesting above. You make a straight forwards rectangular cross with a half housing joint. Then carve that into the desired shape. The joint lines would not coincide with the junctions of the bevels, like a mason's miter.
Carving could be part machine straight cuts on a band saw plus a bit of hand paring for the internal corners etc.
Here's one in stone . Not to be confused with the common angled work-top joint although that is the same in principle, but not obviously:
0198606788.masons-mitre.1.jpg


PS just noticed gasman had already posted up masons mitre design, see his sketch above!
 
gasman":n9s9srwn said:
I have been commissioned to make a wooden cross. It will be about 1400 x 600, in oak and will be on an external wall
The design brief is a bit like this rough diagram
7205287596_1a8d16e954.jpg

You got a contract from NATO?

nato_symbol.jpg


BugBear
 
Ha ha that's great how did you spot that?
Bet whoever made that charged more than I'g going to get for it (it's for my daughter's school chapel)
Thanks Jacob I think we are on similar lines. At the moment I am going to make the long central piece, with the whole of the central joint carved in it. Then onto the side I am going to attach 2 side pieces and then trim them to fit carefully. I am also thinking about a 1 inch dowel about 16 inches long in the same wood drilled right through the middle piece and going about 6 inches into each side piece which should rally help to stop the joints opening up in the weather
Thanks again
Mark
 
I have to be honest and say I have concerns about your joinery. I have made outdoor stuff before and had mixed results. I've used d4 adhesive and had it fail, but also had it withstand several winters. I've had best results with West System epoxy resin.

I would do it as a halving joint, but if you are going to have a spine with arms, do the joinery (your hole drilling or whatever you are going to do) before you do any shaping, it will be easier to do it accurately.
 
I don't know if it is important that the result looks like natural wood but I'd be tempted to think about man made boards for stability and saturation it in epoxy or maybe even wrap it in glass fibre & resin for a long lasting job.

Bob
 
Gasman.
About 10 years ago I made a garden bench from oak for a women not to far from where I live. I did it very cheap as the women was a friend of my mother.
I made it with mortice and tenon joinery. I forgot to tighten the lock screw on the tennoner and the tenons ended up bout 1/8 to small. With money being tight then..I mixed up ISOPON (car body filler) and put into mortices. Put the bench together and clamped up. Left it for half hour and took off clamps. The bench is still sitting under her window and anytime I pass I think of those tenons. :shock:
You should put the cross together the best way you think and you will be surprised how long it will last.
You are thinking of Mortice and tenon which is a great joint.
 
Looking at what you are trying to achieve, I'd say a mitred bridle joint would do the job - it would give true mitre intersections and have decent glue area as well.
You will need a flat edge for the bridle to have some thickness, but you should be able to still taper it down to the profile you need but you'll need to be careful at the bridle intersections as they will become almost feathered unless you go for a more defined flat.
It's a tricky one to describe properly, and trickier to draw!

Andy
 

Latest posts

Back
Top