What a C*^k UP - Help PLS

UKworkshop.co.uk

Help Support UKworkshop.co.uk:

This site may earn a commission from merchant affiliate links, including eBay, Amazon, and others.

AllTrades

Member
Joined
10 Dec 2007
Messages
6
Reaction score
0
Location
West Yorkshire
Hi Guys (& Gals, sorry, that was meant in a none-gender way!)
New here and to the general world of 'hands on' semi-serious woodworking.
After a little miss-hap with a hot pan and the laminated worktop, I decided to put a chopping board into it!
The perfect excuse to add a router to my tool collection. Went to B&Q and settled on a MacAllister 1500W plunge Router, middle of the road I thought for £80. Then after being bamboozled with the myriad of bits, I settled on a set from Trend with a decent sized 1/2" straight bit Incl.
Got a granite 400x300 board from argos, thought simple mark out, set the depth and off I go - 1 hr tops Sorted!!!

Ok stop smirking :oops:
Thankfully I had a spare section of worktop and against my usual judgement decided to practice first. WOW, these things can really move. Decided I need a rail of some kind - impossible to do this freehand, especially as I need to make a couple of passes (although only taking out 14mm, found it dragged a bit at full depth straight off!!).

Now to the real problem....how to fix a guide rail to the worktop without damaging what was going to remain!
Started out by making rail with stop ends that could be screwed into the inside of the area to be routed, turning it around to do each of the four sides and then stepping back for each pass.

Of course I soon found I ran out of waste board to fix to and suffered due to tilting with no support to the back either!! Nearest supports I could find to hand was a 15mm ply rip that kind of did the job once I readjusted the depth setting.

I was convinced I would find a solution to this on line - but nothing obvious on the search engines - lots of clamping systems, jigs and templates but all PRE-installation :?:

I called a supplier in Somerset who only dealt with Trend, whilst he couldn't offer a solution also thought it must be a common problem!
Surely, somebody somewhere must have a paralell guide rail system with a cross rail for the router to run up and down AND fix by suction??

After some serious searching I found that FRESTOOL do have a system, but its totally proprietary (Router, Rails, Clips, Adapters & Rails) and too expensive for me!

Anybody offer some advice before I end up having to replace my entire worktops and tiles!!

Oh and a second bit of help pls....The router bit, a Trend 1/2" 19mm dia x 25mm cut burnt out about 3/4 of the way through ripping the centre out. I had a fast speed setting, 5/6 about 22000 I think - is this right or should it be slower for this size? Did 2 passes, but also found that the depth gauge was moving as I was cutting. - Only the gauge, as it was locked off, but upon releasing it for the second pass made it out!!

Sorry to ramble on, promise to keep reply's shorter.
Any advice, tips n tricks or good book recommendations greatly appreciated.
Thanks in advance
Yan :oops:
 
Hi Yan,

Lots of questions there, but keep it simple :) First point is take small cuts (as in depth of cut) - say 3mm at a time. Don't try to cut the full depth in one go.

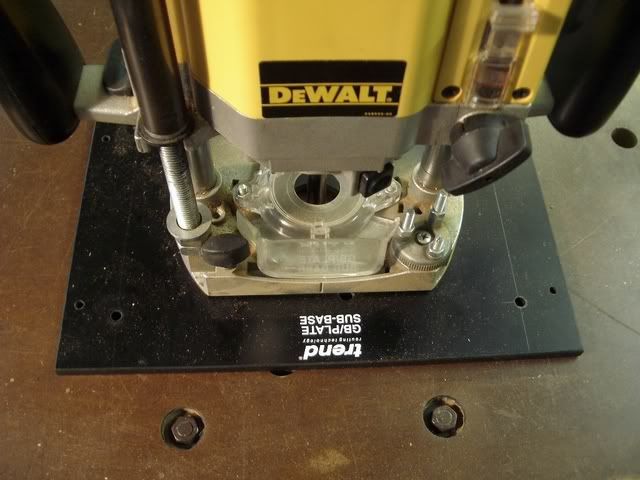
You can increase the stability of a router considerably by adding a square sub-base. Here is the Trend one

Router2.jpg


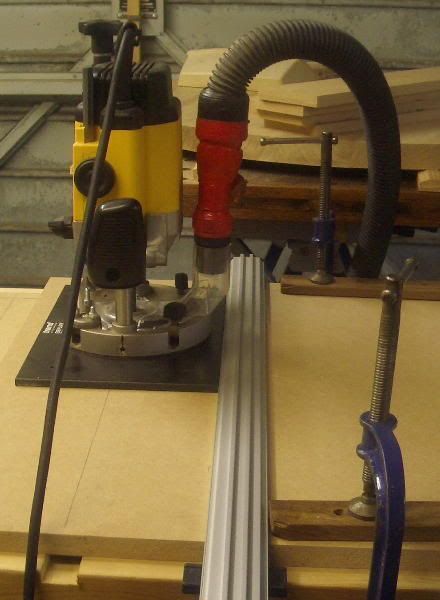
But you can make one from MDF if you don't want to buy one

Router9.jpg


This makes it very easy to run the router along a straight edge and get a nice straight cut

Router8.jpg


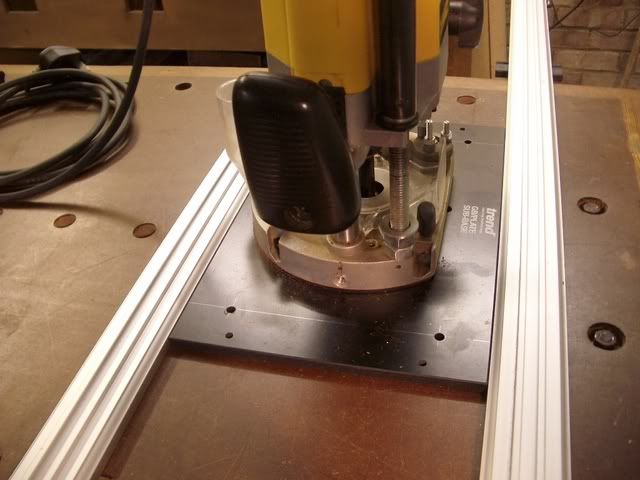
You can even use two, three or four straight edges to determine where the router will cut

Router3.jpg


Those straight edges are Trend Guide Clamps but a piece of MDF clamped to the work with G cramps would do the same job. If you can't use cramps, heavy-duty double-sided tape would work if stuck down really well.

Hope some of these ideas help - no doubt others will be along with some more tips :wink:

In the meantime see here for some general tips http://www.wealdentool.com/acatalog/rou ... _tips.html

Cheers :wink:

Paul
 
Did your router come with a central guide bush accessory? usually around 30mm.

If it did then preparing a scrap template in ply or MDF with the correct size/shape hole (insert plus bush diameter) positioned as required will allow the cutting of the hole to correct size with minimum risk of overshooting size.

To avoid clamps getting in way of router stick template down with double sided tape.
 
Hi Paul,
Thanks for the speedy post.
Will definately invest in a square subbase - can see it would be ideal in lots of situations.
These routers seem such a versatile tool, probably end up with dozens of add-ons! :D

Cheers
Yan
 
Hi Chas,

Yes, there is a guide bush - still nice n shiny!
I get what you're suggesting - brilliant & simple - the light just turned on! :idea:
Oh so many things to learn about this!!
Cheers fella
 
Hi Yan

You might find the latest podcast here useful. Towards the end, the presenter shows you how to make a simple guide rail for a router. Since such a guide rail will cost next to nothing, it's effectively disposable. This means you should be able to make one with an MDF base, fasten it to your work surface using double-sided sticky tape and, when you've finished, just rip it off. If anything gets damaged, it will be the underside of the jig, not the worktop. You should then be able to clean the tape off the worktop with a blunt piece of wood and some mineral spirits.

Never tried it myself but the theory's sound :) .

Gill
 
Thanks Gill
Truly impressed with the speed of posts recieved.
I'll definatley contribute in whatever way possible. Although I'm sure I'll be taking before I can give anything for along time yet!

Will take a couple of pics to finalise this post when done.
Thanks to all!
Yan
 
Double sided tape to the rescue!
Working from the top use DS tape to hold 4 pieces of timber in a square then route using small cuts, don't be greedy!
I've just used this tecnique to let a home made router plate into a work top in my new workshop.
Jigs don't come cheaper than this!
 
Sounds like good advice from those that probably know more than I do :)

Only points I'd add is that 400 x 300 (mm?) is quite a large area to cut out and you might do better to scrap cut out the middle with a jigsaw to say 360 x 260 then rout a rebate round the edge to full size to receive your insert. A small diameter cutter will leave less to be hand cut in the corners if you need square corners. And that you will need to waterproof the cut edges when finished or the surface will swell if moisture gets in. I'll let those that know what they are talking about advise you further!
 
Thanks Digit - any recommendations on tape or are they all as good as each other?

Thanks RobertMP - how do you stop the blade of the jigsaw bouncing off the base? I did consider cutting right thru the worktop, blanking & filling from below but not as neat a solution.
I have a decent Makita jigsaw, 3 gears, variable speed and advance but don't think it has a depth stop on the thrust. - Could however look to use my rip saw set to depth, just wont get that close with the circular blade and the rear guide!

Cheers
 
any recommendations on tape or are they all as good as each other?
I've used tape from all sorts of sources without any problems. My present batch came from a pound shop.
Make your wooden guides as wide as poss and use 2 in wide tape and you're more likely to have trouble removing your guides than have them come adrift.
In cold weather I have found it helpful to bring the tape indoors to warm up as it sticks better then.
Hope this helps.
 
AllTrades":3lqrurpi said:
any recommendations on tape or are they all as good as each other?

I bought some heavy duty double-sided tape from B&Q recently that was very good. It was a bit thicker than some. When removing the stuck down jigs, I've found that the easiest way to get them off is to twist them sideways to break the seal.

Cheers :wink:

Paul
 
Paul Chapman":29bq34qa said:
AllTrades":29bq34qa said:
any recommendations on tape or are they all as good as each other?

I bought some heavy duty double-sided tape from B&Q recently that was very good. It was a bit thicker than some. When removing the stuck down jigs, I've found that the easiest way to get them off is to twist them sideways to break the seal.

Cheers :wink:

Paul

DS carpet tape is one of these tapes that's really sticky, remove any residue once it's removed with a bit of meths or similar - Rob
 
AllTrades":1isgcisb said:
Thanks Digit - any recommendations on tape or are they all as good as each other?

Thanks RobertMP - how do you stop the blade of the jigsaw bouncing off the base? I did consider cutting right thru the worktop, blanking & filling from below but not as neat a solution.
I have a decent Makita jigsaw, 3 gears, variable speed and advance but don't think it has a depth stop on the thrust. - Could however look to use my rip saw set to depth, just wont get that close with the circular blade and the rear guide!

Cheers

By the nature of the way it cuts a jig saw would have to make a through cut. A plunge cut with a circular saw will cut part way through but it will not leave clean edges in the cut. Because it has a circular blade the cut slope up to the surface at the end of the cut. Your best bet, as already said, is to make a template and rout a 1/2" channel to match the dimensions and thickness of your granite block. The centre section is now waste so you drill through it so that you can jigsaw the waste out, leaving the channel which becones a rebate to accept your block. The biggest problem with this approach is to get the profile of the corners to match the granite block. I've used this technique to put router table inserts into table tops and it is easy to round the corners of a phenolic plastic plate with a file but granite will be tougher.
Kitchen worktop is very hard on tools and you just have to accept that router bits are consumables when you are doing this sort of job. If you see yourself doing more of this sort of thing, replacable tip cutters are a good investment. For exampleVersofix range from Wealdon. It took a while for me to be convinced of their value but a single worktop joint will wear a cutter out so a replacable blade will work out at 25 - 30% of the cost of a complete cutter.
 
I set a piece of frosted glass into a worktop in my wife's studio for a light table. Easily done with a jig.

I made up a frame from mdf with its interior 'hole' the size of the hole I wanted to cut plus the width of the router base (from edge of cutter to edge of base). The pieces of mdf were wide enough that together they came to the front and back edges of the worktop and could be held firmly with clamps. Two passes with a decent bit and the hole was cut. Another pass with a rabbeting bit and the inset for the glass was cut. Only snag, if you can call it that, was I had to have the glass with rounded corners as cutting the laminate top square was likely to chip the finish - easier to sand the glass. It looks great.
 
Some cheap double sided tape is paper based - quite sticky but thin and doesn't work well unless there's very good contact- also V difficult to get off. Best carpet tape has a fabric base, so is thicker and a bit gap filling, and often can be rolled off with the thumb without white spirits etc.
 
Back
Top