Wedged through M&Ts

UKworkshop.co.uk

Help Support UKworkshop.co.uk:

This site may earn a commission from merchant affiliate links, including eBay, Amazon, and others.

dunbarhamlin

Established Member
Joined
8 Jan 2007
Messages
936
Reaction score
2
Location
West Cornforth
Watched Mr Cosman's M&T DVD last night. Got me thinking. Any rules of thumb for when you'd bore through the bottom end of the kerf-for-the-wedge as a split inhibitor?

(Got a little something from Mr Iles too - can report that lapping D2 not a problem)

Cheers
Steve
 
dunbarhamlin":1e8291im said:
Any rules of thumb for when you'd bore through the bottom end of the kerf-for-the-wedge as a split inhibitor? Steve

Always. Slainte.
 
Steve from what i've read, you make the hole a mm or two larger than the kerf to accomodate the width of the bottom of the wedge. I'll be doing this very joint soon - hoping not to pipper it up :)
 
Thanks chaps
That's what I thought, though in the vid no hole is used. The kerfs are instead cut on the slant finishing just shy of the edge. Different sort of a joint I suppose
Cheers.
 
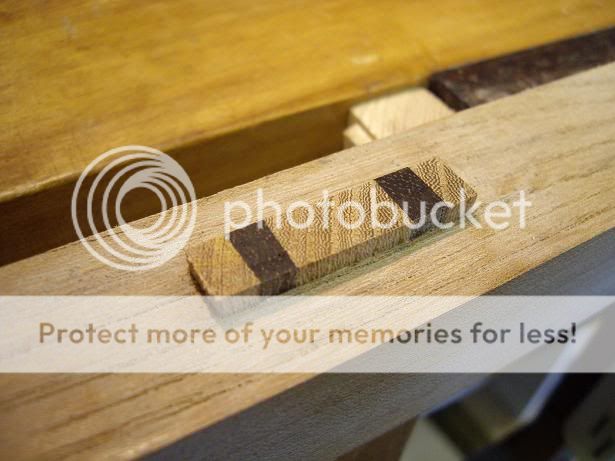
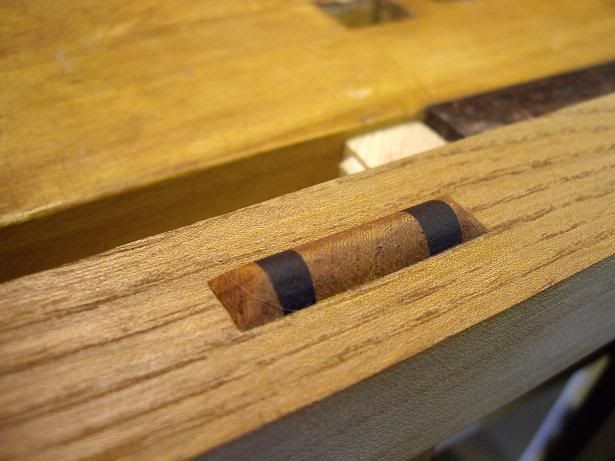
I've recently cut a whole load of these and I think that you need to be quite careful how you produce them. The saw cut for the wedge I make parallel to the side of the tenon and ending about 6mm from the shoulder, no hole at the bottom to prevent a split (tho' this is a good idea). The mortice is made about 3mm wider that the tenon so that it's splayed into it by the wedge. However the critical thing is in cutting the wedge as ideally it needs to come to the bottom of the saw cut and at the same time, push the tenon to the outside of the mortice but unfortunatly it's not something that you can do a trial run on as once the wedge(s) have been tapped home it's almost impossible to get the joint apart again. It would be a disaster if the wedge reached the bottom of the saw cut but didn't push out the tenon to the edge of the mortice, ie the wedge has been cut too thin:

22sd1g2we1.jpg


These particular ones were left higher than the surrounding leg so that they could be shaped:

22s1g1tt.jpg


What I would recommend is a trial joint to get the proportions of the wedge and mortice exactly right before the real thing is attempted, beware tho', it's quite tricky to get it bang on :D - Rob
 
Hi Rob,

Thanks for the detail and the pics! I like the shaping, very attractive joint. How do you work out the size of the wedge? And finally - do you slope the mortice to match the angle of the wedged tenon, or do you keep the sides parallel?
 
Wow - thanks Rob.
Good job I'm in gung ho mode - the sight of work like that could put me off even trying to replicate in a more realistic frame of mind :)
Cheers
Steve
 
BB - saw cuts are kept parallel tho' some people make the saw cut angled....I don't think it makes a lot of difference really. To get the right proportions for the wedge needs a little bit of guesstimation and trial and error. What I did on my practice joints was to make the wedges about 100mm long so that when they're tapped home you at least have got something to hold onto to try and wiggle the damn things out again but it ain't easy. You can also (again on the practice joint) bang in the wedges dry without putting it into the mortice. It's then easier to see if the wedge(s) comes to the bottom of the saw cut and at the same time to measure the deflection of the tenon side to see if it's splayed enough. As an example, say tenon width is 40mm, mortice width is 44mm (2mm splay each side) then when the wedges have been tapped home the width across the top of the tenon ought to be a fraction more than 44mm (to ensure a tight fit). Hope this makes some sense :oops: as this is just the way I worked out how to do it so that the joint looked half decent as the aim I think is also to get both the wedges the same thickness at the top - Rob
 
woodbloke":zp9vt4jg said:
BB - saw cuts are kept parallel tho' some people make the saw cut angled....I don't think it makes a lot of difference really.
If you angle them you'll end up with short grain and that weakens the tenon

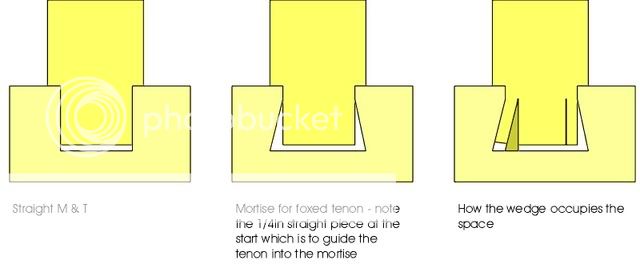
One thing people sometimes forget is to leave 1/4in or so at the shoulder end of the mortise as a straight piece to guide the tenon into the mortise

Scrit
 
Scrit,

Alan Peters used angled sawcuts if the timber was very hard and brittle.

I assume that he thought , that if the glue joints were good there would not be an appreciable loss of strength.

Would like to confirm Rob's observations, that wedged tennons need careful working out and testing.

Many factors to consider;
saw kerf,
tightness of tennon before kerfing,
compressibility of timber,
things swell up with water based glues,
taper on wedges,
accuracy of wedges,
etc, etc.

Don't let me put you off though!

David Charlesworth
 
Hi David

I have to admit that many of the joints I've wedged have been in softwoods and I've just followed the practice I was taught without thinking much about it

One thing about woodworking is that you never stop learning :D

Scrit
 
I'm still a little confused on one issue.

Should the mortice be tapered to accomdodate the new angle of the tenon that is produce by the splaying from the wedges? Or should the mortice stay square?

I've got two books, both showing different ways. Personally, it's seems logical to taper the mortice to accept the splayed tenon and thus achieving a kind of dovetail effect... any thoughts?
 
BB - to clarify. The tenon is of course cut with parallel sides and parallel saw cuts (or sloping) ending about 6mm from the shoulder line. I always cut parallel saw lines 'cos it's easier. The mortice face adjacent to the tenon shoulder is the same width as the tenon, but the top face of the mortice that shows is wider by a couple of mm (or however much you want to splay the mortice, I wouldn't recommend more than 2mm each side) so this needs to be chiseled out after the main mortice has been cut. The mortice as a sectioned view would look like the bottom half of an isosceles triangle with the top cut away. Has the mud cleared and been replaced by sparking waters?.......probably not, it's me not you :lol: - Rob
 
The mortise should be tapered to accommodate the extra material of the taper. Here's a drawing of a foxed tenon which should help explain it:

WedgedMandT.jpg


The tapered wedge is made to fit snugly

OK so these are not through tenons, but the principle is the same.

Scrit
 
BTW the "foxed" tenon is a way of getting a very firmly keyed fixing in a stopped mortice. For a through mortice a foxed tenon is used decoratively, but is likely to be weakened by virtue of the bending outwards of the tenon edges and risk of breaking. Normal edge applied wedges are going to be stonger and easier to perform.

cheers
Jacob
 
Mr_Grimsdale":stmkcth0 said:
BTW the "foxed" tenon is a way of getting a very firmly keyed fixing in a stopped mortice. For a through mortice a foxed tenon is used decoratively...

I thought the term "fox wedging" ONLY applied to stopped mortices, the implication being a hidden/sneaky method.

Surely a through tenon treated this way is simply a "wedged tenon".

BugBear
 
Bugbear wrote:
I thought the term "fox wedging" ONLY applied to stopped mortices, the implication being a hidden/sneaky method
It does. If you miscalculate with fox wedged m/t's they are almost impossible to get apart - Rob
 

Latest posts

Back
Top