trouble with cabinet design

UKworkshop.co.uk

Help Support UKworkshop.co.uk:

This site may earn a commission from merchant affiliate links, including eBay, Amazon, and others.

stef

Established Member
Joined
16 Jan 2007
Messages
383
Reaction score
0
Location
Normandy
I am going to start a new TV bench for my home cinema, and i am currently at the plaaning stage.
the design looks something simple, like this:

THE_TV_MODEL5b.jpg


i am having doubts on the sides though, on the joinery, more specifically.
the sides are like this:
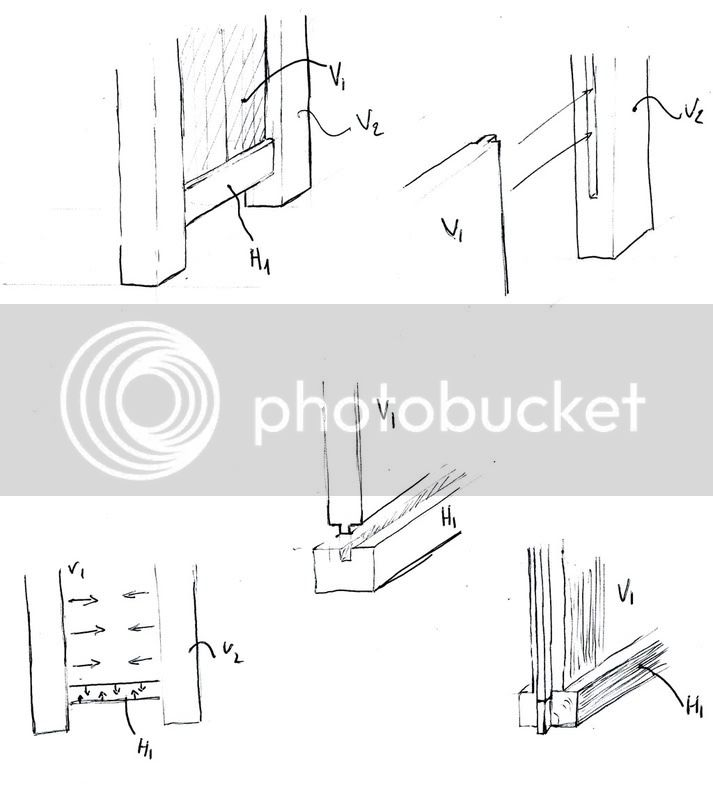
cabinet.jpg


my question relates to the shrinkage of the wood, the vertical panel (v1) will shrink in the horizontal direction, but the horizontal bar at the bottom (H1) will stop this from happening. i am worried that this is a receipe for trouble and that gaps will appear between the side panel (V1) and the corner posts (v2) (which are neatly joined)
comments ?
 
How thick is the panel? I would make the groove the same dimension as the panel and forget the tongue. Doing it this way means the panel can be installed floating, and is free to move. It also means that if it does shrink, there will be no gap.
 
the side panel is 20mm thick.. hardly a panel !
it's all oak.
i thought about your suggestion, but at the price of oak these days, i'd rather do somethign neater. i am worried that sliding a thick panel in the posts will look messy.
 
The panel V1 should be allowed to float in the rail H1 and stile V2 rebates allowing some clearance in total width, although you can put a dab of glue at the top and bottom centre of each stile. This is a perfectly normal construction method, but you should finish V1 before you assemble and make sure that the all the wood has acclimatized in its final resting place before final machining. When you assemble the panel into the stiles and rails put some vaseline on the corners of the panel so that any squeeze out of glue from the joints does not stick to the panel. You do not show dimensions or materials but at a guess I would make the panel V1 6mm narrower than the total width between the bottom of the rebates in the stiles, with the panel centred eg 3mm each side, I stress this is only a guess.
 
newt":1x3qiyiy said:
The panel V1 should be allowed to float in the rail H1 and stile V2 rebates allowing some clearance in total width

thanks.. it's that clearance bit i am worried about. i was hoping to have no visible gap between the panel and V2. if i leave the panel floating, and it shrinks, then a gap will appear (the panel wont fall, because it's held by a tongue, but it will look messy)
 
Stef, like Slim my suggestion would only work if the outside face of the panel did not have a tongue eg you just form the tongue on the inside face. Of course you will see then any movement on the inside and you will have to leave a gap on the shoulder of the tongue.
 
newt":120n8oy7 said:
Stef, like Slim my suggestion would only work if the outside face of the panel did not have a tongue eg you just form the tongue on the inside face. Of course you will see then any movement on the inside and you will have to leave a gap on the shoulder of the tongue.
Thanks !
i dont like that idea much..
i'd prefer is the panel apeared to be resting on V2, rather than being "fed" into V2.
but at least it means my design is flawed..
I guess it would work if the panel and V2 were glued together (tongue and groove), but that means i cannot have H1. and again, that edge will look messy, even if it is on the underside.
back to the drawing board !
 
stef":36hk403m said:
i'd prefer is the panel apeared to be resting on V2, rather than being "fed" into V2.

If done properly, I don't see how you would be able to tell the difference.
 
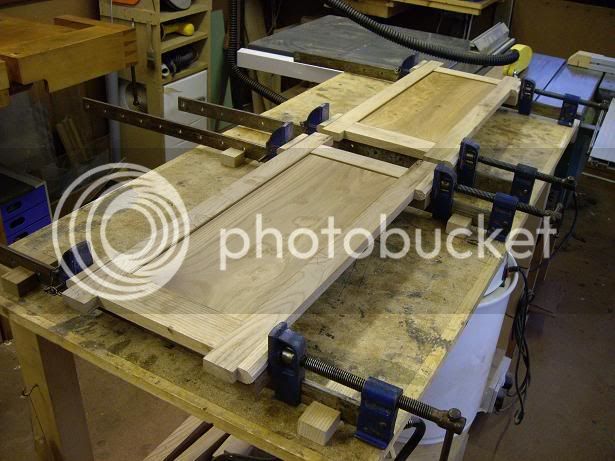
I'm just finishing a TV cabinet which isn't a million miles away from your design. Here is a view of the end panel:
cabinet2.jpg

You're going to have to do something like this or else you'll be in big trouble with the wood movement (and the forces that the oak panel could impart are enormous!). You could put the rebate of the panel on the inside and then the outside will look just the same as the design you were proposing.

As Slim & Newt said, you just leave the panel floating, with either a dab of glue top centre & bottom centre, or a dowel (bamboo skewers work rreally well) or both.

Cheers,
Neil
 
Neil":v4ogy6wu said:
I'm just finishing a TV cabinet which isn't a million miles away from your design. Here is a view of the end panel:
cabinet2.jpg

You're going to have to do something like this or else you'll be in big trouble with the wood movement (and the forces that the oak panel could impart are enormous!). You could put the rebate of the panel on the inside and then the outside will look just the same as the design you were proposing.

As Slim & Newt said, you just leave the panel floating, with either a dab of glue top centre & bottom centre, or a dowel (bamboo skewers work rreally well) or both.

Cheers,
Neil

This is the correct way to make a panel so that the timber is free to move within the frame. Here's another example:

eerty6666.jpg


This is for an elm cabinet that I'm currently making, this is the interior but the exteriors look the same as the TV cabinet. - Rob
 
As i said, back to the drawing back, with new inspiration and new ideas !
that cabinet looks very nice. i like the idea of the "flap" for the AV amp.
i need to work out something for the sat receiver now.. something that lets IR through !
What does it looks like "flap up" ?
 
Stef, You can get a gizmo that will 'remote' the remote!
That is it will allow a tiny hole in the front panel ( or anywhere else ) to sync with the units remote, very useful. RS or Maplins I think.
Cheers
Martin
 
stef":1vrpsfm5 said:
What does it looks like "flap up" ?
Hi Stef, sorry I missed this on Friday. I finished it at the weekend - here it is 'flap-up' showing the two drawers under the main compartment.
TV-unit-finished-s.jpg

IR is supposedly achieved by the video sender (little silver box on cabinet top on right) although I think my toddler has broken it as I can't get any response. I'll probably end up getting a widget like the Maplin one.

Cheers,
Neil
 
Maplin also sell a remarkable wireless remote control widget that takes the form of a subtitute AA size battery. It somehow senses what the IR hanset you put it into is transmitting and converts it into a radio signal that communicates with a receiver inside the cabinet. The receiver then retransmits the command as an IR signal. It don't know how it works, but does.

Paul Hardy
 
Personally Stef, I would construct your design in a totally different way and acheive the same look.

I would start off with a simple rectangular box as the carcass made from oak veneered MDF and lipping the front edges.

I would then make the legs and machine a 19mm x 19mm rebate all the way along one corner of each one. The legs can now be fixed to the carcass, one wrapping around each corner and hiding the exposed MDF. The appearance of the sides being panelled can be completed by applying strips of oak to the top and bottom of each side.

The 'missing bit' on the inside bottom cormer of each leg can be replaced by machining a suitable piece of wood and glueing it in place.

Then add a top.

The purists out there will no doubt be horrified by this approach. However, from the point of view of someone who does this for a living I could make the whole thing this way in a day, around half the time it would take me by making it up with framed panels.

I'd charge the same, though!

And there will be no shrinkage problems.

Cheers
Dan
 
MDF !!
get me the stocks !

Afraid MDF wont do here !
two reasons:
1- i have no source for oak veneered MDF around here, in France.
2- the cabinet will have to hold, at a rough guess, around 80-90Kg of AV equipement (50"plama, AV amp, center speaker and a few bits)
so it has to be strong
3- there are 3 reasons, i start again...
1 -..
2 ..
3 - the cabinet will hold a couple of grants worth of AV equipment, i'd rather the cabinet was also the real stuff !
I am back to the design though.

So far, the sides are sorted (build two grooved frames, and slide a panel inside. i might rebate it as the example shown here..)
the back is also sorted. solid oak cladding, around £25/sqm, slotted on back support rails, at the top and bottom.
Top is also more or less sorted, easy enough.
remains the front design.
flap. no flat ? drawers ? sliding glass doors ?? that's still an open question.
 
It seems that you are trying to achieve an effect that may not be possible in the solid. I don't know what equipment you have, but how about saw cut veneer of a birch ply or mdf substrate to overcome the movement problem. I know some people faint at the mention of veneer, but even St James (Krenov I mean) uses saw cut veneer.
 
It seems that you are right.. trying to do the impossible ! part of the learning process, i guess.
I posted a new version of the design in the "design" section..
feedback welcome !
 

Latest posts

Back
Top