Travel Tool Chest / Workbench

UKworkshop.co.uk

Help Support UKworkshop.co.uk:

This site may earn a commission from merchant affiliate links, including eBay, Amazon, and others.

Dr Al

Established Member
Joined
11 May 2020
Messages
369
Reaction score
916
Location
Dursley, Gloucestershire
For background, the primary reason I did this project was to practice hand tool woodwork without having to worry too much about aesthetics (which are not my forte). Less significantly, I also wanted the ability to take a tool kit on holiday and be able to make small boxes and such-like. Since Carolyn has had M.E., she often needs to spend a reasonable amount of time resting and I'd go spare if I just had to sit around reading all day, so having a little project kit with me helps keep me sane.

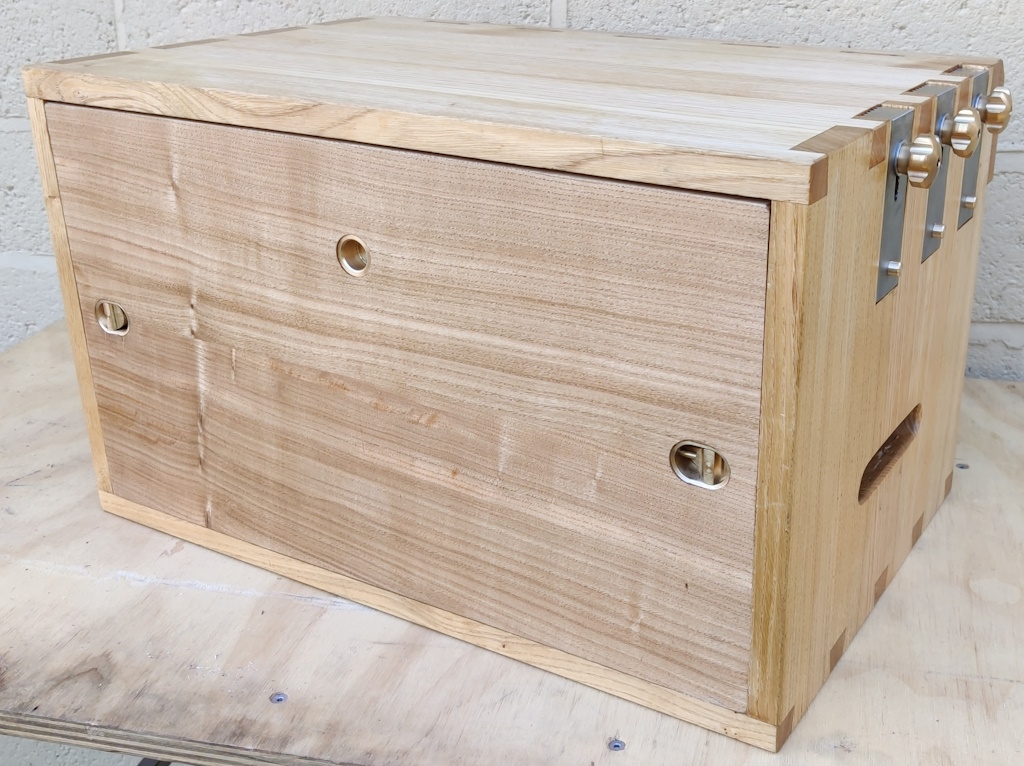
This chest (made out of Sweet Chestnut, American Black Walnut, brass and stainless steel) gives me the ability to carry all the tools I need to make boxes and such-like, while also providing plenty of different work-holding approaches.

All the woodwork (with the exception of a few "resawing" cuts on a bandsaw) was done with hand tools. All of the metal bits were also made by me, but not with hand tools, because hand-tool metalworking is just silly :LOL:

Front view:

with_front_on.jpg


Front open, showing the doe's feet tucked in place:
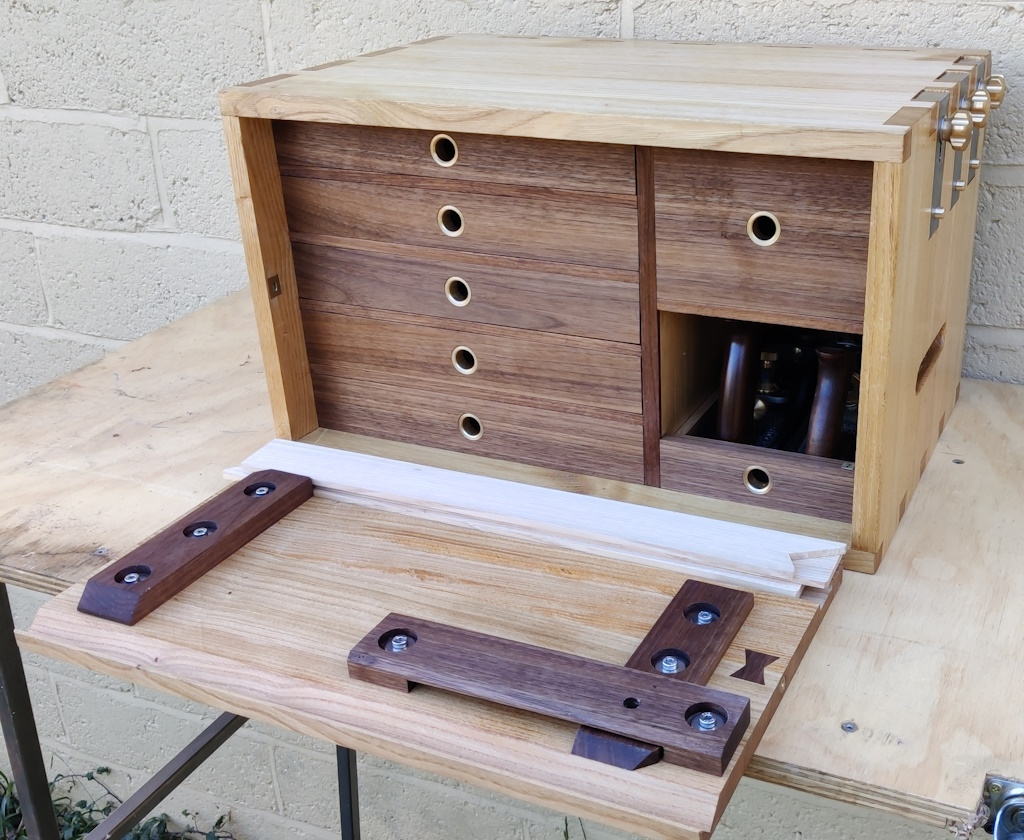
just_opened.jpg


More views of the oiled drawers in place (you can also see the brass number plate in the drawers that are sticking out - the drawers are intended to be removed when the chest is being used as a workbench, so the numbers make it quick and easy to put the drawers back in the right place):
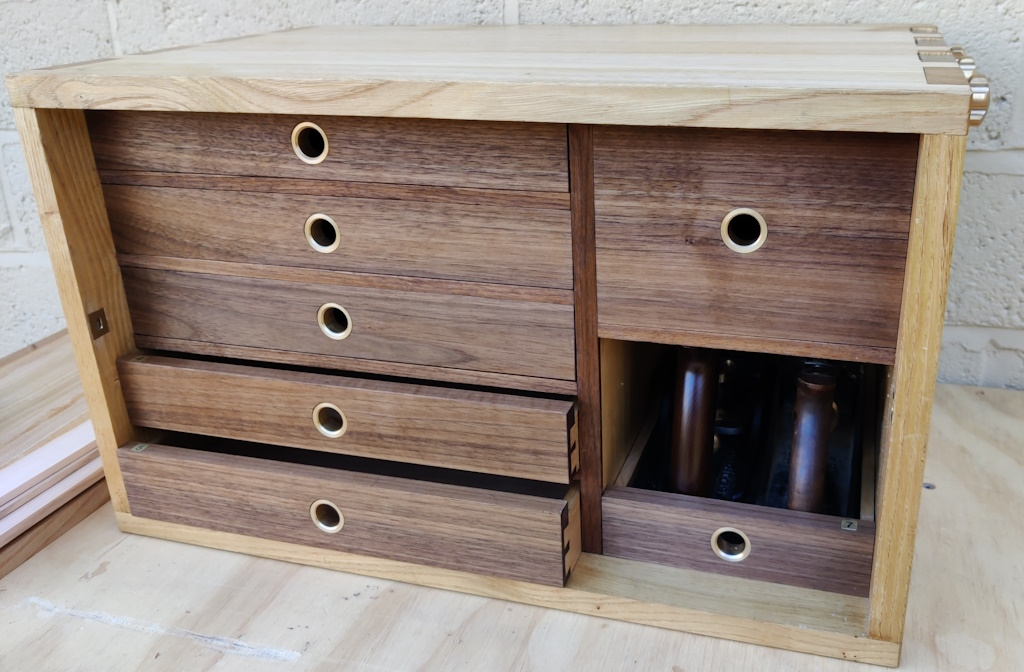
front_with_drawers_slightly_open.jpg


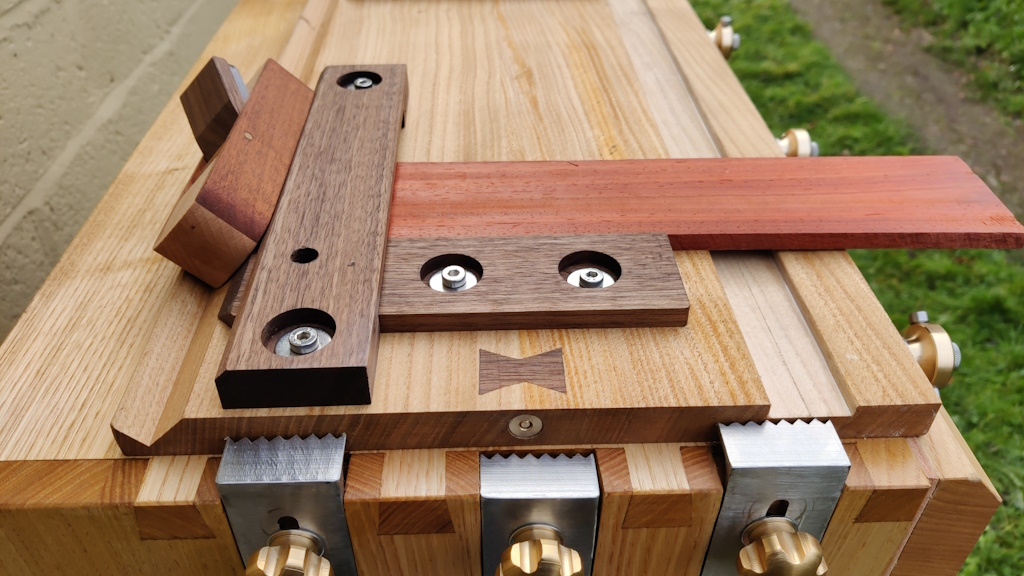
Planing stops; the little brass pins at the bottom are used to push the planing stops up and down after loosening the brass knobs:
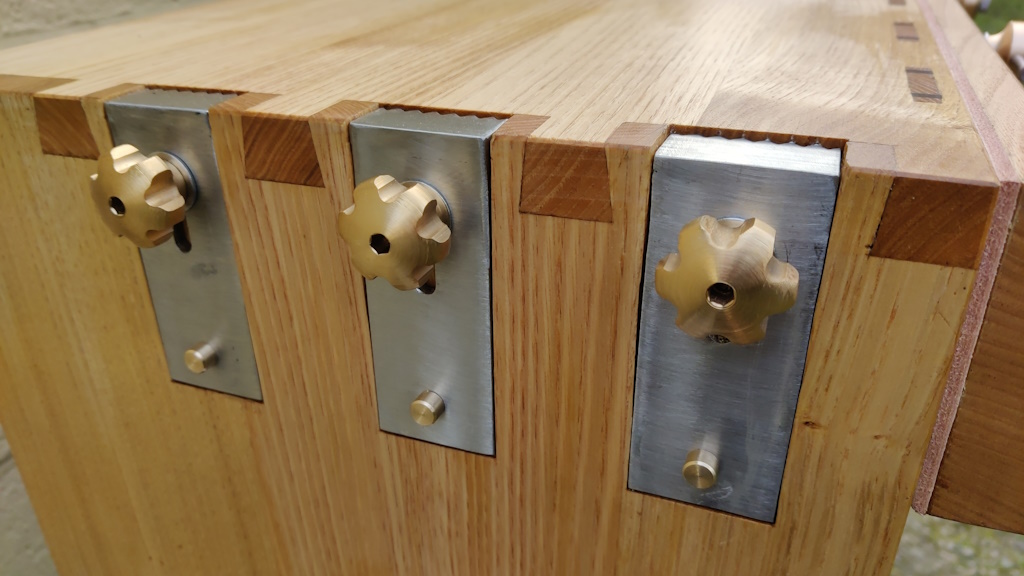
planing_stops_close_up.jpg


The photo above also shows the leather lining on the vice jaw.

Back view:
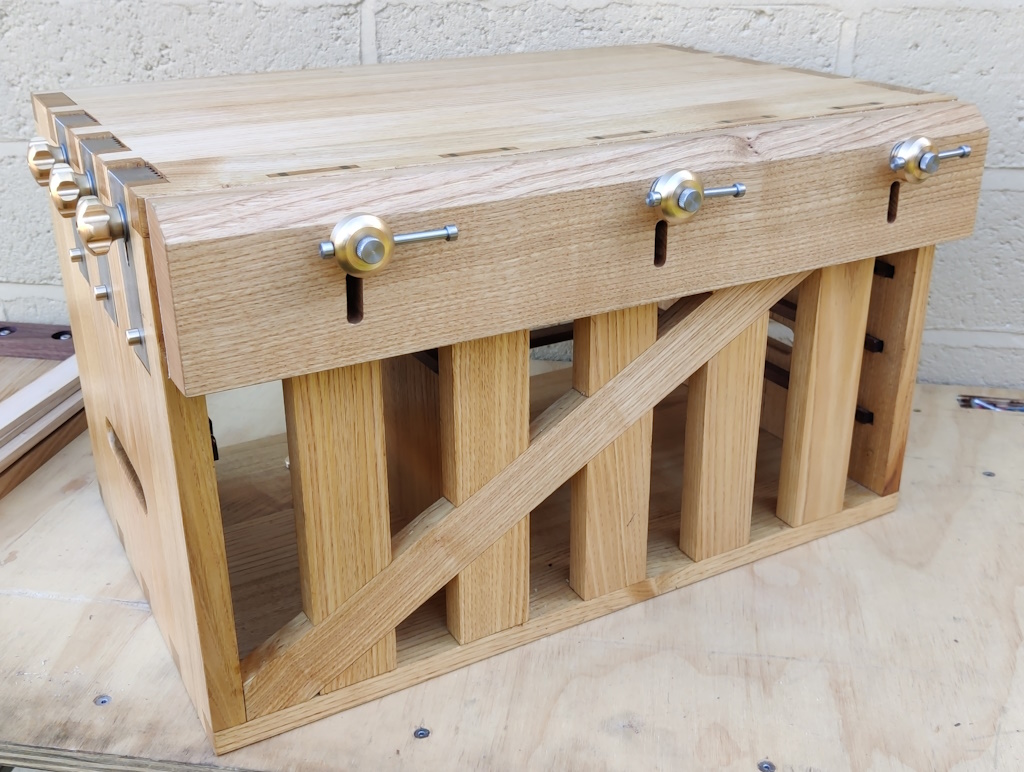
rear_view_showing_vice.jpg


Close-up of a vice screw and a wedged tenon (the knurled stainless steel knob holds the cross-bar in place; the steel screw has a small brass wear pad on the end to stop it damaging the cross-bar):
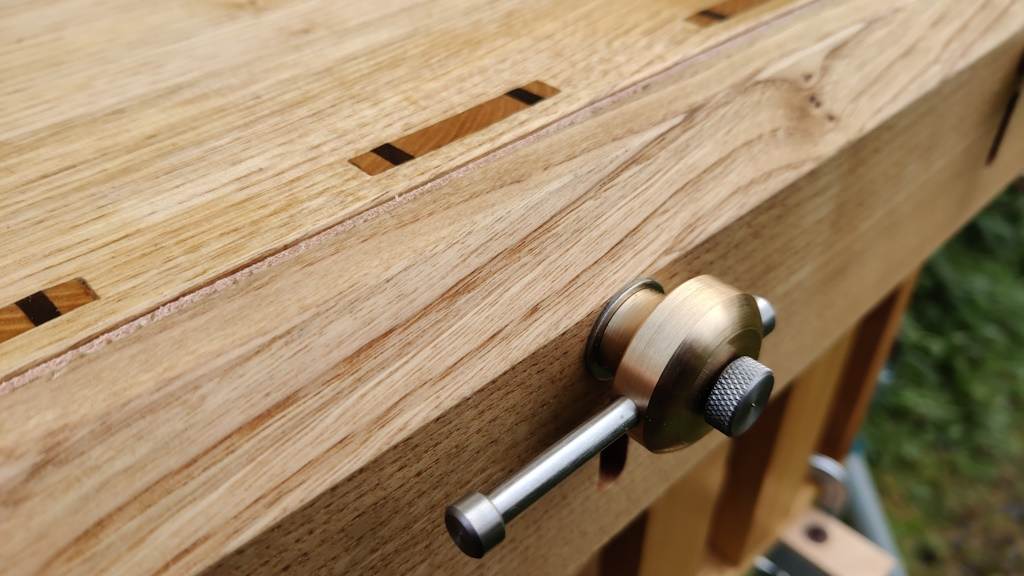
wedged_tenon_and_vice_screw.jpg


View showing the whole of the back with the anti-racking piece (which stops the chest twisting when planing stuff on the top):
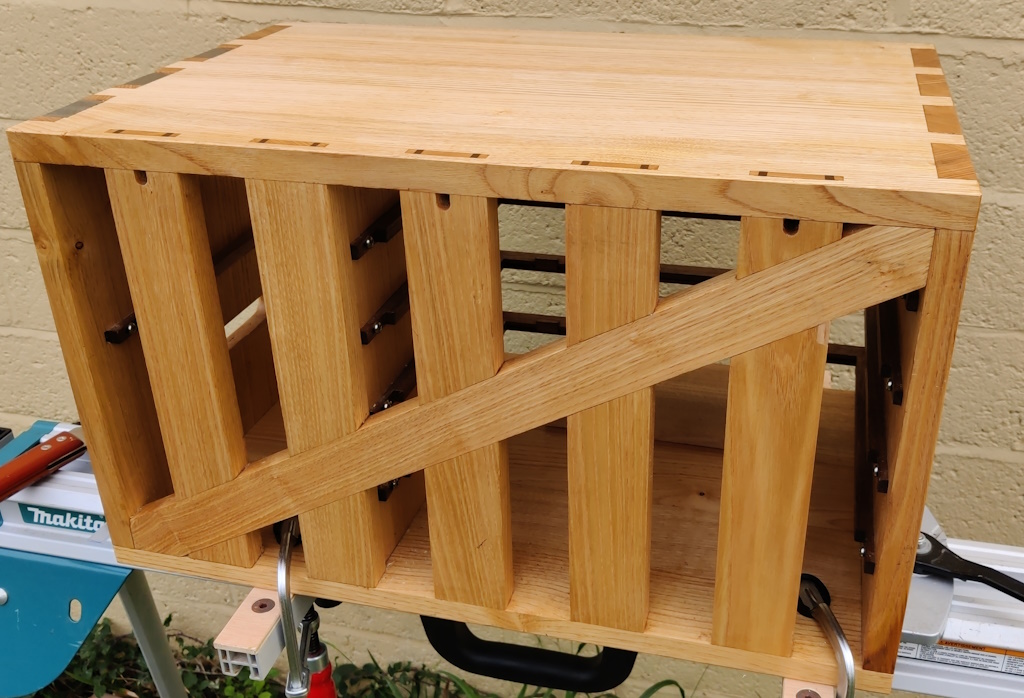
anti_racking.jpg


Work holding:

Holding a piece in the vice for sawing (similar set-up for planing the end/edge):
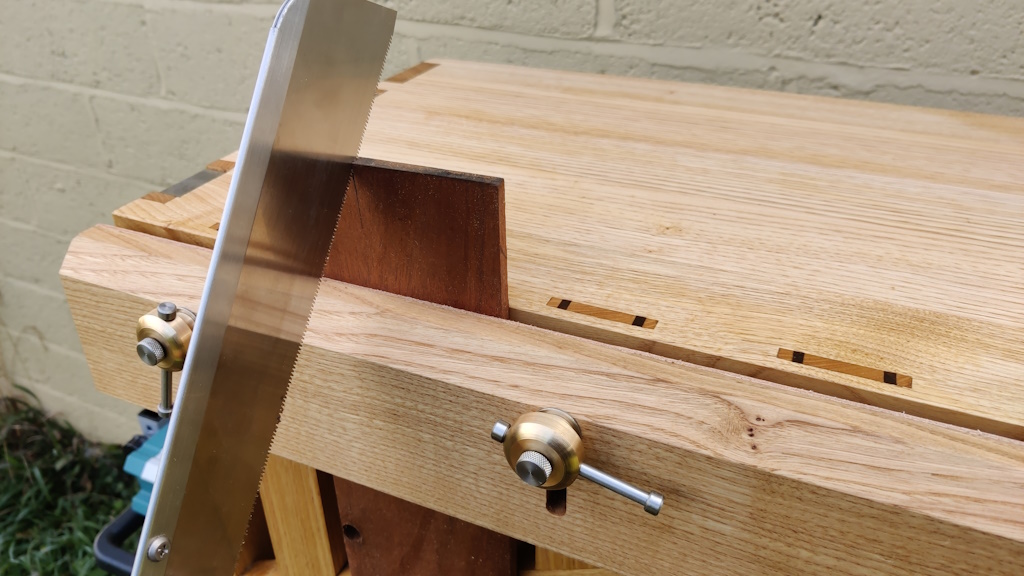
sawing_vertically.jpg


Removing the middle vice screw and holding a wider piece:
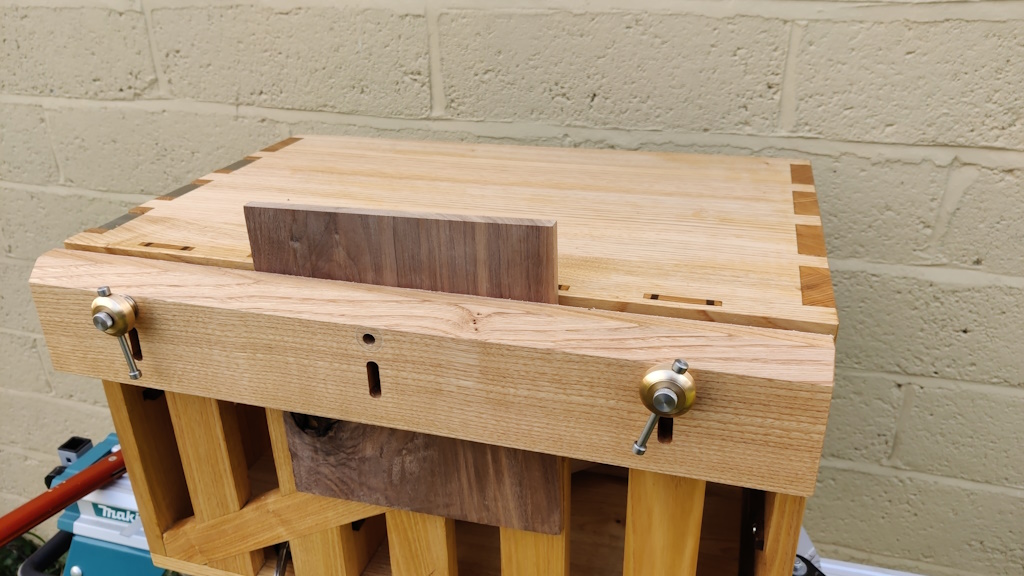
wide_board.jpg


The vice jaw can be completely removed and then really big pieces can be clamped to the back for sawing to length or edge planing:
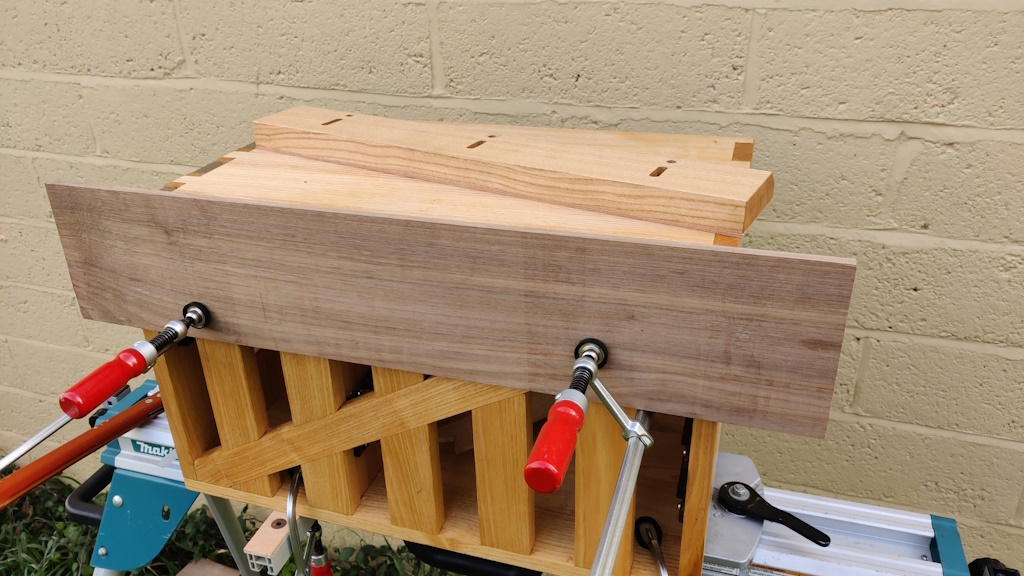
clamping_to_back.jpg


or clamped to the top for sawing or chiselling or whatever:
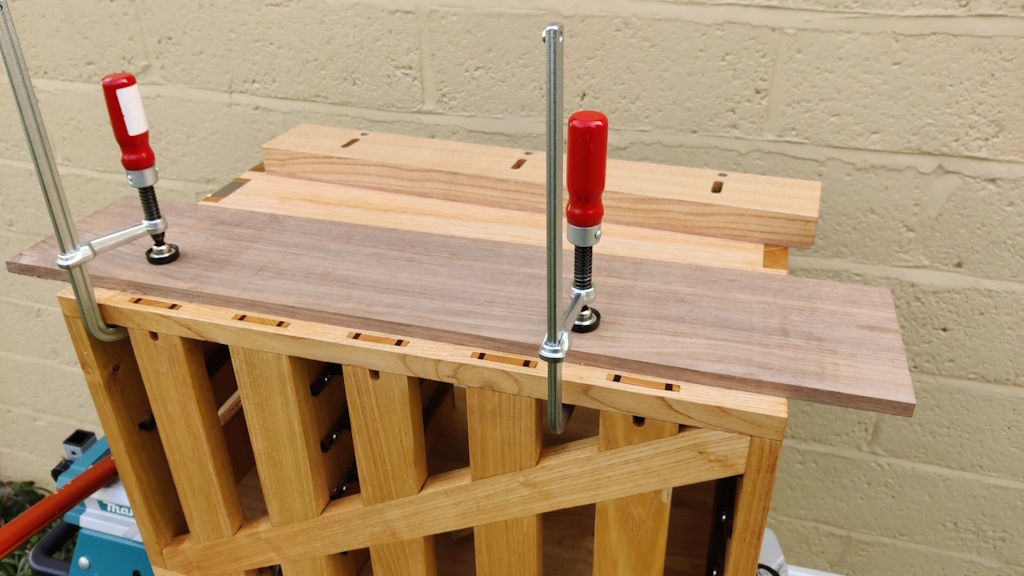
clamping_to_top.jpg


The planing stops can be used for simple face planing:
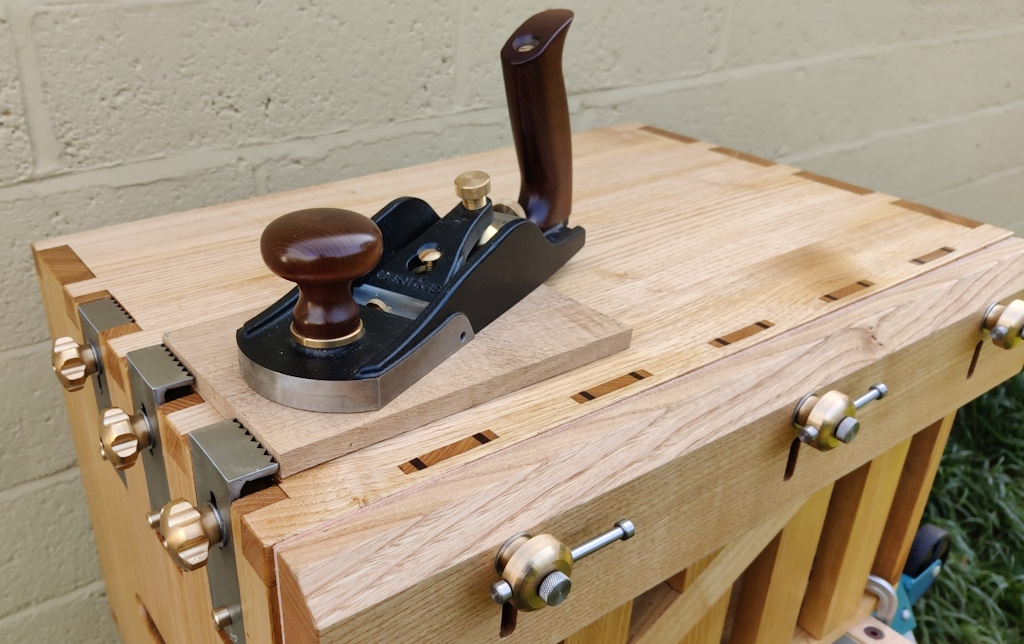
face_planing.jpg


Or for a bit more robustness, a doe's foot can be clamped to the top:
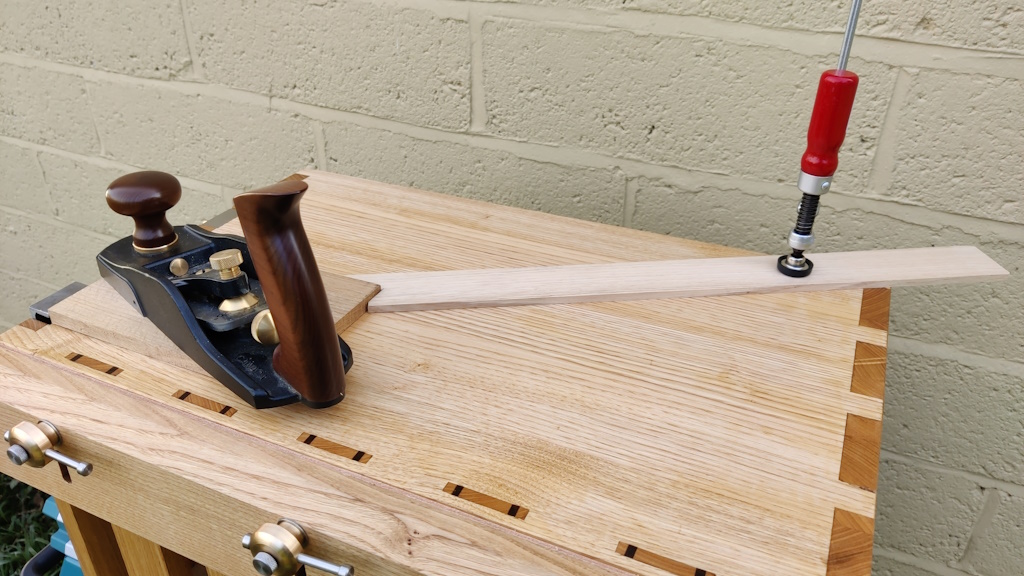
planing_with_does_foot.jpg


The vice can also be flipped round (so that a solid face is against the chest rather than a leather face) and then moved up and down (this photo shows the upper limit):
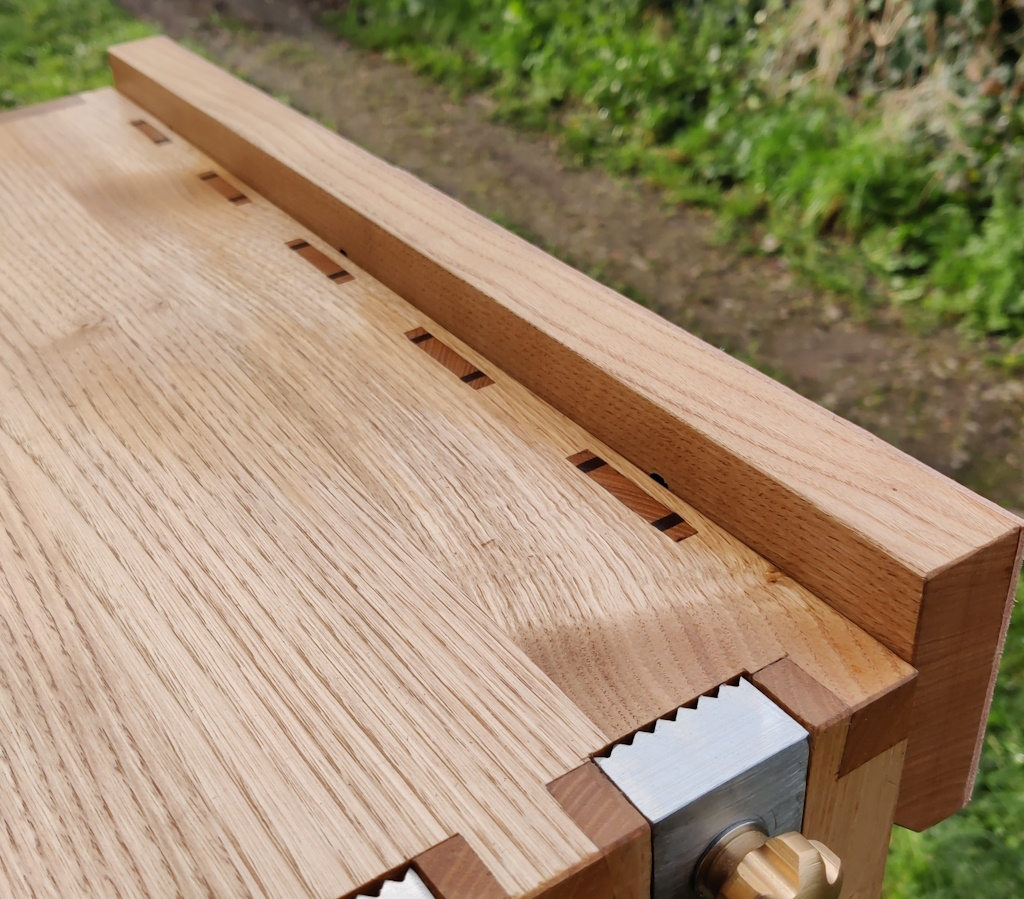
fully_raised_stop.jpg


That allows boards to be fully constrained while still giving complete access to the top surface:
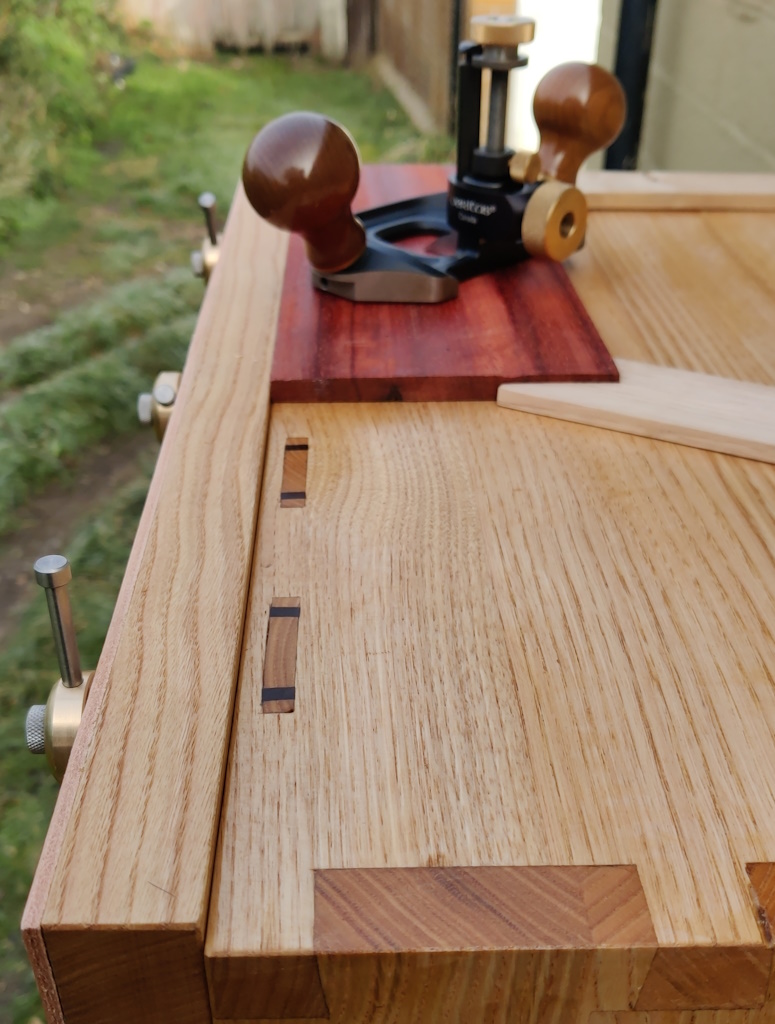
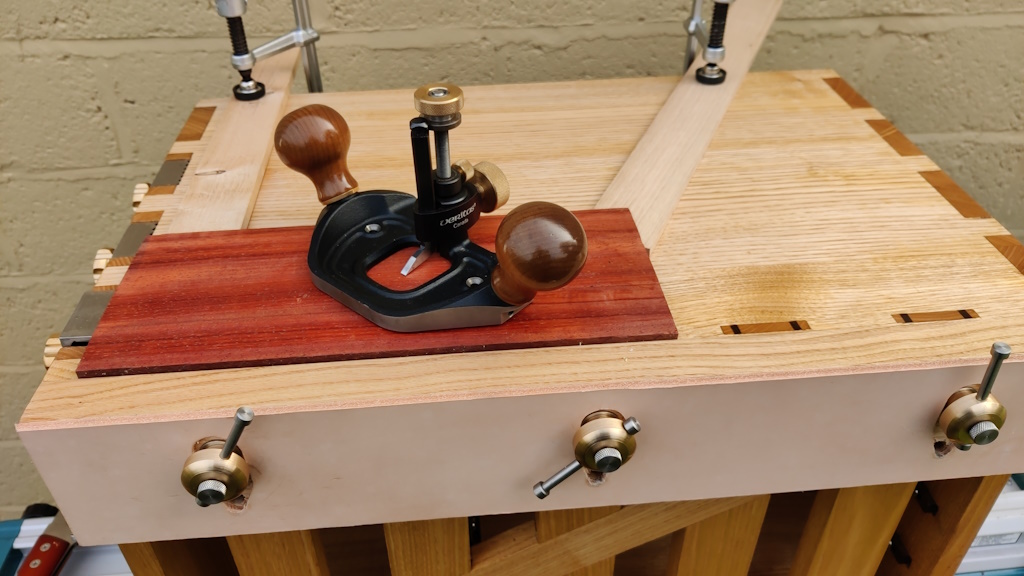
access_to_whole_top_surface_2.jpg


access_to_whole_top_surface.jpg


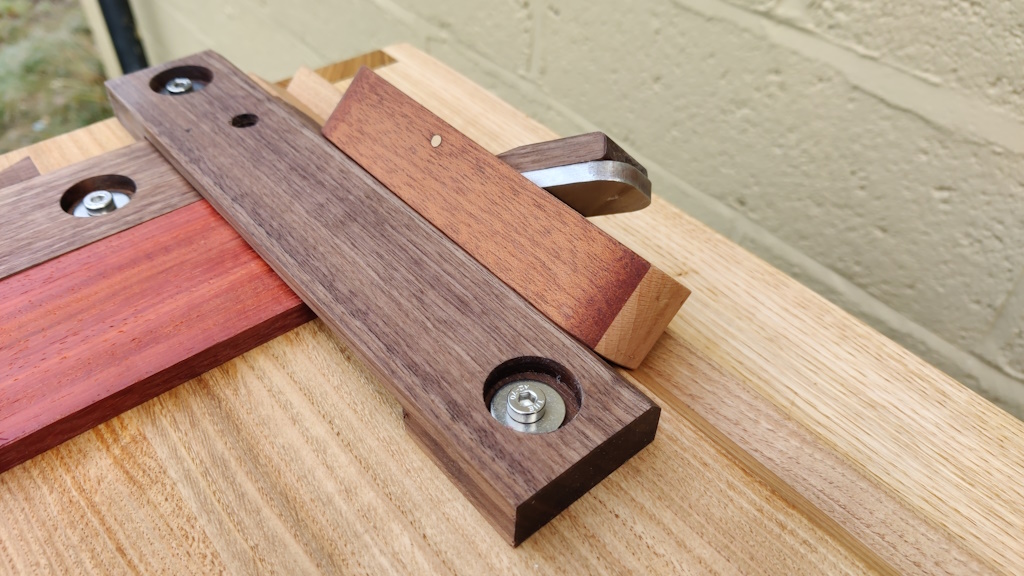
Finally (I think), there's the chest front / shooting board, which goes on top and pushes against the planing stops (this is the main reason for having three planing stops - so one is far enough over to support the shooting board near the working side)...
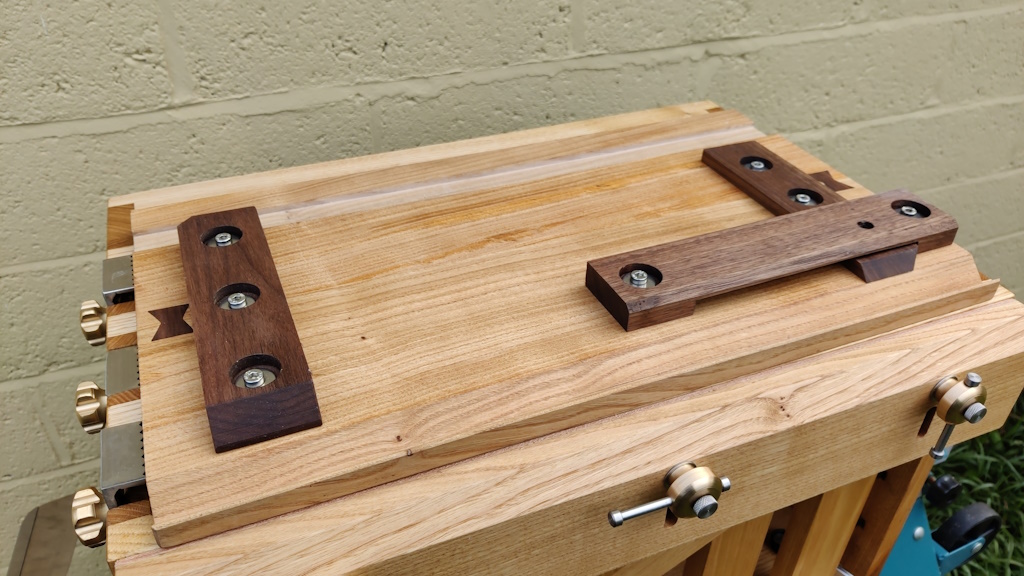
shooting_on_top.jpg


...which can be used for shooting ends square (with a block plane I also made, including the blade, as part of this project):
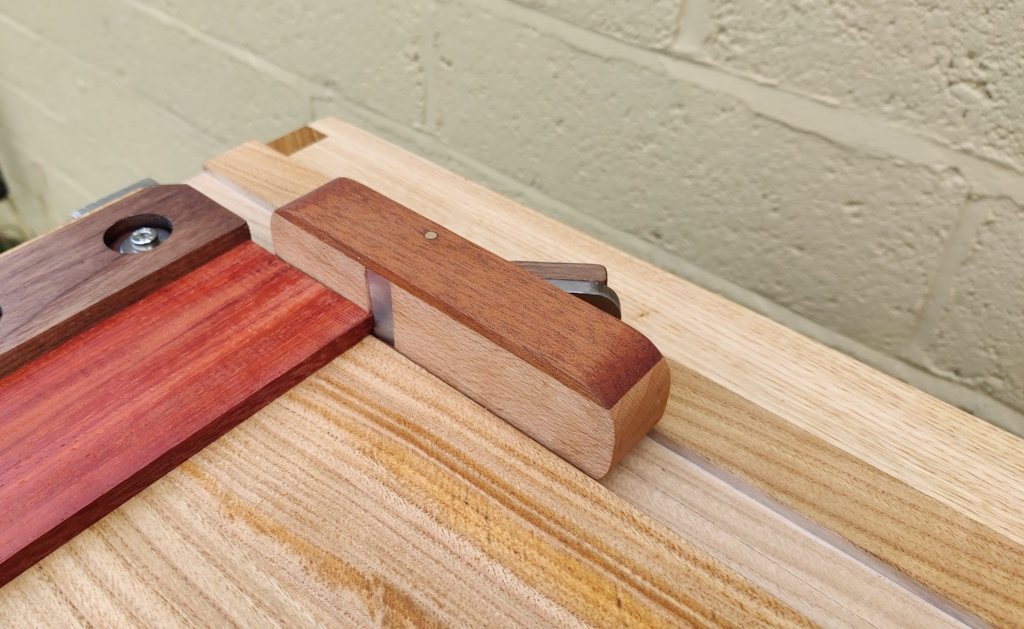
shooting_end.jpg


... and shooting mitres:

shooting_mitre.jpg


shooting_mitre_2.jpg


I mentioned that this project was mainly about learning and practising hand tool woodworking techniques. To expand on that, this was:
  1. The first project in which I've made panels from rough sawn wood by hand. In the past I've made panels, but they've involved a table saw (which I'm very happy to have now sold!) and/or thicknesser (which I've still got, but it's nice to be able to work without it, especially given the amount of snipe from my cheap-ish thicknesser). I've planed wood to size by hand in the past, but only relatively small pieces (for boxes) and this is the first time I've had to make lots of pieces of wood square edged and the same size.
  2. The first project where I've cut dovetails without any sort of saw guide. I've cut quite a lot of dovetails with 3D printed saw guides and I've cut a few (not very successful) dovetails without the guides on bits of scrap wood for practice, but this is the first finished project that includes guide-less dovetails. Also the first time I've cut dovetails on such thick wood: all previous ones have been on box-scale projects, so 10-ish mm thick rather than 20 mm thick.
  3. The first project in which I've cut housing joints (for the middle upright support and the drawer runners) - known as dadoes in America I believe.
  4. The first project with wedged through mortice-and-tenon joints (for the rear uprights). I used blind mortice-and-tenons on my side table, but the tenons were cut with a table saw and the fact that the mortices are blind makes them a lot easier! I'd done a few practice joints (with varying levels of success!) in offcuts, but never used them in a project.
  5. The first project with half-lap dovetails (for the drawer fronts). I'd done exactly one practice piece before starting this project.
  6. The first project with wooden drawers. Unless you count pocket-hole joined plywood boxes with ball-bearing slide runner things, I'd never made a wooden drawer before this project.
  7. The first project with half-lap joints (on the anti-racking diagonal piece on the back).
  8. The first project in which I've used protein-based glue (most joints with fish glue and some with TB hide glue).
  9. The first project where I've had to come up with my own way of dealing with wood movement. On previous projects I've just used well-known techniques (buttons for table tops, grooves for box bases), whereas making what is essentially a five sided box where all sides needed to be rigid took a bit more thought. Hopefully what I've done will last.
  10. The first time I've used a "Dutchman" / graving piece to repair a blemish. I used two different types of Dutchman: decorative butterfly ones in a contrasting wood and discrete grain matched ones.
  11. The first large project I've finished without sandpaper. The faces were finished with a smoothing plane without any of the dust and tedium of sanding (and I think it looks a lot better for it!). A scotchbrite pad was used for rubbing between coats of finish ("Mike's Magic Mix": equal parts pure tung oil, satin varnish & white spirit) but that's a quick job compared with sanding large surfaces.
  12. The first time I've tried photolithography (for etching the numbers that are inset into the top of each drawer front to help re-fit them in the right place as they're removed when the tool chest is in use).
  13. The biggest and most complicated hand-tool project (and woodworking project in general) I've done. I did use a bandsaw for some bits of resawing, but all the other woodwork was by hand. Metalwork was all powered, but that doesn't bother me as I hate filing and don't even aspire to being a hand-tool metalworker. Woodwork power tools are noisy and dusty, but most metalwork power tools I use aren't (angle grinders being the obvious exception). Welding the planing stops without some sort of power source would have been quite a challenge!
 
Wow what a fantastic project. Beautifully executed too.
Thanks Paul
Did you choose steel planing stops for a reason? I would be afraid of running a plane blade in to them
Not a very good reason: just seemed like a good idea at the time. I wanted something fairly strong that could be moved up and down easily and also made flush with the top (the original plan had been to use countersunk screws to hold it in place so it would have been flush on the side as well, but milling a countersunk slot felt too difficult and I like brass knobs :)). Stainless steel has the advantage (over brass or similar) of being easy to weld; it's obviously also strong.

The top surface of the planing stops is parallel with the surface of the chest, but the teeth are angled slightly (they stick further out at the top than the bottom) to help pull the workpiece down. The fact that they can be easily adjusted by very small amounts means that I can set the stop well below the top surface of the workpiece, so I don't think there's much chance of a plane impact and the stream of profanities that would be likely to produce!
 
Wonderful work. I don't think I would even try even with the full arsenal of machines I have. I noticed no holes for a hold down clamp or two. 😉

Pete
 
Wonderful work. I don't think I would even try even with the full arsenal of machines I have. I noticed no holes for a hold down clamp or two. 😉

Pete

The first CAD model I drew (18 months ago :eek:) had lots of 20 mm holes for clamping directly to the top and back:

1701539290895.png


The more I thought about it though (this project had an awful lot of make-it-up-as-you-go-along!), it just seemed unnecessary. With the intermediate slats on the back removed, the holes on the back became redundant and given that it's only about 350 mm deep, clamps can reach enough of the top surface to make hold downs unnecessary. Not having holes in the top also limits the plane shavings going into the chest!

That's a brilliant piece of kit. I love it. Great job !
Thank you.
 
Well, FWIW, I think it's a brilliant bit of kit and imagine it suits it's intended purpose very well indeed.

Especially for someone who - and I had to go back to the start of your post to check exactly what you wrote, hence the QUOTE: without having to worry too much about aesthetics (which are not my forte). - UNQUOTE:

Well I can only say that for someone for whom "aesthetics is not a forte", the result looks absolutely marvellous to me, especially the metal work. BEAUTIFUL finishes there Sir.

Can I ask how heavy is it when loaded with the tools? Doesn't it need a carrying handle? And when going away, do you fly (if M-E. sufferers can fly?), do you have to check it in? If so, have you ever had any "squawks" from security?

Superb work - I fully agree with the above hats off.
 
Can I ask how heavy is it when loaded with the tools? Doesn't it need a carrying handle? And when going away, do you fly (if M-E. sufferers can fly?), do you have to check it in? If so, have you ever had any "squawks" from security?

It'll never go on a plane: I wouldn't trust baggage handlers to treat it nicely. It goes on the back seat of my car & travels by road & ferry.

It's got carrying handles (rounded rectangle shaped cut-outs) in the side: you can see one of them in the first picture.

It is heavy, but manageable. Without the tools in, it's easy enough to lift even with the mitre stand it's clamped to. I'd guess (but haven't measured) it's about 15 kg empty. That's the price of having something sturdy enough to plane & hammer on. Full of tools I'd guess it's a shade under 30 kg, which is firmly in the territory of a heavy lift. However, I only move it from house to car & then from car to self-catering cottage, so it's not too much of a problem.
 
Absolutely amazing work!

What tools do you pack in it? I'd be interested to know your 'essential' tools because I definitely need something like this!
 
Beautiful design and expert construction! I trsut you will have many joyful years of use.

I woulooking to make a padded cover for transport, even in a car. Am not sure if it was asked, but I assume you made all the fittings as well?

Also, I am curious to know what tools go inside, and how much it all weighs?

Regards from Perth

Derek
 
Thanks for all the kind comments.

What tools do you pack in it? I'd be interested to know your 'essential' tools because I definitely need something like this!

Honestly, probably more than I need! I still feel like a woodworking beginner (only started in 2020 and initially it was power tool stuff - this is the first big fully-hand-tool project I've done).

Tools that I took in June (when I did a trial run and made the boxes) are listed below. I'll probably tweak this for the next trip, but the gist of it is there.

Top left drawer:
  • Three folding Japanese saws (this set). If there's something else that makes sense to go in the top drawer, I might filter this down to just two of them (a Dozuki & a Kataba) as three is excessive!
Second left drawer:
  • Sharpening stuff:
  • Several propelling pencils & a sharpie
  • Eraser
  • Multi-function marking gauge (wheel & pin marking gauge in one) - I don't really like wheel marking gauges for with-the-grain marking, but this can be switched from a wheel marking gauge to a pin one or to a pencil-based one, so it's good for flexibility without taking lots of different gauges.
  • Steel rules
  • Small engineer's square
  • Paint brushes (for glue)
Third left drawer:
  • Marking knife with folding blade
  • A spare blade for the Veritas BU smoothing plane and a spare blade for the Quangsheng BU block plane (both sharpened with a different bevel angle to the ones installed in the planes)
  • Router plane blades (I took all of the Veritas ones I have: 3 mm, 4 mm, 5 mm, 6 mm, 12.7 mm and the pointy tip one - definitely unnecessary to take all of them, but the thinner ones are useful for ploughing grooves in box bases)
  • Tealight (for waxing plane bases)
  • Small vernier caliper
  • 150 mm combination square
  • Edge distance gauge thing (one of my most often-used tools)
  • Sliding bevel (which I don't think I've ever used!)
Fourth left drawer:
  • Chisels in a few different sizes, including Narex bevel chisels in a range of (metric :) ) sizes and some chisels that have been home-modified to have a skewed end.
Fifth left drawer:
  • Masking tape (to help with marking dovetails out, or for gluing bits of wood back on that shouldn't have come off :))
  • A couple of right-angle spring clamps, which I use for holding a thick steel rule against the base of dovetails to help alignment when marking pins - the steel rule acts as a stop so you push the steel rule up to the face of the pin board and everything's aligned really easily - no peering through to see if you can see light at the base of the pin sockets.
  • Mallet
  • Card scrapers (they're a lot lighter than my beloved Quangsheng scraper plane, which stays at home!)
Top-right:
  • Router plane
  • Router plane fence (so that I could use the router plane as a plough plane for box bases)
  • Quangsheng BU Block plane
  • Screwdriver
Bottom-right:
  • Veritas BU Smoothing Plane
  • Stanley #4 Smoothing Plane
I also took a separate tool bag for stuff that's a bit bigger and more robust. That contained:
  • Clamps (mostly these)
  • Fish glue
  • Superglue
  • J-cloths
  • Battery-powered light
  • Small atomiser bottle (for spraying the waterstone / diamond plates with water)
  • Colourful set of Allen keys (mainly because I hadn't made the knobs for the planing stops yet, so was just using cap screws)
Finally, I took a mitre saw stand (which I was given for free by a very generous forum member) so I had something solid to clamp it down to. One day I might make a portable wooden base (a mini moravian bench or something like that!), but that's on the very very long todo list!

I would be looking to make a padded cover for transport, even in a car.

That's probably sensible. When I went to France in June I chucked a thick blanket over it, which probably helped a bit. It sits on the back seat on its own, so I'm not sure how likely it will be to get damaged.

At the end of the day, it's a workbench. It's going to get nicks and dents and I'm going to try not to be too precious about it. Besides, it's wood, so I can always plane the surfaces again to clean it up.

Am not sure if it was asked, but I assume you made all the fittings as well?

Yes. There was quite a lot of metalwork involved. Metalwork bits I made were:
  • Planing stops (two bits of stainless steel flat bar welded together, with notches cut in the end for teeth)
  • Brass knobs for planing stops (with stainless steel threaded bar glued into them with Loctite 603)
  • Brass pins for lifting the planing stops
  • Brass knobs for vice (with stainless steel threaded bar glued in and stainless steel cross bars & a stainless steel knurled knob to lock the cross bars in place)
  • Stainless steel brackets for all the knobs to screw into (basically just a bit of 10 mm square stainless bar with a threaded hole in one direction and two countersunk holes for woodscrews at 90° to the threaded hole) - these are inside the chest, screwed to the top.
  • Brass number plates on each drawer to identify them (1.6 mm thick brass sheet, etched with a number, etching filled with engravers' black shellac)
  • Brass finger pulls for each drawer (basically a brass tube, but with a "top-hat" shape for a cleaner look at the front.
  • "Blind" brass finger pull for the front - like the ones on the drawers, but the hole doesn't go through and there's a lip on the inside at the front to give you something to pull on
  • Brass sliding knobs to lock the front into the chest, along with plates set into the sides of the chest for the pins to engage with.
I think that's everything.

Also, I am curious to know what tools go inside, and how much it all weighs?

Tools list above. As I mentioned above, I haven't weighed it so I'm not exactly sure, but fully laden it must be getting near to 30 kg. It's definitely on the upper limit of what's manageable, but it isn't too hard to lift it and carry it short distances. I only really see it being carried from house to car and from car to self-catering cottage, so the weight isn't too much of a problem.
 
This is really excellent. Beautifully made and cleverly designed.

I also have the issue of needing to keep making stuff wherever I am going, so have a design for a (rather more utilitarian) workbench/toolbox that i hope I may have time for in the next decade.
 
This is really excellent. Beautifully made and cleverly designed.

I also have the issue of needing to keep making stuff wherever I am going, so have a design for a (rather more utilitarian) workbench/toolbox that i hope I may have time for in the next decade.
I'll look forward to seeing photos when you make it
 
That's both amazing and inspiring. Thanks for sharing

Wondered what the wood pieces inside the front panel were - I just assumed you had made your own lock of some sort.

Having been slapped on the wrist myself - have you got a way of strapping it down - threading the seat belt through the box? One emergency stop (or worse) and the box could take off at 30/40 mph and cause a lot of damage to you or your tools. Would hate to see those beautiful planes ruined by a pothole or a puncture.
 

Latest posts

Back
Top