Transfering from A4 onto timber...

UKworkshop.co.uk

Help Support UKworkshop.co.uk:

This site may earn a commission from merchant affiliate links, including eBay, Amazon, and others.

goldeneyedmonkey

Established Member
Joined
15 Jan 2010
Messages
1,121
Reaction score
0
Location
Buxton, Derbyshire
Hi all,

I'm about to make a 3d sign for a friend of mines web-development business, I'm going to be cutting out the letters from 1" redwood pine and then mounting them onto perspex after they're painted.

My question is how would you go about transferring the letter's he's given me onto the work-piece? They're nearly as big as 1 A4 piece of paper each, I'm thinking using carbon paper, but not sure as yet.

Thanks in advance, _Dan. :)
 
hi Dan

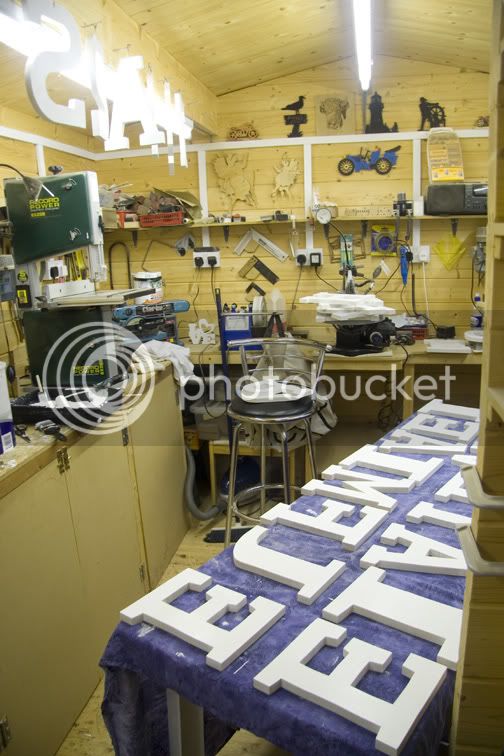
You dont say in what form the letters he has given you are, but supposing they are paper, you could use prit stick to glue them onto the wood
as i did 43 A4 size letters out of MDF recently, or you could use the carbon paper as you suggest..
cabinletters.jpg
 
Hi Steve,

Thanks for the swift reply. Yes they've been given to me on paper. They've not been cut out, so I think my best bet is to cut them out and, like you say, use prit-stick to apply them to the wood and cut them out.

Good thinking, Cheers_Dan.
 
if you are repeating some of the letters, use the first letter cut as a template to draw around, saves loads of time.
 
I have used pritt stick. I have also used spray mount.

Stevebuk. They are really niece. What finish did you put on them.

I have been asked to make "Love" A4 size out of 18mm MDF.
 
hi weegie
the letters you can see are 18mm MDF, i actually cut most of them on the bandsaw as 18mm takes some cutting through and is very slow.
They have all had MDF sealer applied, followed by 2 coats of undercoat and finally 2 coats of oil based gloss, not that water based shyte they sell now.

At last they have all gone from the cabin and i now have all my room back..
 
Hi,

has anyone else used either laser printed pages or photocopies? Both use toner powder which is fused to the paper with heat to form the image. You can reverse this process to transfer the printed image onto another surface, wood in our case. Place the image, printed side down, onto the wood and quickly iron the back of the paper, using an ordinary domestic iron. Don’t use the steam setting. Don’t spend too long ironing as too much heat can warp the timber by drying out the ironed side. You will need to make tests to find the heat setting appropriate for your iron. My experience is that the transferred image is not very dense and is only readable on light coloured wood. This doesn’t work (AFAIK) with inkjet prints.

If you only have photocopies or laser printed pages that you cannot edit the image will be reversed if you transfer it to the viewed side so transfer it onto the back of the wood. If you have the opportunity to edit and print the images yourself you usually can reverse them using the printer software. You can also scale them to fit the size of your wood if necessary.

One thing to watch is that some laser printers change the proportion of the print slightly, only by a few % but if accuracy is important add a vertical and horizontal scale. This only needs to be two lines of known length that you can check are correct on the print. If you find the print is not 100% in both direction then adjust the scaling on the printer software or in an image editing programme.

Irfanview offers some image editing facilities, is free for home use but has a 10 Euro license fee for commercial use. Gimp is free, very capable but more effort needs to be made to learn to fully use all it’s options.

This idea was (maybe still is?) popular with aeromodelers for transferring wing and fuselage rib profiles to balsa wood.

Hope that is useful to someone

Graham
 
Thanks Decodrew,

Interesting, I see that the thread is about using plastic film, mylar, acetate or similar the sort of transparent plastic sheet that you can print OHP images on and a solvent. Using the translation I cannot see an explanation of how they use the solvent. Perhaps I should have another try when it's not so late in the evening. Edit: just looked at your link and see you are in Poland. Does the site you linked to explain how it's done?

I tried other sites found by Google for image transfer. I got an aeromodeling link based on "Mylar, acetone and burnishing" but this ended in a dead/broken link.

I also found a link suggesting printer transfer film that took me here:
http://www.londongraphics.co.uk/acatalo ... tates.html

This link to an Acetone transfer video tutorial is quite interesting. I would not want to breathe in too much acetone but it avoids problems that might arise from use of heat:
http://ontariocacher.wordpress.com/2008 ... -tutorial/

There is a further link at the bottom of the above thread to a site that lists several other techniques:
http://www.ebsqart.com/artMagazine/za_513.htm

Regards

Graham
 
I print out images on an inkjet and then spraymount them to cheap clear sticky backed film used for book coverings and the like. For my jigsaw puzzles I need to take some of the tack off in order not to damage the picture, but for bare wood that's going to be painted afterwards anyway, it shouldn't be a problem.
 
I'm only a beginner in search of a craft to occupy me in my dotage but this will probably surprise and delight some of the more 'careful' of you when it comes to expense.
When I started to experiment with my scroll saw I downloaded patterns from the interweb and printed them on my HP inkjet. I had no repositionable adhesive or Pritt Stick, nothing but epoxy and cyanoacrylate, overkill for the task at hand.
A light bulb came on above my head and out came the self-raising flour and a cup of cold water, mixed to a smooth batter I painted the back of the pattern and slapped it in position. The wood (ash) went onto the the shelf above the radiator for an hour and the pattern was fixed......permanently.
****WARNING**** ONLY USE THIS METHOD IF YOU INTEND TO SAND AND/OR PAINT FINISH THE PROJECT. Having said that, it certainly does fix the pattern with no slippage or curling at the corners, in fact the fixing is probably too strong.
I have since bought a can of Bostik Fast Tak (at a price!) but I tell you, next time I need a lot of cheap sticky stuff for a project that is going on to be finished, the Bero's coming out.
 
Hey.

The method I now use is to cover the wood with wide masking tape (making sure to remove all dust first), spray this and the back of the printed design with carpet/vinyl adhesive from B&Q. I wait for both to dry before slapping one on the other. Once you've finished cutting, peel the masking tape/paper sandwich off the wood and you're done. It can be a bit messy so you need to have a few practice sprays on some scrap to get the distance/movement right otherwise you can get puddles of spray which will soak through the pattern and can obscure the line.

I tried using 3M spray mount as well as prittstick. Always had problems with the pattern lifting off at a crucial moment. Once the carpet/vinyl adhesive has dried it doesn't come off the masking tape. Simples.
 
Hi can you use the masking tape method on intricate patterns with very thin linking pieces? i've had problems with bits breaking out of the finished piece :eek:( if it works then a simple PVA water mix fixes well and relatively fast.
 
The only thing I have ever used is double sided tape from Wilko, better than all the spray glues comes of with no problem Mal
 
Back
Top