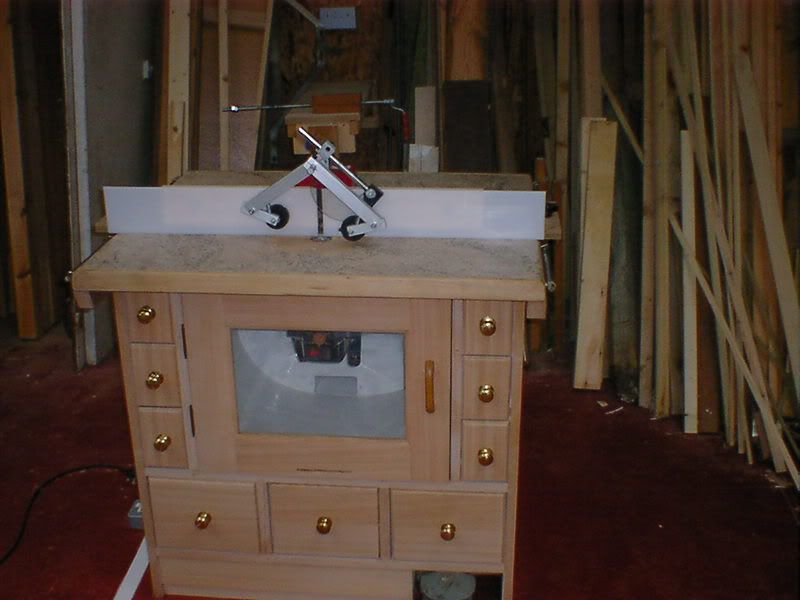
Time for new router table

UKworkshop.co.uk

Help Support UKworkshop.co.uk:

This site may earn a commission from merchant affiliate links, including eBay, Amazon, and others.

martlewis

Established Member
Joined
11 Nov 2006
Messages
425
Reaction score
6
Location
Chesterfield, UK
I think it's time to build my own router table at last. Used a table top model up until now.

I used to have a basic one I made but it wasn't particularly good or stable. The only design idea to come from it was that I used 2 full extension drawer slides attached to the sides of the table and they provided the sliding mechanism for the fence. Worked really well and provided very smooth sliding. I'll probably use that idea again but would welcome any comments or suggestions.

My main concern is making it mobile but very stable when in use, and I have no idea how to go about this. Always found locking wheels aren't very stable even the double locking ones.

Anyone have any suggestions for mobilising at as low cost as possible? :)

It'll soon be payday :(
 
There's a show on woodworkingchannel.com called 'The Router Workshop' in which they use a router table with no fixed fence or mitre slot. In fact, it's just a flat table with a hole for a safety pin-fence when required. They clamp on a fence whenever and wherever they want using C-Clamps, and their mitre slot/jig runs over a bushing in the base of the router. All their jigs and fences seem to be blindingly simple to make.

Having watched a few of the shows, when I made my first router table (a few months ago... from patheticly thin scrap MFC.. which I'm still using) I didn't bother with any of the extras. I'm happy with the design, and when I get around to making a sturdier version, I'll stick with the same layout.

Check out the show for some ideas before you begin.
 
Have you considered replacing the rhs extension wing of your tablesaw with a router table top. You can then use your rip fence as the router fence and you would get a rock solid table without taking up any more room in your workshop. Saw it on the american at home woodworking magazine dvds. Just an idea which I plan to pinch when I get around to it.
Cheers
John
 
I did that on the old table saw but never used it much. If I do use the table saw option it would have to be the left side as I have the saw against the right wall. Have to move it for occasional ripping but not often.

Think I would use a proper table more often. Also gives me loads of storage cupboard space too.
 
Hi

About the wheels.

I am fairly sure there was another thread some time ago
where people discussed home made retractable wheels.

I think the wheels were mounted to a board which could be
then be moved with a simple pulley arrangement.

The wheels could either be in contact with the floor to allow the
table to be moved or fully retracted (the board rotates) to totally remove
the wheel contact with the floor.

You may find this with a search of the forum

Andy
 
To make my router table/cabinet movable, I bought an extra set of wheels and the lever that I have on my Sheppach 2500CI, I then fitted them to my router table/cabinet, the setup works extremely well.
 
Martin

I guess stability of a router table comes with the weight of the table, on mine I have 4 of the 4" locking castors from Rutlands, when these are locked there is no movement of the table what so ever. Hence I have all my machienry on the same castors.
 
Hi Mart
I made the base of mine from 2 x 3 timber and it is easily light enough to move around, while remaining rock solid.
Hope this helps
Philly :D
 
Cheers for the replies, think I'll order some wheels from rutlands or axminster. Need to order a router lift of some form if anyone has any recommendations, and a fixed base router motor I think.

Here's the first stage of my build anyway if anyone's interested...

Carcass assembled from some spare 3/4" spruce ply I had spare. Spot the deliberate mistake on the right edge, an extra rabbet for good measure... :roll:
router1.jpg


Another view.
router2.jpg


Dust extractor port added, 4" and sealed with a bead of silicone glue.
router3.jpg


Final touches today, wrapped the face with some spare pine I had, trying not to spend much if I can help it.
router4.jpg


Working tomorrow so I won't get anything done, but hoping to get the top made up on Monday and start on some drawers.

Martin
 
martlewis":1z4iy5z9 said:
...an extra rabbet for good measure... :roll:
Is that what they mean buy "breeding like rabbets?" :wink: Looking good, Martin - always encouraging to see you don't have to spend a fortune to get a good result.

Cheers, Alf
 
Update after a day in the shop.

Beefed up the melamine top with some offcuts of 3/4 ply
router5.jpg


Wrapped the edges of the top and screwed to carcass
router6.jpg


The next 5 pics are a good few hours work making a fence like the one I made for my first table, worked fine then so I made it same again

router7.jpg


router8.jpg


router9.jpg


router10.jpg


router11.jpg


The first casualty on this build :-({|=
router12.jpg


Added a nice shiny face to the fence from some scrap wood effect chipbord
router13.jpg


Couple of G-clamps to hold the fence steady
router14.jpg


Have also made a door for the router compartment with perspex insert.

I'll be ordering a RoutALift from Rutlands on Thursday morning and installing it on Saturday, unless anyone has a better idea for the lift?

The bottom of the cabinet was going to be a wide drawer for my jointer to hide in, but now I'm not sure. May be better keeping handheld routers in there, but then I'll need somehwere for the jointer to live, suggestions welcome.

Martin
 
Looking good Martin

Before purchasing a router lift and a fixed base router, check out the big triton router.
I and a few others on this forum own one. Mine is fixed in the table full time, a doddle to adjust, change the cutters with one spanner above the table and plenty of grunt.
It is also one of the few routers designed to go upside down in a table so that the motor will not fill up with dust.

Well pleased with mine.

Les
 
Hi Martin
I love the sliding fence idea! Will be trying that as soon as my new workshop is finished!
This is my router table i knocked up a couple of years back I've been very pleased with it especially the dust extraction,
all the best
Mike
Pic024.jpg
 
How does your dust extraction work mate?

My idea for the drawer slides on the fence was that it holds the fence 1/8" above the table so it slides without binding, but there's enough give in them that the clamps pull the fence firmly down onto the table when it's locked.

Also I'm thinking of incorporating a couple of upside down holddown clamps to lock the fence rather than having to fasted screw clamps, they move and sometimes bind too.

Martin.
 
I think you can see inside the door that i curved the bottom of the chamber down to the extraction outlet. what you cant see is that i drilled a large hole in the top surface which sucks air from just by the bit.
I might be able to find a picture of it; if you are unsure of what i mean ;)

mike
 
Wow, not touched the router table for a while now. The snow will provide an excuse tomorrow to stay home and get on with it. Had the router lift waiting to be installed and my Xtreme Xtension arrived today.

Will get some more WIP pics up tomorrow afternoon.

Martin.
 

Latest posts

Back
Top