


This is how I made a chess board and the lessons I learned from it  .
.
I decided to make the board using veneers of contrasting colours. Don't ask me what veneers I used because I've never picked veneers by name - I just think, "That would like nice". The first task was to cut the veneer sheets into uniform strips. I did this by laying the edge of a strip against a straight edge, placing a steel rule on top, then cutting through the veneer along the edge of the rule with a scalpel. Then I alternated different strips of veneer alongside each other and taped them together. It's a long time since I did any marquetry so I didn't have the tape to hand which I would have used in the old days. However, I had lots of blue low-tack masking tape and, working on the principle that it was low tack, I thought that it would be okay. Unfortunately, I was wrong - but more of that later.

If you look closely in the picture above, there appear to be ten strips. However, one of these strips was a sacrificial piece to prevent tear-out as my knife cut through the final strip. Having cut nine strips of veneer, I laid them out and staggered them.
Then I taped them together on the face and removed the blue tape which was on the underside. This tape came away cleanly. I made sure that I removed the tape which was holding the surplus squares in position too, thus creating a proper square checkerboard.
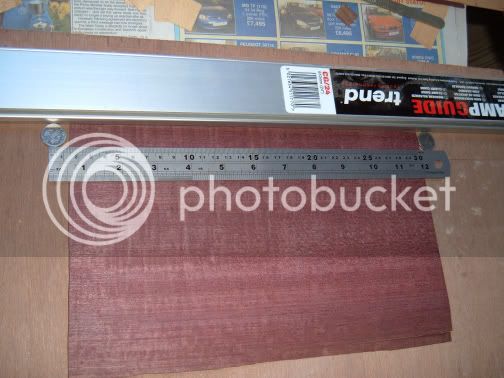
I wanted a differently coloured veneer for the border so I cut some strips from a veneer with a suitably different colour. I wanted these strips to be thinner than the board squares so I used a couple of 5p coins to make sure my steel rule was equidistant from the edge as they were cut.
Four more strips of the border veneer were cut, glued with PVA to the edge of the construction plywood I had chosen as a baseboard.
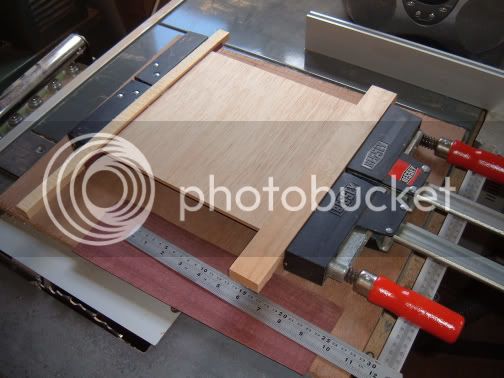
I put a couple of veneer offcuts on the underside of the baseboard to ensure it would not sit directly on top of the clamps. I wanted a little bit of lipping which could be trimmed later.
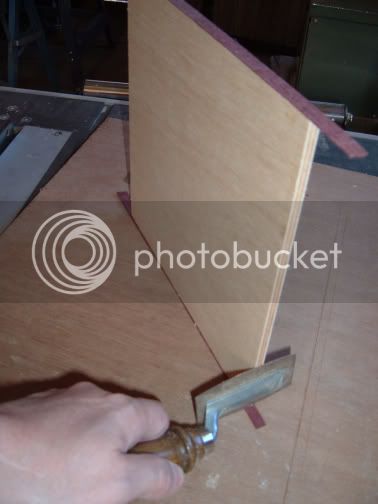
When the glue was cured, I trimmed the edging with a veneer saw (which is an irritatingly right-handed tool :x ) cutting across the grain first and then down the length.
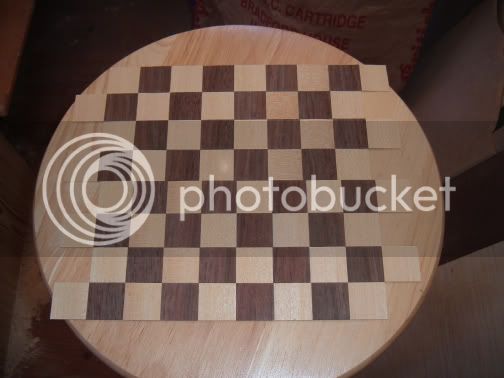
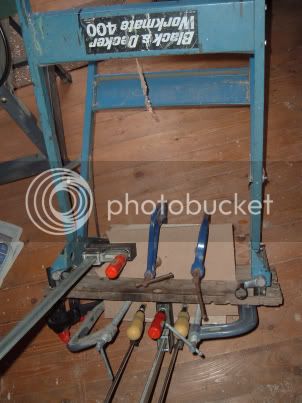
Next, I aligned the mitre joins on the checkerboard borders with the corners of the plywood base and glued them together, using PVA again. A bit of clingfilm was wrapped around the spare piece of plywood I placed between the checkerboard and the clamps so that if any PVA escaped it wouldn't adversely affect the project. Even the old B&D Workmate got dragged into action !
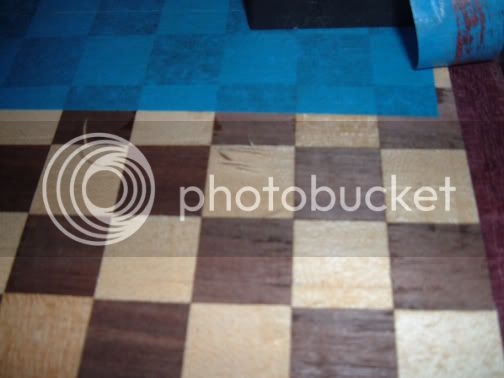
When the board was removed from the clamps, I low had to remove the low tack masking tape. Sadly, applying the pressure necessary to glue the veneers to the plywood base seems to have increased the tackiness of the tape. As it was peeled back, so were slivers of veneer .
Next time I'll buy some proper veneer tape.
I decided the only thing I could do was to try to create an 'aged' appearance. So instead of applying sanding sealer before sanding the project, I gave it a light sanding first and then applied the sanding sealer before continuing. I worked through successively finer grits but many of the tears in the veneer were simply too deep to remove. So a couple of coats of clear wax were applied and the board was finished.
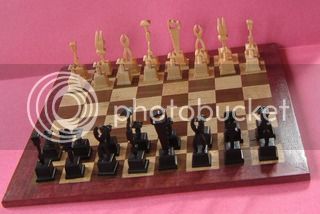
I already had the compound cut Woodworkers Chess Set I'd made earlier from some pine, finishing the light pieces with a melamine lacquer spray and the dark pieces with an ebonising spray.
Although I intend to make a replacement chess board at some point, this is how it all turned out.
Gill
.I decided to make the board using veneers of contrasting colours. Don't ask me what veneers I used because I've never picked veneers by name - I just think, "That would like nice". The first task was to cut the veneer sheets into uniform strips. I did this by laying the edge of a strip against a straight edge, placing a steel rule on top, then cutting through the veneer along the edge of the rule with a scalpel. Then I alternated different strips of veneer alongside each other and taped them together. It's a long time since I did any marquetry so I didn't have the tape to hand which I would have used in the old days. However, I had lots of blue low-tack masking tape and, working on the principle that it was low tack, I thought that it would be okay. Unfortunately, I was wrong - but more of that later.
If you look closely in the picture above, there appear to be ten strips. However, one of these strips was a sacrificial piece to prevent tear-out as my knife cut through the final strip. Having cut nine strips of veneer, I laid them out and staggered them.
Then I taped them together on the face and removed the blue tape which was on the underside. This tape came away cleanly. I made sure that I removed the tape which was holding the surplus squares in position too, thus creating a proper square checkerboard.
I wanted a differently coloured veneer for the border so I cut some strips from a veneer with a suitably different colour. I wanted these strips to be thinner than the board squares so I used a couple of 5p coins to make sure my steel rule was equidistant from the edge as they were cut.
Four more strips of the border veneer were cut, glued with PVA to the edge of the construction plywood I had chosen as a baseboard.
I put a couple of veneer offcuts on the underside of the baseboard to ensure it would not sit directly on top of the clamps. I wanted a little bit of lipping which could be trimmed later.
When the glue was cured, I trimmed the edging with a veneer saw (which is an irritatingly right-handed tool :x ) cutting across the grain first and then down the length.
Next, I aligned the mitre joins on the checkerboard borders with the corners of the plywood base and glued them together, using PVA again. A bit of clingfilm was wrapped around the spare piece of plywood I placed between the checkerboard and the clamps so that if any PVA escaped it wouldn't adversely affect the project. Even the old B&D Workmate got dragged into action
!
When the board was removed from the clamps, I low had to remove the low tack masking tape. Sadly, applying the pressure necessary to glue the veneers to the plywood base seems to have increased the tackiness of the tape. As it was peeled back, so were slivers of veneer
.
Next time I'll buy some proper veneer tape.
I decided the only thing I could do was to try to create an 'aged' appearance. So instead of applying sanding sealer before sanding the project, I gave it a light sanding first and then applied the sanding sealer before continuing. I worked through successively finer grits but many of the tears in the veneer were simply too deep to remove. So a couple of coats of clear wax were applied and the board was finished.
I already had the compound cut Woodworkers Chess Set I'd made earlier from some pine, finishing the light pieces with a melamine lacquer spray and the dark pieces with an ebonising spray.
Although I intend to make a replacement chess board at some point, this is how it all turned out.
Gill


