Spiers plane question

UKworkshop.co.uk

Help Support UKworkshop.co.uk:

This site may earn a commission from merchant affiliate links, including eBay, Amazon, and others.

mynamehere

not in my shed
UKW Supporter
Joined
23 May 2018
Messages
126
Reaction score
53
Location
Preston
I helped my wife’s cousin clear out his mums house after she sadly passed away, amongst all the stuff that was going in the skip was a bucket of his dad’s rusty tools, most of it was junk but there were a couple of rusty planes and a split wooden one as well.

After cleaning one of the planes it turned out to be a Spiers coffin smoother!
I got most of the rust off and sharpened the blade, my question is this, the back infill where the blade sits on is in two pieces, it splits exactly flush with the plane body, is it supposed to be like this or should it be one solid piece?

If it should be one piece, what would be the best way to fix it??

Cheers!

Ferenc
 
mynamehere":1f7bm8nu said:
I helped my wife’s cousin clear out his mums house after she sadly passed away, amongst all the stuff that was going in the skip was a bucket of his dad’s rusty tools, most of it was junk but there were a couple of rusty planes and a split wooden one as well.

After cleaning one of the planes it turned out to be a Spiers coffin smoother!
I got most of the rust off and sharpened the blade, my question is this, the back infill where the blade sits on is in two pieces, it splits exactly flush with the plane body, is it supposed to be like this or should it be one solid piece?

If it should be one piece, what would be the best way to fix it??

Cheers!

Ferenc

That's how they were originally made. I've cleaned a few up with perfect wood and they all have a seam. Not all of the infill makers did that, but spiers did. I never took one apart to see how they're bonded, but the exact fitting of wood to an infill is labor intensive, and splitting the fit into two parts (one that can be sanded flush with the sides and another one that can just be joined over is far easier to do). If done that way, the bottom can be a little looser and probably filled (or not, it's not necessary) in the infill - they're dovetailed, and I'm sure they have great patterns and peining jigs (had) and mills that allowed them to get close, but it would've still been costly and labor intensive.

I separate the step of fitting the wood when making one of these (this was a kit) so that I can fit the wood well. It's tedious - I'm sure you can get better at it, but I wouldn't want to do it for a living.

https://i.imgur.com/5yacaZb.jpg

I suspect (if you zoom in on this one and look at the fit of the wood to the metal in the rear) that most rosewood infills from the good makers were fitted like this new (the front bun is vertical grain and expansion and contraction has already resulted in some separation). There are some rumors once in a while that these planes (like yours) were sloppily made compared to the modern boutique infills, but that's nonsense when it comes to the golden era planes.
 
by the way, if you don't like the split (if it's visible - none of mine were until I got them to bare wood - they all had wood that was in need of a refinish), you can sand similar colored wood into a paste with shellac or linseed oil and fill the gap. Do it once again once it shrinks some.
 
B734DAA4-9E82-45A3-88A3-59028602BF03.jpeg
02623C35-4E9C-414B-ABA7-6DEEFF4B9957.jpeg


These are the pictures of the plane, the problem is that when the blade is in and I tighten the lever cap screw, the top bit of the infill (the loose bit) gets pushed back.
I’m guessing that the infill piece shouldn’t come to pieces in operation, should I try to glue it together??

Cheers,

Ferenc
 

Attachments

  • 02623C35-4E9C-414B-ABA7-6DEEFF4B9957.jpeg
    02623C35-4E9C-414B-ABA7-6DEEFF4B9957.jpeg
    29.7 KB
  • B734DAA4-9E82-45A3-88A3-59028602BF03.jpeg
    B734DAA4-9E82-45A3-88A3-59028602BF03.jpeg
    25.7 KB
Yes. be sparing with the glue so that the glue line isn't too thick, and clamp it under pressure - line it up as well as possible. You want the top part of the bed to be in contact with the iron just below the screw (as in, make sure if you do anything at all, don't allow the bottom of the bed to stick out further than the top - make them as even as possible).

Any glue is fine - old rosewood like that should glue well. If you feel the absolute need to use epoxy (as people often do), heat it so that it's thin. I would use a regular woodworking glue. If the joint ever fails, you can just card scrape it off.
 
They are wonderful planes to use if the sole is reasonably flat. I thought they'd be an overweight lunk, but they are a pleasure. If there are any other performance issues when you start to use it, let me know. I have much familiarity with planes (making, repairing - and unlike some tool nuts, much using). MikeG will tell you how annoying I can be reminding people of that.
 
Thanks for the replies, I’ll glue the bits together if I have a spare minute.

It does feel a bit awkward at first but the plan is to get it going and using it!

Cheers,

Ferenc
 
sole.jpg
Got the back infill glued up with PVA and the plane is back up and running!

shaving.jpg


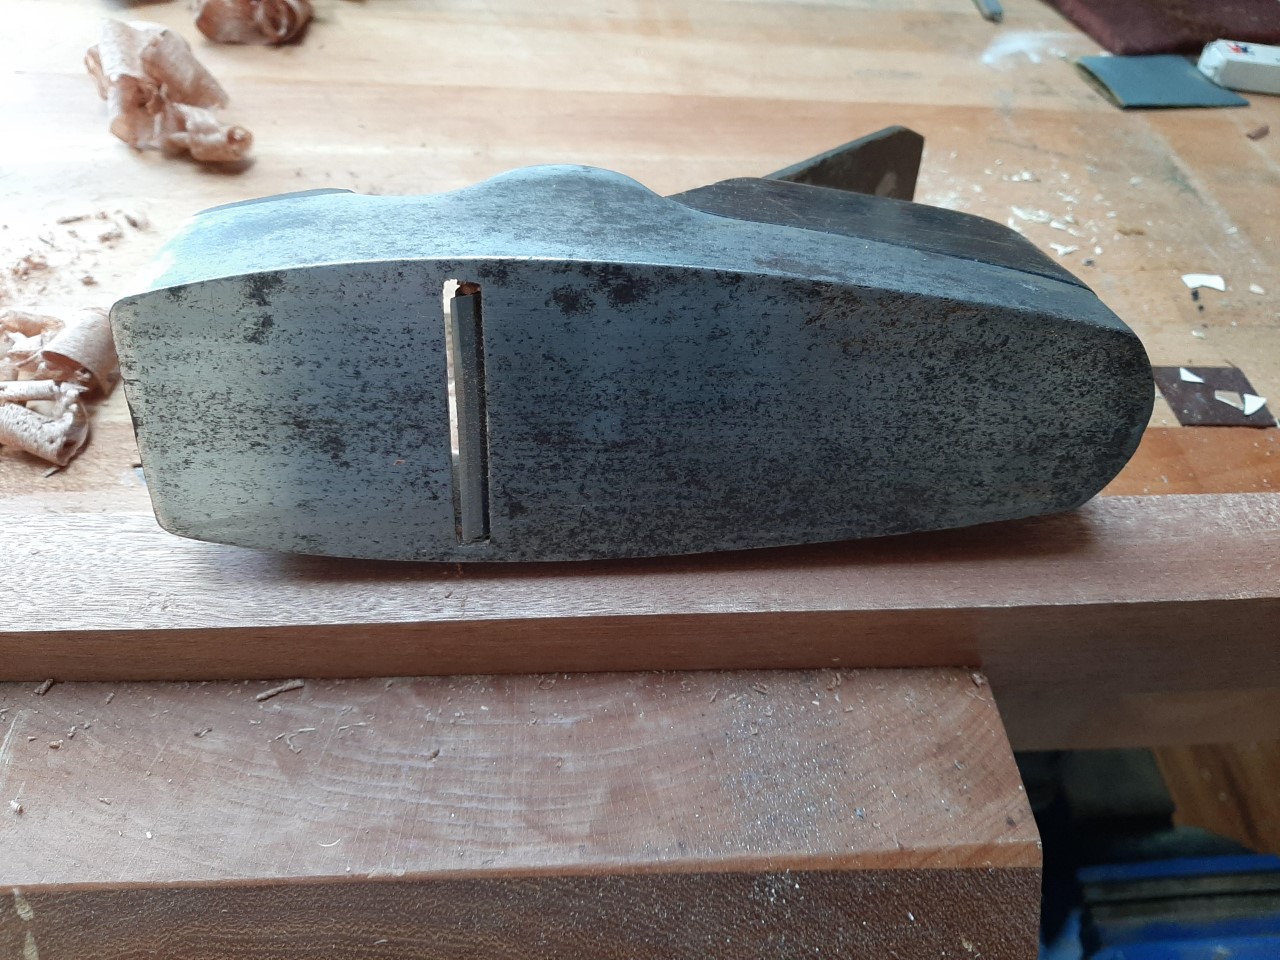
The sole and sides are a bit pitted, should I clean/polish/flatten until it's all gone or better to leave it as is?

Cheers!

Ferenc
 

Attachments

  • shaving.jpg
    shaving.jpg
    281.5 KB
  • sole.jpg
    sole.jpg
    310.9 KB
There's a reasonable half-way house, where you get the sole cleaned up to remove all the rust, using your thumb and a piece of hand-held sandpaper, then flatten enough such that it takes a good reference to the wood, but not all the hollows have gone. So long as you remove the hills and the valleys aren't immediately in front of the mouth, then you should be fine. If it works well now, though, you don't even need to do this.
 
Thanks Mike,

I took must of the corrosion off the sole with 180 grit on a piece of glass, I couldn't see or feel any rocking or big hollows, so might just leave it as it.
As for adjusting the depth of cut, is it done by tapping the blade with a hammer as I have done or is there a more sophisticated way?
 
mynamehere":wjkqdt9r said:
Thanks Mike,

I took must of the corrosion off the sole with 180 grit on a piece of glass, I couldn't see or feel any rocking or big hollows, so might just leave it as it.
As for adjusting the depth of cut, is it done by tapping the blade with a hammer as I have done or is there a more sophisticated way?

This is what I've found is the easiest way to do depth adjustment:
* put your plane on a board (you're not going to do any damage to anything with this). tighten the lever cap very lightly so that the iron moves around
* pull move the plane back and forth lightly (forward and reverse) lightly and tighten the lever cap as you're doing this. At this point, it should cut something very light or nothing. Tighten it about 80% or so.

Turn the plane over and look at iron projection (or not, your choice) and adjust laterally if needed.

place the plane back down on the wood or a test piece if you like to do that and fine tune the adjustments and then tighten the lever cap.

each time you've added too much depth, you can slacken the lever cap and move the plane back and forth a little bit and you're back to zero.

The entire amount of this only take seconds. find a good light steel hammer to add depth and correct lateral.

For some planes (the spiers coffin that I had included), tightening the lever cap will add just a little bit of depth. You can account for that by setting it light and then using the lever cap tension as a micro adjuster of sorts.

In less good infill planes (later norris planes with adjuster), the effect of this is stark and the lever cap tension itself is a better depth adjuster for most fine work than anything else.
 
Nice rescue. It looks like it's working really well.
Don't rush to clean the rest of the body, especially the brass. It's taken a long time to look its age and if you remove too much of the surface, there's no going back.

If I were you I'd aim to remove any loose dirt - a damp rag will do - and then apply a very little wax, just to keep the surface clean so it doesn't blacken your hands or the work.

And no brasso!
 
Thanks Mike,

I took must of the corrosion off the sole with 180 grit on a piece of glass, I couldn't see or feel any rocking or big hollows, so might just leave it as it.
As for adjusting the depth of cut, is it done by tapping the blade with a hammer as I have done or is there a more sophisticated way?
I read somewhere (I cannot find the reference now), that you can place the plane on a piece of plate glass, preferably "float glass", without the blade inserted. I use a piece of 1/4 inch glass from a broken shelf. Then, carefully mount the blade so that it now sits flush with the bottom of the plane bed. Then, tighten the lever cap screw a bit (not tight). At that point, in my experience, the plane takes whispers of a very fine shaving. Follow this with a few light taps with a plane hammer and/or tighten the lever cap screw and you will find the "sweet spot". It works very well! Try it!
In case you are wondering, I have yet to dull the blade with this method. :)
 
Back
Top