SOME NEW ITEM'S

UKworkshop.co.uk

Help Support UKworkshop.co.uk:

This site may earn a commission from merchant affiliate links, including eBay, Amazon, and others.
A

Anonymous

Guest
Heres a few pics of some stools and a chair I have been working on recentley

This one is based on the basic irish fire side chair form, it has been distressed but as yet un stained, oiled or waxed or anything; made up from burr elm, ash, pine and recycled floorboard's
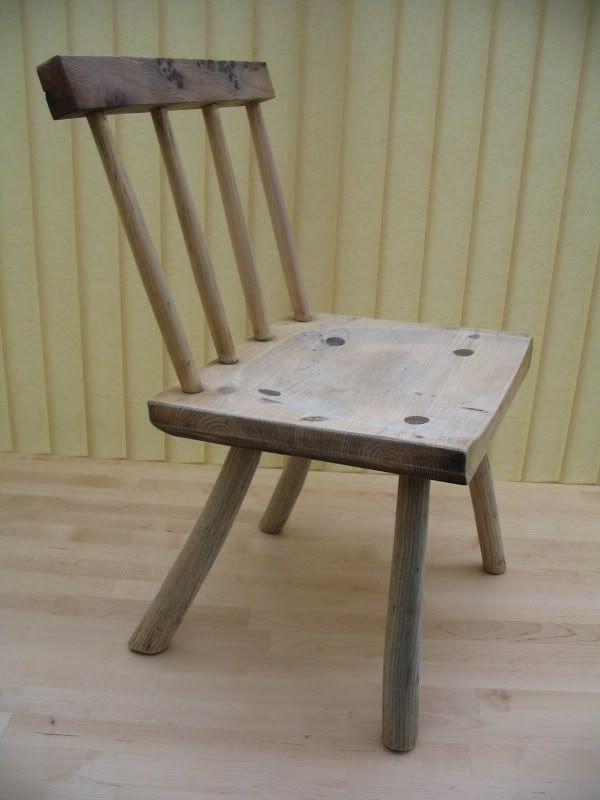
irishchair1.jpg


This one is a 3 legged kiddie sized chair, again based on an irish form. It has been stained with various glazes then cut back with caustic and wire wool, also un oiled or waxed as yet. Ash, with seat made of the sink cut out from my worktop off cut.
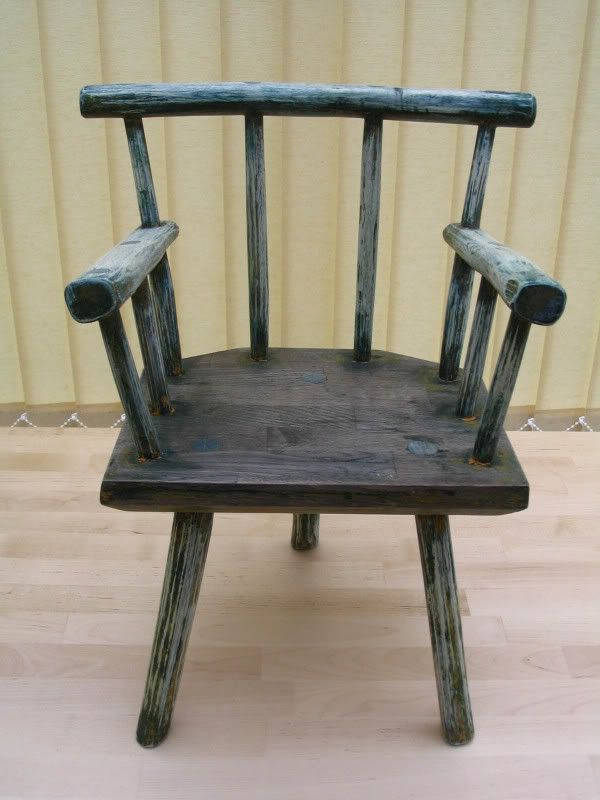
bluestool2.jpg


Final one is another 3 leg kiddies one that I made some while ago but wanted to work on the finish so I cut it off with custic/sugar soap etc then used red oil glaze then heated buffed up wax (as in Ian hosker's finishing book which I just got) Made from ash and old joist's
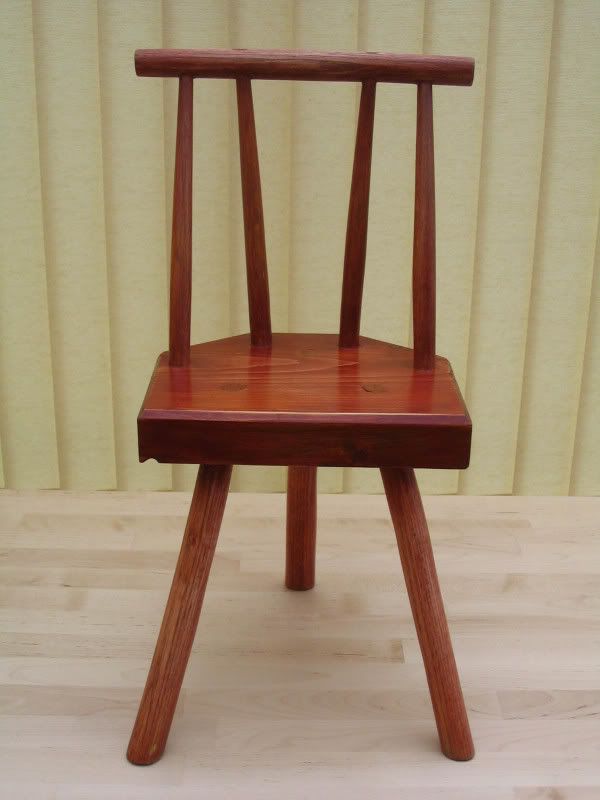
redstool2a.jpg


I'm trying to create an aged distressed look and texture in all my piece's but its a lot harder than it would seem to be to look convincing (I'm not trying to con people, but real old country furniture fetch's silly prices now :roll: ) I like to deliberately make some component's slightly wonky just as you get with old primitive furniture.

I got a much bigger 3 leg welsh-type chair in progress I'll post some pics in due course. I'm sourcing firewood suppliers that will save decent crooks and bends and sections from the base of the tree (= flared klismos legs) and to make up a 3 part joined arm
cheers Jonathan :D :lol:
 
Very nice chairs Jonathan. Old floor boards never looked so good. Did you see the New Yankee Workshop show where Norm visited the couple who made and "distressed" Windsor chairs? there were lots of coats of dye, paint and lacquer with lots of sanding and scraping in between. The chairs looked good but personally I'm not so sure about the whole distressed look thing.
 
Hi Jonathan

Very chairs and nice to see some of your work in the flesh ( well the last time you posted some it was in sepia)

I see you like the rustic look :wink:

That reminds me I have a windsor to repair and sell :roll:
 
Jonathan,

Yes very nice :D, the middle one I particulary like, not quite sure why, just looks spot on. 8)
 
i'm with DaveL I also like the design and got me thinking of a seat from a offcut from a worktop (Ikea).
Saying that the seat on the third is too thick for my liking, just me prob
 
Thanks for your kind comments gents :D

Your comment George about distressing, wether its a good thing or not?? I think could do with its own thread, its something I've thought about a lot.

As you may have realised I aproach chair building from an artists point of view (being trained in sculpture at Goldsmith's college in Londn), I do LOTS of sketches, designs visuals etc, when the drawing is flowing well, its usually less effort to get the chair forms to work. If I labour too much they loose their spontaneous quality. I study all sorts of furniture forms. I take risks and mess up often, but lately the gap between what I can see in my imagination and the actual finished end result is getting smaller and smaller :roll: :lol: :lol: .

I got a bunch of thick beech table top's cheap on the off chance from ikea at Lakeside park end of range clearout just managed to get them home on the roof :lol:
 
All very nice,Mr.S. :D
Particularly like the idea that they all contain at least some recycled timber.

Andrew
 
Sawdust Producer":24ibo3wk said:
i'm with DaveL I also like the design and got me thinking of a seat from a offcut from a worktop (Ikea).

Go for it man, its extremley satisfying wedging it all together. :lol: :lol: Just about all you need is jack plane axe drawknife spokeshave brace and bits and scraper; also an adze if you want a dished seat :wink: PM me if you want other pics (not of my work but other stuff from my archive) for ideas/inspiration??

Cheers Jonathan :D
 
Excellant Jonathan and much better pics too.

As usual you make it all sound so simple.

Andy
 
Hallo Mr S

Great stuff. Love to see it. But how stable do you find those three legged chairs to be? Some friends used to have three legged dining chairs and they were always tipping somebody on the floor. No, it wasn't the wine!

Regards.
 
mr spanton":2abu5p6x said:
I like to deliberately make some component's slightly wonky just as you get with old primitive furniture.

Best come and work in my workshop then, as there is obviously some kind of discontinuity in the space - time continuum that ensures that no matter how carefully I measure, mark and cut, something always ends up a bit wonky. Obviously it isn't something I am doing wrong - perish the thought! :oops:

It's obviously this tear in the trans-dimensional whatsit that they keep banging on about in Torchwood that runs through Cardiff - it obviously extends a few miles north and right through the middle of my workshop. This would also explain where the tools that I can never find keep disappearing to - they obviously fall through the hole, only to re-appear when I am no longer looking for them.

The more I think about it, the more it makes sense. The truth is out there!!!!

Taffy
 
Taffy,

These "time warp" things seem to crop up everywhere, although I have a theory that the time an object remains in the time warp for is inversely related to its size. Fortunately this means that you are fairly unlikely to lose your whole workshop for very long at all, but something as small as a pencil could remain trapped in the ether for a very long time, perhaps until after we have all passed away....

Cheers,

Dod
 
Evergreen":2igk1rcb said:
Hallo Mr S

Great stuff. Love to see it. But how stable do you find those three legged chairs to be? Some friends used to have three legged dining chairs and they were always tipping somebody on the floor. No, it wasn't the wine!

Regards.

Valid comments Evergreen :D
My first attempts were a bit unsteady, but I had a tendency to make all the leg's too near vertical, I've had to be much more daring with extreme splay's to add stability even 15-20 degree's. Curved legs also help, dont know why :lol: I've got another little experiment in the pipeline with 2 curved legs at the back and 1 at the front similar to a George Nakashima type arrangement, I'll see how that works.

cheers Jonathan :D
 
Jonathan,

I particularly like the first chair, it looks great, and I also rather like the back/arm interface of the second one (although I expect that it takes a fair bit of fiddling to fit).

Do your experiments with curved legs start off more vertical at the seat and become more horizontal as they reach the floor? Do you make these curved parts from curved pieces of wood to maintain fairly continuous grain?

Great stuff, looking forward to seeing more :D

Cheers,

Dod
 
Hi there northern Dod :D :lol:

Thanks for the comments
The gibson type with the arm's is not too bad to do, but I've had a LOT of practice at drilling holes and remembering the angle's. I'd be ashamed to say how many cack up's ended up in the bin :oops: :oops: , but you improve with practice :lol:
I always make the undercarriage first (legs tennoned into tapering holes in the seat and wedg'd) I use an Alexander type wooden reamer to make the taper'd holes. Then I drill for the back row of spindle's, & wedge them in. Then I drill the top rail and loosely assemble it on the tops of the spindles. I drill the front and intermediate post hole's next and insert short spindles in those holes. I decide on the arm height and cut a pair of short battons to hold the arm at that height while I mark the position's & angles on the side. I drill them and thats about it. The connection of the 2 outer back spindles with the arms IS a tad tricky. The lower section of the spindle is fatter than the section above the arms. So I use a small taper'd reamer to make a cone shaped hole in the back arm holes. I carefully adjust the swell on the outer back spindles with a fine spokeshave or tiny block plane until the tapered bit on the arm just sits snugly at the right height as determined by my short battons. Then its a case of inserting and wedging the short spindle's into the seat; slide the arms over the outer rear spindles and the short spindles wedging them in place at the correct height; then fit on the comb and wedge it in place. It normally works out OK with a bit of fiddling and fettling especially if the arm post's are at extreme angles; and this type of construction is very forgiving, its flexible to some extent to allow for slight "errors" in drilling angles etc :whistle: .

When drilling into the seat its obviously easier to do the closer the angle is to plumb. If I have to do an extreme angle for a straightish leg, I sometimes clamp a scrap block on top of the seat and drill into it first so the hole in the seat has a clean cut with no break out chip's. But if you use curved legs its the best of both worlds. I've seen some chairs or stools where the legs arent far off horizontal where they contact the floor :shock:

And your right, I do use curved stock, still cleft, but from curved log's. In fact I'm in negotiation today with another tree surgeon who as I type is chipping the thinnings from my neighbour's hedge, to supply good natural bent branches for 3 part arms and swept root stock for flared legs. Why fanny on laminating or even steam bending when nature's done it for me :lol:
cheers Jonathan :D :ho2
 
Wanlock Dod":1wgzcqg2 said:
Fortunately this means that you are fairly unlikely to lose your whole workshop for very long at all,

Dod,

Don't you believe it - when the Welsh rugby team won the Grand Slam I couldn't even find my house for two days after!!!!! :oops: :lol: :eek:ccasion5: :eek:ccasion5: :eek:ccasion5:

Taffy
 

Latest posts

Back
Top