SAW-TOOTH SETTING ADVICE

UKworkshop.co.uk

Help Support UKworkshop.co.uk:

This site may earn a commission from merchant affiliate links, including eBay, Amazon, and others.
xy mosian":qvgy96ug said:
The gullet on the saw set. The gap in the saw set frame that goes over the saw blade when in use. As I said further on " The bottom of the gullet is the place where the teeth rest. " (When the set is in use.) Can anyone think of a better name for it, gap, slot, mouth ?

HTH

xy

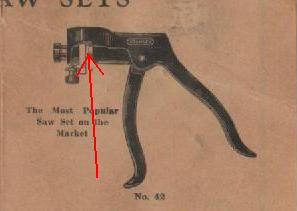
Don't know the word, but I think you mean this?

saw+set.JPG


Cheers Pedder
 
Okay, now I understand which bit we're talking about, but I still don;t know where this 'packing' is going, or what it looks like :oops:

Sorry if I'm being a pain here but I am sat looking at the 77 now and just can't see what i'm supposed to stick where. Sorry.
 
Pedder, spot on. Sorry I didn't get to a picture.
Now then the packing. Place the saw set over a saw blade as if to set a tooth. The teeth of the blade will be in contact with the bottom of the gullet. Now place a thin piece of plastic, or similar, between the teeth and the gullet bottom and there you have the packing which will reduce the amount of set.
The thickness of the packing will need to be chosen well. Too thick and you get no set, too thin and too much. If you choose your packing with the anvil mid rotation, you will still have some fine adjustment available.

From my dictionary some of the meanings of 'Gullet', throat, ravine, trench.

Hope this clears things up a bit. (HTCTUAB :lol: )

xy
 
xy mosian":2qymfwd2 said:
Pedder, spot on. Sorry I didn't get to a picture.
Now then the packing. Place the saw set over a saw blade as if to set a tooth. The teeth of the blade will be in contact with the bottom of the gullet. Now place a thin piece of plastic, or similar, between the teeth and the gullet bottom and there you have the packing which will reduce the amount of set.
The thickness of the packing will need to be chosen well. Too thick and you get no set, too thin and too much. If you choose your packing with the anvil mid rotation, you will still have some fine adjustment available.

From my dictionary some of the meanings of 'Gullet', throat, ravine, trench.

Hope this clears things up a bit. (HTCTUAB :lol: )

xy
:idea: and there's the lightbulb moment :D

Yep, I get where you're coming from now. So get the packing thickness right, and tape it along the length of the blade, in the right position, and I should just be able to whizz along one side, flip blade and move packing and repeat on the other side.

Cheers xy, I will try and find some time this week to give that a bash. I've a couple of old saws that could do with a tidy up so I can use them to practice on.

And I would just call it the 'blade slot' ;)
 
Trim sorry not quite.

Setmouth.jpg

I hope this makes it even clearer. There may be little clearance between the anvil and the bottom of the gullet (blade slot), in which case position the packing as best you can.

xy
 
Hi,

Looking at the D&M ones one has flat lugs on each side, drill and tap for adjuster screws? I will dig all mine out and see if I have one with lugs.


Pete

Yes I do have several :wink:
 
I've just been looking at mine. The thirty year old bought new, and the new one which has lots of slop. The anvil is a round piece of steel which has a chamfer all around the edge on one face. The size of this chamfer changes to give different setting for the saw teeth, if you've got one it will make sense on inspection.
Now I've done a bit of metal work, school stuff mostly, and I cannot think how this could be machined without some fairly complex machinery. Any ideas anyone?
Of course I was thinking of replacing the anvil for use with fine toothed saws.

Pete, your adjuster screws sound like a good idea, let us know how you get on.

Pedder, you are the saw king around here. What sort of set would you use on, say, a 20 tpi saw? I hope you don't mind me asking.

xy
 
xy mosian":37g6jt9s said:
What sort of set would you use on, say, a 20 tpi saw? I hope you don't mind me asking.

Hi xy mosian

I don't believe that the amount of setting depends on tpi.

I believe it depends on cutting depth, experience of the sawing person, moisture of the wood, kind of wood, length of the saw, length of the cerve....

I don't set a 15tpi dovetail saw more than a 20tpi dovetail saw. How much? That it cuts well and fast. :)

Okay, I'll tell when i measured after the weekend.

Cheers
Pedder
 
Pedder. Thanks for the prompt reply. I can see good reason for all you say. But methinks this could be as mind boggling as effective pitches in plane iron sharpening :) I have an old book, a guide for beginners, which suggests that the sawn kerf should be three times the thickness of the blade. Now I always thought that was too much and set less than that. Personally I tend to the finest set which will work well, there is less physical effort involved then. :) Snag is of course many of us are part time woodies without the experience to make judgements such as you suggest. Still if it were easy everyone would be doing it.

Must add, no critisism of your reply intended here at all. I hope it doesn't read like that. Quite the reverse you've opened up even more areas for thought. Thanks again. :)

xy
 
xy mosian":pgvdz9vk said:
I have an old book, a guide for beginners, which suggests that the sawn kerf should be three times the thickness of the blade.

Fare too much on any saw.

xy mosian":pgvdz9vk said:
Personally I tend to the finest set which will work well, there is less physical effort involved then.

I agree 100%. The problem for me as a maker is to anticipate wich is the finest set wich will work for a customer. But when you sharpen your own saw, you can try in real life. (Wich is what I do most of the time.)

xy mosian":pgvdz9vk said:
:) Snag is of course many of us are part time woodies without the experience to make judgements such as you suggest. Still if it were easy everyone would be doing it.

Now I tell you a secret: It is that simple. Nike comes to my mind: Just do it.

xy mosian":pgvdz9vk said:
Must add, no critisism of your reply intended here at all. I hope it doesn't read like that. Quite the reverse you've opened up even more areas for thought. Thanks again. :)


No offense taken. I do understand, that you want to hear the big secrets. But all I can tell you is there are no big secrets. Just training and practice.

Cheers
Pedder
 
pedder":n95f12tz said:
Nike comes to my mind: Just do it.

Cheers
Pedder

Thanks Pedder Nike's advice, via your good self, should be my motto. I do tend to think things through for far too long. In fact a one time boss of mine accused me of "Making a career out of a project" on several occaisons. :oops:

xy
 
xy mosian":1dcpr7y8 said:
Now I've done a bit of metal work, school stuff mostly, and I cannot think how this could be machined without some fairly complex machinery.

From an old post to OLDTOOLS:

paul womack wrote:

> So; has anyone out there tried non-uniform
> teeth in a saw?

Heh, heh. At the risk of replying to my own post,
I have (now).

Summary; it took a while to do, and the saw cuts well.

Longer version.
I spent 10 minutes filing off the old 14 TPI teeth,
and then filed a 1/8" camber onto the toothless edge.

Since this saw is to be used for tenons and dados,
I felt a "breasted" edge was desirable.

I then SiC'd and polished the blade - this is normally
difficult due to the teeth shredding up your
abrasive, so I made the most of my opportunity

The layout was done by using a computer to print
out the graduated teeth pattern on paper,
and simple gluing the paper on to the saw.

Initial filing is tricky - you need to make a "notch"
somewhere in the gullet of each tooth. Once you have
a prelimnary gullet, it's quite easy to guide the
triangular file left/right rather accurately
as you work downwards.

Once I'd more or less created the teeth, I removed the
paper, and did a final shaping and evening up pass.
All the work to this point was done from one side of the
saw. I find this *MUCH* easier, especially when filing BOTH
sides of a large tooth to get it's size and position correct.

I then applied moderate set with a modified Eclipse
#77 saw set.

SIDEBAR - the Eclipse #77 saw set
Eclipse #77 saw sets normally apply too much set -
the marked TPI settings around the anvil are WAY off.

Worse, you can't just use the setting for smaller teeth,
since the angle of the set is more or less constant (at around
20 degrees). If you use (e.g.) the 10 TPI setting on 6 TPI
teeth, you just bend the top part of the tooth, but still
at 20 degrees. This does give you less total set,
but in the wrong way.

I therefore removed and reground the anvil disc from
one of my #77's (I'm not a c*ll*t*r, no sir).

I ground a good amount of material from the thickness
of the disc (thus reducing the amount
of set) and then bolted the disc to the end
of a plywood scrap, and clamped the scrap in my
giant honing jig. I could then set the jig to my desired
angle (around 13 degrees) and carefully grind the disc.
Rotating the disc gradually on the bolt allowed me to make a
varying size, contsant angle bevel around the circumference of the disc.

Doing this the "quick" way by carefully eyeball the spiral
took very careful judgement and several passes.
It would probably have been quicker to measure/mark some depth stations,
grind these accurately and then interpolate.
END

(later I realised that that end of the plunger needed to be at the same angle as the face of the anvil, and ground the plunger's end face too)

BugBear
 
Strange BB, I was reading that very post on 'Old Tools' earlier today, completely missed the sidebar about the '77. Was it more than just a gut feeling that led you to a setting angle of 13 degrees?
I had worked out the thinning of the anvil to reduce overall set, but I'd still like to know how such a thing could be machined. That of course is a different story.

xy
 
Hi,

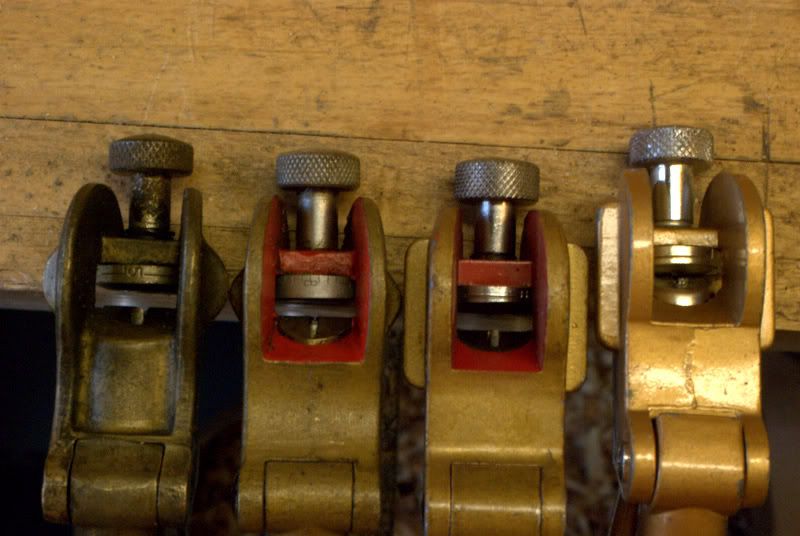
I checked my 77 style saw sets
DSC_0004.jpg

L to R Eclipse77, Eclipse 77, Somax, Unbranded
None of them have big enough cheeks to drill and tap.

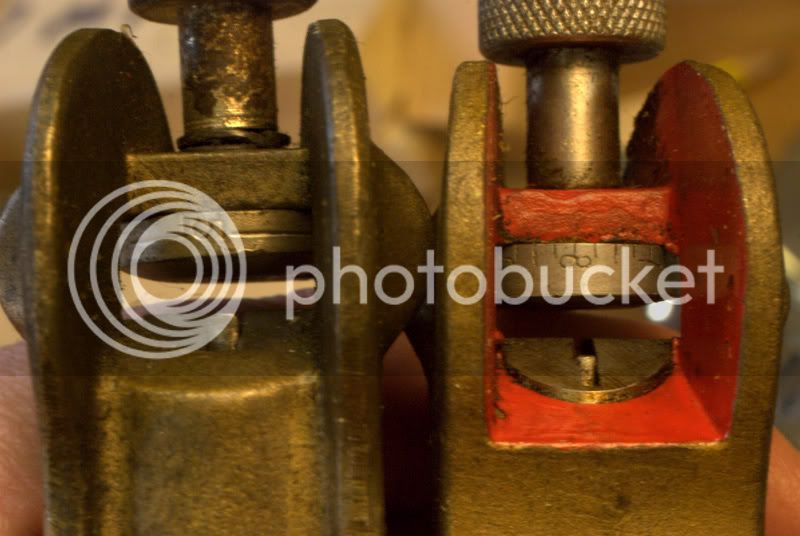
But it did show up a startling difference in the two Eclipse 77 the hammers are very different sizes 2.36mm and 1.51mm.
DSC_0006.jpg

Any one come across this before? They are both marked Eclipse 77 and Made in England but the fatter one looks older, its has more metal to it, the thinner one looks simplified and streamlined, like the accountants have got there hands on it.

Pete
 
Pete, one of the things that makes my recent, 12 month old, '77 horrible, is the fit of the hammer in the 'sliding clamp?'. It is noticeably thinner than the same part in the thirty year old. The 'sliding clamp' in the older model is machined steel whereas in the newer it looks like a plastic casting (I kid you not!). The fit between the hammer and clamp? You could drive a bus through the gap as they used to say.

Another great shame because the design, to my mind, is well thought out. :cry:

xy
 
xy mosian":2p6i67dm said:
Strange BB, I was reading that very post on 'Old Tools' earlier today, completely missed the sidebar about the '77. Was it more than just a gut feeling that led you to a setting angle of 13 degrees?
It's just "less than 20"

I had worked out the thinning of the anvil to reduce overall set, but I'd still like to know how such a thing could be machined. That of course is a different story.
xy

OK. Since there seems to be some confusion, I'm made diagrams, which I hope will help.

Let's start with my claim that the plunger angle needs to match the anvil angle (which also implies that the anvil angle must be constant around it's circumference).

ecl77_match.png


If the plunger angle is too obtuse, the tooth can't be bent over as far as the anvil allows, so that's wrong (left hand side picture).

If the plunger angle is too acute, the teeth is subject to excess pressure (since the plunger effectively makes a point contact), so that's wrong too (right hand picture).

We're left with "they must match".

Moving on to "adjusting the set".

ecl77_set.png


In the left hand pictures (representing the #77 as supplied), the amount of set is adjusted by rotating the anvil. This has the effect of moving the "location of the bend" up or down, because of the spiral.

Since the anvil angle is constant, moving the bend point up reduces the set, moving it down increases it. This can be seen on the diagram.

However, if one wishes the bend to be at the mid point of the tooth's height, the amount of set is NOT adjustable - it is determined by the anvil angle.

Further, on a stock #77, the spiral bend point does not go all the way to the edge of the anvil disc, so there is a lower bound to the set.

For this reason, I reground an anvil (as described) so that the angle was lower, and so that the spiral went all the way to the edge. This is the case on the right hand pictures.

The lower angle means that you get less set for a given bend point (i.e. tooth size, if you're following the mid point recommendation).

So this modified #77, in toto, gives less set for a given tooth size (due to the lower angle), and will handle small teeth (due to the spiral going all the way to the edge, and the narrowed plunger).

While I'm on, I'll also point out that older #77's have narrower plungers.

BugBear (exhausted!)
 
Pete Maddex":33i4ho9v said:
Hi,


But it did show up a startling difference in the two Eclipse 77 the hammers are very different sizes 2.36mm and 1.51mm.
DSC_0006.jpg

Any one come across this before? They are both marked Eclipse 77 and Made in England but the fatter one looks older, its has more metal to it, the thinner one looks simplified and streamlined, like the accountants have got there hands on it.

Pete

I bet the right hand one is older. Look at the much nicer and clearer number markings on the anvil. it also has the (desirable, IMHO) narrow plunger.

Any chance of pulling out the anvils (don't mix them up!) and photographing the spiral, and measuring the angle (see my post for what I mean by angle)?

BugBear
 
Hi,

My money would one on the left one being older, it’s more curvaceous than the one on the right.
I will pull then tonight.


Pete
 
BB / Pete

Whichever of you is correct ( I'm with BB as it happens) this tool certainly changed over the years ( quality of casting, plunger width, fine/course adjustability)

Amongst those I have :roll: some are much better than others. If I had any sense I hoick quite a few in the bin as I'd never contempate using them

At some point Eclipse lost the plot, so we should not talk about "a 77" as if they were all the same quality
 
bugbear, thanks for that explanation.

The anvil on my older '77 (30yrs) does not have a clearly defined corner where the spiralled chamfer meets the flat of the anvil face. Visually this looks rather like a blend radius. The 'striking' face of the hammer is very slightly curved, really very slightly. It certainly does not match the curve of the anvil. Hammer thickness is 2.4mm. However the edges of the'striking face' are chamfered reducing the width of the face to 1.9mm, as nearly as I can tell with a dial caliper.

On the newer '77 (2yrs) the same, chamfer/face, corner is definitely an angle. As for the hammer face, that can easily be seen to be curved even without the aid of a straight edge. Hammer thickness is 1.8mm.

I find it kind of interesting that the screw thread used to hold the anvil in place is the same on both models. 4.7mm diameter for the screw, now this could be 3/16", I wonder if they are using old tooling?

But, as lurker said, "At some point Eclipse lost the plot, so we should not talk about "a 77" as if they were all the same quality". Same as nearly all once great tools really.

xy
 

Latest posts

Back
Top