Sanity check please : razee jack to scrub plane WIP

UKworkshop.co.uk

Help Support UKworkshop.co.uk:

This site may earn a commission from merchant affiliate links, including eBay, Amazon, and others.

baldpate

Established Member
Joined
30 Jan 2011
Messages
271
Reaction score
10
Location
London
Hi all,

I recently posted a question (here: http://www.ukworkshop.co.uk/forums/post666408.html#p666408, in a general discussion about scrub planes), asking about mouth shape in a conversion I was contemplating. I've now started the conversion, but before committing further effort I would dearly love a sanity check from those who have first hand knowledge (I have never used, nor even handled, such a plane before, so I am unsure what to expect by way of performance).

First a picture of the plane I'm starting with : a 14" razee jack with a double iron; the iron is 1.75" wide and Robert Sorby cutting iron is 4mm thick at the bevel end. You can see why I called it "knackered" in the previous thread - the tote is chipped and loose, the strike button is missing (though leaving a nice hole for a future front knob :)), and there are some cracks in the body (nothing too serious).
DSCF0258_small.jpg


So far, I have concentrated on shaping the cutting iron and the mouth. I put a 90mm radius arc on the cutter, then rough ground the bevel to 25 degrees by eye, finishing with flattening the back and honing a 30 degree final bevel using a WorkSharp and a simple jig. The mouth I opened with a chisel and rasp (still rough and unfinioshed, but large enough for this test I believe). See the next two pictures:
DSCF0261_small.jpg

DSCF0260_small.jpg


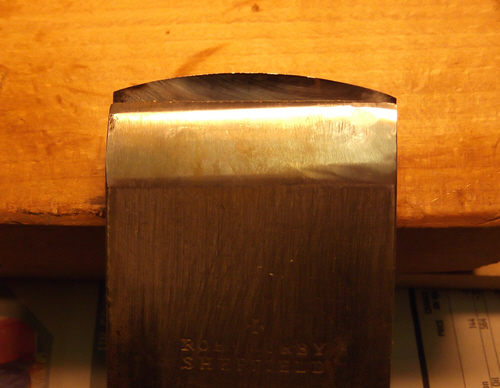
The cap-iron is well out of square (see next photo), but I suspect this doesn't matter too much for the intended use - I'm assuming a 4mm-thick cutting iron should be enough, without support to the very tip from the cap iron. Is that right, do you think?
DSCF0263_small.jpg


Now (at last!... I hear you say) for the sanity check :) ...

With about 1" width of blade, projecting a tad less than 1mm through the mouth, I tried reducing two boards both in width and thickness. One was a badly cupped 'pine' board (6" wide x 1" x 36" long) - not really 'pine', just some sort of cheap B&Q-type softwood. The other was a smaller piece of engineered oak shelving (5" wide x 1.25" x 9" long), which was flat and square to start with.
The two photos below show the chips/shavings produced from the two types of wood.

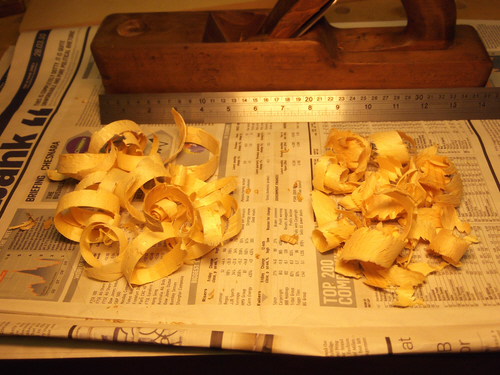
First, the softwood. This felt OK, generally. Planing along the narrow edge to reduce it in width produced longish shavings about 0.9mm thick (pile on the left in the picture). Planing diagonally across the width to reduce the thickness produced the pile on the right - same thickness, shorter shavings (more like 'chips') : generally felt OK but with some tendency to tear out lumps, particularly near knots.
DSCF0265_small.jpg


Then the oak. This didn't feel at all good. Planing along the narrow edge to reduce it in width didn't produce shavings - more like curly chips (see pile on the left). Same thickness as before. It worked, but it wasn't a nice experience. Diagonally across the width produced even smaller chips (pile of the right), and again the tendency to tear bits out of the wood rather than to cut it (no knots in this board) - definitely felt more like gouging than planing - not something I would care to try on anything except scrap wood.
DSCF0264_small.jpg


So, to the question: is this about what you would expect? If not, can you tell from the pictures and description I have been able to provide what I should be doing differently? Is the radius of the camber on the blade to great/aggressive? Retract the blade more on hardwood? Throw ii in the bin and buy a planer/thicknesser :) ?

I don't expect to have to use a scrub plane very often, so this project is being undertaken more in the spirit of experiment and self-education than of necessity; I'm therefore reluctant to expend more effort on this project (tote repair, adding knob, etc etc) if it's a non-runner. Any comments or advice you can offer would be very welcome.

Many thanks

Chris
 

Attachments

  • DSCF0258_small.jpg
    DSCF0258_small.jpg
    168.2 KB
  • DSCF0261_small.jpg
    DSCF0261_small.jpg
    168.3 KB
  • DSCF0260_small.jpg
    DSCF0260_small.jpg
    119.6 KB
  • DSCF0263_small.jpg
    DSCF0263_small.jpg
    142.3 KB
  • DSCF0264_small.jpg
    DSCF0264_small.jpg
    204.7 KB
  • DSCF0265_small.jpg
    DSCF0265_small.jpg
    194.1 KB
You haven't shown us the planed surfaces of the wood. The shavings don't matter just stuff them in the bin, don't even look at them! If you were a hairdresser you wouldn't judge your performance by the hair on the floor!

If it's cutting rough it's either blunt or too deeply set. Probably both judging by what you say about the oak.
 
that's what scrub planes do. follow it up with a longer plane set fine with no camber, then a smoother.
 
Scrub planes will leave a nasty surface, but I would try putting more radius on the blade before binning the project. I note that commercial scrub planes have a radius around 75mm, which will remove less wood across its width because it's narrower, but in a more focused area... not explaining myself very well, but when carving violin tops, a deeply curved gouge removes wood quicker and neater than a flatter one and, while I realise that the plane blade is not gouge shaped, the greater radius would have the same effect. Also be a bit easier to push.

For the record, I only really use my scrub for thicknessing stock, for rough levelling I use an old Acorn jack with a radius of about 8 inches, more than enough.

El.
 
I bought the ECE scrubber in a spirit of enquiry. It works really well.
It's good for taking off bumps and rough surfaces but if, like most woodworkers, you buy sawn timber, they aren't really necessary IMHO.
I guess most scrubbers were just old knackered planes with a steep camber to the edge, set aside for rough work, rather than purpose bought. So Chris is on the right lines - he's got there, he doesn't need to abandon the project!!
They seem to be better known in Europe and America where there is a bigger tradition of back to the woods type woodwork, log cabins etc. They'd be ideal for trimming logs to make them fit better, as an alternative to gouge, axe, adze etc
 
+1 for all above.

It sounds/looks like it's doing exactly what it's s'posed to be doing - scrubbing. It will be a very useful plane to have to hand especially if you ever try to cleave green boards or get hold of very roughly sawn, or cupped stuff.
I think you could use the 14" sole to advantage by cutting straight across the grain then coming back diagonally from both ways, taking off the high points of the previous scoops to leave shorter high points for the next, flatter plane to deal with.
Though I suspect that the plane's original purpose was not too far off what you have - a fore; with a radius of about 8 to 10".
 
Hangaboutabbit ...... Just looking at the pictures again, might you have the cap iron on the wrong side? (Third picture down.) Or is that just me being at least 4mm thick? :)
 
To my eyes it's performing as it should - you use the term "gouging". That's what it should be doing. Tearout is to be expected, but that will be cleaned up later by other planes in the sequence.

The scrub plane isn't a finishing tool but a starting tool. The first plane used in the process of flattening a piece of wood (at least in my hand tool method).

Cheers

Karl
 
In case these are any help, here are some pictures of a commercially made scrub, which works fine. I bought it in a Rutlands sale a few years ago; it's probably machine made in Eastern Europe.

IMG_0277.jpg


This shows how much blade protrudes - about 30mm width on a 40mm blade:

IMG_0275.jpg


and here it is from the side:

IMG_0276.jpg


And this is an old scrub I've shown on here before - I think Jacob was right in his suggestion that it started as an old jack plane and was split down the middle to take a narrower blade. The shaping of the toe would have been done at the same time.

IMG_4483.jpg


IMG_4484.jpg


Both these planes have single irons with no cap iron. It might be worthwhile trying yours without one - you might need to make a new wedge.
 
Thanks for all of your replies - they have persuaded me that I'm not so far off-track after all, but that I had perhaps too high an expectation of the consistency of the 'finish' I could expect from a scrub : I expected the board to be 'grooved', of course, but I thought the material would come off more smoothly than is obviously actually the case.

I shall do some more experimenting with the set of the blade, even perhaps regrind it to slightly shallower curve.

In any case I'm going to carry on with the project and finish refurbishing the body of the plane. Having a substantial front knob and tote might improve my control, as well

PS: Richard T - the cap iron is on the correct side : i.e. the side opposite the bevel, sitting on top of the cutter iron when in it's working position. I think I may have caused the confusion by the order in which I posted the pictures : the third image is shot with the double iron in place, looking down onto the sole of the upturned plane, so the cutting iron is nearest the camera (bevel showing); whereas the fourth is of the double iron extracted from the plane body, with the cap iron nearest the camera and the cutter behind it (bevel hidden).

Cheers

Chris
 
I wouldn't reduce the curve. The whole point of a scrub is a deep but narrow cut. Deep and wide is too difficult. It also needs to be fairly short. Put these together and you have a plane which will cut through the bumps rather than floating over them just nicking the tops.
Similarly on poor surfaces such as reclaimed building timbers, the deep cut takes you into the clean wood underneath and lifts off most of the grit and gunge in a deep peeling, rather than skimming shallowly through it as you would with a smoother.
Also you will get chatter marks. If you don't it means you aren't working it hard enough! It's not a finishing plane so chatter is good.

NB the finish is far worse than what you would get on normal sawn boards, so avoid the myth of using a scrub for "prep" in general - it'll make it worse, not better.
 
Jacob":3nvcidje said:
I wouldn't reduce the curve. The whole point of a scrub is a deep but narrow cut. Deep and wide is too difficult. It also needs to be fairly short. Put these together and you have a plane which will cut through the bumps rather than floating over them just nicking the tops.

+1
Traditional continental scrubs have narrow blades with very heavy camber. In this way you can have deeper cuts without expose too much blade width, a good thing for reducing tearout. Mine is from Ulmia (Germany), like that Andy showed above but with a 33 mm blade.

Ciao
Giuliano :D
 
Jacob":1gycy1hj said:
Also you will get chatter marks. If you don't it means you aren't working it hard enough! It's not a finishing plane so chatter is good.

NB the finish is far worse than what you would get on normal sawn boards, so avoid the myth of using a scrub for "prep" in general - it'll make it worse, not better.

Disagree on both those points Jacob. Chatter is never good - it means you've got it set too coarse. Not having chatter doesn't mean that you've got it set up wrong, quite the opposite. As long as it's working well (chatter doesn't equal well in my eyes) then that's what matters.

In my opinion it is a plane for removing large amounts of material quickly. So if you have a board with significant cupping, the scrub plane will quickly remove the cupping; far quicker than a jack plane. Yes, the surface will be rough, but that will be cleaned up afterwards.

Cheers

Karl
 
Karl":17lh6ogp said:
......
Disagree on both those points Jacob. Chatter is never good - it means you've got it set too coarse. Not having chatter doesn't mean that you've got it set up wrong, quite the opposite. As long as it's working well (chatter doesn't equal well in my eyes) then that's what matters......
It's something I worked out some time ago - there's a thread somewhere about rebate planes, with pics.
Over the years I've worked over 100s of old windows and one thing which used to puzzled me was very regular little marks in rebates just like the impression you might get from a feed roller on a thicknesser, smaller but perfect. I wondered if they were machine marks from some long forgotten Victorian machine.
It's only when I had a go with a wooden rebate plane that I discovered what they were i.e. chatter marks. If you work a rebate plane gently you get a smooth cut, if you whip it over fast you get chatter marks and the noise is more of a zip than a woosh. But it's otherwise a perfect cut just done a lot faster i.e. more productively. If you want a clean surface you just do the last cut more slowly.
So chatter marks in a rebate mean somebody working hard and fast, but not necessarily inefficiently.
You get the same with a scrubber. The blade isn't so tightly held, no cap iron, and the cut is deep so if you work it hard you get chatter. Not a problem, just keep zipping off the shavings! No zzzzip means you aren't trying!
 
Jacob":26ipajvk said:
You get the same with a scrubber. The blade isn't so tightly held, no cap iron, and the cut is deep so if you work it hard you get chatter. Not a problem, just keep zipping off the shavings! No zzzzip means you aren't trying!

I would describe zipping as quite different to chatter. To my mind chatter is when the blade bounces along the workpiece, normally either blunt blade or set for too deep a cut. I agree that the zipping noise indicates sharp blade, good depth of cut and efficient working.
 
The zip is the sound of the chatter which makes the chatter marks. No zip; no marks, slower rebating.

A skew plane gives skewed chatter marks, as you might expect.

PS this'd only apply to narrow rebate planes and scrubs. You wouldn't get it with a wider blade it'd stop dead or bounce as you say.
 
Jacob":387p8hw0 said:
The zip is the sound of the chatter which makes the chatter marks. No zip; no marks, slower rebating.

A skew plane gives skewed chatter marks, as you might expect.

PS this'd only apply to narrow rebate planes and scrubs. You wouldn't get it with a wider blade it'd stop dead or bounce as you say.

Blimey, Jacob, what are you on about now :? Chatter has nothing to do with the speed of planing. It's usually caused by defective bedding of the blade on the frog, or an insecurely-held blade, which sets up vibration, which is generally referred to as chatter.

Cheers :wink:

Paul
 
Paul Chapman":275ptnqd said:
....Blimey, Jacob, what are you on about now...
something you don't understand and have not experienced, obviously
....., which sets up vibration, which is generally referred to as chatter.
......
That's it you've got it. If you work a wooden rebate plane quite hard (or scrub plane as I've discovered) you get vibration (the zip referred to above) and chatter shows as fine lines evenly spaced.
Bin there dunnit - and looked closely at it so I do know what I'm talking about.
If I could find the thread you could see the photos.
 
Jacob":2yg9qvel said:
If you work a wooden rebate plane quite hard (or scrub plane as I've discovered) you get vibration (the zip referred to above) and chatter shows as fine lines evenly spaced.

Doesn't just apply to wooden rebate planes or scrubs or whether you're working the plane hard. It can apply to any plane where the seating between the blade and frog isn't good or where the blade isn't held firmly.

Cheers :wink:

Paul
 

Latest posts

Back
Top