Router operations, Is this safe?

UKworkshop.co.uk

Help Support UKworkshop.co.uk:

This site may earn a commission from merchant affiliate links, including eBay, Amazon, and others.

Ttrees

Iroko loco!
Joined
18 Nov 2012
Messages
4,927
Reaction score
926
Location
In me workshop
Hello everyone
It seems that there is very few instructional videos on the subject of routing online.
I haven't got the beans to buy some Roy Sutton DVD's, and even if I wanted them they seem unavailable ATM to purchase.
Having watched a recent Matt Estlea video, he mentions that he will be making a series on them soon.
I am excited!,
I understand that this is no mean feet for a whippersnapper to accomplish, but I can see myself learning a good deal of information
from him.
I would imagine he is thorough, considerate and savvy enough to take down and make changes to a video, if an operation was deemed unsafe.
I'd guess this won't be the case though, and he will be demonstrating most of what he learned at the Rycotewood furniture college.
I don't know what that entails, and presume that there is a lifetimes worth of knowledge to learn.

I was thinking that a tips and tricks/safe operations thread might be of use to compliment his videos, and hoping that some folks might
chime in.
This is a tall order though, so I am thinking that it would be better idea to structure the thread in a non obligating fashion,
It might make a more interesting thread.
Hoping to glean some stuff from you guys

Here are the only two pictures I have of using the router.
Handy having a stack of odd bits to lash up for a fence
Router stop.JPG


Just wondering what you folks would have done in this instance...
The 10 of these 3/4" deep slots are bench dog spacings for a Scandinavian workbench and are at 88 degrees.
Cut and chopped out first, but then what would you do?
What a serious tool for cutting to a depth, I didn't chance going too close to the line and paired to it instead.
Presume I should have made a jig, interested to see what would suit.
Bench dogs.JPG

Bench dogs 2.JPG

Bench dogs 3.JPG
 

Attachments

  • Router stop.JPG
    Router stop.JPG
    210.5 KB
  • Bench dogs.JPG
    Bench dogs.JPG
    224.8 KB
  • Bench dogs 2.JPG
    Bench dogs 2.JPG
    184.8 KB
  • Bench dogs 3.JPG
    Bench dogs 3.JPG
    186.8 KB
Surely this is a job for a simple dado jig and the router? If you've got a sliding mitre saw with trenching stop then I'd probably use that and chisel it out, it'd be quicker and less dusty than using the router
 
I was thinking I would have needed a fancier jig at the time, as the trenching was not 90 degrees to the edge.
It also seems that you need a bearing guided bit for a few of the jigs I've seen, compared to what I'd imagine Roy Sutton's videos
demonstrate.
I could be wrong with this assumption though.
Tom
 
I’m not sure I follow, the trench is 88 degrees relative to the top surface of the bench or the bottom of the trench has an 88 degree slope to it?

If it’s 88 degrees relative to the top surface I would’ve either marked them all out and freehanded them with the router to the line, which isn’t easy but doable. If I had quite a lot to do or if I wasn’t confident I could get it close to the line (or it needed to be absolutely critical size) I would definitely have made a jig. A jig could be simply made out of 4 battens, two that sit either side of the workpiece, the other two spanning the top set at 88 degrees and set parallel to each other at the same width as the base plus however much wider the groove is relative to the cutter, say the groove you want to cut is 25mm, the base is 150mm and the bit is 12.5mm, you’d want the span between the battens to be 162.5mm. Router runs on top of the workpiece and bumps up against both battens taking progressive cuts to the final depth.

A good rule of thumb, you want your progressive plunges to be half the diameter of the bit, so with a 12mm bit you’d want to plunge 6mm at a time so you’re not killing your bit or the machine.
 
I suppose I am complicating the jig that would have been necessary for the job, as the trench wall was 90 to the surface and cutting with a flat bit.
The cuts were done freehand, dropping it in 2mm increments and just a skim on the last depth and making sure to not make a climb cut.
I cleaned up the last 2mm on the walls with a chisel.
I was expecting to be told off for doing this freehand?

I could have made a custom job with four batons easily, I have some pine about, not heaps, but I'd rather make something that would
prove useful again.
Would any of this fly in a factory with strict H&S.... or would I be out the door?
 
lay the wood flat on the bench and clamp it steady.
Use a router bit that is the width of the slot.
Measure from the cutting edge of the bit to the flat side of the router base.
Clamp a batten across the wood at that measurement from the edge of the intended groove.
run the router across the wood keeping the flat edge of the router base to the clamped batten.
If its soft wood you can take 5 mm at a time. If its hard wood, 2 or 3 mm at a time.
If the router bit is not as wide as the slot, you have to cut so that one edge is in the right place, then move the clamped batten enough so that the second pass cuts the other edge.
 
Or, use a table saw and cross cut sled (but that would require removal of the guard and knife :shock: :shock: :lol: )
 
sunnybob":1xpipaa4 said:
If the router bit is not as wide as the slot, you have to cut so that one edge is in the right place, then move the clamped batten enough so that the second pass cuts the other edge.

Screw that, once you've got one in place, sit your router on with the cutter out the way, use a scrap on the other side that's the right width to give you the position of a fence on the other side, clamp the fence on. once your happy use a couple of brads and some scrap to join the fences at either end then just slide your now super complex jig along too the next slot once you're done cutting.

complex isn't it.
 
Well forty plus years ago I used a dado blade in the radial arm saw. Now I would either do the same, dado blades in the table saw with a sled (bob a lean guard over the blade slot and blade buried in a block at the exit makes it safe) or most likely pass on the square dogs altogether and drill round ones. :wink: I also have a metal milling machine so I could use it too if I wanted too.

Pete
 
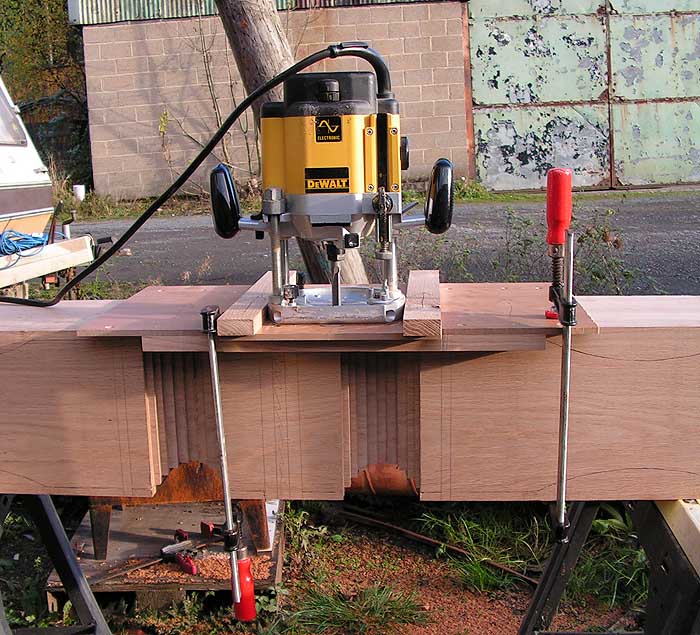
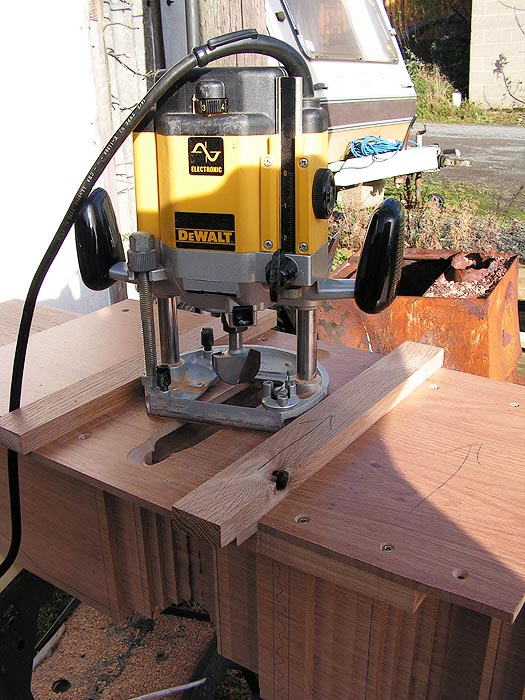
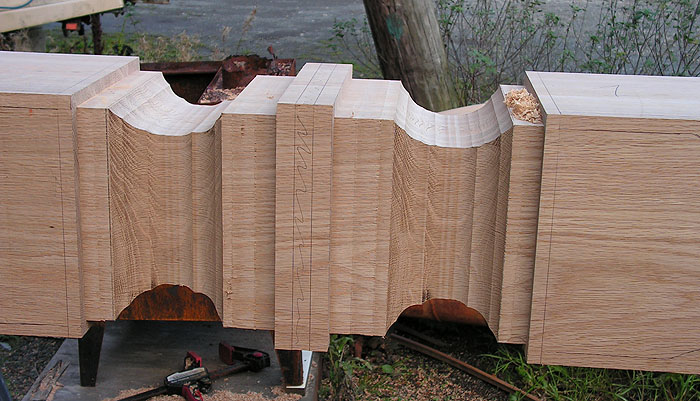
Like others have said, a fairly simple to make cross cutting jig is all that's needed, and there are a few variations of the basic pattern you could make. Here's another example of the type of thing you could use for a job of that type, in this case used to rough out the cove profile of a pair of pedestal legs in a series of ever deepening increments. This was followed by using the same cross cutting housing jig with a large diameter cove cutter in the router which replaced the 12 mm diameter straight cutter: this second cutter was used to incrementally take out the rather large steps left by the straight cutter with that process not quite completed in the last image. There are two legs in one long length at this point, which were later separated from each other at the mid-point between the cove profiles shown here. Slainte

pedestal-leg-04-700px.jpg


pedestal-leg-06-700px.jpg


pedestal-leg-07-700px.jpg
 
novocaine":1hta9ozl said:
sunnybob":1hta9ozl said:
If the router bit is not as wide as the slot, you have to cut so that one edge is in the right place, then move the clamped batten enough so that the second pass cuts the other edge.

Screw that, once you've got one in place, sit your router on with the cutter out the way, use a scrap on the other side that's the right width to give you the position of a fence on the other side, clamp the fence on. once your happy use a couple of brads and some scrap to join the fences at either end then just slide your now super complex jig along too the next slot once you're done cutting.

complex isn't it.
It could be.
using a guide both sides means that one of the passes could have the cutter rotating in the wrong direction. that would lead to jumping and jiving of the cutter and quite possibly tear out as the contra rotating bit exited the wood pile.
Direction of travel is very important on a router 8) 8)
 

Latest posts

Back
Top