Rivet Nozzles

UKworkshop.co.uk

Help Support UKworkshop.co.uk:

This site may earn a commission from merchant affiliate links, including eBay, Amazon, and others.

Lonsdale73

Established Member
Joined
21 Feb 2015
Messages
1,472
Reaction score
132
Location
County Durham
Following some advice on here I bought a Clarke rivet gun. Although described as 'new and unused' there was a mandrel wedged in it however, for the sake of the fiver it cost, that wasn't an issue. I guess it's possible that may have been left from a QC check? Did take a while to get it out.

It came with four nozzles, something like 2.4, 3.2, 4.0 and 4.8mm which I think appears to be the norm. I watched a video on how to use it, one of the key points being to use a nozzle which the mandrel just fits into. Picked up some 4mm rivets today and did a Goldilocks test to find the right nozzle to use. Small hand issues notwithstanding, I experienced a number of jammed mandrels. They were getting wedged in the inner jaws. On double-checking, seems I was using the 3.2mm nozzle not the 4mm I would expect to use. Could this be the cause of the jam or are jams common in these cheapy guns?
 
jams are common on all plier type rivet guns. jam the next rivet in to clear the old pin and get on with it. :)
 
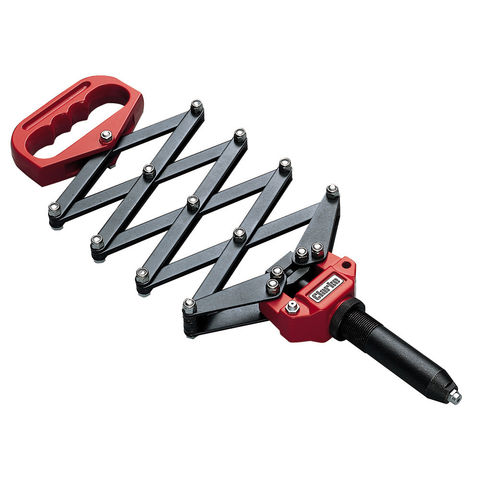
Is it the pliers type or the "lazy tongs" ones, like this:

4317BA15-B429-4D49-B634-3EEE9B8F874C-large.jpg


I've got one of the above, branded Draper, and it's pretty good. The knurled ring (where the black bit meets the red in the picture) lets you adjust the grab of the thing. I think it's supposed to be adjusted for each mandrel, but I usually don't bother. Fully extended, the pin drops out towards the scissors.

I've had several versions of the plier types, including a Stanley one. Never really been very good, although the Stanley mandrels do (did) seem to fit the pins better. The Draper one has a few combinations where the pin seems to be quite a loose fit.
 
+1.

OR, remove the nozzle completely, and eyeball it to be sure there are no burrs, bits of crud, etc, in there. ALSO, while the nozzle is removed, remove also the "firing handle" (the pin is most probably retained with either a circlip or an "E" clip), then check both jaws are also free from burrs, crud, etc. LIGHTLY lubricate the pivot pin then re-assemble.

Then repeat the above with the other 3 nozzles.

As the Instructions say, choosing the right nozzle to fit the mandrel of the rivet is absolutely critical to success with these guns - some cheapo pop rivet packs are not all that accurately marked so it's well worth double-checking the mandrel dia when first using a new pack.

It COULD also be that at least one of the nozzles is actually worn out (it does happen), even though your seller said un-used. AFAIK spare nozzles are not available anywhere, but the complete guns are cheap enough (our Aldi or Lidl had a set on sale recently for about a tenner equiv).

HTH

Edit for P.S. Just seen Eric's post. The lazy tongs are the "more professional" tools (even though pop rivets are generally frowned on except for "cheapo production" work). From The OP I thought we were talking about the plier/gun type. If lazy tongs they're MUCH more expensive than "a tenner" AFAIK. But the above points about nozzles do still apply.
 
It's this one.

I did end up taking it apart when I first got it. I had been wearing goggles as the limited instructions advised but having taken them off to read something a spring came flying oout of the gun and oppped me right in the eye! And having seen how the mandrels come flying out of the back I'm very wary of peering down the barrel of one!

Even without adequate marking, the nozzles apertures are clearly different sizes so it's relatively easy to identify which is (supposed to be) which. Similarly I can hazard a guess at which of the supplied rivets are supposed to be used with nozzle but I now know that knowing one is eg 3.2mm is only half the vital stats. They all look much too short to be much use for joining anything thicker than tissue paper!
 
OK, I presume it's the "gun" (down at the bottom of the link you provided)? Not the lazy tongs Eric pictured?

And yes, you're quite right, it's not only the diameter of the mandrel that's important. For example, in my small stock I have pop rivets with the following dimensions:

A) (1) Body dia = 2.5mm; (2) Body length (EXCL. head) = 7 mm; (3) Mandrel dia. = 1.45mm

B) (1) = 3 mm; (2) = 8 mm; (3) = 1.8 mm

C) (1) = 3 mm; (2) = 10 mm; (3) = 1.6 mm

D) (1) = 4 mm; (2) = 8 mm; (3) = 2.1 mm

E) (1) = 4.5 mm; (2) = 12 mm; (3) = 2.3 mm

Yup, I've just been out to the shop to measure them. Sets A) and B) are "steel" rivets; C), D) and E) are all Ali.

Note that the main body dia of all the 3 mm rivets seem to have a quite a big tolerance (about 0.2 mm), I didn't check them all! Tolerances seem to vary from manufacturer to manufacturer too. Important therefore to match the drill you're going to use for the holes in the job to the actual rivet body dia. (see below)

Note also that the length of the rivet chosen for the job is also very important (and note that it's the length of the body, EXCLUDING the head) that's important - as well as the diameter of the hole you drill in the sheets - the river body should be a "tight-ish" push fit into the holes.

And selecting the rivet the length is perhaps even more important than the dia of the body/the hole you drill. When riveting 2 x 2 mm thick sheet parts together (example) I would choose a rivet with AT LEAST an 8 mm body length - or even 10 mm, but NOT the above 12 mm. The length of rivet body standing clear of the job MUST BE AT LEAST DOUBLE the thickness of the 2 sheets being joined, and a bit more is OK (e.g. my 8 mm/10 MM length example above). Note also that if using a rivet with body length of more than twice the 2 sheets, a single draw of the closing trigger may not close the rivet fully. In such cases it's quite permissible to fully open the closing trigger (so opening the jaws gripping the mandrel); then slide the whole gun along the mandrel; then close again for a second/further time of closing the rivet off.

This works well, as do suitably-sized "spreader washers" inserted under the head before entering the job with the rivet for the first time, especially on delicate sheet materials. But in such cases, don't forget to allow for the thickness of the washer when selecting the correct length of rivet.

Finally, don't forget to fully deburr the holes in both sheets before inserting the chosen rivet for the first time. The 2 sheets >MUST be sitting flush together to achieve any success with pop rivets. And a couple of spring clamps each side of the hole are no bad idea either, especially on thicker sheet jobs.

Sorry if any of the above is teaching granny to suck eggs.
 
They are really meant for sheet work.
I do have some long shank rivets, they are for joining 3mm grp to 3mm aluminium (amoungst otger stuff inclluding some 20mm shanks). Not your typical use though. I dont think ive ever used a plier type on them though. The rivet only needs.0.5 to 1mm clearance on the back to cinche up (excluding the pin head). Wouldnt want to fly in a frame with that but for most mundane stuff it'll hold just fine.
 
And here me and AES differ for a change. Only on the shank length and hole dim though. You can get away with a little bit of slop as the rivet body will expand in the hole to accommodate (+- a thou or so). Everything else id agree with.
 
I think our 2 posts crossed novocaine. Agreed that pop rivets are really only designed for sheet metal work (but NEVER, EVER on aircraft that's what I was always taught)!!!

But I disagree about your "half to one mm" length for closing off. I was always taught at least double the thickness of the 2 sheets making up the job (as per my post above).

But in "practical reality", pop rivets, though certainly not really structural, really are a handy "bodge" to have in the home workshop. For example a couple of weeks back I saved us about 25 quid by repairing our (PVC?) under-sink kitchen waste bucket thingy with a bit of sheet Ali and a few pop rivets (with spreaders under the heads). Have also satisfactorily repaired some garden implements in similar fashion too.

But must say too that about the only "professional" use of pop rivets that I've ever really noticed is on the big Ali "boxes" fitted to delivery vans, light trucks, etc. It seems that your experience is somewhat more extensive than mine?

;-)
 
Nope, reckon we are about the same. We used the on hovercraft (they fly too). For none stuctural youll be fine with minimal clearance, for structural i think id agree with you. We used thenlm on airframes for none stuctural, skins on light aircraft and the like.
 
AES":2atjcnza said:
OK, I presume it's the "gun" (down at the bottom of the link you provided)? Not the lazy tongs Eric pictured?

And yes, you're quite right, it's not only the diameter of the mandrel that's important. For example, in my small stock I have pop rivets with the following dimensions:

A) (1) Body dia = 2.5mm; (2) Body length (EXCL. head) = 7 mm; (3) Mandrel dia. = 1.45mm

B) (1) = 3 mm; (2) = 8 mm; (3) = 1.8 mm

C) (1) = 3 mm; (2) = 10 mm; (3) = 1.6 mm

D) (1) = 4 mm; (2) = 8 mm; (3) = 2.1 mm

E) (1) = 4.5 mm; (2) = 12 mm; (3) = 2.3 mm

Yup, I've just been out to the shop to measure them. Sets A) and B) are "steel" rivets; C), D) and E) are all Ali.

Note that the main body dia of all the 3 mm rivets seem to have a quite a big tolerance (about 0.2 mm), I didn't check them all! Tolerances seem to vary from manufacturer to manufacturer too. Important therefore to match the drill you're going to use for the holes in the job to the actual rivet body dia. (see below)

Note also that the length of the rivet chosen for the job is also very important (and note that it's the length of the body, EXCLUDING the head) that's important - as well as the diameter of the hole you drill in the sheets - the river body should be a "tight-ish" push fit into the holes.

And selecting the rivet the length is perhaps even more important than the dia of the body/the hole you drill. When riveting 2 x 2 mm thick sheet parts together (example) I would choose a rivet with AT LEAST an 8 mm body length - or even 10 mm, but NOT the above 12 mm. The length of rivet body standing clear of the job MUST BE AT LEAST DOUBLE the thickness of the 2 sheets being joined, and a bit more is OK (e.g. my 8 mm/10 MM length example above). Note also that if using a rivet with body length of more than twice the 2 sheets, a single draw of the closing trigger may not close the rivet fully. In such cases it's quite permissible to fully open the closing trigger (so opening the jaws gripping the mandrel); then slide the whole gun along the mandrel; then close again for a second/further time of closing the rivet off.

This works well, as do suitably-sized "spreader washers" inserted under the head before entering the job with the rivet for the first time, especially on delicate sheet materials. But in such cases, don't forget to allow for the thickness of the washer when selecting the correct length of rivet.

Finally, don't forget to fully deburr the holes in both sheets before inserting the chosen rivet for the first time. The 2 sheets >MUST be sitting flush together to achieve any success with pop rivets. And a couple of spring clamps each side of the hole are no bad idea either, especially on thicker sheet jobs.

Sorry if any of the above is teaching granny to suck eggs.

Not sure where the link is taking you but when I checked it just now it went straight to an ebay listing with a whacking great big picture of my rivet gun. Thanks though, by no means sucking eggs with some salient points I wish I'd known earlier.

On average it takes two to three pulls to rivet. Having small hands, I have to use them garden shears fashion so I have some bruised knuckles from instances where it snapped off and my hands banged together.
 
Lonsdale 73 wrote, QUOTE: I have to use them garden shears fashion so I have some bruised knuckles ..... UNQUOTE.

Yup, been there, got the plasters to prove it (ouch)! ;-)
 
The best hand riveters are tucker TT55's. Modern ones are ok for hobby use but we wear the jaws out in a couple of months at work (go through literally thousands of 1/8" stainless and ally rivets a year) so I've taken to scouring ebay to build up a stock of the vintage ones which last much longer. You can tell the good old ones as they've got a square section handle - the round ones are where they started to go downhill. We do have an awesome gesipa battery riveter for larger ones as well - much easier on the hands!
Edit
If you're doing sheet metal work, the same goes for tin snips - best ones are gilbow, I've no idea how people use those aviation style things. And they've got enough weight behind them to use as a light hammer :lol: new ones aren't as good though, the grinding is all over the place.
 
Pro flight cases for music gear most certainly cannot get away with bodge fasteners , everything is pop rivet , wood to alu to steel , best stuff has steel washers on the back sides. I recently re-sized a flight case by removing the rivets and track sawing right through the ply and alu extrusion sides , went back together perfectly, I used large lever tongs , best is air powered , but watch out for those mandrels they can really fly ,
 

Latest posts

Back
Top