


Derek Cohen (Perth Oz)
Established Member
In July, I posted a router-based method I used to remove the waste from hand cut hand-blind sockets (link). This involved orientating the boards vertically and routing into the end grain. This necessitated a rather clumsy piece of work-holding - which, as I explained at the time, was difficult to avoid as the end grain was not square to the sides, as is usual with drawer front. The bow fronted drawers created ends which were angled.

With the usual square drawer fronts, both Bill and Roger on the forum preferred to place their boards flat on the bench and rest the router on the edge. Roger's photos ...
However, this method leaves is too much waste remaining at the sides of the socket - as this is angled and the router bit is vertical - which means that there is more work needed to clear ...
Bill's objection - that holding the work piece vertically looked too clumsy for easy work - continued to ring in my head. The horizontal method certainly had the advantage of being more stable. So, now that my then-current project, the Harlequin Table, is complete, between pieces I take some time to solve these problems. Which I have, and hopefully in a way that others will find helpful.
Just as an aside, my preference is hand tool work, and generally if the wood is willing this is my go-to. The method here is not to replace all hand work, but to make the process easier in particular circumstances. Some of the timbers I work, especially for cases and drawer fronts, are extremely hard, and it is not viable to chop them out, particularly when there are several to do. It is not simply that this is time consuming - after all, this is just my hobby - but that it is hard on the chisels. I use machines to compliment hand tools. There is a time and place for everything.
Let's take it from the beginning:
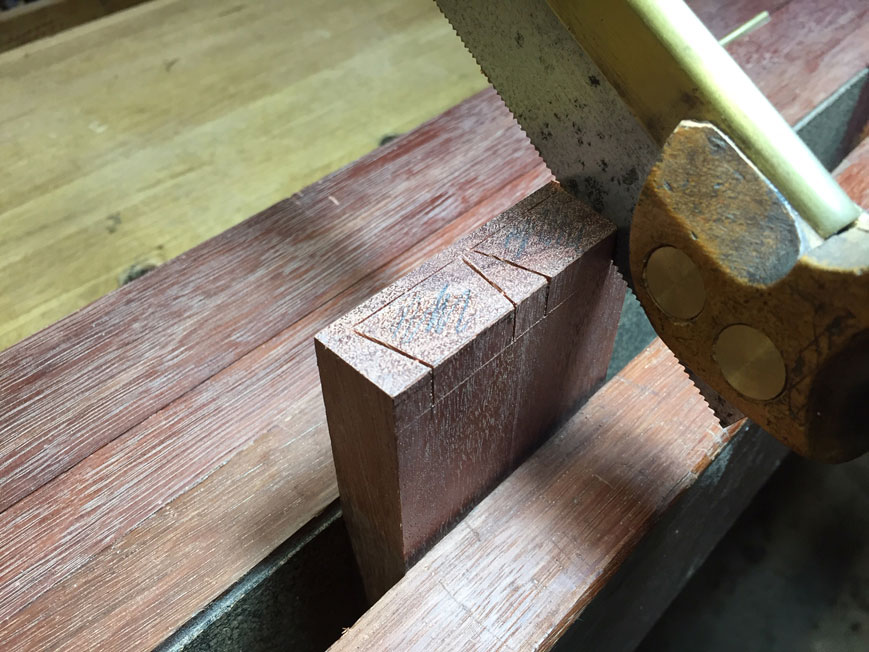
Step 1: saw the pins ...
Step 2: deepen the kerfs with (in my case) a kerfing chisel (see my website for more info) ...
Now we come to the new jig. I must tell you that this did my head in for a long time. As with everything, there is a simple solution, and in the end it could not have been simpler!
The need is (1) quick and easy set up, (2) accurate routing leaving minimal waste, and (3) visibility and dust control (bloody machines!).
The jig
This turned out to be nothing more than a block of wood. This one is 16"/440mm long x 4"/100mm high and 2"/50mm wide.
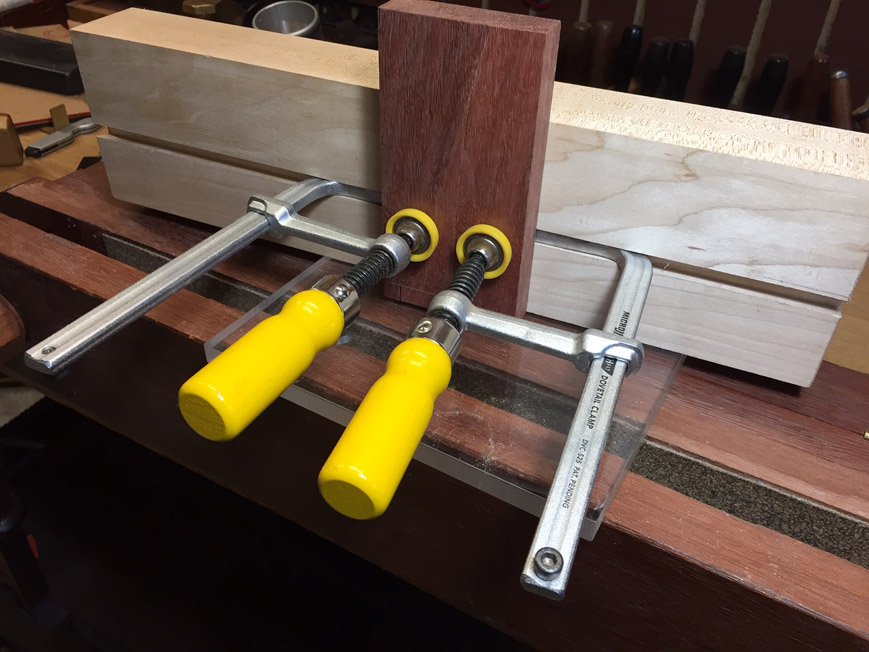
I used MicroJig clamps, which slide along a sliding dovetail. This is not necessary; one can just use a couple of F-clamps. However the MicroJig clamps not only make work holding less finicky, but they extend the length of the board one can hold with this particular jig to 500mm. That is easily enough for most case widths.
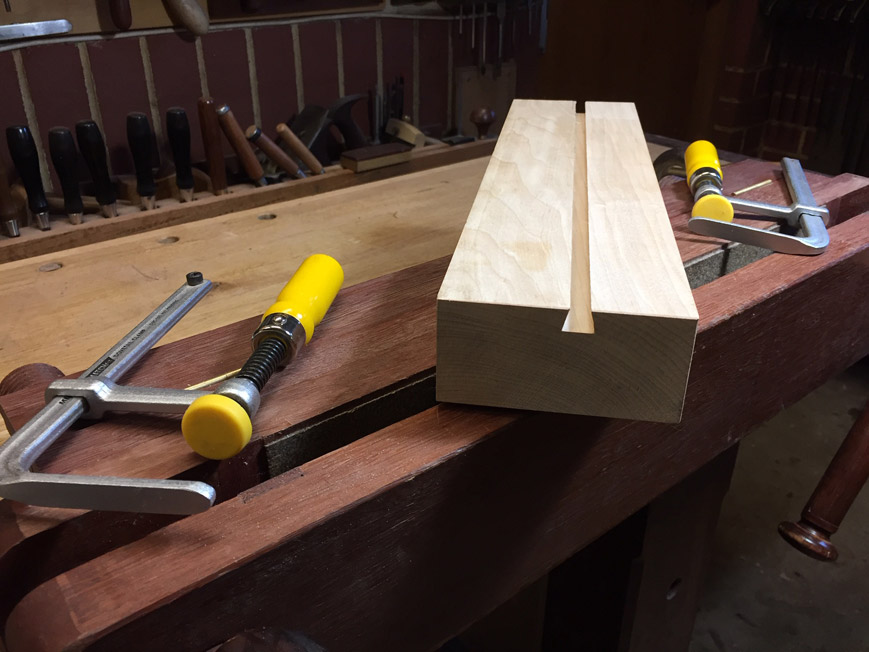
To use, place face down on a flat surface and clamp the drawer front close to centre ...
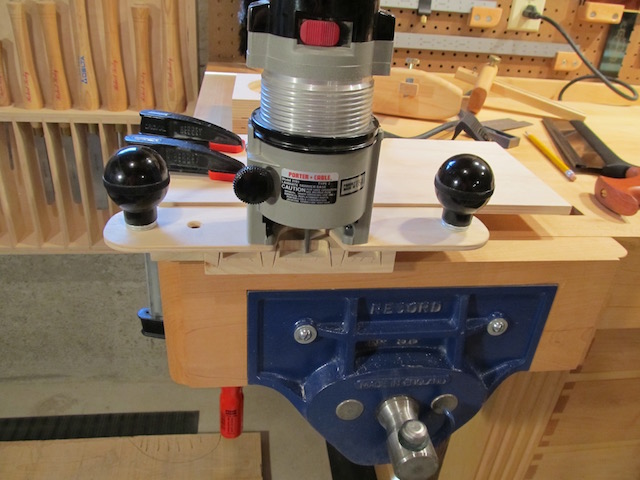
Up end the combination, and place the end of the drawer front into your vise. This could be a face vise or, as here, a Moxon vise. Note that the image is taken from the rear of the vise ...
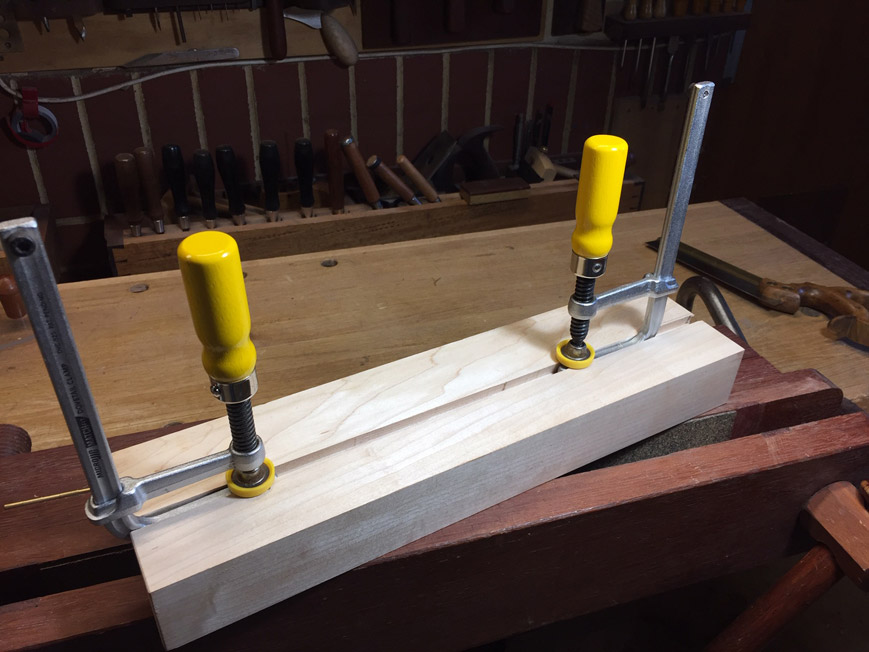
This is what you will see when standing in front of the jig/vise ...
Let's talk about the router.
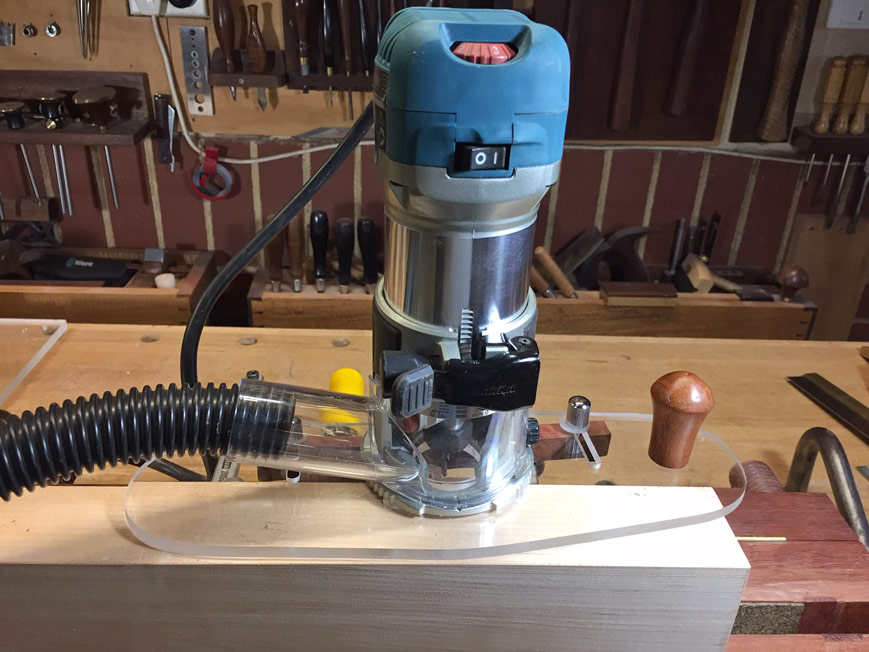
This is a Makita RT0700C trim router. Fantastic little router: 1 hp, variable speed, soft start. Together with a Mirka 27mm antistatic dust hose, the dust collection is amazing! The photo shown is after use, and there is no dust to be found (I very much doubt that a small plunge router could remain this clean). That also means that visibility is good, even though it does not have a built-in light. There are other excellent trim routers around for much the same price. This is the one I use.
The base
The base is the other half of the jig. This made from 6mm perspex. This is not the strongest, but does the job. I plan to build another out of polycarbonite (Lexan), which is much tougher.
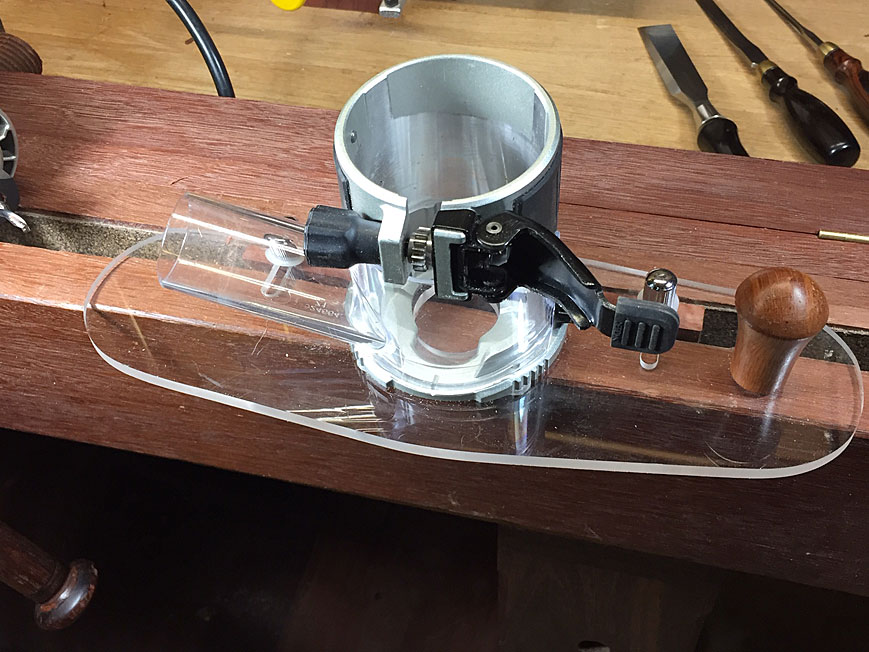
There is just the single handle as the left hand will grip the dust outlet.
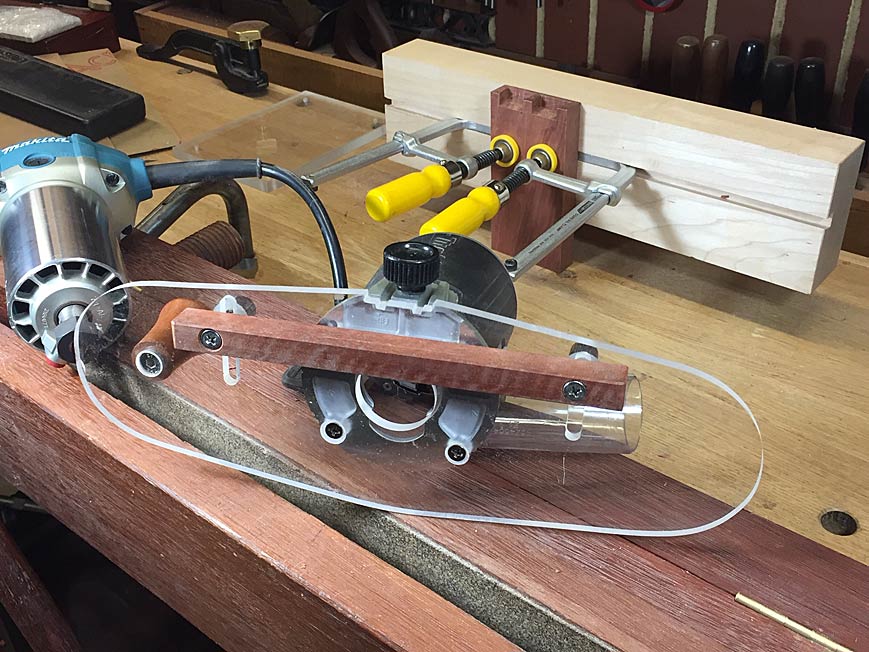
Below is the rear of the base. Note the adjustable fence/depth stop ...

This is the underside ...
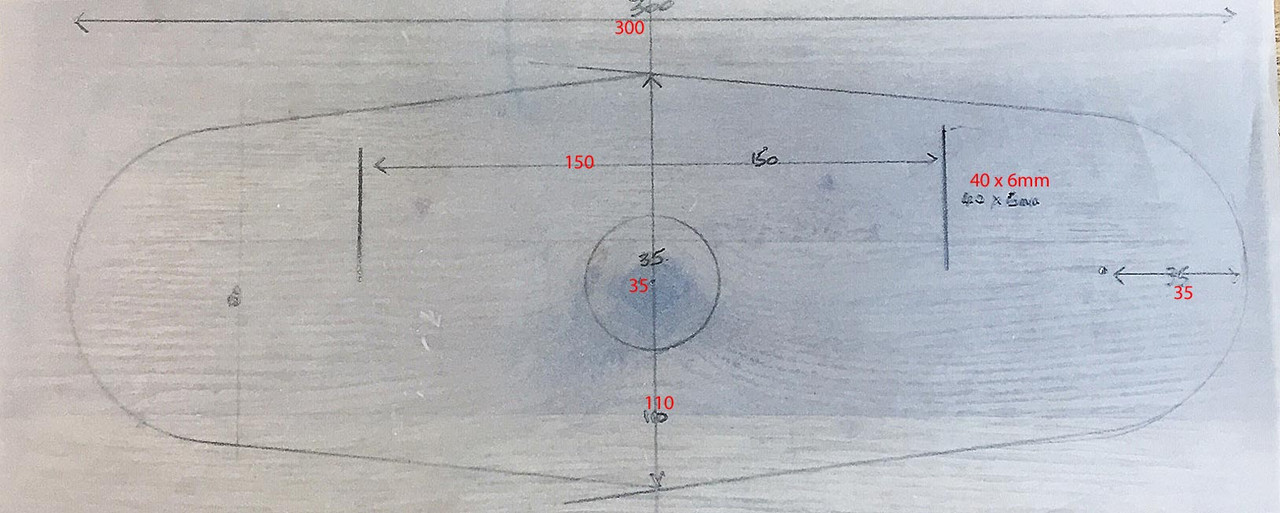
Plans for anyone looking to make their own ...
Setting up
Step 1: set the depth of cut - I scribed marks on the fence for two drawer side thickness I use. Mostly I use 6mm (or 1/4"). The other is 10mm, which is used here. I shall make another, deeper fence, so that I can add a few other thicknesses, such as 19mm for case sides.
Step 2: set the cut to the boundary line - this is done as close as possible. In the end I want to leave about 1mm to clear with a chisel (this is such an important line that I am not willing to take a risk here). If you move the bit side-to-side, the scratch pattern will show where it is cutting ...
The result
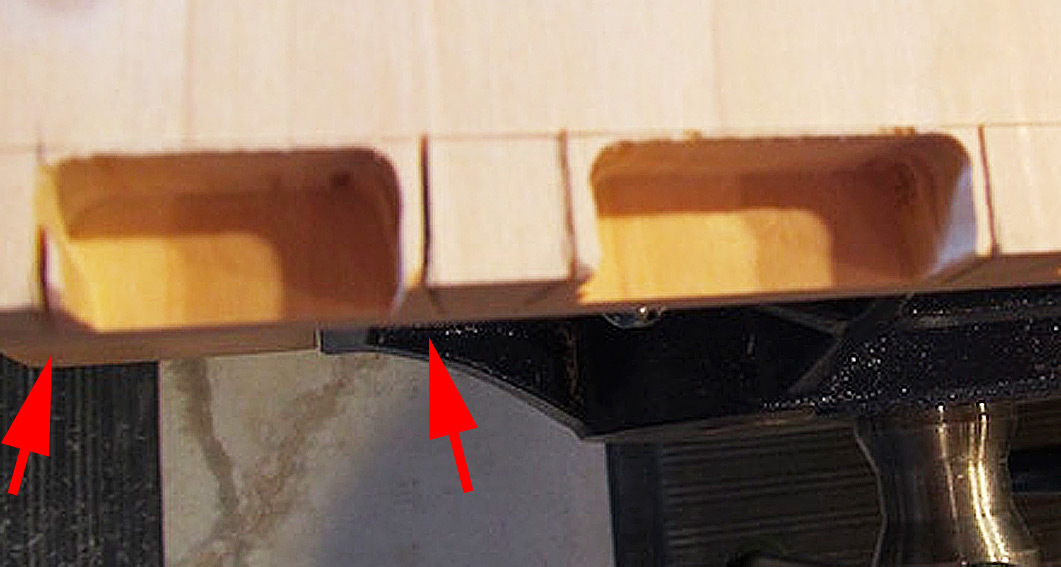
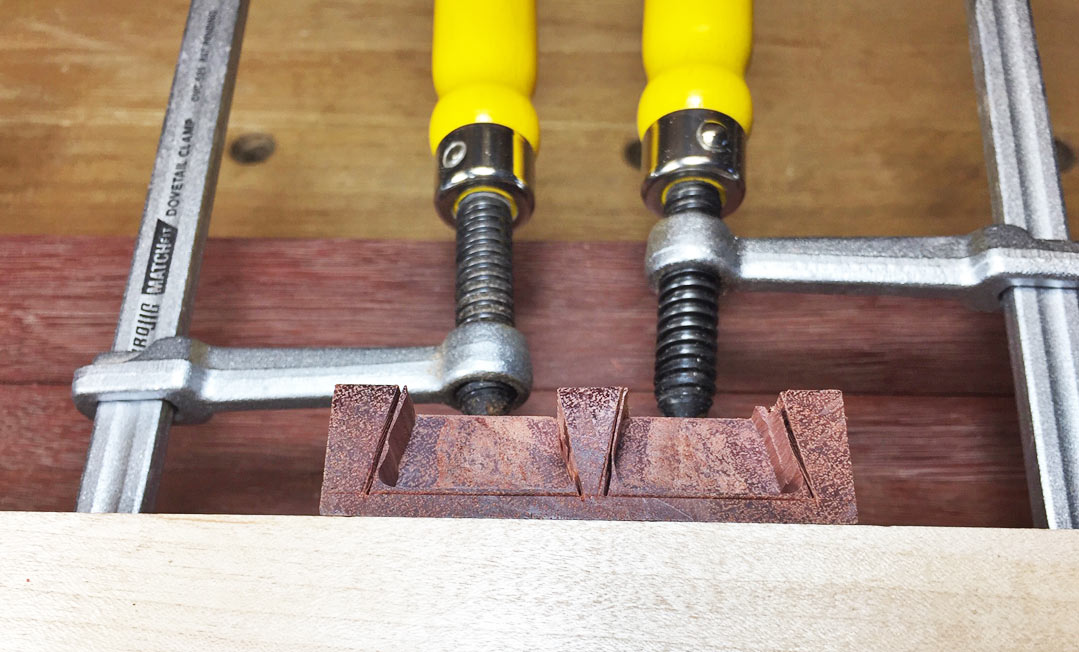
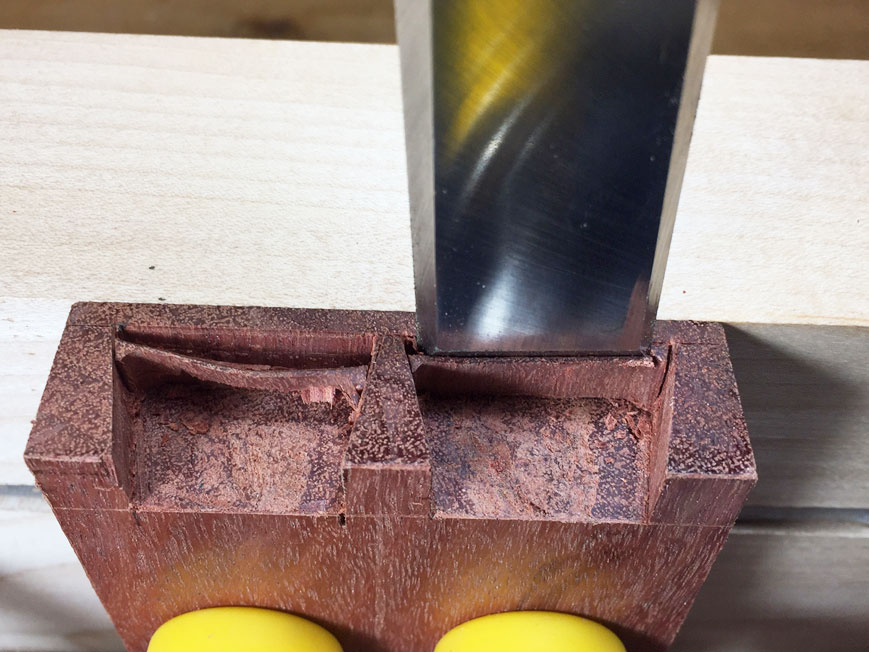
The router bit is 5/32" carbide. It is very controllable, and this makes it possible to freehand close to the side kerfs. The fence/depth stop prevents over-cutting the boundary line. In 15 seconds, this is the result ...
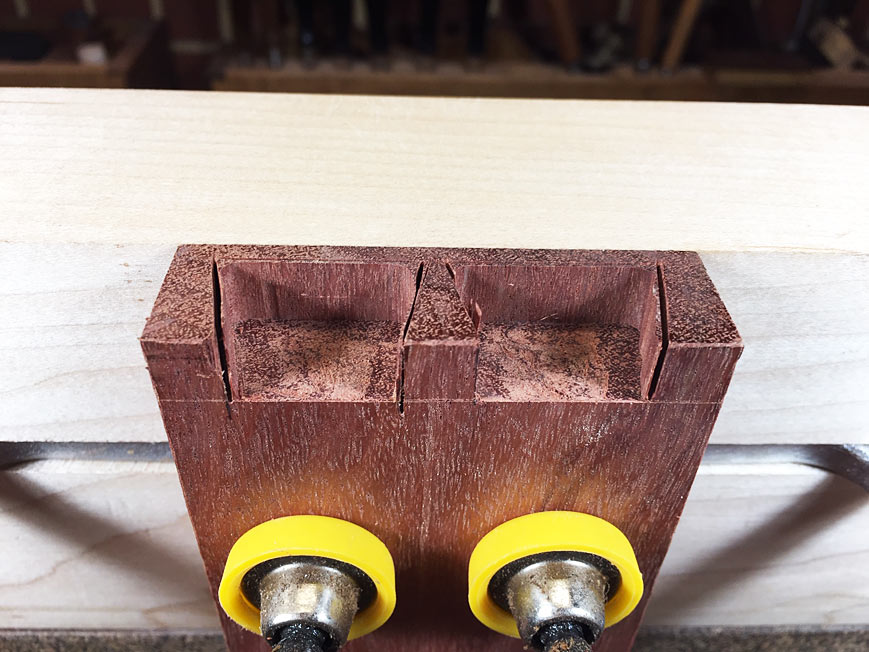
Turn the board around to chisel out the waste ..
Order of waste removal
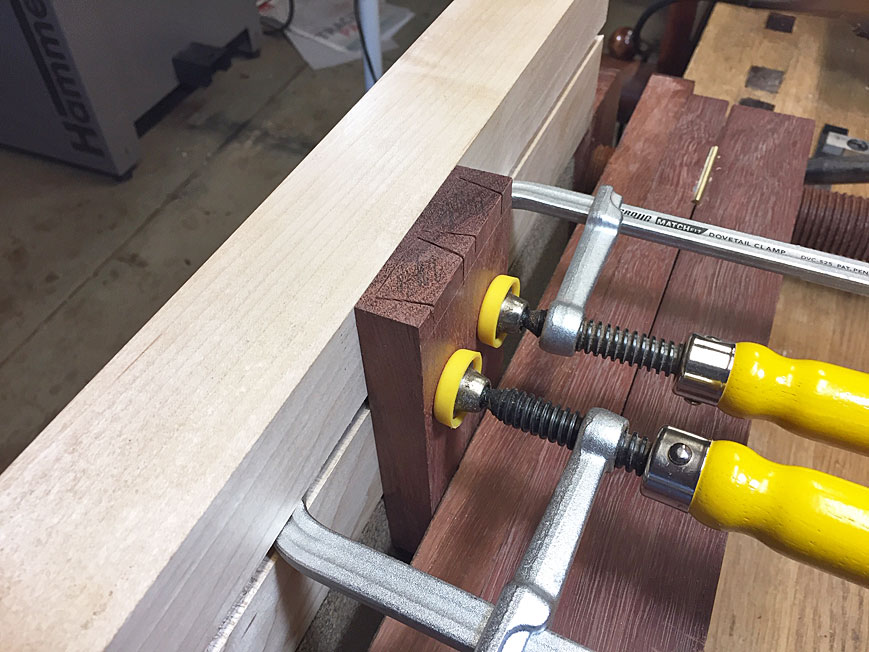
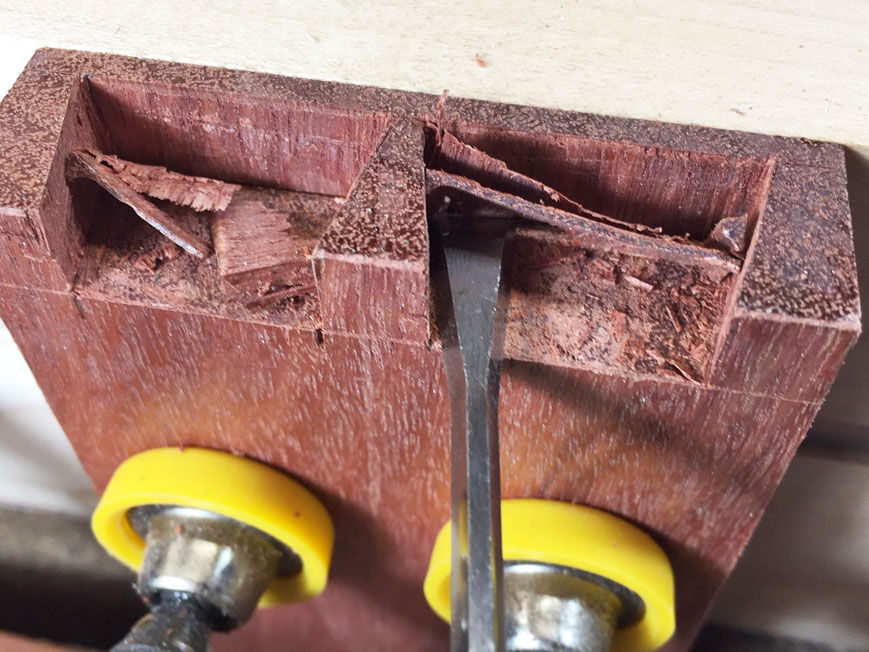
First lever away the sides. The waste here is paper thin and breaks away ...
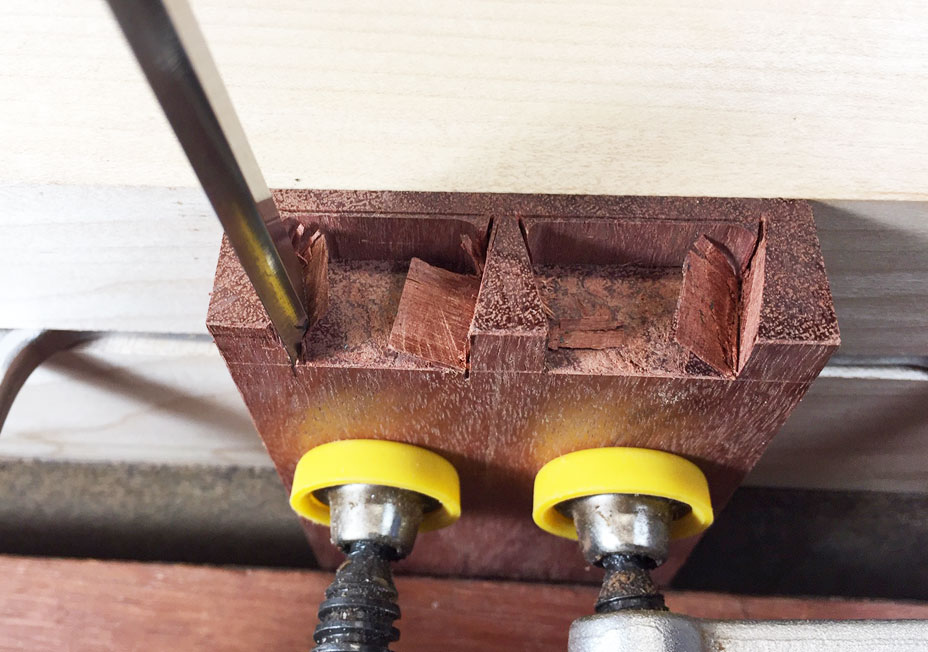
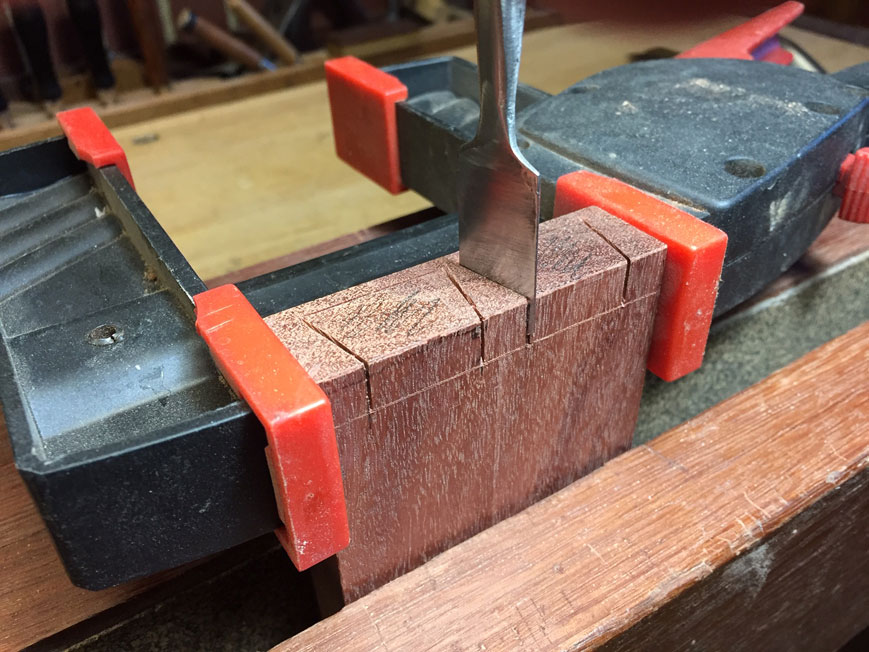
Secondly, place a wide chisel in the scribed boundary line, and chop straight down ...
Finally, use a fishtail chisel into the corners to remove this ...
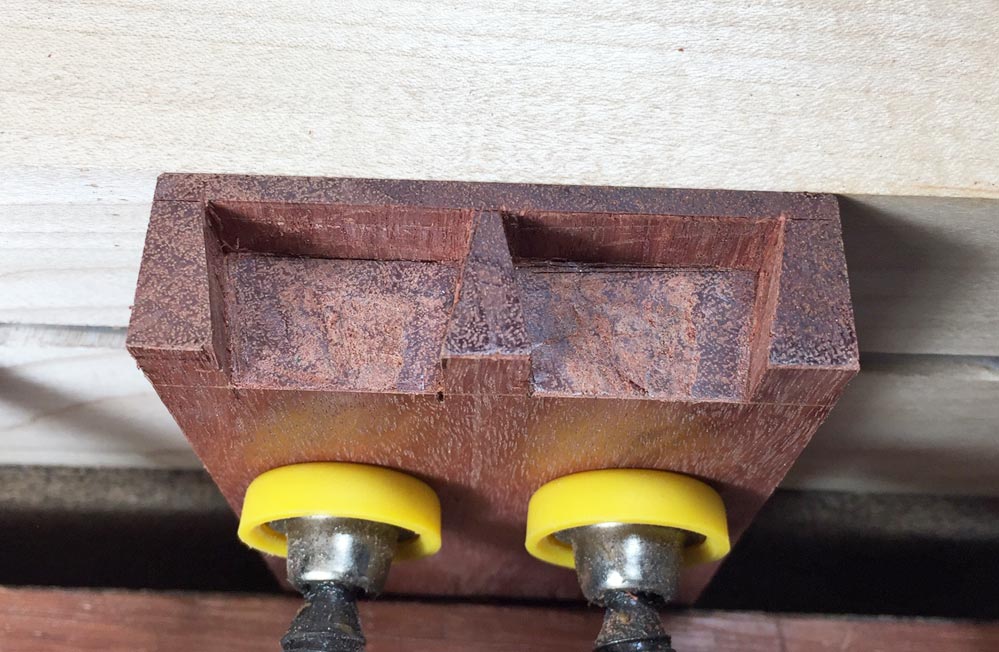
A note: removing the waste this cleanly and easily was facilitated by using the kerfing chisel to ensure that there was a release cut at the sides of the socket.
Regards from Perth
Derek
With the usual square drawer fronts, both Bill and Roger on the forum preferred to place their boards flat on the bench and rest the router on the edge. Roger's photos ...
However, this method leaves is too much waste remaining at the sides of the socket - as this is angled and the router bit is vertical - which means that there is more work needed to clear ...
Bill's objection - that holding the work piece vertically looked too clumsy for easy work - continued to ring in my head. The horizontal method certainly had the advantage of being more stable. So, now that my then-current project, the Harlequin Table, is complete, between pieces I take some time to solve these problems. Which I have, and hopefully in a way that others will find helpful.
Just as an aside, my preference is hand tool work, and generally if the wood is willing this is my go-to. The method here is not to replace all hand work, but to make the process easier in particular circumstances. Some of the timbers I work, especially for cases and drawer fronts, are extremely hard, and it is not viable to chop them out, particularly when there are several to do. It is not simply that this is time consuming - after all, this is just my hobby - but that it is hard on the chisels. I use machines to compliment hand tools. There is a time and place for everything.
Let's take it from the beginning:
Step 1: saw the pins ...
Step 2: deepen the kerfs with (in my case) a kerfing chisel (see my website for more info) ...
Now we come to the new jig. I must tell you that this did my head in for a long time. As with everything, there is a simple solution, and in the end it could not have been simpler!
The need is (1) quick and easy set up, (2) accurate routing leaving minimal waste, and (3) visibility and dust control (bloody machines!).
The jig
This turned out to be nothing more than a block of wood. This one is 16"/440mm long x 4"/100mm high and 2"/50mm wide.
I used MicroJig clamps, which slide along a sliding dovetail. This is not necessary; one can just use a couple of F-clamps. However the MicroJig clamps not only make work holding less finicky, but they extend the length of the board one can hold with this particular jig to 500mm. That is easily enough for most case widths.
To use, place face down on a flat surface and clamp the drawer front close to centre ...
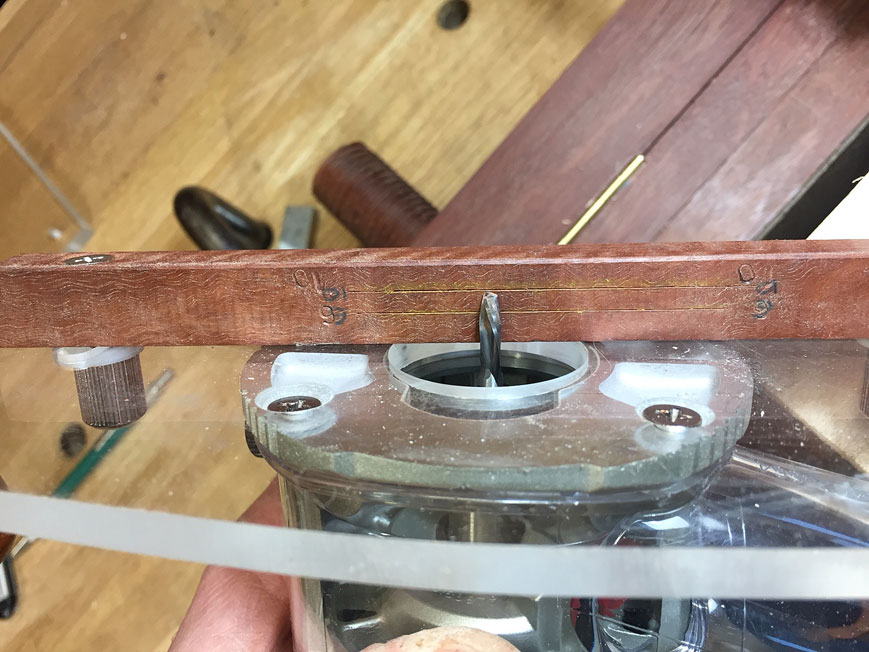
Up end the combination, and place the end of the drawer front into your vise. This could be a face vise or, as here, a Moxon vise. Note that the image is taken from the rear of the vise ...
This is what you will see when standing in front of the jig/vise ...
Let's talk about the router.
This is a Makita RT0700C trim router. Fantastic little router: 1 hp, variable speed, soft start. Together with a Mirka 27mm antistatic dust hose, the dust collection is amazing! The photo shown is after use, and there is no dust to be found (I very much doubt that a small plunge router could remain this clean). That also means that visibility is good, even though it does not have a built-in light. There are other excellent trim routers around for much the same price. This is the one I use.
The base
The base is the other half of the jig. This made from 6mm perspex. This is not the strongest, but does the job. I plan to build another out of polycarbonite (Lexan), which is much tougher.
There is just the single handle as the left hand will grip the dust outlet.
Below is the rear of the base. Note the adjustable fence/depth stop ...
This is the underside ...
Plans for anyone looking to make their own ...
Setting up
Step 1: set the depth of cut - I scribed marks on the fence for two drawer side thickness I use. Mostly I use 6mm (or 1/4"). The other is 10mm, which is used here. I shall make another, deeper fence, so that I can add a few other thicknesses, such as 19mm for case sides.
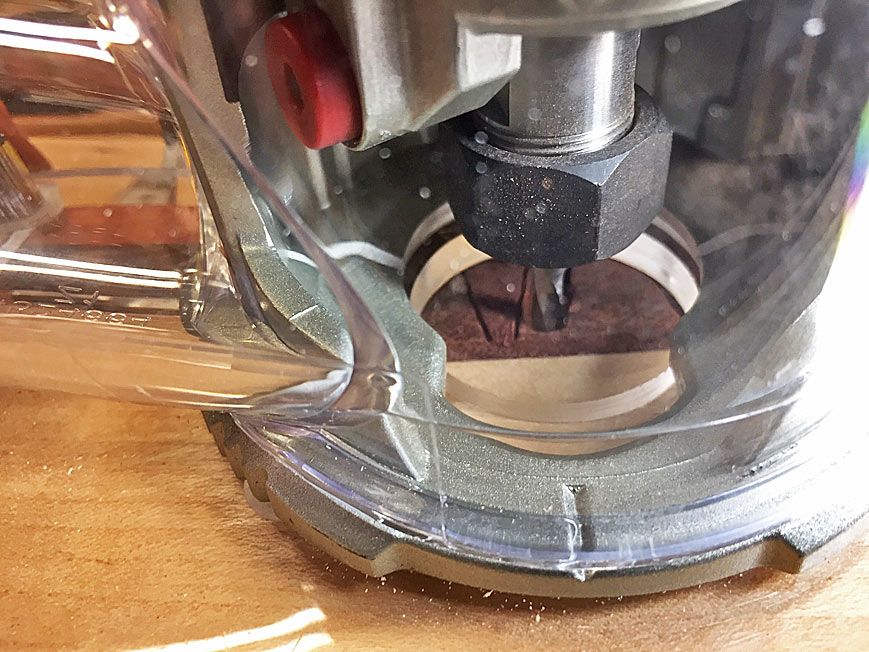
Step 2: set the cut to the boundary line - this is done as close as possible. In the end I want to leave about 1mm to clear with a chisel (this is such an important line that I am not willing to take a risk here). If you move the bit side-to-side, the scratch pattern will show where it is cutting ...
The result
The router bit is 5/32" carbide. It is very controllable, and this makes it possible to freehand close to the side kerfs. The fence/depth stop prevents over-cutting the boundary line. In 15 seconds, this is the result ...
Turn the board around to chisel out the waste ..
Order of waste removal
First lever away the sides. The waste here is paper thin and breaks away ...
Secondly, place a wide chisel in the scribed boundary line, and chop straight down ...
Finally, use a fishtail chisel into the corners to remove this ...
A note: removing the waste this cleanly and easily was facilitated by using the kerfing chisel to ensure that there was a release cut at the sides of the socket.
Regards from Perth
Derek


") Interlocked woods do not split out well.
Interlocked woods do not split out well.