


Martingchapman
Established Member
HOW I CAME TO BUY A TABLE SAW
As a hobby woodworker I started off working in my garage, fired by enthusiasm and Norm Abraham’s NY Workshop, my first machine was a Tyzack 10” table saw which was adequate but the top was quite small, the mitre gauge was a bit loose in the slot and the rip fence was not very solid.
I used a friends Dewalt RAS to cut a load of stair spindles for a new banister I was making and I thought something like this was what I needed, but at the time I could not afford it, so I sold the Tyzack and bought a Hegner Unicut and Makita saw, which was a step up from the Tyzack.
Fed up working in the garage (freezing cold and everything going rusty) I bought a 16ft x 8ft wooden workshop, which is much cosier and (thanks to a de-humidifier) rust free, but I found the Hegner was too big for the space available so I sold it and bought a Triton Work Centre.
The Triton was really good for rip cutting (but not at an angle) but not so good for cross cutting, however I also bought the Triton router table and router and having the saw and router table in the same space was ideal for my small workshop.
Then I got the Festool bug! I sold the Triton and bought the CMS with the TS75 saw insert, sliding table and the router table insert (into which I have fitted the Triton router). This setup is really solid and accurate and I am very happy with it and have enjoyed using it, but all the while (since the Tyzack and watching Norm) I have wanted a table saw (the CMS will be up for sale soon (update 4/3/09 all CMS kit now sold)).
Does any of the above sound familiar to anyone else, have you been there?
WHY DID I CHOOSE THE RECORD
As well as the Record, I looked at saws from Axminster, Makita, Bosch, Kity, Excalibur, Fox and Jet, they all have their advantages and disadvantages, but through the above journey I had identified what was important to me, so I made a list;
1. 75mm cutting capacity (needs a 250mm/10” blade) will run off of a 13amp supply. Most of the time I would not be cutting much more than 55mm but wanted the ability to go to 75mm when required
2. Separate height and tilt adjusters
3. Minimum 310mm/12” ripping capacity with a solid, easy to adjust rip fence that can be pulled forward for ripping real wood (as a bonus the Record has a fine adjuster on the rip fence)
4. Accurate cross cutting ability (minimum 450mm/18”), preferably with a sliding carriage and a flip stop on the mitre fence
5. The top guard should be easily removable and the top of the riving knife should be the same height as the top of the blade (for cutting tenon shoulders). At the lowest setting (with the top guard removed) the knife and blade should drop below the table so the top is clear for assembly work
6. There should be dust extraction from above and below the blade
7. The saw and table should occupy no more than one square metre of space
8. The cost of the saw should be below £500
The Record ticks all the above boxes except;
4. No flip stop on the mitre fence (I am looking at making one of these)
5. As supplied, the top of the riving knife is above the blade to give the full 75mm depth of cut underneath the top guard (I have subsequently modified the saw to comply with my requirements, explained later on)
8. Not quite, I paid £529.99 with free carriage
The Record does not tick all the above boxes, but in my opinion it came the closest.
UPACKING AND BUILDING THE SAW AND STAND
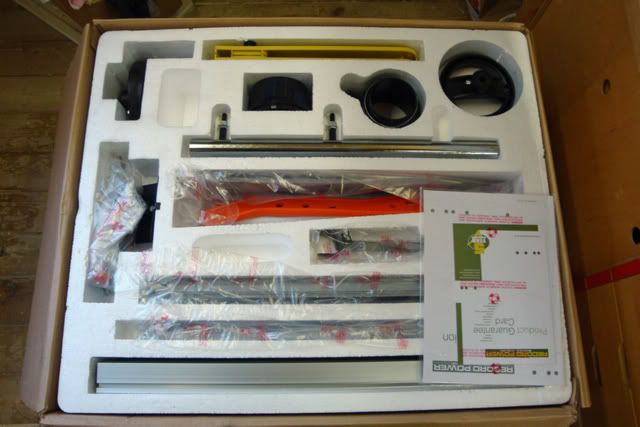
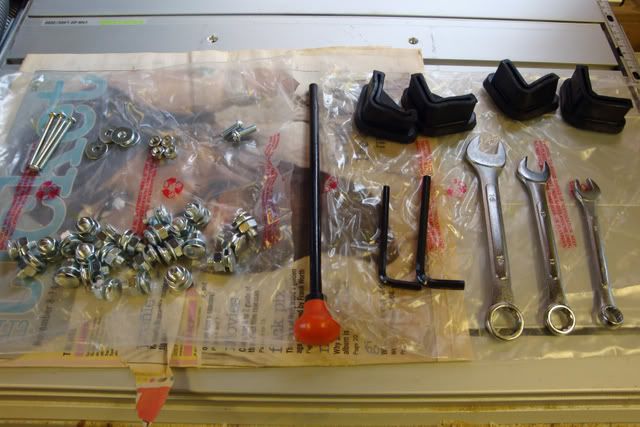
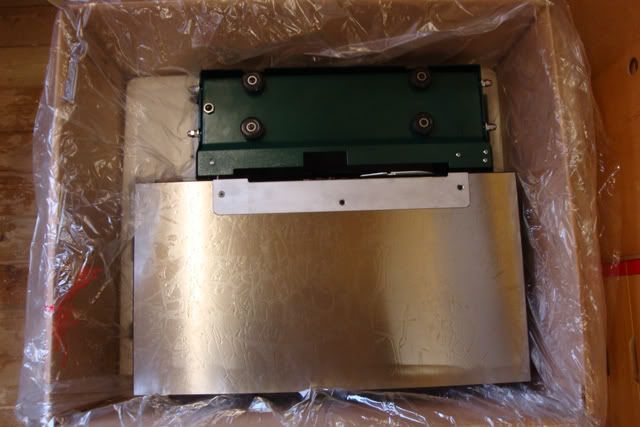
The saw was delivered on the day and in the time window it was booked for. It comprised two boxes on a pallet, one containing the sliding carriage the other containing the saw and stand. This second box was extremely heavy (90 kgs) and is definitely a two man lift. The delivery driver helped, we took it off the pallet and carried it into my workshop. Opening up the main box there is a polystyrene tray containing the stand and all the bits and pieces (photo below) beneath which is the saw, mitre gauge and rip fence carrier (photo below). The way the saw is packed is very good, nothing was damaged or missing and it gave me confidence in the product.
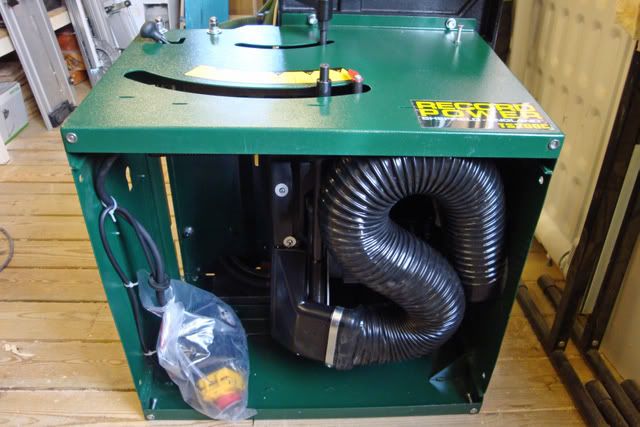
The stand is a simple bolt together job, once I had done this, I laid the saw on its back with a piece of 75mm x 50mm timber under the front edge, then I laid the stand on its back and pushed it up to the saw and bolted it to the bottom of the saw using the four bolts supplied. I was then (just about) able to lift the saw up, with the stand attached so that it was upright. The NVR switch is wired up but packed inside the saw body (photo below), I removed a plate from the left hand side of the saw, pushed the NVR switch through the resulting hole and screwed it to the side of the saw, then replaced the plate. The dust extraction tube (100mm) is also inside the saw body (photo below), you simply push this tube through the hole on the right hand side of the saw, slip a collar over it and clip this to the saw body. Fix the adaptor to the tube that also has a fixing for the small diameter tube that comes from the blade top guard and then fix this small tube to the adaptor.
SETTING THE SAW UP
Whilst the saw is supposed to be set up at the factory, it has probably had a long journey to get to me, so I like to set things up myself, and then I know they are correct. This is a good way of getting to know the tool and understand how goes together and how it works.
The instructions on how to set up the saw up are not very good, I followed the instructions and then went over the settings again, using different methods, to get it right.
Table top to blade;
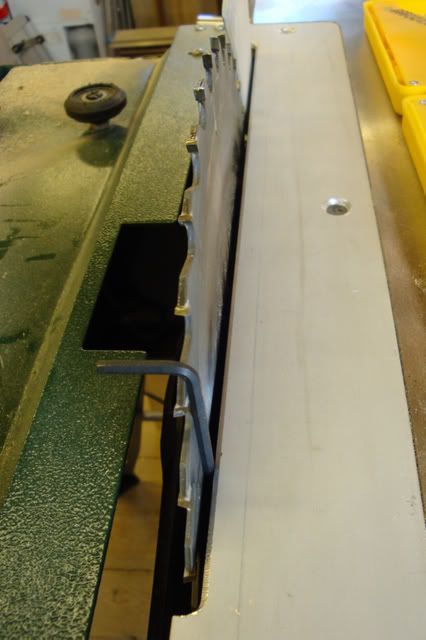
The table top is held to the saw body by four allen bolts from underneath the top. By releasing these four bolts (allen key supplied) it is possible to adjust the relationship of the table to the blade. I loosened the bolts, and used a 3mm allen key to set the gap between the table insert and the front and back of the blade (see photo). I set the gap at the back of the blade fractionally wider that the front to prevent burning of the wood by the back of the blade when ripping.
Riving knife/Blade height;
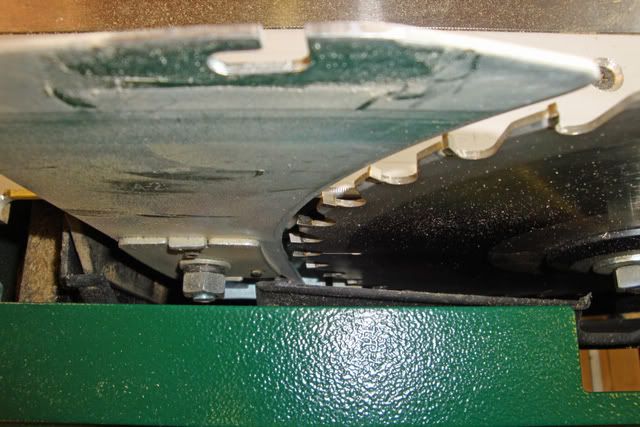
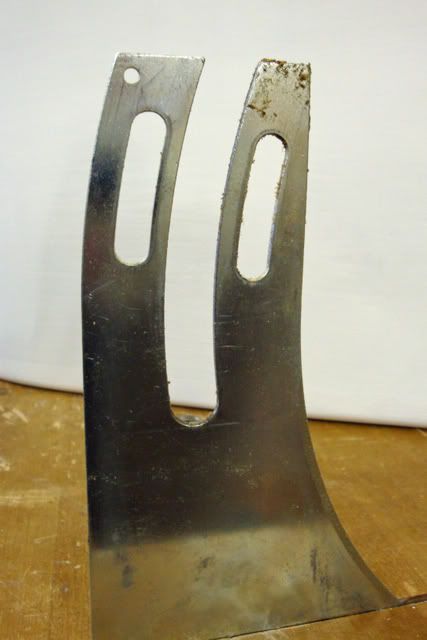
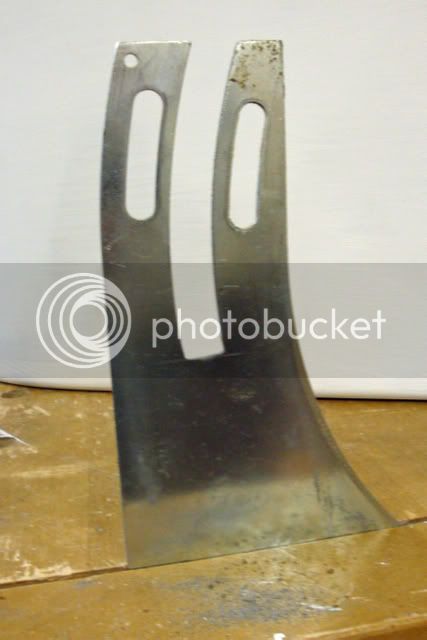
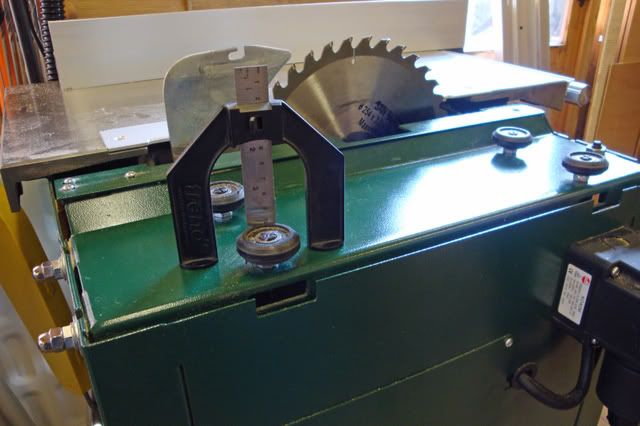
As supplied, the riving knife is set so that the bottom edge of the blade guard is just in line with the top of the blade; this gives the maximum depth of cut of 80mm (and for the UK market is how it should be). The blade guard slides into a slot on top of the riving knife and is held in place with one screw/knob, so it is simple to remove, however this leaves the top of the riving knife above the top of the blade (again correct for the UK). I want to be able to cut tenon shoulders with the saw (not acceptable in the work place but acceptable in my home workshop) and lower the riving knife and blade below the table top to be able to use the top for assembly. As supplied, if you take the blade guard off and lower the blade to the bottom of its travel the back of the riving knife fouls the saw trunnion and is pushed into the blade, allegedly to discourage you from taking the blade guard off. It is unlikely you are going to turn the saw on with the blade below the table surface, but it might happen. This was pointed out in British Woodworking magazine and they have referred it to Record. For my part, in order to be able to cut tenon shoulders and lower the riving knife and blade below the table I ground about 9mm from the back of the riving knife, filed the rounded top of the slot in the riving knife to be square (photo below) and set the riving knife as low as possible. To remove the knife you remove the sliding carriage and the blade, then loosen the single bolt that holds the knife in place and jiggle it along a slot into the space where the blade normally sits, it will then lift out of the saw. It sits in a carrier from which it can be simply lifted out. Having adjusted the shape of the knife it is simply a case of putting it back in the carrier, then back in the saw, setting it to the required height and tightening the securing bolt. Then replace the blade and sliding carriage. With these mods the top of the riving knife is now just below the top of the blade (photo below), so I can do what I want. It reduces the guarded cutting capacity to 60mm (photo below) but this is more than enough for the majority of my cuts, if I need more that this I can easily remove the blade guard, I have bought a square of 12mm Perspex and intend to make a blade guard that will clip on the rip fence and extend over the top of the blade when I am using the saw in this mode.
Rip Fence;
The rip fence and carrier slides along a heavy chromed bar which is bolted to the front edge of the table top with two bolts (held captive in the bar). You lightly bolt this in place, then slip the rip fence carrier (complete with rip fence) onto the bar and adjust the bar so the fence is parallel to the table, and the face of the fence is at 90 degrees to the table top, then secure the bar by tightening the bolts.
Rip Fence Scale;
The scale is stuck onto an aluminium extrusion which you secure to the front edge of the table top by two large screws. In order to get this set up correctly I had to extend the fixing holes about a millimetre to the left with a file. This is best done once all the other settings have been completed and you can run some timber through the saw, measure the width of the timber as cut and, without moving the rip fence, set the scale in line with the fence.
Sliding carriage;
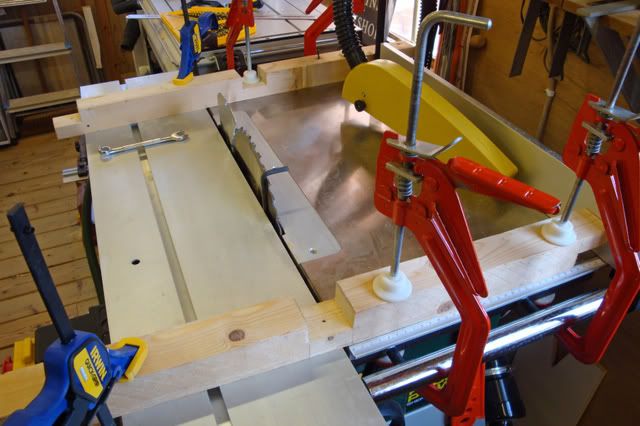
This was the most difficult thing to set up. The carriage slides on four wheels which are on pivots on a plate bolted to the saw body (photo below). The inner two wheels are adjustable for height only, the outer two are adjustable for height and also pivot in or out in relation to the blade, to adjust how easily the carriage slides. I found the best way was to adjust all four wheels to be exactly the same height in relation to the plate they are fixed to (photo below). Then fit the carriage and pivot the outer two wheels in or out until the carriage slides smoothly and easily, but without any horizontal or vertical play. Then with the carriage fitted I released the four bolts holding the wheel supporting plate, fixed the carriage to the table top with two lengths of 50mm x 50mm timber and six clamps (making sure the gap between the inside edge of the carriage and the back of the blade was fractionally wider than the gap between the carriage and the front of the blade), and then tightened up the four bolts (photo below), this technique was shown in British Woodworking magazine. Using this method I was able to get the sliding carriage level with the table top and sliding smoothly and easily. Also, because the gap between the carriage and the blade is fractionally wider at the back of the blade compared to the front of the blade, once the timber has passed the teeth at the front of the blade it clears the teeth at the back of the blade so I don’t get any back cutting or burning when I complete the cut.
Mitre gauge
The mitre gauge has two Bristol levers, one appears to lock the angle the other to lock the gauge to the sliding carriage. However, as supplied, when you lock the angle it also locks the gauge to the carriage, the second lever seems superfluous. I wanted to be able to lock the angle but be able to slide the gauge off of the carriage in case I wanted to rip something in between cross cutting. This is not possible because you have to loosen the angle lock Bristol lever to remove the gauge. This was pointed out in British Woodworking magazine and they shimmed the gauge to allow the angle lock lever to do just that, you then use the other Bristol lever to lock the gauge to the carriage; I have fitted a similar shim (photo below).
SO HOW DOES THE SAW PERFORM
I have had the saw for a week now, it took me three days (on and off) to set it up to be how I wanted it so I have not done much real cutting, however I have made several test cuts.
Good points
Rip cutting;
The rip fence slides smoothly across the table. I can set it to the width I want using the rip scale and get it accurate first time. If I need super accuracy then I can set the fence a tiny bit wide and close up to the final setting using the rip fence fine adjuster. Very easy, very accurate, I like it.
Cross cutting;
The mitre gauge is easy to adjust to the required angle, once set you lock the angle and then lock it to the sliding carriage (there are two Bristol levers) once locked it does not move. The sliding carriage has a good range and slides easily, however there is a very slight cogging feel to it when sliding very slowly (as if one of the supporting wheels had a flat section on the tyre and you can feel it every time it comes around) its perceptible but not a problem. Used at normal speed it is not noticeable. In use it cross cuts very accurately and again I am very pleased with it. There is a work cramp on the end of the sliding carriage which you slide along the mitre gauge slot, up to the wood being cut, and when you tighten it down it clamps the wood to the mitre fence to stop it moving whilst being cut, simple but very effective.
Adjustments;
The rip and mitre fences are easy to adjust. It is easy to slide the rip fence forward (so the end of it is ahead of the back of the blade) for cutting real wood, it is also easy to flip the rip fence over for cutting thin strips. The mitre fence moves up and down the sliding carriage easily, it is easy to adjust the angle and it has (adjustable) stops at all the normal angles.
Both the blade height and tilt adjustments are very smooth. There is a small amount of backlash in both so, for example, if you go from lowering to lifting, for half a turn the blade does not move, until the screw catches up, but again this is not a problem.
Not so good points
Dust collection;
The plastic dust collection shroud that is around the blade is not very strong and flexes quite a bit when the blade is tilted. I am using a Festool CTL33 LVHP dust collector which is pretty powerful but after doing some cutting there was a fair amount of dust left on the table and on the floor beneath the saw. This is an area that could be improved, but I am not sure how.
Sliding Carriage support fixing bolts;
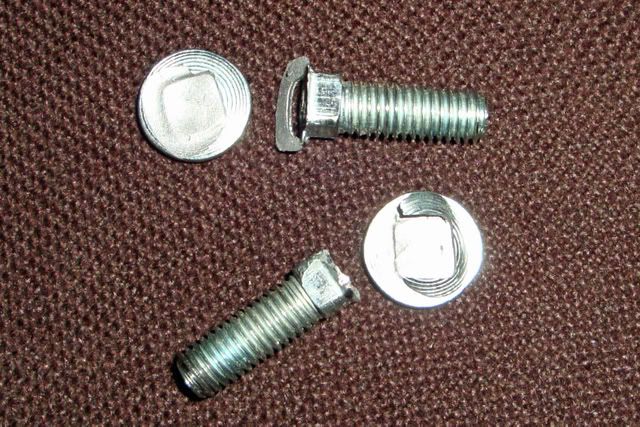
Record have come in for some stick recently on the quality of their products but from my point of view the quality of the TS200C is pretty good all round, except for the sliding carriage support fixing bolts. The sliding carriage sits on four wheels which are in turn fixed to a metal plate (photo below) which is fixed to the saw body by four dome headed 8mm bolts with square shanks. In adjusting the sliding carriage height I had to release and re-tighten these bolts and in doing so managed to shear the head off of two of them (photo below). I am no gorilla and I used the supplied spanner but it did not take excessive force to shear these heads off (as far as I can tell I applied the same force to all four of them). Fortunately I had a couple of spare 8mm bolts so it was not a major problem to put right, I will be reporting this to Record.
Other points
Changing the blade;
To change the blade you take off one of the stops underneath each end of the sliding carriage (by undoing one screw - photo below) and then slide the carriage off the saw. You remove the insert plate from the table (unscrew three set screws). You put the supplied rod into the hole in the arbour spindle to lock the blade into place (through the insert plate opening) and use the supplied spanner to loosen the blade securing nut (from the sliding table side) then remove the nut, washer, large washer and blade. Fitting the new blade is the reverse. Sounds complicated but in practice it’s a couple of minutes work.
Start up current;
The saw has soft start and an induction motor so it is quiet in use, it works fine on a 13 amp supply but when I start it up it initially dims the workshop lights. To start off with I had it plugged into the power tool socket on the CTL33 extractor so that when I started the saw it started the extractor. This was fine for the first four times I used the saw however, on the fifth time, the saw and extractor both started up but then before the saw got up to speed they both cut out. On investigation I found the 13amp fuse in the extractor mains plug had blown. Thinking about it I should have expected this (hindsight is a wonderful thing) the combined start up current of the saw and extractor is going to exceed 13amps and I think I am lucky that it has not damaged the power feed from the extractor. Now the saw is plugged into its own 13amp socket, I start the saw and then the extractor manually, and I have not had any further problems
CONCLUSIONS
Having set the saw up and modified it to suite me I am very happy with it.
I know that whatever saw I bought, as supplied, it would not tick every single box and I would have had to change something to suite what I want. For my purposes the Record did not need much modification and what it did need, was simple and within the scope of the (in my case, very) average engineer/woodworker.
It fits in my small workshop, its powerful, quiet and rips and cross cuts accurately, I could not ask for more.
Apart from the problem with the sliding carriage support fixing bolts and the poor dust collection, the quality of the saw is very good.
I think it is good value for money and Record must have confidence in their product as they give a five year guarantee (that is two more than Festool).
I don’t think it is manufactured in Britain but Record is a British company and in these difficult times I am proud to be supporting British manufacturing.
Martin.
PHOTOS
The bits and pieces tray in the top of the box
The tools, fixtures and fittings that come with the saw
The actual saw in the bottom of the box
The underneath of the saw with the NVR switch in the plastic bag and the extractor hose
Setting the table top in line with the blade using a 3mm allen key
The riving knife securing bolt
The riving knife before and after filing
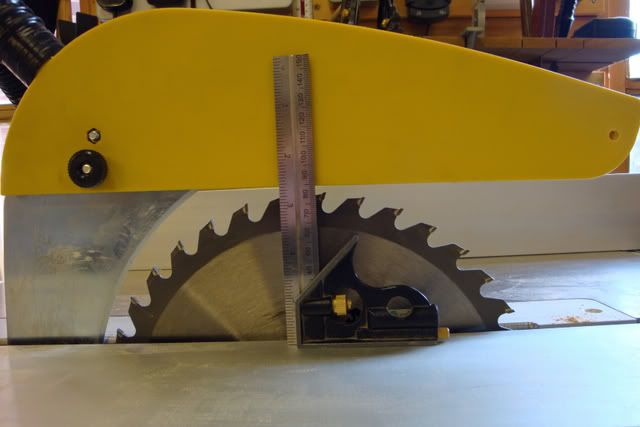
Cut height below the blade guard as supplied (80mm) ................................................................................................................ and after modification (60mm)
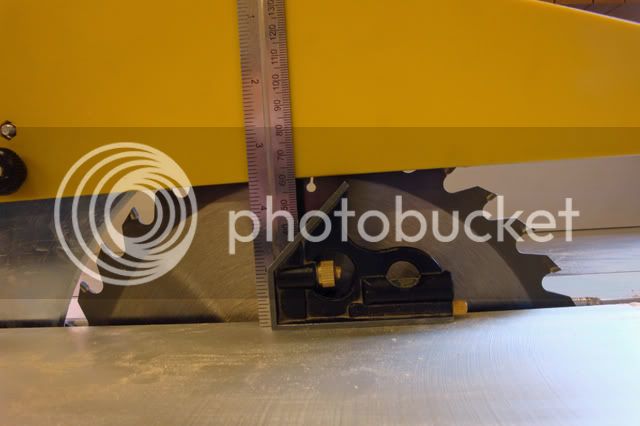
In this photo you can see the tip of the saw blade is just above the table top whilst the top of the riving knife is just below the table top (this is not fully lowered, the blade does go down about another 6mm so it leaves the top completely clear).
The stop on the underneath of the sliding carriage, remove this to allow the carriage to slide off.
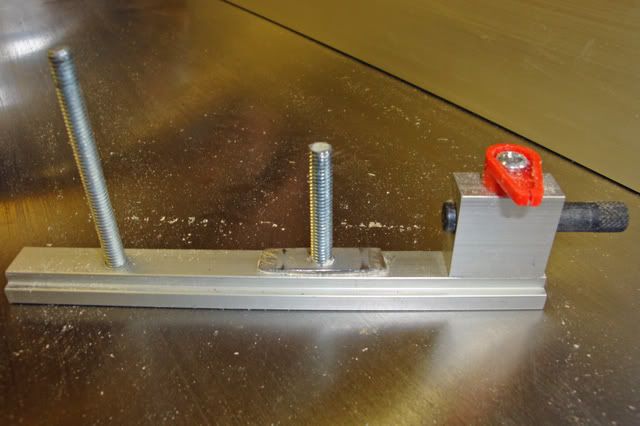
Adjusting the sliding carriage support wheels using a Trend setting gauge, the bolts to the left, with the domed covers on, are the ones I sheared the heads off (there are two more on the other end of the saw)
Setting the sliding carriage height using a couple of 50mm x 50mm timbers and half a dozen cramps
The sheared bolts that secure the sliding carriage wheel support
The mitre gauge with the shim (attached by double sided tape)
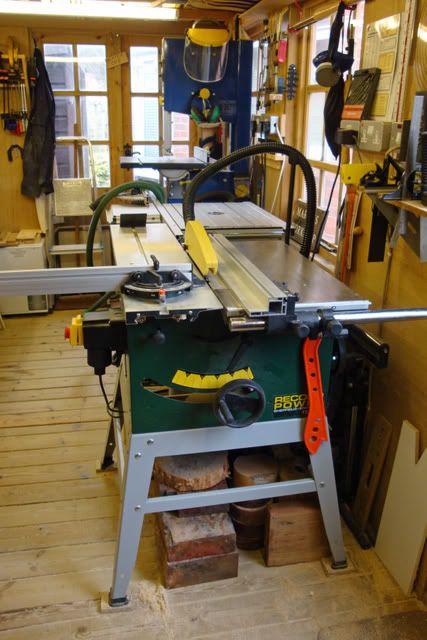
The saw set up and in position, ready to chew some wood!
Martin.
As a hobby woodworker I started off working in my garage, fired by enthusiasm and Norm Abraham’s NY Workshop, my first machine was a Tyzack 10” table saw which was adequate but the top was quite small, the mitre gauge was a bit loose in the slot and the rip fence was not very solid.
I used a friends Dewalt RAS to cut a load of stair spindles for a new banister I was making and I thought something like this was what I needed, but at the time I could not afford it, so I sold the Tyzack and bought a Hegner Unicut and Makita saw, which was a step up from the Tyzack.
Fed up working in the garage (freezing cold and everything going rusty) I bought a 16ft x 8ft wooden workshop, which is much cosier and (thanks to a de-humidifier) rust free, but I found the Hegner was too big for the space available so I sold it and bought a Triton Work Centre.
The Triton was really good for rip cutting (but not at an angle) but not so good for cross cutting, however I also bought the Triton router table and router and having the saw and router table in the same space was ideal for my small workshop.
Then I got the Festool bug! I sold the Triton and bought the CMS with the TS75 saw insert, sliding table and the router table insert (into which I have fitted the Triton router). This setup is really solid and accurate and I am very happy with it and have enjoyed using it, but all the while (since the Tyzack and watching Norm) I have wanted a table saw (the CMS will be up for sale soon (update 4/3/09 all CMS kit now sold)).
Does any of the above sound familiar to anyone else, have you been there?
WHY DID I CHOOSE THE RECORD
As well as the Record, I looked at saws from Axminster, Makita, Bosch, Kity, Excalibur, Fox and Jet, they all have their advantages and disadvantages, but through the above journey I had identified what was important to me, so I made a list;
1. 75mm cutting capacity (needs a 250mm/10” blade) will run off of a 13amp supply. Most of the time I would not be cutting much more than 55mm but wanted the ability to go to 75mm when required
2. Separate height and tilt adjusters
3. Minimum 310mm/12” ripping capacity with a solid, easy to adjust rip fence that can be pulled forward for ripping real wood (as a bonus the Record has a fine adjuster on the rip fence)
4. Accurate cross cutting ability (minimum 450mm/18”), preferably with a sliding carriage and a flip stop on the mitre fence
5. The top guard should be easily removable and the top of the riving knife should be the same height as the top of the blade (for cutting tenon shoulders). At the lowest setting (with the top guard removed) the knife and blade should drop below the table so the top is clear for assembly work
6. There should be dust extraction from above and below the blade
7. The saw and table should occupy no more than one square metre of space
8. The cost of the saw should be below £500
The Record ticks all the above boxes except;
4. No flip stop on the mitre fence (I am looking at making one of these)
5. As supplied, the top of the riving knife is above the blade to give the full 75mm depth of cut underneath the top guard (I have subsequently modified the saw to comply with my requirements, explained later on)
8. Not quite, I paid £529.99 with free carriage
The Record does not tick all the above boxes, but in my opinion it came the closest.
UPACKING AND BUILDING THE SAW AND STAND
The saw was delivered on the day and in the time window it was booked for. It comprised two boxes on a pallet, one containing the sliding carriage the other containing the saw and stand. This second box was extremely heavy (90 kgs) and is definitely a two man lift. The delivery driver helped, we took it off the pallet and carried it into my workshop. Opening up the main box there is a polystyrene tray containing the stand and all the bits and pieces (photo below) beneath which is the saw, mitre gauge and rip fence carrier (photo below). The way the saw is packed is very good, nothing was damaged or missing and it gave me confidence in the product.
The stand is a simple bolt together job, once I had done this, I laid the saw on its back with a piece of 75mm x 50mm timber under the front edge, then I laid the stand on its back and pushed it up to the saw and bolted it to the bottom of the saw using the four bolts supplied. I was then (just about) able to lift the saw up, with the stand attached so that it was upright. The NVR switch is wired up but packed inside the saw body (photo below), I removed a plate from the left hand side of the saw, pushed the NVR switch through the resulting hole and screwed it to the side of the saw, then replaced the plate. The dust extraction tube (100mm) is also inside the saw body (photo below), you simply push this tube through the hole on the right hand side of the saw, slip a collar over it and clip this to the saw body. Fix the adaptor to the tube that also has a fixing for the small diameter tube that comes from the blade top guard and then fix this small tube to the adaptor.
SETTING THE SAW UP
Whilst the saw is supposed to be set up at the factory, it has probably had a long journey to get to me, so I like to set things up myself, and then I know they are correct. This is a good way of getting to know the tool and understand how goes together and how it works.
The instructions on how to set up the saw up are not very good, I followed the instructions and then went over the settings again, using different methods, to get it right.
Table top to blade;
The table top is held to the saw body by four allen bolts from underneath the top. By releasing these four bolts (allen key supplied) it is possible to adjust the relationship of the table to the blade. I loosened the bolts, and used a 3mm allen key to set the gap between the table insert and the front and back of the blade (see photo). I set the gap at the back of the blade fractionally wider that the front to prevent burning of the wood by the back of the blade when ripping.
Riving knife/Blade height;
As supplied, the riving knife is set so that the bottom edge of the blade guard is just in line with the top of the blade; this gives the maximum depth of cut of 80mm (and for the UK market is how it should be). The blade guard slides into a slot on top of the riving knife and is held in place with one screw/knob, so it is simple to remove, however this leaves the top of the riving knife above the top of the blade (again correct for the UK). I want to be able to cut tenon shoulders with the saw (not acceptable in the work place but acceptable in my home workshop) and lower the riving knife and blade below the table top to be able to use the top for assembly. As supplied, if you take the blade guard off and lower the blade to the bottom of its travel the back of the riving knife fouls the saw trunnion and is pushed into the blade, allegedly to discourage you from taking the blade guard off. It is unlikely you are going to turn the saw on with the blade below the table surface, but it might happen. This was pointed out in British Woodworking magazine and they have referred it to Record. For my part, in order to be able to cut tenon shoulders and lower the riving knife and blade below the table I ground about 9mm from the back of the riving knife, filed the rounded top of the slot in the riving knife to be square (photo below) and set the riving knife as low as possible. To remove the knife you remove the sliding carriage and the blade, then loosen the single bolt that holds the knife in place and jiggle it along a slot into the space where the blade normally sits, it will then lift out of the saw. It sits in a carrier from which it can be simply lifted out. Having adjusted the shape of the knife it is simply a case of putting it back in the carrier, then back in the saw, setting it to the required height and tightening the securing bolt. Then replace the blade and sliding carriage. With these mods the top of the riving knife is now just below the top of the blade (photo below), so I can do what I want. It reduces the guarded cutting capacity to 60mm (photo below) but this is more than enough for the majority of my cuts, if I need more that this I can easily remove the blade guard, I have bought a square of 12mm Perspex and intend to make a blade guard that will clip on the rip fence and extend over the top of the blade when I am using the saw in this mode.
Rip Fence;
The rip fence and carrier slides along a heavy chromed bar which is bolted to the front edge of the table top with two bolts (held captive in the bar). You lightly bolt this in place, then slip the rip fence carrier (complete with rip fence) onto the bar and adjust the bar so the fence is parallel to the table, and the face of the fence is at 90 degrees to the table top, then secure the bar by tightening the bolts.
Rip Fence Scale;
The scale is stuck onto an aluminium extrusion which you secure to the front edge of the table top by two large screws. In order to get this set up correctly I had to extend the fixing holes about a millimetre to the left with a file. This is best done once all the other settings have been completed and you can run some timber through the saw, measure the width of the timber as cut and, without moving the rip fence, set the scale in line with the fence.
Sliding carriage;
This was the most difficult thing to set up. The carriage slides on four wheels which are on pivots on a plate bolted to the saw body (photo below). The inner two wheels are adjustable for height only, the outer two are adjustable for height and also pivot in or out in relation to the blade, to adjust how easily the carriage slides. I found the best way was to adjust all four wheels to be exactly the same height in relation to the plate they are fixed to (photo below). Then fit the carriage and pivot the outer two wheels in or out until the carriage slides smoothly and easily, but without any horizontal or vertical play. Then with the carriage fitted I released the four bolts holding the wheel supporting plate, fixed the carriage to the table top with two lengths of 50mm x 50mm timber and six clamps (making sure the gap between the inside edge of the carriage and the back of the blade was fractionally wider than the gap between the carriage and the front of the blade), and then tightened up the four bolts (photo below), this technique was shown in British Woodworking magazine. Using this method I was able to get the sliding carriage level with the table top and sliding smoothly and easily. Also, because the gap between the carriage and the blade is fractionally wider at the back of the blade compared to the front of the blade, once the timber has passed the teeth at the front of the blade it clears the teeth at the back of the blade so I don’t get any back cutting or burning when I complete the cut.
Mitre gauge
The mitre gauge has two Bristol levers, one appears to lock the angle the other to lock the gauge to the sliding carriage. However, as supplied, when you lock the angle it also locks the gauge to the carriage, the second lever seems superfluous. I wanted to be able to lock the angle but be able to slide the gauge off of the carriage in case I wanted to rip something in between cross cutting. This is not possible because you have to loosen the angle lock Bristol lever to remove the gauge. This was pointed out in British Woodworking magazine and they shimmed the gauge to allow the angle lock lever to do just that, you then use the other Bristol lever to lock the gauge to the carriage; I have fitted a similar shim (photo below).
SO HOW DOES THE SAW PERFORM
I have had the saw for a week now, it took me three days (on and off) to set it up to be how I wanted it so I have not done much real cutting, however I have made several test cuts.
Good points
Rip cutting;
The rip fence slides smoothly across the table. I can set it to the width I want using the rip scale and get it accurate first time. If I need super accuracy then I can set the fence a tiny bit wide and close up to the final setting using the rip fence fine adjuster. Very easy, very accurate, I like it.
Cross cutting;
The mitre gauge is easy to adjust to the required angle, once set you lock the angle and then lock it to the sliding carriage (there are two Bristol levers) once locked it does not move. The sliding carriage has a good range and slides easily, however there is a very slight cogging feel to it when sliding very slowly (as if one of the supporting wheels had a flat section on the tyre and you can feel it every time it comes around) its perceptible but not a problem. Used at normal speed it is not noticeable. In use it cross cuts very accurately and again I am very pleased with it. There is a work cramp on the end of the sliding carriage which you slide along the mitre gauge slot, up to the wood being cut, and when you tighten it down it clamps the wood to the mitre fence to stop it moving whilst being cut, simple but very effective.
Adjustments;
The rip and mitre fences are easy to adjust. It is easy to slide the rip fence forward (so the end of it is ahead of the back of the blade) for cutting real wood, it is also easy to flip the rip fence over for cutting thin strips. The mitre fence moves up and down the sliding carriage easily, it is easy to adjust the angle and it has (adjustable) stops at all the normal angles.
Both the blade height and tilt adjustments are very smooth. There is a small amount of backlash in both so, for example, if you go from lowering to lifting, for half a turn the blade does not move, until the screw catches up, but again this is not a problem.
Not so good points
Dust collection;
The plastic dust collection shroud that is around the blade is not very strong and flexes quite a bit when the blade is tilted. I am using a Festool CTL33 LVHP dust collector which is pretty powerful but after doing some cutting there was a fair amount of dust left on the table and on the floor beneath the saw. This is an area that could be improved, but I am not sure how.
Sliding Carriage support fixing bolts;
Record have come in for some stick recently on the quality of their products but from my point of view the quality of the TS200C is pretty good all round, except for the sliding carriage support fixing bolts. The sliding carriage sits on four wheels which are in turn fixed to a metal plate (photo below) which is fixed to the saw body by four dome headed 8mm bolts with square shanks. In adjusting the sliding carriage height I had to release and re-tighten these bolts and in doing so managed to shear the head off of two of them (photo below). I am no gorilla and I used the supplied spanner but it did not take excessive force to shear these heads off (as far as I can tell I applied the same force to all four of them). Fortunately I had a couple of spare 8mm bolts so it was not a major problem to put right, I will be reporting this to Record.
Other points
Changing the blade;
To change the blade you take off one of the stops underneath each end of the sliding carriage (by undoing one screw - photo below) and then slide the carriage off the saw. You remove the insert plate from the table (unscrew three set screws). You put the supplied rod into the hole in the arbour spindle to lock the blade into place (through the insert plate opening) and use the supplied spanner to loosen the blade securing nut (from the sliding table side) then remove the nut, washer, large washer and blade. Fitting the new blade is the reverse. Sounds complicated but in practice it’s a couple of minutes work.
Start up current;
The saw has soft start and an induction motor so it is quiet in use, it works fine on a 13 amp supply but when I start it up it initially dims the workshop lights. To start off with I had it plugged into the power tool socket on the CTL33 extractor so that when I started the saw it started the extractor. This was fine for the first four times I used the saw however, on the fifth time, the saw and extractor both started up but then before the saw got up to speed they both cut out. On investigation I found the 13amp fuse in the extractor mains plug had blown. Thinking about it I should have expected this (hindsight is a wonderful thing) the combined start up current of the saw and extractor is going to exceed 13amps and I think I am lucky that it has not damaged the power feed from the extractor. Now the saw is plugged into its own 13amp socket, I start the saw and then the extractor manually, and I have not had any further problems
CONCLUSIONS
Having set the saw up and modified it to suite me I am very happy with it.
I know that whatever saw I bought, as supplied, it would not tick every single box and I would have had to change something to suite what I want. For my purposes the Record did not need much modification and what it did need, was simple and within the scope of the (in my case, very) average engineer/woodworker.
It fits in my small workshop, its powerful, quiet and rips and cross cuts accurately, I could not ask for more.
Apart from the problem with the sliding carriage support fixing bolts and the poor dust collection, the quality of the saw is very good.
I think it is good value for money and Record must have confidence in their product as they give a five year guarantee (that is two more than Festool).
I don’t think it is manufactured in Britain but Record is a British company and in these difficult times I am proud to be supporting British manufacturing.
Martin.
PHOTOS
The bits and pieces tray in the top of the box
The tools, fixtures and fittings that come with the saw
The actual saw in the bottom of the box
The underneath of the saw with the NVR switch in the plastic bag and the extractor hose
Setting the table top in line with the blade using a 3mm allen key
The riving knife securing bolt
The riving knife before and after filing
Cut height below the blade guard as supplied (80mm) ................................................................................................................ and after modification (60mm)
In this photo you can see the tip of the saw blade is just above the table top whilst the top of the riving knife is just below the table top (this is not fully lowered, the blade does go down about another 6mm so it leaves the top completely clear).
The stop on the underneath of the sliding carriage, remove this to allow the carriage to slide off.
Adjusting the sliding carriage support wheels using a Trend setting gauge, the bolts to the left, with the domed covers on, are the ones I sheared the heads off (there are two more on the other end of the saw)
Setting the sliding carriage height using a couple of 50mm x 50mm timbers and half a dozen cramps
The sheared bolts that secure the sliding carriage wheel support
The mitre gauge with the shim (attached by double sided tape)
The saw set up and in position, ready to chew some wood!
Martin.
")


