Post a photo of the last thing you made

UKworkshop.co.uk

Help Support UKworkshop.co.uk:

This site may earn a commission from merchant affiliate links, including eBay, Amazon, and others.
I’m going to post something about my planes to try to renew my enthusiasm for doing it and push on to the next level. I’ve now completed a half set (even numbers) of hollows and rounds. The anomaly is, I haven’t yet done the #2 (chickened out, but I will get to it) but I have done a #11. It’s taken ages, because there’s lots of tooling to make and lots of techniques to learn. I can now complete a pair of planes in a day if I stay focussed and don’t get interrupted, which is very rarely. It often takes several days in practice.

You can tell from the wedges that they started pretty rough but now I’d say I’m getting to a good amateur standard, they look good and perform properly.

IMG_4643.jpeg


After a few pairs I went off and started making other planes, but realised that the overall standard wasn’t good enough so I went back to the hollows and rounds to practice the basics. It’s been a process of gradual improvement, but the #11s, # 18s and one #14 have been made with my “new system” and are starting to get a lot more consistent, to look nicer and perform really well.

IMG_4644.jpeg


Oddly, the first plane I made was a #14 round, but I made its companion hollow recently, which hopefully shows how they’ve come on. But even the old one works pretty well, if it clogs sometimes.

IMG_4645.jpeg


Next innovation will be skewed mortises, and once I’ve done a few of those I’ll get on to sash planes, which was my original goal. Skewed rabbet plane tomorrow.
 
I’m going to post something about my planes to try to renew my enthusiasm for doing it and push on to the next level. I’ve now completed a half set (even numbers) of hollows and rounds. The anomaly is, I haven’t yet done the #2 (chickened out, but I will get to it) but I have done a #11. It’s taken ages, because there’s lots of tooling to make and lots of techniques to learn. I can now complete a pair of planes in a day if I stay focussed and don’t get interrupted, which is very rarely. It often takes several days in practice.

You can tell from the wedges that they started pretty rough but now I’d say I’m getting to a good amateur standard, they look good and perform properly.

View attachment 174549

After a few pairs I went off and started making other planes, but realised that the overall standard wasn’t good enough so I went back to the hollows and rounds to practice the basics. It’s been a process of gradual improvement, but the #11s, # 18s and one #14 have been made with my “new system” and are starting to get a lot more consistent, to look nicer and perform really well.

View attachment 174550

Oddly, the first plane I made was a #14 round, but I made its companion hollow recently, which hopefully shows how they’ve come on. But even the old one works pretty well, if it clogs sometimes.

View attachment 174551

Next innovation will be skewed mortises, and once I’ve done a few of those I’ll get on to sash planes, which was my original goal. Skewed rabbet plane tomorrow.
They look great. Well done! It's amazing how time consuming making a pair can be. I started a half(ish) set over the past May Day holiday and it dragged on for almost a month. (No.6s I did some time ago.)
These are mine. A bit on the 'Spartan' side, but they work pretty well. Some still show a bit of chatter, but I'll deal with that when the need arises.
hr.jpg
 
They look great. Well done! It's amazing how time consuming making a pair can be. I started a half(ish) set over the past May Day holiday and it dragged on for almost a month. (No.6s I did some time ago.)
These are mine. A bit on the 'Spartan' side, but they work pretty well. Some still show a bit of chatter, but I'll deal with that when the need arises.
View attachment 174569
Wouldn't it be easier to pick up a router?!

It's amazing what the old school woodworkers used to make amazing things, church pews / interiors comes to mind!
 
Wouldn't it be easier to pick up a router?!

It's amazing what the old school woodworkers used to make amazing things, church pews / interiors comes to mind!
I’m not sure it would be easier to use a router. For a small run of sash bars for example it’s incredibly efficient to get the sash planes down from the shelf and stick the mouldings - quicker than setting up a router table and the planes produce a much finer finish. Plus they don’t try to remove your fingers, make dust or require PPE. In a mass production situation it would be different though.

Its worth remembering that the most exquisite furniture and interior joinery in history was made with those planes.

The difficulty with profiled wooden planes is maintenance, They do move seasonally and to flatten a profiled plane sole is extremely difficult without specialised skills. The old planemakers shops provided this as a paid service. I imagine that after the first world war, many of those with moulding plane skills didn’t return or were needed for other jobs, and electrification/mass production with spindle moulders took off.
 
This is a bit of an experiment. Most forums I've been on have had a "Post pics of [something topical]" thread, but not this one. There's probably a good reason for that, but I'm going to stick my neck out anyway.

The idea is, quite simply, to post a photo of the last thing you made. It can be something quite insignificant, a component of something bigger, or a completed project. It can be something that's not thread-worthy on its own, or it can be something that already has a 9 page WIP thread in the Projects section, it really doesn't matter! It's just a bit of fun, but hopefully it will generate some discussion too.

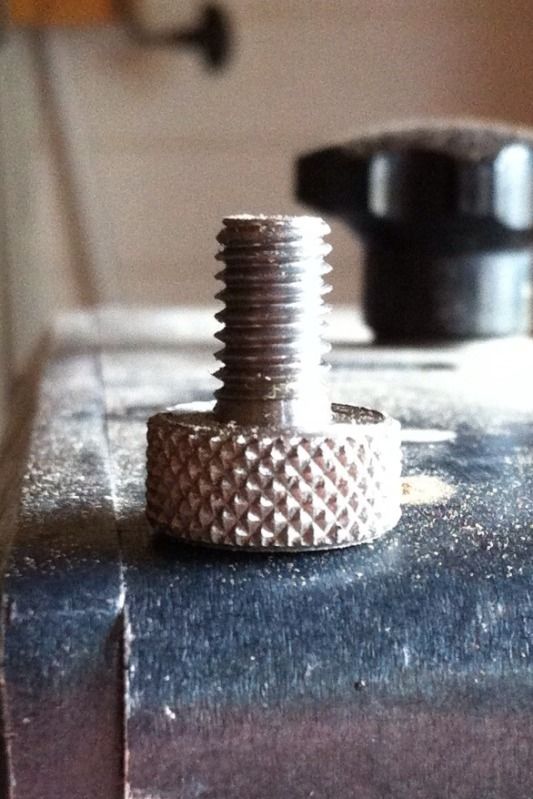
So here's my offering to get the ball rolling. I could have posted a photo of a mug of tea, but that's hardly relevant. This is a replacement guide knob for SWMBO's Burgess bandsaw. Formally it was in the care of her Dad, who isn't the most mechanically minded, hence why it needed a bit of a spruce up before going back into service!

4AE52A01-AAFD-4813-8F34-C55D8209C5E5-234-0000006EEEAED070_zpsa1b2a1f3.jpg
 
This is a bit of an experiment. Most forums I've been on have had a "Post pics of [something topical]" thread, but not this one. There's probably a good reason for that, but I'm going to stick my neck out anyway.

The idea is, quite simply, to post a photo of the last thing you made. It can be something quite insignificant, a component of something bigger, or a completed project. It can be something that's not thread-worthy on its own, or it can be something that already has a 9 page WIP thread in the Projects section, it really doesn't matter! It's just a bit of fun, but hopefully it will generate some discussion too.

So here's my offering to get the ball rolling. I could have posted a photo of a mug of tea, but that's hardly relevant. This is a replacement guide knob for SWMBO's Burgess bandsaw. Formally it was in the care of her Dad, who isn't the most mechanically minded, hence why it needed a bit of a spruce up before going back into service!

4AE52A01-AAFD-4813-8F34-C55D8209C5E5-234-0000006EEEAED070_zpsa1b2a1f3.jpg
 
Making a nice neat job of something like that is a good achievement.

What material? What lathe? What thread? The thread looks turned, rather than using a die? Nice neat knurling.

edit - I presume you made this rather than bought it!
 
I’m not sure it would be easier to use a router. For a small run of sash bars for example it’s incredibly efficient to get the sash planes down from the shelf and stick the mouldings - quicker than setting up a router table and the planes produce a much finer finish. Plus they don’t try to remove your fingers, make dust or require PPE. In a mass production situation it would be different though.

Its worth remembering that the most exquisite furniture and interior joinery in history was made with those planes.

The difficulty with profiled wooden planes is maintenance, They do move seasonally and to flatten a profiled plane sole is extremely difficult without specialised skills. The old planemakers shops provided this as a paid service. I imagine that after the first world war, many of those with moulding plane skills didn’t return or were needed for other jobs, and electrification/mass production with spindle moulders took off.
Thanks that's really interesting!👍
 
My recent router table build ment I needed somewhere to store the 10 reduction rings that came with the lift, I figured a simple wooden box would be best & as Japanese tool boxes seem to be de rigueur at the mo particularly on Instagram I thought as I had this afternoon free I’d have a go at one of those.


37AB732A-907E-470A-A3F4-0783758F0413.jpeg


Construction was nothing special just a few grooves cut on the router table to make the basic box.

983A5237-E635-47D0-A50F-56B5B52D8599.jpeg


Made from off cut of pine plus some oddments of oak used to make the wedge & bracing bits.

08FFA00F-67A4-48B1-8298-218E7C949D7E.jpeg


The reduction rings slide into slots cut at the chopsaw in two more offcuts of pine which just sit loose in the box but are held in place by the rings

45EBEFE9-93FE-41D2-955D-7418B8EAC253.jpeg

All that’s left is to give the outside a good sand & apply a coat or two of oil.
 
They look great. Well done! It's amazing how time consuming making a pair can be. I started a half(ish) set over the past May Day holiday and it dragged on for almost a month. (No.6s I did some time ago.)
These are mine. A bit on the 'Spartan' side, but they work pretty well. Some still show a bit of chatter, but I'll deal with that when the need arises.
View attachment 174569
Great effort! Nice to see someone else suffering like I am.
 
For her birthday, my daughter wanted a bunk bed for her dolls. Loathed to buy more plastic, I succeeded in getting the commission to make one.

Pine and MDF, spray painted.


View attachment 174693
Great job and an extra well done for avoiding the the purchase of another plastic junk toy. Your little girl will be thrilled with that.
 
Great job and an extra well done for avoiding the the purchase of another plastic junk toy. Your little girl will be thrilled with that, I still remember my father buying a wooden wheelbarrow for me from a shop that made wooden toys nearly sixty years ago.
 
Great job and an extra well done for avoiding the the purchase of another plastic junk toy. Your little girl will be thrilled with that.
Thanks Max Power, I'm pleased to say she was. It was quite fiddly to spray, and I said to my wife I'm never spraying anything like that again. My other daughter has now asked for one too, although she asked if it can be big enough for her to get in :ROFLMAO:
 
I was given the top half of a large mahogany? sideboard by some friends which had been in the family for a couple of generations. They were keeping the base and couldn’t find a home for the top so offered it to me for the wood. It was a shame to break it down but they were at the point of taking it to the tip which would never do.

I thought it would be nice to give them a little reminder and decided on a box, in my head it is to store tea sachets but that will be up to them. This was an interesting exercise as I didn’t want to take it down to fresh wood and create something that could have come from any source.

I presume that some of the timber is mahogany which was used for the sides, glazed door frames, glazing bars and trim mouldings. The rest was stained tulip wood.

I cut the sides from a 8mm slice from one of the side pieces keeping one face and edge with the original finish. The top is a 4mm slice, again keeping the original finish for the outside face. I’d lightly sanded a couple of strips on the sides so that I could glue on some trim taken from the glazing bars.

Box_DandJ00.jpg


The base and the liner were cut from the cream coloured section of piece of tulip wood. Obviously I couldn’t resist the opportunity to introduce a bit of kumiko and created some mahogany strips from the glazing bars. The kumiko ‘frame’ is cut from a green section of the tulip wood board.

Box_DandJ02.jpg

Box_DandJ03.jpg


This was an interesting exercise as I couldn’t sand any of the external faces where I wanted to retain the original finish. Nor would reinforcing splines be suitable so I hope the mitre joints are well glued!

The final touch was the geometric trim prised from the cornice. This is attached to the original finish and I couldn’t find a glue that would hold (I balked at the prospect of tracing around the trim and scratching the finish for gluing). I’m embarrassed to say that I resorted to double-sided tape so I’ve no idea if/how long that will last :unsure:
 

Latest posts

Back
Top