


OK, here goes my first WIP!
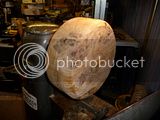
I bought some of George's red pippy / bur oak some time ago and have a log of it sitting at my Father-in-Laws. On a recent holiday there I decided to give wet turning a go. Knowing that fast working is th key to green wood I arranged for the children to be looked after and set aside a whole afternoon to the enterprise. Turned out I needed rather longer but hey ho.
First job was to remove the bark etc.
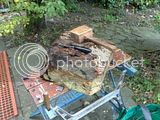
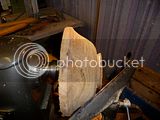
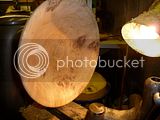
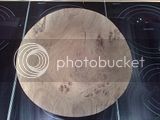
At first I thought that I would turn a set of smaller bowls but Father-in-Law suggested a bigger bowl would be more of a fun challenge") So we turned it into a circular blank
So we turned it into a circular blank
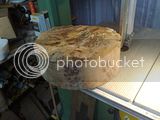
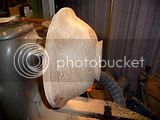
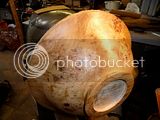
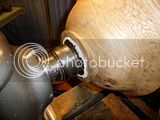
After power planing a smooth bit we were able to attach a face ring. We went down this route as we didn't have face plate. I initially wanted to sort a screw check into the bark side as that would have presevered more of the surface figure however the wood was just to soft in places...
And here it is mounted on the graduate
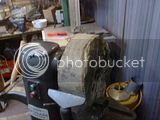
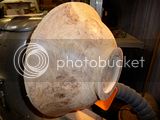
After quite a bit of work I'd got it into a fully round thing, more or less balanced, though it wasn't ever really fully in balance because the wood seemed to be somewhat uneven in density. During the actual truing of the blank the graduate actually vibrated - something that I'd never felt before. Well we said it would be a challenge!
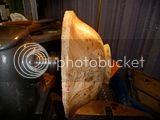
I decided I wanted to do some sort of Ogle shape - possibly the first time that I've actually sketched out the rough shape first rather than trying to join together the results of cuts
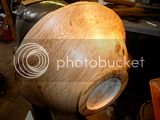
I was getting some wicked tear out so decided to use some finishing oil (Chestnut food safe) to try and fix it. This was pretty successful however I kept getting digs and tear so the shape kept subtly changing.
and
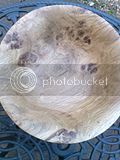
However I finally ended up somewhere I liked and put some finish on it (forgive the gratuitous number of shots but I was very happy with the wood and the look )
That ended one day's turning and the bowl was left on the lathe in a bag full of dust and shavings. As it turned out this was a shame for the finish but I managed to bring that back later in the process with more sanding and finish so no harm done.
Goodness knows if it helped prevent drying as the bowl had moved a but when I came back to it the next day.
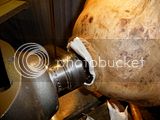
More frustratingly I'd cut the recess a bit too large - still don't know which measurement I'd chosen or messed up but the bowl was just slipping on the chuck. Not much but enough to constantly throw it off balance. I thought all was lost and I'd have to cut another recess in some way within the larger one (as I'd planned to use the largest chuck)!
Luckily Father-in-Law suggested laying some thicknesses (3) of cotton cloth into the recess
tightening up the chuck and when proven successful trimming off the excess:
Thank God, it worked. Cracked on with the centre of the bowl. I ran out of time to be taking many pics so here's one of the partial depth.
I was going to try to get it very thin and even to protect the bowl however I was getting such a lot of chatter (technique and possibly the wood?) I decided to see what would happen when such things were not done and to settle for a more flowing inner profile.
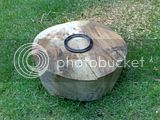
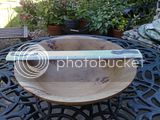
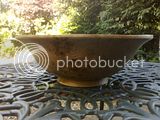
After finishing the bowl here are the after shots:
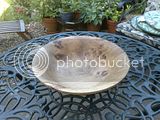
The bowl cracked after 1 week inside - rather a harsh test it has to be said however more interesting was the fact that the pippy / bur bits shrank in thickness quite a lot and the bowl remained very tactile and smooth to hold.


I think that more than 2 coats of food safe would have been good and no doubt not drying inside the house would have helped however I suspect that the splitting would have happened anyway given the uneven thickness in the walls (smooth increase from rim to centre).
Many thanks George for the wood I draw comfort from the fact I have at least 4 more bowls to come from that stash
Comments welcome of course.
Miles
I bought some of George's red pippy / bur oak some time ago and have a log of it sitting at my Father-in-Laws. On a recent holiday there I decided to give wet turning a go. Knowing that fast working is th key to green wood I arranged for the children to be looked after and set aside a whole afternoon to the enterprise. Turned out I needed rather longer but hey ho.
First job was to remove the bark etc.

At first I thought that I would turn a set of smaller bowls but Father-in-Law suggested a bigger bowl would be more of a fun challenge
So we turned it into a circular blank
After power planing a smooth bit we were able to attach a face ring. We went down this route as we didn't have face plate. I initially wanted to sort a screw check into the bark side as that would have presevered more of the surface figure however the wood was just to soft in places...

And here it is mounted on the graduate

After quite a bit of work I'd got it into a fully round thing, more or less balanced, though it wasn't ever really fully in balance because the wood seemed to be somewhat uneven in density. During the actual truing of the blank the graduate actually vibrated - something that I'd never felt before. Well we said it would be a challenge!

I decided I wanted to do some sort of Ogle shape - possibly the first time that I've actually sketched out the rough shape first rather than trying to join together the results of cuts

I was getting some wicked tear out so decided to use some finishing oil (Chestnut food safe) to try and fix it. This was pretty successful however I kept getting digs and tear so the shape kept subtly changing.

and

However I finally ended up somewhere I liked and put some finish on it (forgive the gratuitous number of shots but I was very happy with the wood and the look
)


That ended one day's turning and the bowl was left on the lathe in a bag full of dust and shavings. As it turned out this was a shame for the finish but I managed to bring that back later in the process with more sanding and finish so no harm done.
Goodness knows if it helped prevent drying as the bowl had moved a but when I came back to it the next day.
More frustratingly I'd cut the recess a bit too large - still don't know which measurement I'd chosen or messed up but the bowl was just slipping on the chuck. Not much but enough to constantly throw it off balance. I thought all was lost and I'd have to cut another recess in some way within the larger one (as I'd planned to use the largest chuck)!
Luckily Father-in-Law suggested laying some thicknesses (3) of cotton cloth into the recess

tightening up the chuck and when proven successful trimming off the excess:

Thank God, it worked. Cracked on with the centre of the bowl. I ran out of time to be taking many pics so here's one of the partial depth.

I was going to try to get it very thin and even to protect the bowl however I was getting such a lot of chatter (technique and possibly the wood?) I decided to see what would happen when such things were not done and to settle for a more flowing inner profile.
After finishing the bowl here are the after shots:


The bowl cracked after 1 week inside - rather a harsh test it has to be said however more interesting was the fact that the pippy / bur bits shrank in thickness quite a lot and the bowl remained very tactile and smooth to hold.


I think that more than 2 coats of food safe would have been good and no doubt not drying inside the house would have helped however I suspect that the splitting would have happened anyway given the uneven thickness in the walls (smooth increase from rim to centre).
Many thanks George for the wood I draw comfort from the fact I have at least 4 more bowls to come from that stash
Comments welcome of course.
Miles


