My Workbench Design - Drawer Sizing (page 3)

UKworkshop.co.uk

Help Support UKworkshop.co.uk:

This site may earn a commission from merchant affiliate links, including eBay, Amazon, and others.

OPJ

Established Member
Joined
31 Jul 2005
Messages
5,566
Reaction score
1
Location
North Somerset
Hi guys,

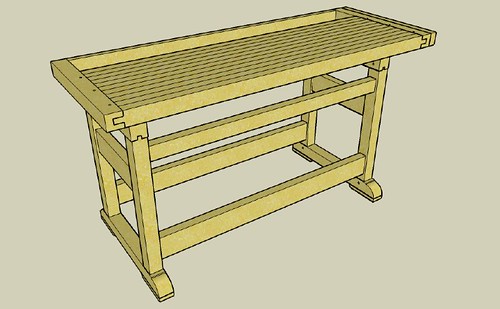
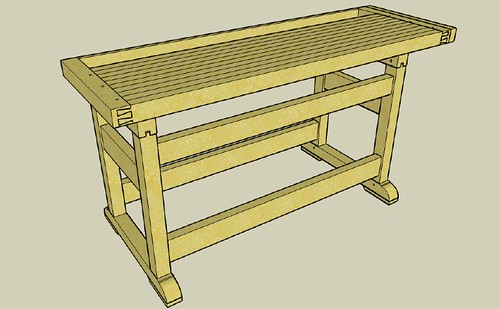
Here's my current design for a new workbench I'm planning to start building fairly soon.
3288161073_167d8639d7.jpg


Generally, I'm very happy with what I've come up with and I believe it will do everything I personally want a workbench to do for me (I haven't set out the dog holes yet! :wink:).

Current dimensions are 1830mm long x 900mm high x 620mm wide. That width measurement is likely to change though.

Couple of areas I need some help with...

Bench Well

Currently, I've allowed 150mm for the width (top will be 70mm thick). Do you think this is enough, or should I make it wider?
Also, I'd like to make a removable well but I'm not sure how - Jim Tolpin's book doesn't seem to mention it, unless I missed it.

Racking

I know that racking can be a problem when planing boards. I know that normally people would probably fit panels in to either end of the framework. But, I'd like to keep this as 'open' as possible so, I've added an extra rail here - do you think this will make much difference?

I might also add a series of holes down the length of the right hand length for supporting longer boards (with dowels) - what do you think?

Thanks for looking,

Olly. :)
 
Looks good. As far as preventing racking, I would suggest that you plan to bolt the rails and stretchers to the legs so you can tighten things up when they become loose.
 
If your definitely going to have the base open can I suggest making all the upper stretchers the same height perhaps 9" below the top and making a shelf below the work surface. It's only a suggestion. :)
 
Thank you, guys. :)

Dave, I will be assembling the frame with nuts and bolts so that it can be "knocked-down" and moved if/when required. I'll probably secure the top to the frame with long coach screws - that seems to be a popular way to do it.

Nibbo, good thinking. I do plan to use the area just below the top for jig storage (shooting boards, etc.) so I will add a ply shelf. I'll probably do something similar on the bottom rails, with a stack of drawers on one side for hand tools. :wink:

Anyone got any tips or plans on designing a removable tool well? :?
 
Are you sure you don't want storage under there?

For the tool well, couldn't you just use some 'turn keys' Just a piece of wood which can be turned to support the well and then turned out the way to remove it ?

Or could it be hinged down at the back ? :-k
 
Thanks Tom, I like the 'turn keys' idea - dead simple to make and easy to remove! :wink:

With the bottom shelf, I want to leave part of it open for storing things like my metalworking vice (although I don't have one yet...), a sharpening stone station, bench grinder, things like that really.
And, I've made the space below the bottom rail tall enough for me to slide those awkward power tool cases underneath (I hope)! :wink:
 
Olly
By "removable tool well" do you mean you want to lift out a box? Or do you mean you just want to have that section open for clamping, etc?

You could have a pair of battens running the full length, with the well bottom (1/4" MDF) just sitting on that.

Don't forget to put in a pair of sloping ends to make brushing out the shaving easier.

Cheers
Steve
 
Hi Steve, yes, I basically want a 'box' that will lift out. :)

I've drawn the back rail at 22mm thick though, I'm now thinking of making it thicker (45mm, like the rest) to accommodate some battens of similar. That way, I could rebate them to fit in place, with the MDF/ply sitting on top.
 
forgive my ignorance. Why do you want a full box to lift out? Where will you put it and what will you do with it. :?
 
One diagonal brace at the back, Olly, and your racking problem should be resolved. Even better if it is reasonably broad.........say 100mm plus, and chopped in (half-housed, maybe?).

If you don't want one long diagonal, you could do 2 corner braces, but make them at least 500 long. I wouldn't consider doing a bench without bracing or panelling.

Looking good, though, so far. I suggest making it a bit bigger..........like a workshop, you'll always be grateful for the extra space.

Mike
 
Tom, I'm actually thinking about making the well in three or four segments, which should help with the storage issue when it is removed (if I need to remove all of it). This would generally be used for clamping larger items (doors, etc.) on the workbench top. What will probably happen is that I'll never actually use it but, for me, this seems the smarter option than to fit a permanent well and later find I want to remove it!! :wink:

Mike, I'm looking at making it wider still - if I made it any longer than 6ft, I'll be running out of space for other things in my small space. I'm gonna stretch the tool well to about 175mm wide and increase the 450mm surface to either 495mm or 540mm (one or two lengths of beech).

Still undecided on the end/tail vice. I might just leave plenty of room and decide on it later, when I'm ready to do something about it.
 
Olly
I'm sure you've already done this, but, for anyone doing a search in a year's time, etc....

Read Scott Landis - The Workbench Book. Classic text, full of excellent designs.
Look at Bob Lang's video on the PopWood site. Excellent modern design, easy to build, too.

S
 
If you can wait a few days there'll be a new workbench design featured on Fine Woodworking. It doesn't have a tool tray but that would be easy to add.
 
Just been watching the Bob Lang video that Steve mentioned earlier... It's got me thinking again about making the legs and rails flush and, whether I should turn my bench in to a piece of Swiss cheese...! :wink:

Without any dog holes, this is how my design is looking right now:

3291830137_3503b9660f.jpg


I've reduced the top rail to 70mm wide from 95mm, increased the thickness of the rear rail on the top to 30mm and lost the dovetails on the front edge of the top, as I'm not aware that it could interfere with the top's inclination to shrink. :? I shouldn't have anything to worry about though; the bredboard end caps will be draw-bored in place, so there's plenty of strength there. :)

3292649120_2b7946a1e0.jpg


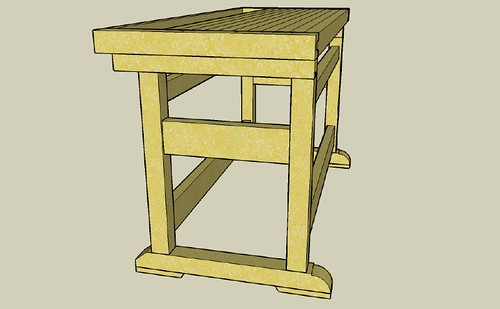
The feet are still sticking out roughly 90mm at the front of the bench. I've now made them flush at the back though, which makes sense as this will be sat against a wall! I've increased the width of the tool well to 175mm and the main surface is now 495mm wide.

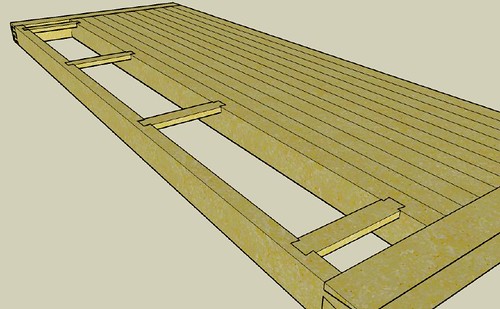
I had this idea for supporting the tool well; whether it's segmented or in one hole length:

3292676534_632a8d198e.jpg


I'm a little worried this might also cause some issues with expansion/contraction of the top - what do you think?

I've just found Bob's workbench design available as a SketchUp model - I'm gonna download it and see what he's done. :)
 
I'm almost there with this design, I can feel it!! :D

3297192525_d137ffe397.jpg


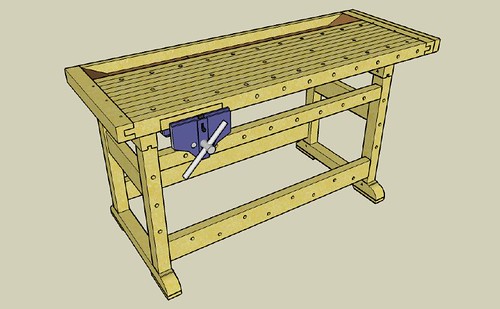
As you can see, I've added plenty of dog holes to the top, all based around where the central dog will be on my front vice. Bob Lang's video has certainly had an influence! I've made all rails flush with the legs but, I'm going to make sure the top still overhangs about 5mm, as it's inevitably going to expand and contract anyway... Perhaps American "garages" are more stable than ours, given that most of them are stuck on the side of a house? :roll: :wink:

The tool well, I've decided, will be "segmented" and removable in three parts. Nothing fancy here, just some scraps of 6mm ply or MDF with no sides. I will scrap the dovetailed supports idea due to all the short grain where they join in the rails (why didn't I see that before?! :roll:). Coupled with the risk of the top shrinking over time, something's going to give at some point! :shock: :)

Tail Vices

I'd still appreciate some advice here - perhaps "end vice" is the more appropriate term? Looking at the Axminster range (I can't afford the Veritas!!), this one caught my eye. It looks as though it is fixed to the underside of the top, which is ideally what I want. Capacity isn't really important as I'll mainly be using this for work-holding against the dogs - not for cutting dovetails! :wink: I'm still thinking of running two side-by-side, to try and imitate the Veritas vice... Do you think it would work? Should I just stick with one end vice? £50, against £170, sounds like it's worth a shot to me...?

I'd like to get this sorted out fairly soon. Without it, I can't easily determine the maximum size for my under frame assembly - I need to buy the end vice(s) first.

As always, your thoughts would be much appreciated. :)
 
That's looking more serious.

I would make the front edge piece on the top at least twice as high as you've drawn it if not more. Maybe 150mm and put the dogholes about 100mm below the top. This will allow you to support a board on edge for planing. Actually, I would set the dog holes a few mm above the screw and guide rods on the vise so you have maximum clamping height.

Make those dog holes through and be sure there's nothing to interfere with them behind. That way if you want to use one of those iron holdfasts that look a bit like a shepherd's crook, you can. Make sure all of the dogholes on the top also have clearance below.
 
Back
Top