Modifying woodies

UKworkshop.co.uk

Help Support UKworkshop.co.uk:

This site may earn a commission from merchant affiliate links, including eBay, Amazon, and others.

condeesteso

Established Member
Joined
10 Mar 2011
Messages
1,929
Reaction score
7
Location
Sevenoaks, Kent
This was prompted by a chat with Richard Arnold at Mac on Sunday, and also slightly by Richard Maguire doing a clean-up of a shoulder plane recently.
I acquired a woodie jack for £8 recently - nice and workable with a good Ward blade, but not an investment piece by a long stretch.
I first got it as I had an urgent need for an aggressive scrub plane. Of course I found a way round the scrub excuse, but got the plane anyway (complete with a woodie block plane and a very old router plane, all £8). So I thought I would modify it to see if I could make it more pleasing to handle and use (that being purely personal - what might feel right for me).
Here we go, so far (blade and cap out, need corrodip so trip to Jim's):
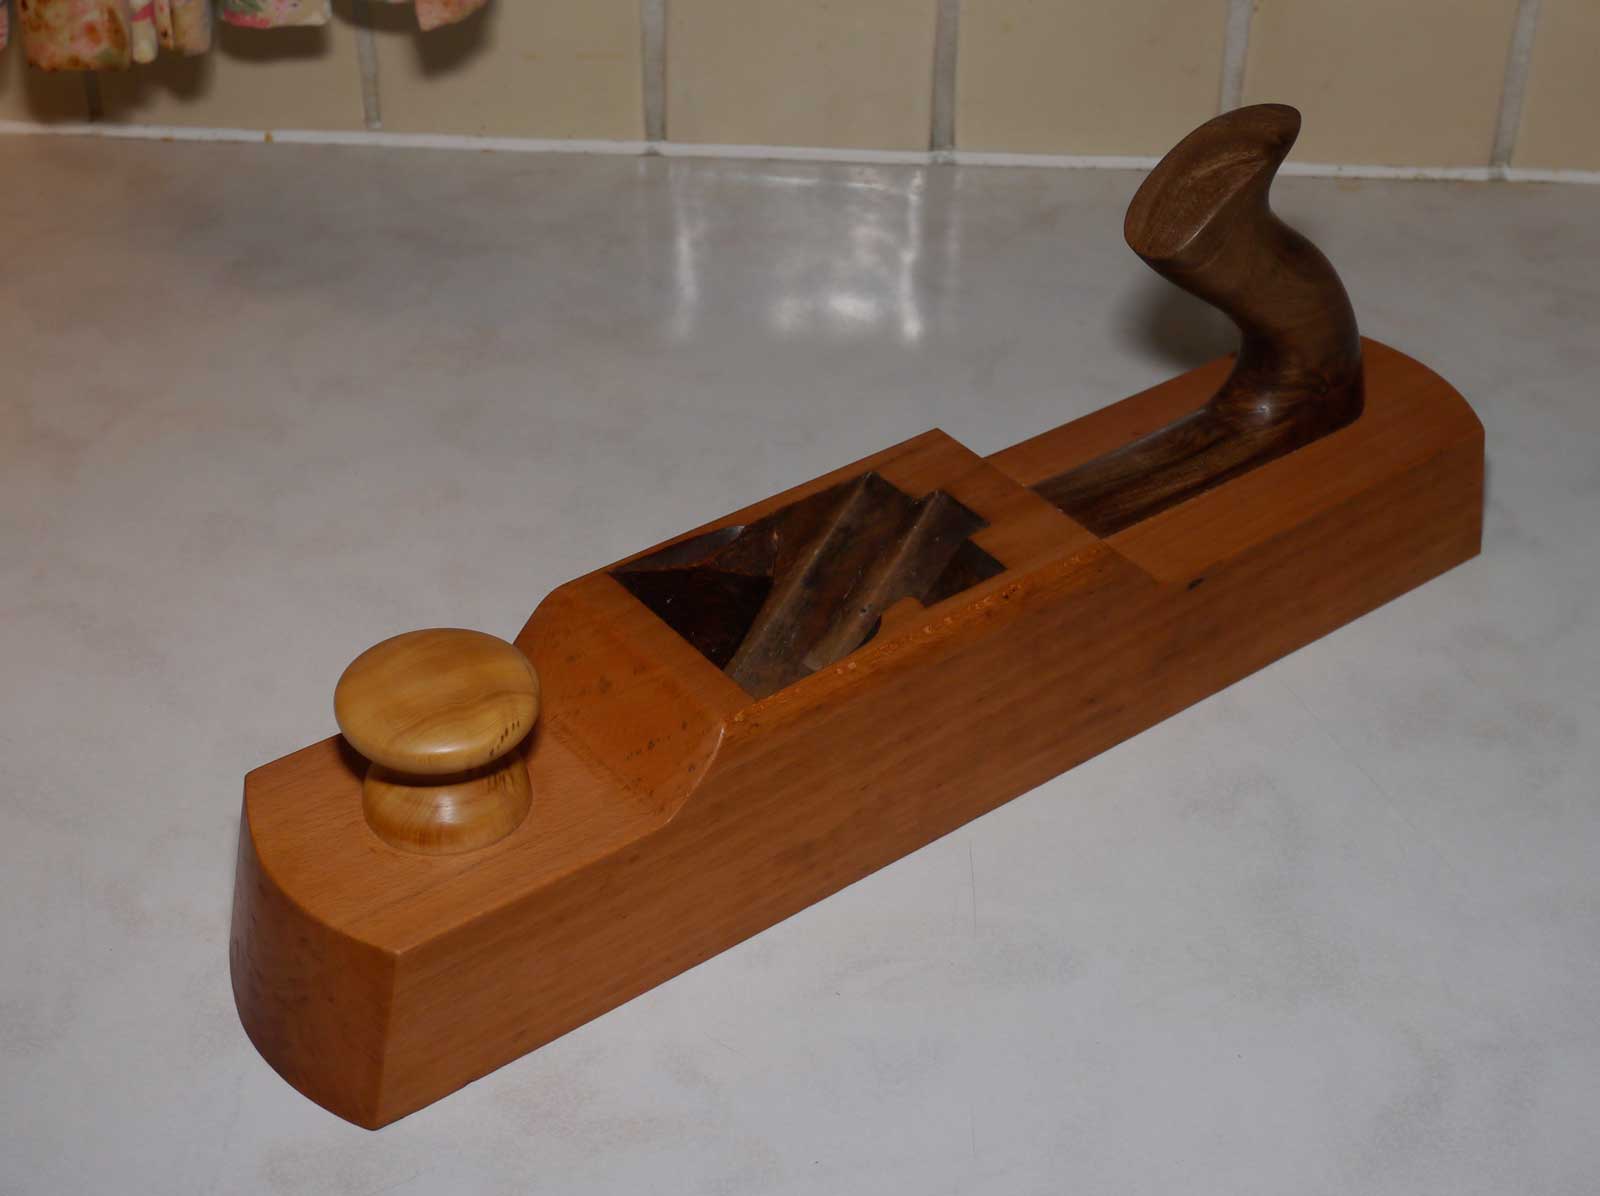
D1.jpg


I'd call this the first in the Dreadnought Class :D
I've spent longer on this than allowed, it messed up a 'working' day but never mind. The ideas have been to drop the centre of gravity a little (admittedly not much), make the front knob far more comfy and also to serve to tap for depth adjustment (tap, not whack). A tote that feels nice and leans forward more than usual to point force more down to the blade (woodies being light and benefiting from some downward pressure).
The tote is a scrap of wild walnut, with a grain flow that suits the tote shape well:
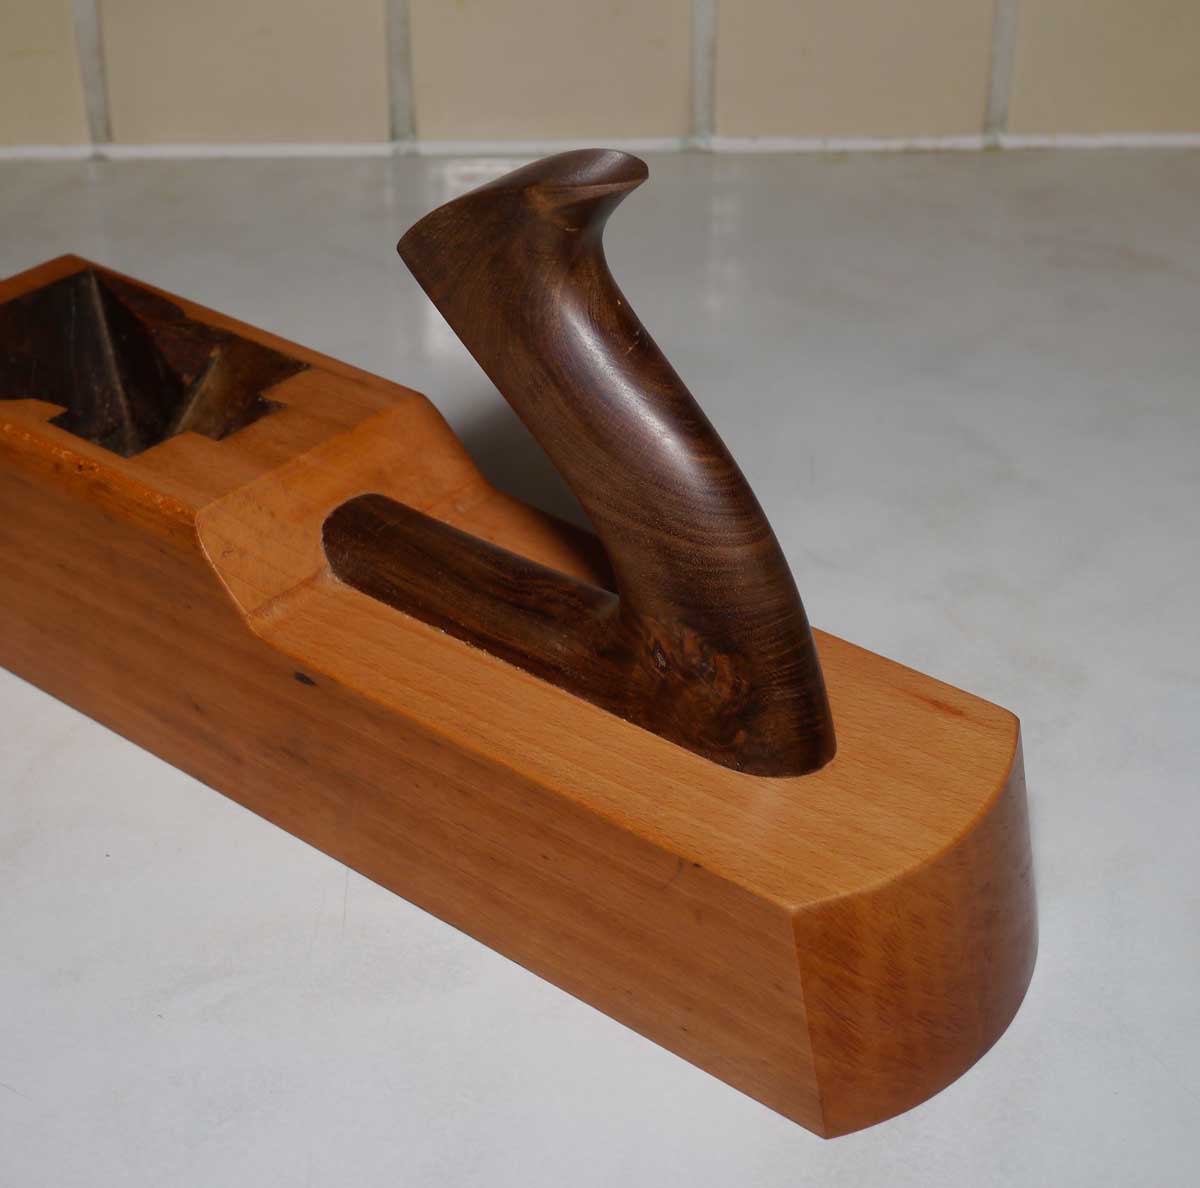
D2.jpg


I enjoy shaping handles - this was bandsaw, then round-over on router table, with all the real profiling using hand-stitched rasps... surely the best tool for a quick and fluid result. Abrasives to finish. I aimed for no flat surfaces anywhere (except in the tenon!) - I don't like those machine-made looking totes.

I can see a box insert going into the sole, but will tune the blade and cap first.
Oh yes, also took a skim off the sole (using my infill first, then the borrowed Philly smoother with Holtey blade, 55 pitch).

Modifying old woodies like this may seem wrong, but my view is there are so many around we cannot possibly save them all, let alone restore and use them. This was not a fine example so why not?

Any more out there??
 

Attachments

  • D1.jpg
    D1.jpg
    48.4 KB
  • D2.jpg
    D2.jpg
    48.6 KB
Interesting!

I do agree that there are some sad old planes that can fairly be seen as donors of useful old iron and wood. (Months ago I started trying to make a little bullnose plane from a similar basket case, which I will get round to again some day.)


The cut-down shape at the front is unusual. It reminds me of some designs by Robert Wearing - though he used Stanley spare parts for the blade and adjuster.

The rear handle is really lovely. Having had a little go with an Auriou rasp I can imagine what a pleasure it must have been to make.


How is it in use?
 
AndyT":k9eozrqr said:
How is it in use?

Can't say yet Andy, need to tune the blade and the cap which is very slightly convex at the contact area - lots of blade left and it hasn't been misused, just left to get dusty and a little surface corrosion.

I was pleased with the tote - pleasant work... but Liogier rasps of course :D

I will get the blade sorted, insert a box piece in front of mouth (probably) to close the gap a little... then report back.
 
Oops! Wrong rasps!


The really big change with what you have done is in the introduction of the front knob. The way you hold a wooden jack plane is quite different from the way you hold a metal plane with a front knob. When surfacing, your left thumb goes on the near side and your left hand fingers curl over the top. That puts your wrist in quite a different position.


I don't mean to suggest that one way is any better it worse than the other - they clearly both work - but they are different.
 
So to scrub or not to scrub? How much camber have you put on the iron?

I must get around to converting one of mine. I have a 10" cambered iron in a Record #5 and that does very well but I would like a more aggressive and lighter option.
 
Richard T":3pyc3pqj said:
So to scrub or not to scrub? How much camber have you put on the iron?

I must get around to converting one of mine. I have a 10" cambered iron in a Record #5 and that does very well but I would like a more aggressive and lighter option.

Yeah - scrubbing isn't really a yes/no thing. The shaving just progress from "tapering towards the edges" to "narrow, more like chips" as the camber increases.

A Bailey can be made "fairly scrubby".

A wooden jack can be made "very scrubby".

http://web.archive.org/web/200901141057 ... scrub.html

scrub_use.JPG


Shavings - or chips...

scrub_chip.JPG


BugBear
 
Yes Andy - I have departed from the woodie norm with this bun knob. I want to see how it feels in use as I find the trad way awkward, particularly on long passes (which this size is surely is intended for).
I ought to make this the scrub I intended (as said, not touched the blade yet) - I really don't need another jack, really not :lol:

OK, scrub it is, like the aggressive one BB refers to. I will get it finished and test, asap. I need to pop over to Jim's - corrodip then one of his many grinders to get the approx profile. Given the scrub decision, the box insert in front of mouth is probably not necessary.
 
Your modified plane looks pleasant and can be a good idea for recovering some old woodie.
I like it!
May be, if available, I would have made the knob with same wood as the rear handle.
Ciao
Giuliano :D
 
I'd be tempted to try it out before converting it to a scrub Plane. You just never know, metal bodied planes might be resigned to being the door stops. :)
Plenty of smaller woodies about to convert to a scrub. In fact a shorter Plane might be a bit more appropriate. Either that or look for a similar Jack and chop it to size.
BTW. I did a quick, rough calculation recently on how much I'd spent on Block, Smoothing, Jack and Jointer Planes. Over a 35 year period it amounted to around £700. Not excessive considering the time period. Then again if I'd gone the cheap woodie route (and selected carefully) that figure could have been well under £70. Just one of those silly thoughts when one has too much time to waste!
 
CHAPTER THE THIRD: In which Kerry becomes Keira.

Revisited this old woodie during the quiet period, and decided it's potentially too good to make into a scrub. So I decided to close the mouth down fairly tight, if I start a bit too tight I can open it a little later.
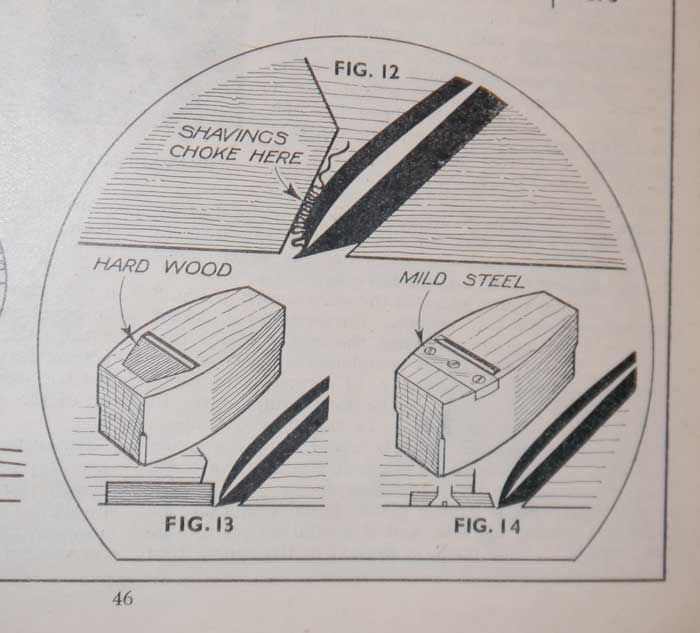
I happened upon a woodie tune-up article in an old copy of woodworker (Feb '38, sixpence). The writer starts out by saying that old ones are better than new ones (that's lucky :) ) - and then discusses the deformation of sole just behind the mouth when the wedge is first fitted in tight, See pic top left:
wp1.jpg


A bit later he moves onto repairing the mouth and tightening it at the same time. The usual beech insert is covered but also a quick-to-fit steel plate:
wp2.jpg


I'd be slightly concerned that the steel full-width is removing body at a high-stress point although I bet it works fine.
I went for the insert, box in my case as I had a bit around:

pl1.jpg


The current mouth is quite large - I can check roughly by backing the cap iron and lowering cutter well down, using paper to check roughly how wide. 2 lines off that gave me a good enough reference to zero mouth:

pl3.jpg

pl4.jpg


I cut the recess first and then took the insert down to size (20 degrees on this one) and the mouth sides were poor, so slightly widened and squared-up.
The old Record 71 was used for final skimming to depth (insert left a little proud), and the paring chisel to clean inside the mouth edges:

pl5.jpg


Got it fitting well with patience and very fine cuts (block plane for final adjustment). It's clamped up now.
The blade has been an issue - a very solid old Ward with an equally solid cap iron. As is very typical, there is some pitting on the back of blade just where the cap contacted. I am slowly working on that but it is tedious and I won't resort to a back bevel:

pl6.jpg


I know the obvious thing to do with this is turn it to a scrub, the central area is now good. But I shall persevere - mainly to see how good I can get an eight quid woodie (not costing time of course).
Still a big fan of wooden planes - I think they are sadly overlooked, stupidly cheap, abundant, made of the minimum number of components, a great source of very fine blades and cap irons... and hugely capable. I often question the ergonomics, but that's where this started out. And by the way, don't like the new knob now. Not the right shape at all. May do something about that, a bit of Krenovian influence probably. (The man has become an adjective, says something =D> ).
 

Attachments

  • wp1.jpg
    wp1.jpg
    35.2 KB
  • wp2.jpg
    wp2.jpg
    39.8 KB
  • pl1.jpg
    pl1.jpg
    55.9 KB
  • pl3.jpg
    pl3.jpg
    75.6 KB
  • pl4.jpg
    pl4.jpg
    26 KB
  • pl5.jpg
    pl5.jpg
    51.7 KB
  • pl6.jpg
    pl6.jpg
    36.7 KB
Time for an update. The box insert is in and was a slight interference with blade. Use of a file and a bit of trial and error ended up with a tightish mouth, I didn't want it too tight as I have enough fine tuned planes already - this is intended for fairly proper jack work:

Pu2.jpg


(Two Lawyers saw thrown in... product placement :lol: )
I spent a bit of time on the edge primary, but the tiny pitting goes back a bit... how far do I go? I got to the point where the central 60 - 70% is good. One day I may go further but I ran out of patience. SO, contrary to all intentions - a back-bevel. Not a ruler trick, a proper 3 degrees approx, going back less than 1mm. So pitch becomes 48 (not at all unusual) and I get a decent edge for now.

Front bun / knob: I got an idea and it turned out to be a bad one... what on earth?

Pu1.jpg


Nonsense. I've been looking at an infill jack I have - that may inspire my next (hopefully) final attempt.

How does it plane? - very well indeed, pleased. I don't normally bother measuring shavings but a good 12 - 14 thou across about 1 1/2" of the edge. It has a camber, didn't have much choice but it suits this plane I think.

It could do with oiling - I'll find some putty and bung the mouth, then tank it up for a while.

I think I'll get what I was aiming for - a really useable woodie jack. They are cheap as chips but I have spent hours on this one so forget the economics!
I think it's nicely made, this one (excellent irons, wedge fits very nicely etc). I was reading Alf (blog) saying generally how bad the 20thC woodies (post 1930-ish) are, but I think there are good ones to be had.

Once the knob is done, I'll do another pic. Sorry it's slow, but it's a part-time fettle.

edit p.s. Yes Richard, that is yours :wink: it was only a prop! Mint it is, honest.
 

Attachments

  • Pu2.jpg
    Pu2.jpg
    71.3 KB
  • Pu1.jpg
    Pu1.jpg
    59.8 KB
condeesteso":2g9uckor said:
It could do with oiling - I'll find some putty and bung the mouth, then tank it up for a while.

Perhaps not...

woodworker 1928":2g9uckor said:
Forty years ago it was the general practice to take a new beechwood
plane to the chandler's or oil stores to have it soaked in raw linseed
oil. The oilman generally weighed the plane minus the blades and then
proceeded to tie a piece of strong twine to it, after which he threw it
bodily into the drum of linseed oil. In a week or ten days the owner,
usually an apprentice, would call and the oilman would withdraw the
plane from the drum by hauling in the twine. After the plane was drained
the oilman again weighed it and charged the owner for the oil absorbed
plus his labour. The plane was left for a few days to allow for
oxidation of the oil, after which the blade, etc. was adjusted and the
plane put into action. Another method was to putty up the mouth of the
plane and then to pour raw linseed oil into the escapement, after which
the plane as allowed to soak up the oil, which was, if necessary,
replenished once or twice.

Nowadays the plane makers decry such treatment, and at least one firm
issues a danger label printed in red which distinctly states that if the
plane be soaked in oil their warranty ceases. The accepted treatment at
the moment is to wipe the plane over thoroughly with a freely charged
linseed oil rag every day for from seven to ten day's, after which the
plane is fadded-in with french polish. One is apt to refer to work done
in the "good old days" so why this alteration in treatment?

First of all let us examine the end of a plane and we shall see that,
if a careful selection of timber has been made. the annual rings and
the medullary rays wll run approximately as shown at Fig 1. In other
words, the blocks from which the plane is made has been quarter sawn.
If cut as at Fig. I the sole stands up to the wear better and the
tendency for shrink is minimised because it is more or less in the
direction of the arrow. To illustrate this this more forcibly look at
Fig. 2, where the effect of circumferential shrinkave is shown, and it
will be obvious that, if the plane block were cut like this, the side
of the plane and its sole would soon cease to be at right angles and
this shape would be practically useless when used in conjunction with
the shooting board. Soaking the plane in oil has a tendency to swell
the wood and cause undue distortion, whereas if the plane is gradually
oiled the pores are filled gradually as the oxidation of the oil takes
place. The appli- cation of a little french polish as a finishing
process further seals the pores and makes for cleanliness. Swelling the
wood with oil also causes the frog (or the part on which the blade
beds) to become twisted, and this produces "chattering" and imperfect
cutting when the plane is in use.

BugBear
 
I think I can see why the Mk. II front bun wasn't a complete success - though to be fair, if you don't try you don't find out.

Maybe it might be worth trying the continental-style front horn - after all, in European practice it's common and long-lasting, and that wouldn't have happened if that form of hand-hold didn't have great merit. I stand to be corrected, but I think I can recall Jimi showing us a plane with one that he'd aquired at a boot fair (where else!), so there may be reference material readily to hand, if Alfie will let you play with it...
 
Indeed BB - I think the practice fell from grace around the 20s maybe. Previously I have been known to put the whole body in a poly bag with a cupful of thinned RLO, tie the top and shift it around every so often. I might do that as it dawns on me now (daylight, awake) with the box insert I could cause myself problems.
Cheshire! - hadn't thought of that, but you spot the problem with the previous. I know exactly the thing you mean (and they look a lot like a thing to me, a horn maybe) - a very good option, I shall ponder. Not in a rush on this you understand :)
Re the beech and grain etc - The best ones are obviously bang-on the quarter, annular rings perpendicular to sole. But either mine was a later mass-produced item bought by an indifferent customer, or it was the runt of the litter (last one left in the shop, I mean). If I'd asked for rings at 45 degrees they couldn't have got closer. Sole is good and true though (did skim it very slightly).
I shall oil it some way I think, and attack the handle / bun / horn quite soon. Main thing is how well these planes can work, even the cheap late rather average ones.
 
I found the following in Making and Modifying Woodworking Tools by Jim Kingshott (first published 1992): “I soak my planes in a bath of linseed oil – this has been the traditional treatment since planes were first made. Once the wood has soaked up as much oil as it will hold it is placed on a pile of old newspapers. Quite a lot of the oil will bleed out but this will not take long – a day in the oil and a day bleeding is all that is required.” So it seems that Jim kept to the old way. However, I think I’ll just stick to applying coats with a rag …..

How about a mushroom shaped knob like the one at the end of this link, but not so tall?
#p730682

It’s a very good looking vice, by the way :lol:
 
I found the above posts interesting as I have been rejuvenating three wooden planes 6" long (1 1/2" blade); 7 5/8" long (2 1/8" blade); 17" long (2 1/4" blade). No modifications as above, just cleaning them up, new wedge and sharpening the blades.

This was after rejuvenating some old wooden spokeshaves which I got working a treat.

I've sealed the plane bodies with a few coats of sanding sealer with light rub downs between, and I'm well surprised and impressed how they work in comparison to my old record planes.

What are the views for sealing/lubricating the sole?
 

Latest posts

Back
Top