meddings drill strip and pimp

UKworkshop.co.uk

Help Support UKworkshop.co.uk:

This site may earn a commission from merchant affiliate links, including eBay, Amazon, and others.

marcros

Established Member
Joined
11 Feb 2011
Messages
11,302
Reaction score
746
Location
Leeds
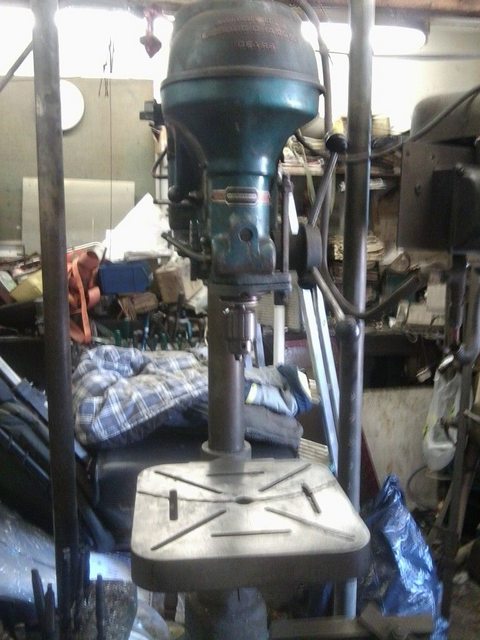
I have bought a meddings driltru, which I think is a mark 2. It is the nice one with the curved top, like an elegant car bonnet of yesteryear. It seems to be reasonably clean, but I would like to have it looking as new. I have bought it as an alternative to spending the same money on something new and inferior from SIP, Clarke etc!

I have stripped it down, with the exception of the quill- struggling to get the chuck off at the moment, so need to order some wedges. It needs a new chuck, this one is rusty and seized. The bearings may as well be done whilst it is in pieces. I was expecting the chuck to have an arbour like the one on my lathe, but it seems form a parts breakdown I have for the later mark 3 that the quill is the male, going straight into the female chuck.

I have a few paint options and would appreciate some thoughts. I am not trying to restore to factory colours, I quite fancy something pimped- a copper brown maybe.

1. Have it powder coated
2. Send it somewhere to be painted (I have no equipment for spraying)
3. Use a rattle can, but I have no prior experience in doing this and I suspect that it probably needs sand blasting first.
4. Paint by hand. It will still need blasting or preparing somehow.

I would have thought that by the time I have bought rattle cans and spent a while preparing it by hand it would almost be as cost effective to have it sent for blasting and powder coating/spraying. I would prefer to avoid spending hours having to paint it if the difference is only £40 or £50 between doing it myself and having it done, given that at the moment I can only spend a few hours a week in my workshop.
 
I would think that painting would be a bit more in keeping, given it's age and history, than the powder coating,
Also I am not so sure that powder coating is robust enough for the potential knocks and dings possible in every day use,
Plus it's difficult stuff to repair or touch in any chips.
If there are many chips out of the current finish, you may as well get the sand blasting done first.
After de greasing, several thin coats of finish by brush, will look as good as spraying, gently de-knib with the green kitchen scourer,(not the one you used yesterday doing the dishes)!
But a degreas and spraying will be faster, But more like £50.00 plus £30.00 for paint and thinners etc.
I wish you the best of luck renovating a bit of history, could you please at least do a before and after pics?
Regards Rodders
 
Be aware that some castings can be quite rough and even have blow holes in non critical places. In production these would have as much filler as required to make them look nice. If the machine is in otherwise good condition (or will be with new bearings etc) then I'd get someone else do do a nice job on it if you can afford it. Grey or Green are common colours although I think Meddings favoured blue? Don't much like the sound of Brown personally but it's whatever floats your boat! :? How about that really bright Myford Greeny Turquoise colour?! :lol:
 
woodpig":qswx9tw5 said:
Be aware that some castings can be quite rough and even have blow holes in non critical places. In production these would have as much filler as required to make them look nice.

I saw a website of a model engineer making a sophisticated grinder, and the EFFORT needed to "just" make a painted casting
look nice was amazing.

BugBear
 
With castings, powder coating will often 'blow' and have a pock marked surface due to the heat of the curing oven expanding the air trapped in the occlusions within the casting. Wet spray, or rattle can would be preferable if your looking for the blemish free finish.
 
Food for thought, thanks everybody.

It sounds like powder coating is out, so if I can find somebody to blast and spray it I will explore that option. If not then I will have to rattle can it or brush.

The existing stuff isn't chipped as far as I can recall. Would i get away without having to remove it all- it looks like the factory finish whatever that was.
 
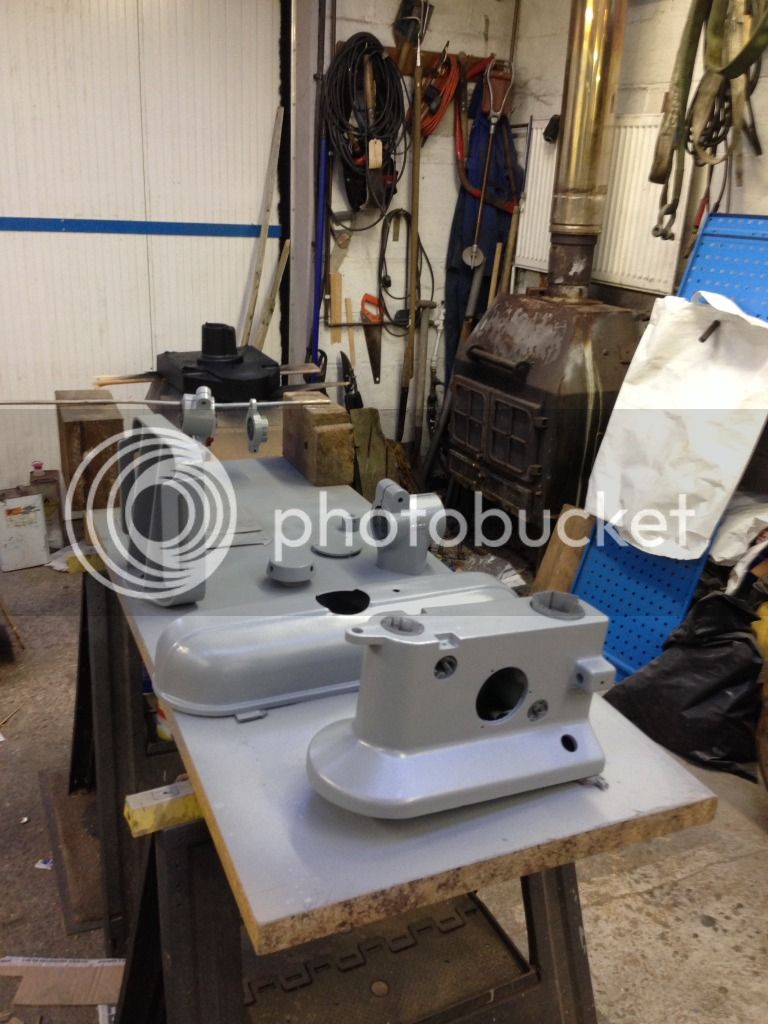
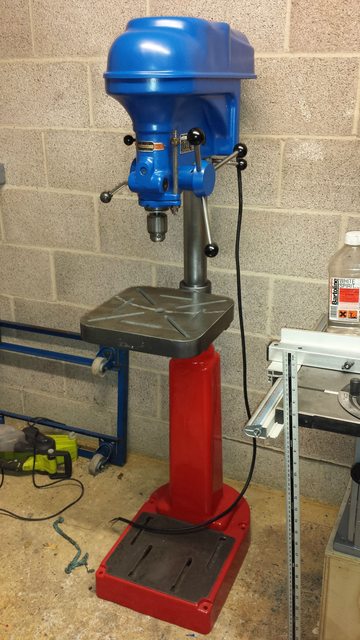
I recently did up a Meddings, I'd already stripped it down but it only took 5 hours to flap wheel, grind & wire brush back to bare metal & then get to this stage.

photo1_zps0b3fd092.jpg


All sprayed with aerosols including the black foot in the background.

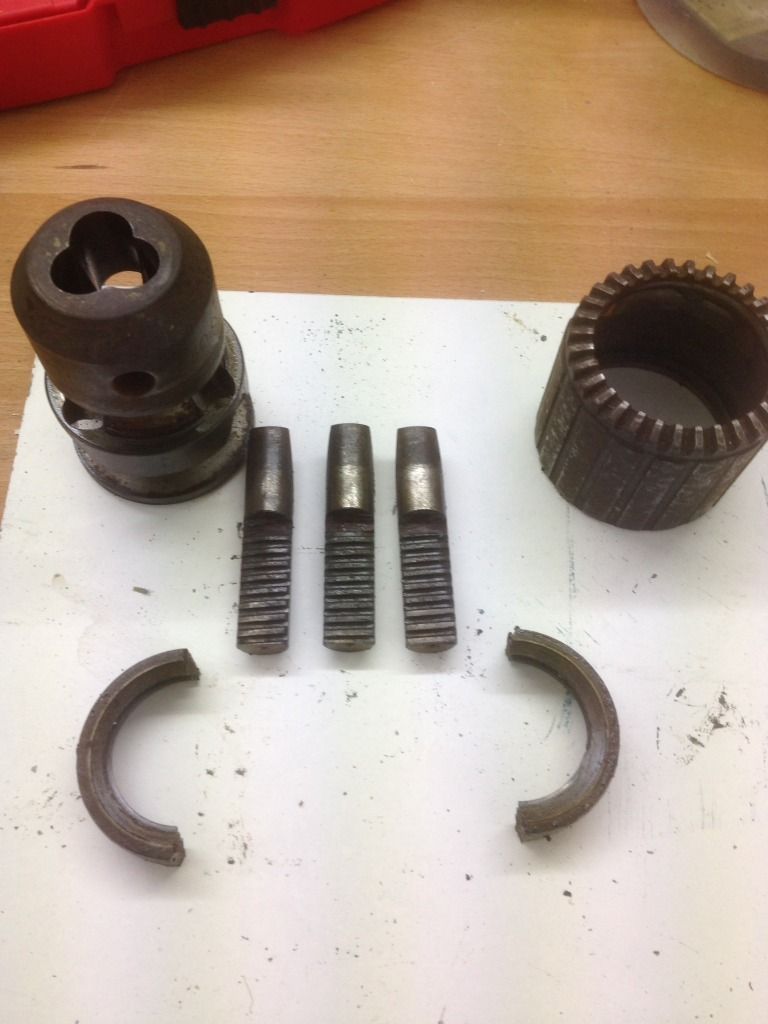
Don't give up on the original chuck to readily mine was seized & looked like this when taken apart

photo2_zps2c83fa67.jpg


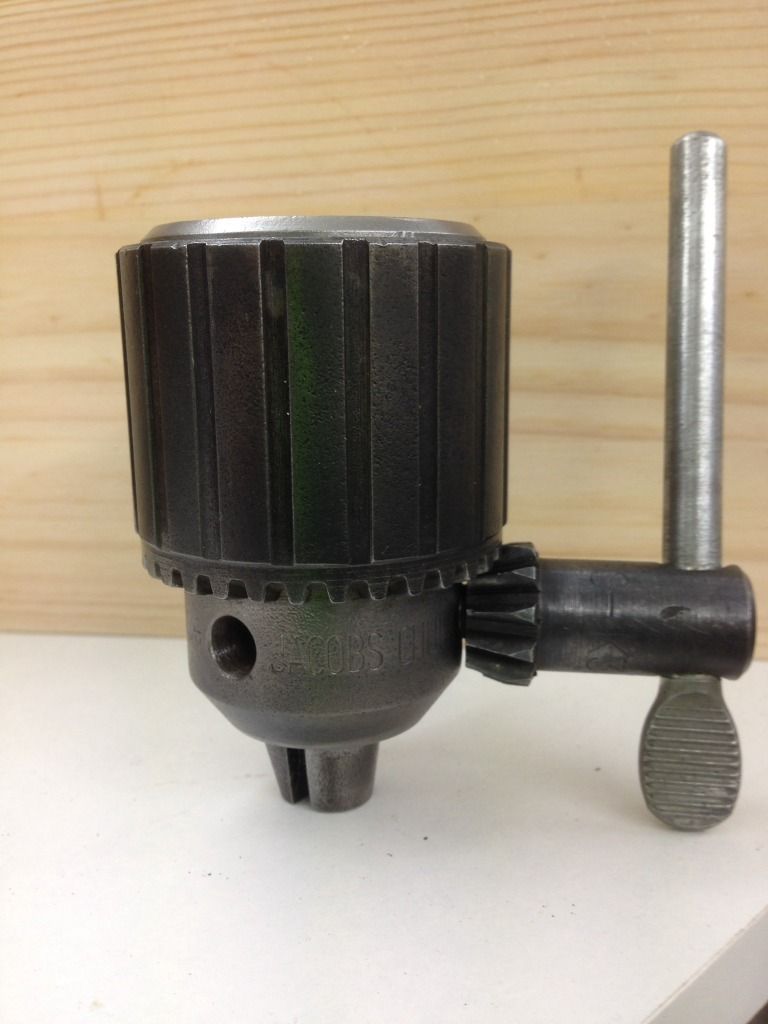
But after some TLC & just a tad of grease (don't over do it) it came up like new & works a treat.

photo3_zps4986baa1.jpg


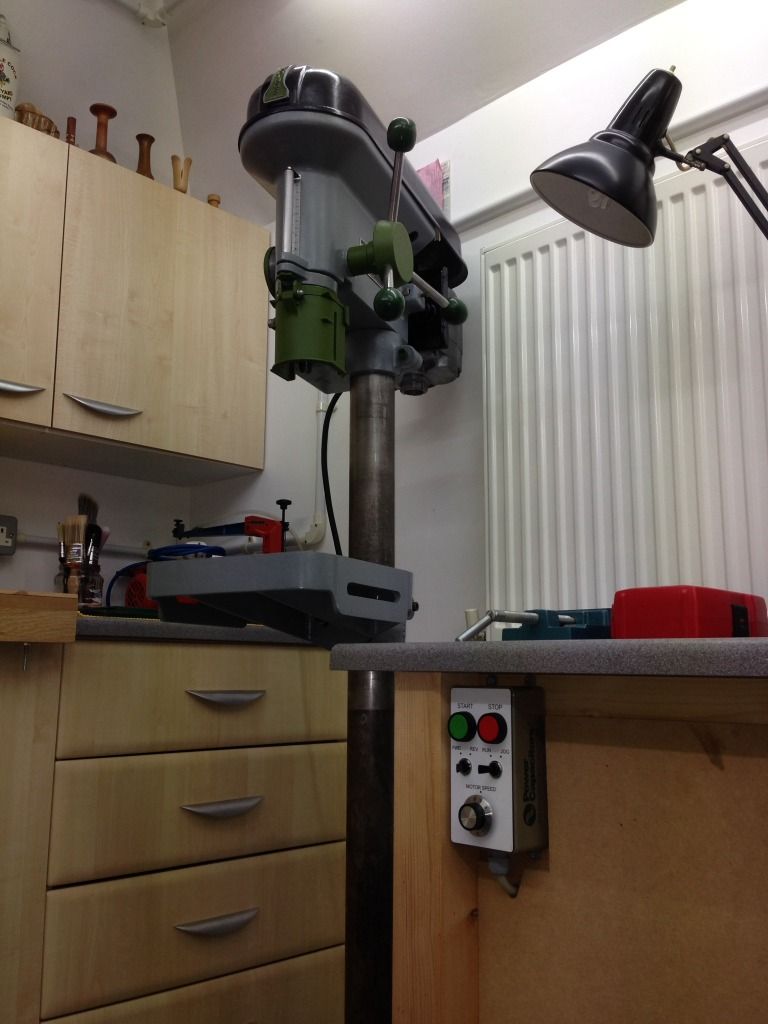
I'm really pleased with mine, I changed all the bearings, made new parts that were damaged including knobs for the handles & depth gauge, then fitted an inverter to get variable speed & allow me remote control via a pendent fitted on the cupboard next to the drill. This is it nearly finished just need two springs for the chuck guard.

photo_zps3a54f23d.jpg


Doug.
 
That picture is a huge help- shows me how the chuck will look when it comes off. I am not going to buy a new chuck until this one is off- I can soak it and have a proper look then.

Yours looks the same as mine except I have the bench version. Certainly very similar. How many cans did it take to spray?
 
marcros":2n9x1al6 said:
snip

Yours looks the same as mine except I have the bench version. Certainly very similar. How many cans did it take to spray?

I used I can of hi build primer & 2-3 cans of grey, I already had the paint as I'd used it on other projects & as they weren't full cans it's difficult to be precise but I would have thought 2 would do.

I have loads of photos of the rebuild, in fact I did start a thread but haven't had time to write it up I'll try & get it done soon.
 
I have a Meddings drill like this but the star wheel spindle is seized. How did you get the star wheel off this?
I have an LF1 which looks exactly like the meddings in the picture and I have yet to find how to get the star wheel hub off.
There is a collar before it which is loose the star wheel hub has a hole in it and rotates a little on the shaft but the hole does not seem to have anything in it. If It does its broken off nearly flush with the spindle shaft.

It looks like a blind hole and I cant see a thread.

There is a plastic bush or top hat between the collar with the grub screw and the body but this looks liek it has a saw cut through it.
The spring is fine and the quill not rusty and well lubricated. The issue seems to be the shaft is siezed.
does anyone have any manuals or info on this drill?
Regards

Robin
 
I've just embarked on restoring an LF1 MkIII from 1977 I got on eBay. For me the pin (I think about 3/16") could be drifted out of the star wheel with a punch. I have a parts diagram I got from Meddings themselves if it's any use?
 
I have just got myself a meddings pillar drill M2/mk1 and would be very interested in any photos of builds or a link to any threads regarding meddings drill refurbs although ive got the parts diagram from meddings i would like a bit more info on the strip down process. Many Thanks

Richard
 
Richard1":14m1t3il said:
I have just got myself a meddings pillar drill M2/mk1 and would be very interested in any photos of builds or a link to any threads regarding meddings drill refurbs although ive got the parts diagram from meddings i would like a bit more info on the strip down process. Many Thanks

Richard
My drill thread is here. new-meddings-owner-if-i-ve-learnt-one-single-thing-t106700.html
Fair warning: it's probably not what you need. It's amateur hour. But there's some links in there that might be useful as well as some other bits of info etc. There's some excellent Meddings threads on UKW, it's a question of searching well. Wide number of meddings/drill/restoration phrases as search terms.
Mindthatwhatouch (member on here) It's well worth looking up his restoration, he's very knowledgeable along with many others.
I still have the PDFs mentioned in my thread if they are of any use PM your email address.
A good link posted by Deadeye:
http://www.lathes.co.uk/meddingsdrills1960/

I still haven't finished mine totally although it works. A return spring turned up from China about three days ago for a fiver. Took a month to get here but looks like it might sort out an issue at £35 cheaper than a proper Meddings replacement spring. Still have no reverse. :|
Good luck with your drill. Look forward to updates.
 
Awesome reply, many thanks, sorry i couldn't thank you sooner, had to take the misses out for a meal and wasn't allowed to look at my phone. I think she suspects im having an affair with a woman called meddings!!!! Anyway if you could send me those pdfs you mention i would be very grateful. I plan to put a 230v motor on mine, have a company not too far from me that can supply them, saves postage costs. Plan to replace bearings etc. And of course re paint. Not sure what colour yet. Colour of motor may dictate that. Blue then...
 
Richard1":1hh7g1er said:
Awesome reply, many thanks, sorry i couldn't thank you sooner, had to take the misses out for a meal and wasn't allowed to look at my phone. I think she suspects im having an affair with a woman called meddings!!!! Anyway if you could send me those pdfs you mention i would be very grateful. I plan to put a 230v motor on mine, have a company not too far from me that can supply them, saves postage costs. Plan to replace bearings etc. And of course re paint. Not sure what colour yet. Colour of motor may dictate that. Blue then...
Because im too new to this forum it won't let me pm you my email address or write it in this message.
 

Latest posts

Back
Top