Layer problem in scetchup 8

UKworkshop.co.uk

Help Support UKworkshop.co.uk:

This site may earn a commission from merchant affiliate links, including eBay, Amazon, and others.

mpooley

Established Member
Joined
23 Jul 2006
Messages
714
Reaction score
0
Location
Norfolk UK
Hi all
I have just started a new project so i am back to using my old aversary Sketchup!
I love this program and hate it in equal measure lol

when you make a component and then want to change it's level thats easy but strange things can happen down the line when viewing different levels.
Why
because only the Component is in the new level not all the lines etc that make it up !
they have stayed on the level they were first drawn.

So when i want to change a components level I have to edit it first select everything and change all their levels then change the component level.
This seems crazy to me and a very easy step to overlook.
Is this a feature? if so why?

thanks

Mike
 
In short, you're doing it wrong.

In SketchUp layers are only used to control visibility. You should only make layer associations for components/groups. All lines and faces should remain on Layer 0, the default layer. There is absolutely no need to change the layer associations for lines and faces.

When you turn off a layer, it in effect turns on a "cloaking device" hiding the entities within it.

This is copied and pasted from the help files. It's worth understanding and following this stuff. I don't know how many models I've fixed for others who didn't follow the guidelines. It can be a lot of work to straighten out a model.

"First things first: by default, a SketchUp model has one layer, Layer 0 (zero), which is the base layer. You can't delete or rename Layer 0, and you should always draw your individual entities on Layer 0 and leave them there.

The main difference you'll notice is that entities associated with different layers in SketchUp still intersect each other. For this reason, it's almost always best to draw all your individual entities on Layer 0 and leave them there. Then, if you want to use layers to organize your model, you can turn individual entities into groups or components, and then associate different layers with those groups or components. To add additional layers:

Open the "Window" menu.
Click "Layers."
In the "Layers" dialog box, click "+" button
Optionally, you can rename a layer (other than Layer 0).
Optionally, you can delete a layer (other than Layer 0). If the layer you are deleting isn't empty, a message asks if you want to move its contents to another layer or delete the contents.
Optionally, you can make another layer active by clicking its option button. When you draw individual entities, they are always drawn on the active layer, so you should typically have Layer 0 selected, unless you need to hide it, in which case, you need to select a different layer.
Important note: Groups and components are also entities, and, just like with individual entities, you control their layer properties in the Entity Info dialog box. To try to keep things clear, this article refers to individual entities (things like edges and faces) versus groups and components. To try to make things even clearer, since groups and components behave the same with respect to layers, only groups are mentioned from now on in this article. Finally, the idea of drawing individual entities on Layer 0 and leaving them there is so important that this article doesn't even address the option of associating other layers with individual entities. If you want to experiment with that, you'll need to take along your own search and rescue team!

Notice the way this is phrased: you associate layers with groups, rather than moving groups to layers. This is because a layer is actually a property of a group, and you associate a layer with a group by selecting it in the group's Entity Info dialog box.

Once you have associated layers with groups in a model, you can use the layers to control the visibility of those groups. In this way you can easily turn off or on the visibility of various parts of your model, for example, you could make all of your wall and roof entities different groups, associate layers with those groups, and then hide those layers so as to display just the floor plan in the model.

To control the visibility of layers:

In SketchUp open the "Window" menu.
Click "Layers."
Click the check box in the "Visible" column: when it has a check mark, the layer is visible; when it is clear, the layer is hidden.
Note: The active layer is indicated by its option button being selected. You can't hide the active layer, but you can select another layer, and then hide the original one.
Additional notes about layers:

Be happy! Always draw your entities on Layer 0 and leave them there. (Did we say that already?)
Controlling visibility versus isolating geometry. It's important to note again that layers control only visibility. You can't isolate geometry (make it independent of other geometry) by associating different layers with it; you can only control whether it is visible or hidden by making the layer that is associated with it visible or hidden. The way to make selected SketchUp geometry independent is to make it into a group or component.
Keeping track of layers with color. When you are associating layers with groups, you can make it easier to keep track of the layers by turning on layer colors:
Open the "Window" menu.
Click "Layers."
In the Layers dialog box, open the options menu, and then select "Color by Layer."
If you are following the advice to draw all individual entities on Layer 0, and then leave them there, all individual entities will have the color of Layer 0. All groups or components will have the color of the layer they are on.
If you select the Paint tool, Color by Layer is automatically turned off.
Entities within groups. If you draw some entities on Layer 0, make them a group, and then associate another layer with the group, the entities within the group remain associated with the original layer. However, the group controls the visibility of the entities. If you hide the layer that is associated with a group, all of the entities within the group are hidden. Also, if you use Color by Layer, the color is controlled by the layer that is associated with a group or component.
Color by Layer with groups that are nested within other groups. If you have Layer 0 associated with a group, and then nest that group inside another group, the Layer 0 group will inherit the layer color of the topmost group. If you have a layer other than 0 associated with a group, then that group inherits and keeps that layer's color, even if you nest it with another group and associate a different layer with the topmost group."
 
Thanks Dave :shock:

I dont think i will ever get good at sketchup :oops:

so why allow the user to have Active layers in the first place?
If that was not possible then all new entities would be drawn on layer 0 and there wouldn't be a problem.
it would also make it clearer that the layers are only there for visibility.

Do you think I should go round my model and change the entities back to level 0?

I do Hate sketchup LOL

thanks

Mike
 
Mike, I don't know why they make it possible to change which layer is active. I wouldn't mind if they took that functionality away. Still, it's just a matter of making sure the Layer 0 radio button is always showing the black dot.

As to the layer thing, some would just say, "read the manual (help files)", but I think the confusion comes from the fact that there are programs that do use layers to separate things.

If you continue to work at it, you will get to be good at it. I muddle through but I wasn't hatched knowing how to use the program. ;)

You should indeed fix your model. If you want to send it to me, I can fix it in short order and send it back. If you fix it, you can think of it as punishment forscrewing it up. :lol: :lol: :mrgreen: It'll learn you not to make that mistake again.
 
Thanks Dave.

I think I have read more and watched more video's on sketchup than on any other application I use except possibly the programming languages I use.

I think maybe that because sketchup is so easy when you first start using it that you are fooled into believing its easy to do the more complex models too !

In other words You can get something that looks good in sketchup very easily but when you start to manipulate that model to do more complex things you quickly realise sketchup is a right B****** and has led you astray by its apparent ease of use.

thanks
Mike
 
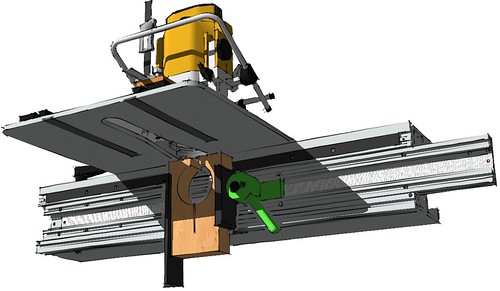
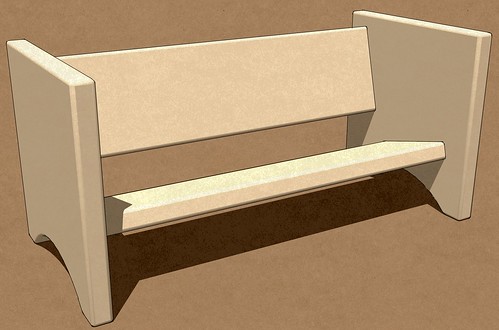
I think some of it comes from learning less than the best methods to begin with. There are some tutorials out there that teach what I think are poor practice under the guise of keeping it simple for beginners. The problem comes when you want to move beyond drawing simple boxes to more involved pieces. With good practice from the beginning, there is much less problem when it comes to the mode complex models. For example this model of the Router Boss isn't really any harder to draw than the book rack. It's just more parts.


Dave R":284wf20d said:
I think some of it comes from learning less than the best methods to begin with. There are some tutorials out there that teach what I think are poor practice under the guise of keeping it simple for beginners. The problem comes when you want to move beyond drawing simple boxes to more involved pieces. With good practice from the beginning, there is much less problem when it comes to the mode complex models. For example this model of the Router Boss isn't really any hard to draw than the book rack. It's just more parts.


The trouble is Dave is that i do try to do very complex models when i use sketchup but they are usually a year or more apart, so i dont remember all that i learnt the year before.

The good news is I do remember some of it so I could accumluate a good working knowledge in about 50 years lol
Mike
 
Hi Roger,

I would put dimensions on their own layer or layers to help with organizing the model. That allows you to turn off the dimension layer(s) when you want views of the model without them. You might use more than one layer in cases where there are unneeded dimensions or confusing dimension in some views. Don't put dimensions inside components, either. This will cause them to appear in every instance of the component which will cause clutter, be redundant and likely confusing.
 
Hi Dave

When you say 'don't put dimensions inside components' I can see your reasoning but the only way I can seem to add a dimension to an edge, say, in a component is to open it for editing so that I can then select it and thence the dimension.
 
Instead of selecting the edge, leave the component closed and click on the end points of the line for which you want to create the dimension. There is a case in which you must open the component for editing. That is for radii of circles and arcs. But they don't come around all that often. In those cases, I will open the component for editing, place the radius dimension, select Cut (Edit menu, Scissor tool or keyboard shortcut), close the component and choose Edit>Paste in Place.
 
Brilliant...thanks, that worked.

I noticed a wee 'feature' (which I'm sure you already know about) but if you have two windows open..one of which has the Units in Model Info set to the lowest level of precision ...with some dimensions on that model..then if you bring the second window to be active, then the dimension display of the window underneath changes to reflect the level of precision on the second (topmost) window. Curious.
 
Glad that worked. Precision is set as part of the model--it's initial setting is actually part of your starting template along with the Units. You can change this from one model to another so if you want to work in metric for one model, you can do that. You can set to old money for the next model, though. If you do change precision settings from model to model, it is a good idea to keep track of it.

My suggestion is that you draw with Precision set high. This gives you the opportunity to see errors more easily. I think you and I, Roger, went through that a few months back. If you are working in metric units, after you've dimensioned your model and confirmed that all the dimensions make sense, you might reduce the Precision setting to only a couple of places beyond the decimal or whatever you like, so that you don't see all those trailing zeros. If you are working in Fractional inches, leave Precision set to 1/64". You will be able to see the errors because you aren't likely to intentionally choose to make something, say, 7-1/64" long but fractions are reduced automatically so you won't see 4-1/2" written as 4-32/64" If you see a dimension with a 64th, that should throw up a red flag and make you check it out.

Remember that the Precision you have selected is also used in the cutlist. Setting the precision very fine and examining the cutlist will make errors instantly identifiable.

Oh, and another thing. If you are using the cutlist remember it is reporting the size of the component's bounding box. So, if you put a dimension inside the component, the bounding box will be larger than really needed and your cutlist will be in error.
 
My bad explanation..I was talking about two separate windows each with a different model. Whichever window/model is active, the precision that it has been set to ripples down into the other model in the window underneath.

And then if you bring the underneath model to become active, it reverts back to whatever precision setting you had it at!
sketchup%20funny%202.jpg


sketchup%20funny.jpg
 
That's a Mac thing. On the PC you can have two models open but they are independent SketchUp sessions. On the Mac, there is one instance of SketchUp open and multiple windows. Seems to make more sense considering the resource usage but I can see how it might be confusing if your dimensions change on the window underneath. To prevent seeing that, enlarge your active drawing window. It's a bit like putting black electrician's tape over the oil light on your car's instrument cluster. :D
 

Latest posts

Back
Top