Chris Knight
Established Member
I have posted a couple of short things about this before but rather than go back to the old posts, I thought I would gather the story here as they were a long time ago - I took a motorcycling sabbatical from woodworking..
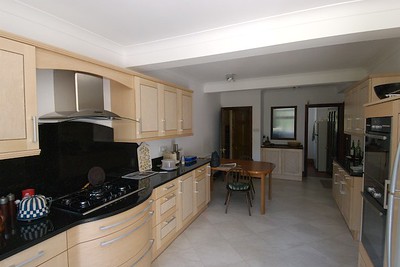
We recently had a new kitchen put in. The doors and drawers etc are in maple and although it will go somewhat yellow rather than stay the nice pale cream colour it started out, we felt the need for a nicer table than the old one which is just visible at the end of the counter on the left.
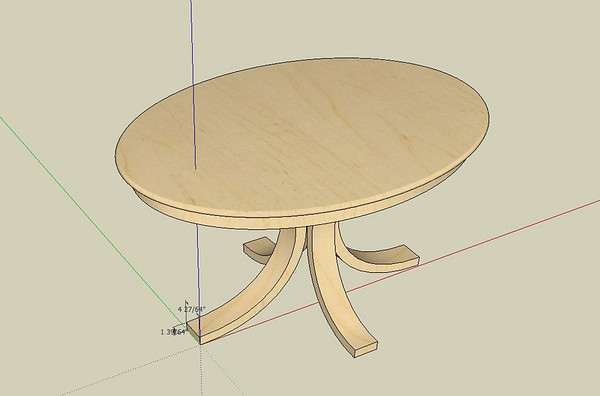
This is a Sketchup design we came up with. It is an oval table, 60 inches long by 40 inches wide and the same height (30 inches) as the existing table.
The legs are also elliptical with a rectangular cross-section of 3 1/2 inches by 1 3/4 inches
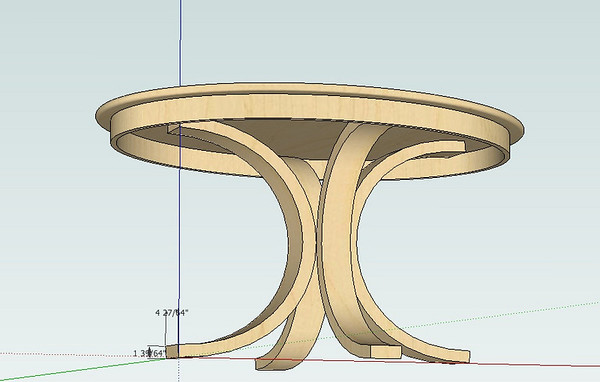
The oval apron is 3 1/4 inches deep.
Seeing the legs like this, the first question is how to assemble them and fit them to the top?
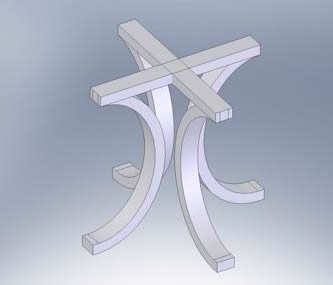
This is what I came up with for the leg assembly.
As far as construction of the curved elements was concerned, I considered various approaches but in the end settled on cold lamination of veneers as the method to be employed for the legs - reckoning that this would provide the necessary strength.
For the apron, I elected to use the time honoured technique of "brick building" a curved wall then later sawing it to the required curve.
First job was to make a couple of trammels for drawing/routing ellipses. I needed two - one for the legs and one for the table top as the difference in dimensions of the two ellipses was too great for one to bridge.
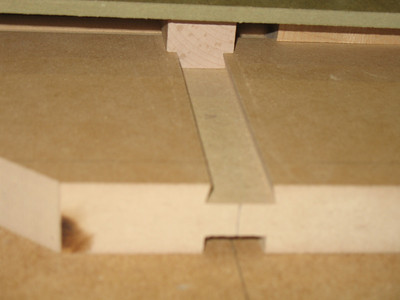
The trammel was made with 25 mm MDF. Dovetail slots were routed in a cross and sliders made from hard maple were placed in the slots. Holes for the pivot pins were drilled in the centre of each maple slider.
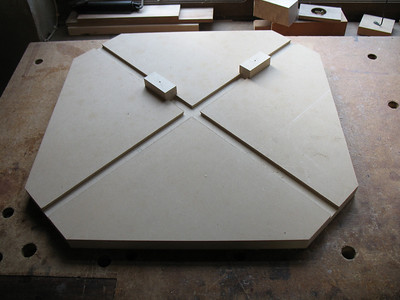
Here you can see the slider in a little more detail. They have to be a good close fit but also to slide easily. I made them very accurately and also waxed them to assist their sliding action. I found that with even a small increase in humidity, they had a tendency to jam so I ensured they were kept in a dry environment.
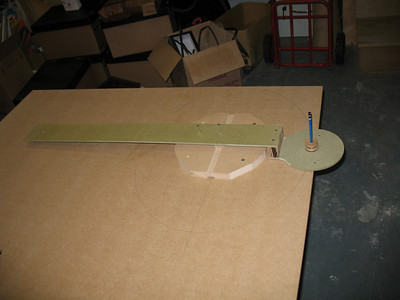
Here I have the trammel arm installed and fitted with a removable pencil holder that places a pencil on the same centre that a router bit will occupy. Holes in the trammel are drilled to correspond with the major and minor axes semi-diameters, adjusted by half the diameter of the router bit I subsequently used to cut the MDF (in my case a half inch bit).
For this operation, a pencil line is not really necessary but I wanted it to give me confidence I was cutting in the right place. A pencil line was needed elsewhere later on, as you will see.
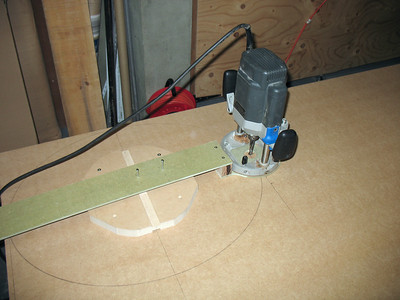
The pencil has now been replaced by a router and I am starting to cut the MDF.
I am using an Elu MOF 177 with a half inch solid carbide spiral bit. As usual when cutting MDF a good dust mask is essential for this operation! It's horrid stuff to work from that point of view but it is very useful and wonderfully stable compared with wood.
This is the smaller of the two trammels I am using here. You can see I have cut the MDF for about half the perimeter - which is all I want as the former will be semi-elliptical in shape.
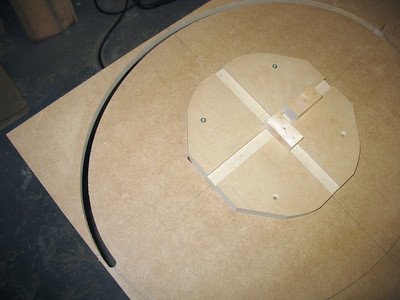
I missed a few steps here! The six pieces of MDF were glued up and (after this picture was taken) glued to a couple of blocks to clear the bench. Holes drilled through the template took steel rods (as seen below) with holes drilled at each end, tapped to received threaded rod with captive nuts that, together with square section pieces of oak, formed the clamping system.
At intervals around the periphery of the template, small aluminium uprights were placed to stop the veneers sliding off the template during the clamping operation.
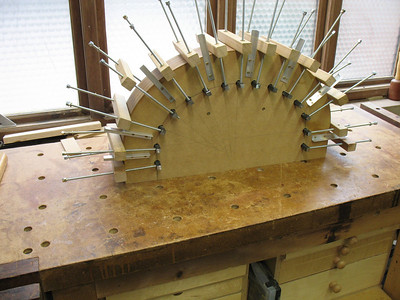
These steel rods are square in cross section, a little shy of half an inch square and made of mild steel, they nonetheless bent somewhat when every was clamped up!
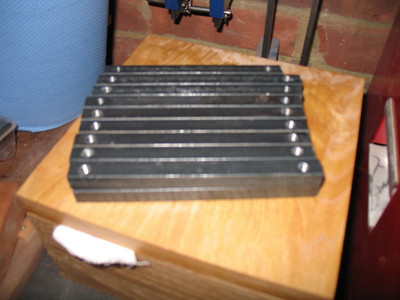
Another view of the "Hedgehog"
To tighten the threaded rods, I used an impact driver with a socket to engage the captive nuts on the ends of the rods.
My wife assisted me a lot to make these laminations. Handling all the leaves of veneer, covered in polyurethane glue (brushing the glue on was already a major job!), getting them onto the former, the clamps installed and tightened evenly and very tightly is NOT a one man operation!
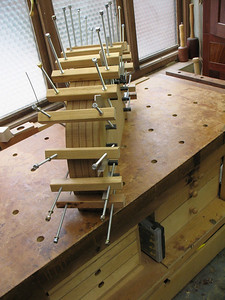
After much glue, swearing and many panic attacks, I had four legs to hand. These were joined to pieces of ash, themselves to be joined with a simple halving joint, to form the structure shown in the design of the substructure.
Shown upside down here!
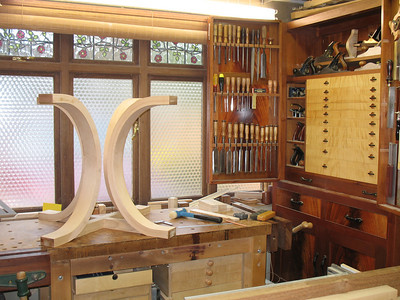
To cut the joinery I routed slots in the legs to to receive the ash cross pieces. For this, I screwed the legs to a piece of MDF with another on top of it to form a kind of sandwich -. Here you can see the sandwich with the top layer removed. This allowed me to ensure that the legs were in the right position (I used the cast iron top of my table saw as a reference) relative to the "ground" and to each other. I ran the router on the top edges of the MDF forming the sandwich - with a couple of router fences (one each side of the sandwich) to keep the router from moving about.
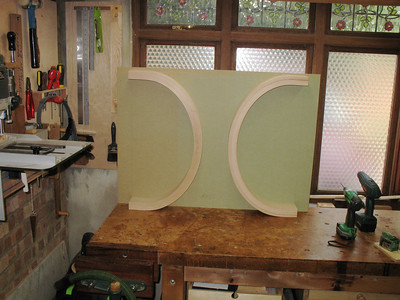
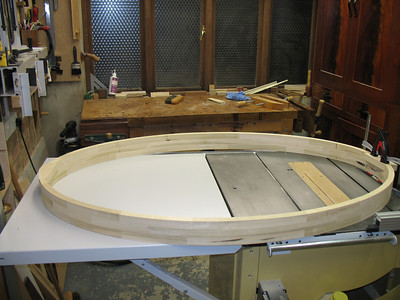
This is half the apron in its raw "brick-built" state. I am using the large trammel to draw the outlines of the ellipse on the top which I shall use as guidelines for band-sawing the apron free from the "wall".
I had to make it in two halves. Firstly it's too big to build as a single piece in my workshop and secondly, It simplifies band-sawing the centre section. (I would have had to either cut through the apron or cut and re-weld the bandsaw blade around the apron if it had been in a single continuous piece.
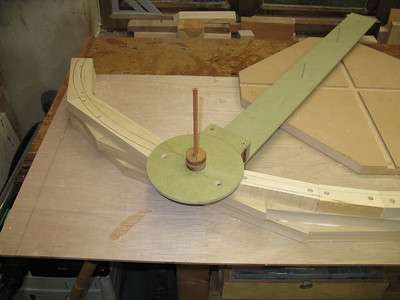
I have bandsawn around the curves I drew and now I am smoothing the inside of the semi-ellipse apron using a compass plane. I works well although being an ellipse rather than a circle and therefore having a constantly changing radius, I need to adjust the curvature of the sole on the compass plane quite frequently.
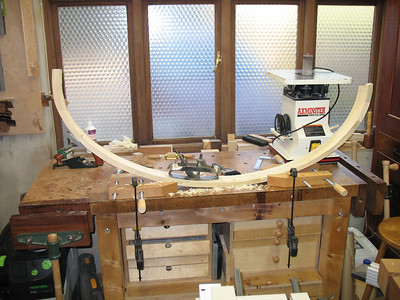
With the inside of the half-apron planed smooth, I turned my attention to the outside. Again using my compass plane I planed to the line I had drawn with the trammel.
The hand screw clamp is gripping the apron and standing on a block of wood to stop the apron flexing while I plane it.
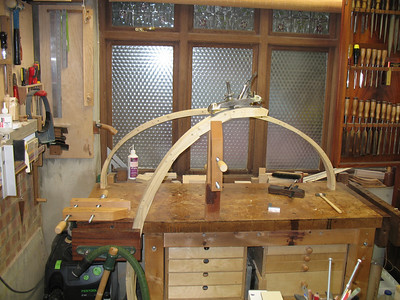
Here I am joining the two halves together. In order to do this, I cut spaces for new joining "bricks" in both halves, then glued in the joining pieces. One is being clamped here while the glue dries.
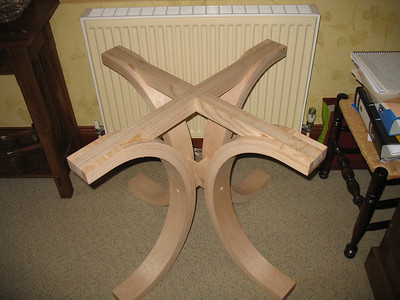
Here is the substructure again, right way up this time.
In this picture you can see that I have inserted a cruciform joiner in the centre of the legs to add stiffness to the assembly as without it, the assembly could be twisted somewhat on its central axis. The cruciform is screwed through the legs and the holes will be blanked off with ebony plugs.
The cruciform is simply a small cross with a halving joint. It was however tricky to fit as I had to shape the ends of the arms slightly concave to match the leg curvature and even tiny errors created what seemed like very big gaps. I had a couple of goes to get it right..
A few more missing steps..
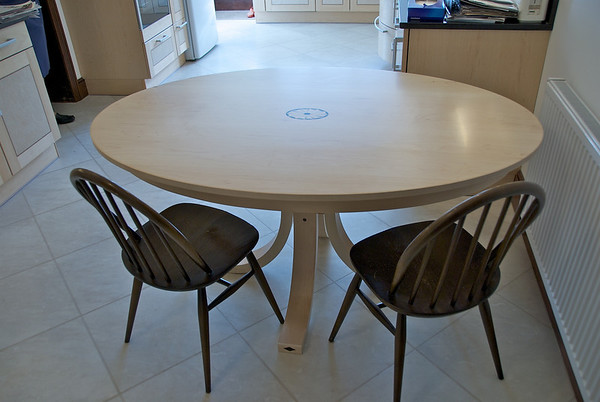
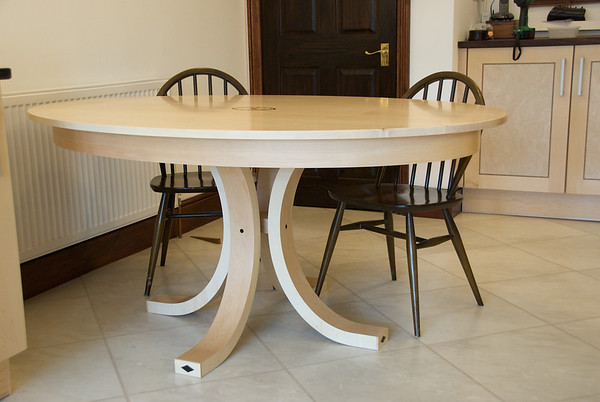
I used ebony plugs to cover the holes for the screws into the cruciform and I capped the ends of the legs with pieces of maple with inlaid ebony diamonds.
I glued up the top from seven boards, cut out the ellipse with my trammel and inlaid a nice fan with sand shading. I used buttons to fix both the apron to the top and the top to the legs.
We recently had a new kitchen put in. The doors and drawers etc are in maple and although it will go somewhat yellow rather than stay the nice pale cream colour it started out, we felt the need for a nicer table than the old one which is just visible at the end of the counter on the left.

This is a Sketchup design we came up with. It is an oval table, 60 inches long by 40 inches wide and the same height (30 inches) as the existing table.
The legs are also elliptical with a rectangular cross-section of 3 1/2 inches by 1 3/4 inches

The oval apron is 3 1/4 inches deep.
Seeing the legs like this, the first question is how to assemble them and fit them to the top?

This is what I came up with for the leg assembly.
As far as construction of the curved elements was concerned, I considered various approaches but in the end settled on cold lamination of veneers as the method to be employed for the legs - reckoning that this would provide the necessary strength.
For the apron, I elected to use the time honoured technique of "brick building" a curved wall then later sawing it to the required curve.

First job was to make a couple of trammels for drawing/routing ellipses. I needed two - one for the legs and one for the table top as the difference in dimensions of the two ellipses was too great for one to bridge.
The trammel was made with 25 mm MDF. Dovetail slots were routed in a cross and sliders made from hard maple were placed in the slots. Holes for the pivot pins were drilled in the centre of each maple slider.

Here you can see the slider in a little more detail. They have to be a good close fit but also to slide easily. I made them very accurately and also waxed them to assist their sliding action. I found that with even a small increase in humidity, they had a tendency to jam so I ensured they were kept in a dry environment.

Here I have the trammel arm installed and fitted with a removable pencil holder that places a pencil on the same centre that a router bit will occupy. Holes in the trammel are drilled to correspond with the major and minor axes semi-diameters, adjusted by half the diameter of the router bit I subsequently used to cut the MDF (in my case a half inch bit).
For this operation, a pencil line is not really necessary but I wanted it to give me confidence I was cutting in the right place. A pencil line was needed elsewhere later on, as you will see.

The pencil has now been replaced by a router and I am starting to cut the MDF.
I am using an Elu MOF 177 with a half inch solid carbide spiral bit. As usual when cutting MDF a good dust mask is essential for this operation! It's horrid stuff to work from that point of view but it is very useful and wonderfully stable compared with wood.

This is the smaller of the two trammels I am using here. You can see I have cut the MDF for about half the perimeter - which is all I want as the former will be semi-elliptical in shape.

I missed a few steps here! The six pieces of MDF were glued up and (after this picture was taken) glued to a couple of blocks to clear the bench. Holes drilled through the template took steel rods (as seen below) with holes drilled at each end, tapped to received threaded rod with captive nuts that, together with square section pieces of oak, formed the clamping system.
At intervals around the periphery of the template, small aluminium uprights were placed to stop the veneers sliding off the template during the clamping operation.

These steel rods are square in cross section, a little shy of half an inch square and made of mild steel, they nonetheless bent somewhat when every was clamped up!

Another view of the "Hedgehog"
To tighten the threaded rods, I used an impact driver with a socket to engage the captive nuts on the ends of the rods.
My wife assisted me a lot to make these laminations. Handling all the leaves of veneer, covered in polyurethane glue (brushing the glue on was already a major job!), getting them onto the former, the clamps installed and tightened evenly and very tightly is NOT a one man operation!

After much glue, swearing and many panic attacks, I had four legs to hand. These were joined to pieces of ash, themselves to be joined with a simple halving joint, to form the structure shown in the design of the substructure.
Shown upside down here!

To cut the joinery I routed slots in the legs to to receive the ash cross pieces. For this, I screwed the legs to a piece of MDF with another on top of it to form a kind of sandwich -. Here you can see the sandwich with the top layer removed. This allowed me to ensure that the legs were in the right position (I used the cast iron top of my table saw as a reference) relative to the "ground" and to each other. I ran the router on the top edges of the MDF forming the sandwich - with a couple of router fences (one each side of the sandwich) to keep the router from moving about.

This is half the apron in its raw "brick-built" state. I am using the large trammel to draw the outlines of the ellipse on the top which I shall use as guidelines for band-sawing the apron free from the "wall".
I had to make it in two halves. Firstly it's too big to build as a single piece in my workshop and secondly, It simplifies band-sawing the centre section. (I would have had to either cut through the apron or cut and re-weld the bandsaw blade around the apron if it had been in a single continuous piece.

I have bandsawn around the curves I drew and now I am smoothing the inside of the semi-ellipse apron using a compass plane. I works well although being an ellipse rather than a circle and therefore having a constantly changing radius, I need to adjust the curvature of the sole on the compass plane quite frequently.

With the inside of the half-apron planed smooth, I turned my attention to the outside. Again using my compass plane I planed to the line I had drawn with the trammel.
The hand screw clamp is gripping the apron and standing on a block of wood to stop the apron flexing while I plane it.

Here I am joining the two halves together. In order to do this, I cut spaces for new joining "bricks" in both halves, then glued in the joining pieces. One is being clamped here while the glue dries.

Here is the substructure again, right way up this time.
In this picture you can see that I have inserted a cruciform joiner in the centre of the legs to add stiffness to the assembly as without it, the assembly could be twisted somewhat on its central axis. The cruciform is screwed through the legs and the holes will be blanked off with ebony plugs.
The cruciform is simply a small cross with a halving joint. It was however tricky to fit as I had to shape the ends of the arms slightly concave to match the leg curvature and even tiny errors created what seemed like very big gaps. I had a couple of goes to get it right..

A few more missing steps..
I used ebony plugs to cover the holes for the screws into the cruciform and I capped the ends of the legs with pieces of maple with inlaid ebony diamonds.
I glued up the top from seven boards, cut out the ellipse with my trammel and inlaid a nice fan with sand shading. I used buttons to fix both the apron to the top and the top to the legs.


