You are using an out of date browser. It may not display this or other websites correctly.
You should upgrade or use an alternative browser.
You should upgrade or use an alternative browser.
Instructions on how to do inlay
- Thread starter LarryS.
- Start date

Help Support UKworkshop.co.uk:
This site may earn a commission from merchant affiliate
links, including eBay, Amazon, and others.
OPJ
Established Member
Paul, is this the entire shape you are looking to inlay or is it just the two squares in the centre?
OPJ
Established Member
Okay, thanks Paul.
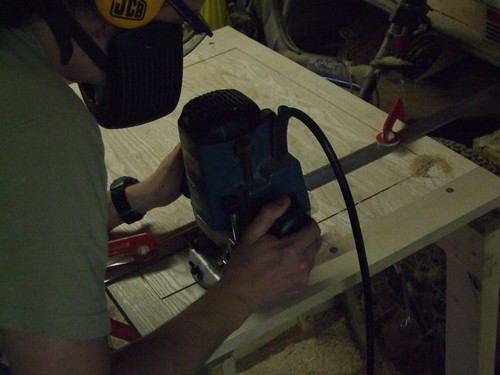
Right. You should be able to cut this quite easily with a router and fence, leaving the corners to be squared up with a sharp chisel. How big is the box gonna be, roughly? I'd have thought it would be enough to support a router on its own.
If you look back at my coffee table project, you can see I did something quite similar, using a router. I only used a straight edge in this shot because the bars on my fence are too short. :roll:

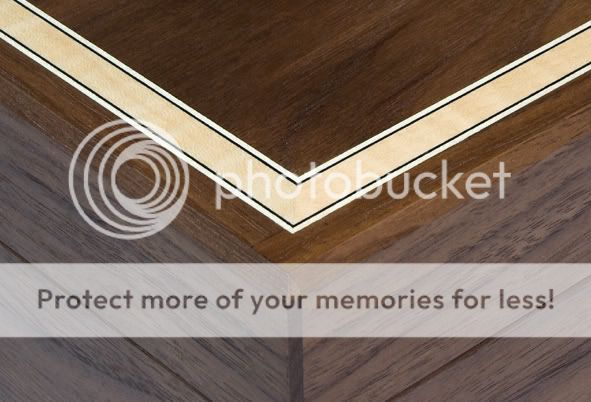
Your inlay can be as thick as you like really, within reason... As I mentioned yesterday, your planer will thickness down to about 3mm. But... the finish isn't always perfect. So, you may be better off cutting something on the bandsaw, slightly over thickness and, then, scraping/hand-planing and sanding it flush with the rest of the top once it's been fitted.
You'll need to mitre the corners of the inlay as well - that's the tricky bit! :? If the inlay's thick enough, you could plane the mitres with a shooting board (that's another one for you to make!! :twisted: ). With care, you might be able to chisel them... Maybe disc sander? I'm not sure on this one, actually. See what everyone else says. :wink:
Right. You should be able to cut this quite easily with a router and fence, leaving the corners to be squared up with a sharp chisel. How big is the box gonna be, roughly? I'd have thought it would be enough to support a router on its own.
If you look back at my coffee table project, you can see I did something quite similar, using a router. I only used a straight edge in this shot because the bars on my fence are too short. :roll:

Your inlay can be as thick as you like really, within reason... As I mentioned yesterday, your planer will thickness down to about 3mm. But... the finish isn't always perfect. So, you may be better off cutting something on the bandsaw, slightly over thickness and, then, scraping/hand-planing and sanding it flush with the rest of the top once it's been fitted.
You'll need to mitre the corners of the inlay as well - that's the tricky bit! :? If the inlay's thick enough, you could plane the mitres with a shooting board (that's another one for you to make!! :twisted: ). With care, you might be able to chisel them... Maybe disc sander? I'm not sure on this one, actually. See what everyone else says. :wink:
thanks for the info olly, picture helps a lot, the top is going to be 250mm square so should be fine for routing on.
Plan is the build the shooting board in the next couple of days, then I can try the clifton. Think the top will be about 10mm thick so may go for 5mm inlay which hopefully can then be mitred on the shooting board - unless anyone has an esaier way of doing it :?:
Plan is the build the shooting board in the next couple of days, then I can try the clifton. Think the top will be about 10mm thick so may go for 5mm inlay which hopefully can then be mitred on the shooting board - unless anyone has an esaier way of doing it :?:
Ian
Established Member
Hi Paul
Router table with a good fence, make sure you cut crossgrain first then with the grain. As for the mitres use a disc sander or if you don't have one but have a lathe make one up this will acheive perfect mitres.
And of course take you time
Cheers
Ian

Router table with a good fence, make sure you cut crossgrain first then with the grain. As for the mitres use a disc sander or if you don't have one but have a lathe make one up this will acheive perfect mitres.
And of course take you time
Cheers
Ian


£9.99 (£1.00 / count)
£14.45 (£1.44 / count)
JSP M632 FFP3moulded Disposable Dustmask (Box of 10) One Size suitable for Construction, DIY, Industrial, Sanding, dust protection 99 Percent particle filtration Conforms and Complies to EN 149
Amazon.co.uk

£34.99 (£3.50 / count)
£39.99 (£4.00 / count)
VonHaus Chisel Set - 10pcs Woodworking Tools Set - Wood Carving Tools, Wood Chisel Sets with Sharpening Stone, Honing Guide and Storage Case
VonHaus UK

£10.10
£15.48
Portwest Browguard with Clear Visor, Size: One Size, Colour: Clear, PW91CLR
Amazon.co.uk

£16.99
£19.99
Respirator Mask,Safety Dust Face Cover,Dust Face Cover Paint Face Cover,Gas Mask With Filter,For Paint,Dust And Formaldehyde,Sanding,Polishing,Spraying And Other Work
ShenZHEN CIRY MINGYANG LITIAN ELECTRONIC ECOMMERCE

£15.99 (£1.60 / count)
£27.44 (£2.74 / count)
3M 8822 Disposable-fine dust mask FFP2 (10-pack)
Amazon.co.uk

£10.19 (£0.39 / count)
£11.99 (£0.46 / count)
Nicpro Carpenter Pencil with Sharpener, Mechanical Carpenter Pencils Set with 26 Refills, Case, Deep Hole Marker Construction Pencils Heavy Duty Woodworking Pencils for Architect (Black, Red)
NicproShop EU

£199.00
£360.17
Trend Portable Benchtop Router Table with Robust Construction for Workshop & Site Use, 240V, CRT/MK3
Amazon.co.uk

£49.91
£58.33
Mefape Mortise and Tenon Jig Tools for Woodworking Routers, Tenon Cutter, Manual Mortising Machine, Invisible Slotting Machine Jig Stand, 3-Axis Guide Rail for Adjust Trimming Length and Width
wangshijuntianjinhongyuegongyipin

£24.99
Facemoon Reusable Masks,Safety Masks,Dual Filter Masks, Paint, Dust, Epoxy Resin, Construction, Welding, Sanding, Woodworking, Chemical Reusable Gas Masks
ShenZHEN CIRY MINGYANG LITIAN ELECTRONIC ECOMMERCE
You might also want to check out www.tchisel.com the podcast episodes on project #1 and their forum.
OPJ
Established Member
I'd be careful, Paul, if you decide go down router table route route - not sure how much experience and confidence you have with this machine? The important thing would be to setup two stops - one front and one back. This will help to prevent the box was shooting back past your right arm at the beginning of the cut! :wink:
Whatever you do, cut the grooves first and then 'machine' the inlay to fit that (as you would cut a mortice first, then a tenon to fit).
What timber do you plan on using for the inlay? Ash? Depending on the species, you may find it easier to cut it slightly thicker, rather than veneer thickness. For example, because of it's open grain, oak veneers can split quite easily and be a PITA to handle at 1mm thick.
Probably doesn't need saying, but just in case :? :-
Don't try to sand a light wood inlay in darker wood ground; you'll just transfer dark dust into the light.
DAMHIK.
Don't try to sand a light wood inlay in darker wood ground; you'll just transfer dark dust into the light.
DAMHIK.
dickm":2hzs2ot0 said:Probably doesn't need saying, but just in case :? :-
Don't try to sand a light wood inlay in darker wood ground; you'll just transfer dark dust into the light.
DAMHIK.
definately did need saying :shock: Does that mean I need to get the inlay the perfect thickness before putting it in ? If so how do I do that ?
Chris Knight
Established Member
Paul,
A well-tuned scraper produces much better results than sandpaper. Best of all is a well-tuned plane, capable of taking a very fine cut. Don't try this though unless you really know what your plane can do, as any tearout will have you weeping bitter tears..
A well-tuned scraper produces much better results than sandpaper. Best of all is a well-tuned plane, capable of taking a very fine cut. Don't try this though unless you really know what your plane can do, as any tearout will have you weeping bitter tears..
Gill":ix3jvbjb said:Apply sanding sealer before you sand/scrape/plane. It's standard procedure amongst marquetarians to protect contamination by wood dust of a contrasting colour.
Gill
That's a great tip Gill, is that why it's called sanding sealer? Never really thought about it before.
stupid question but which wood do I apply the sealer to? Could you give me the step by step process as can't work out how what I should be sanding / sealing in what order ?Gill":30bi6tuq said:Apply sanding sealer before you sand/scrape/plane. It's standard procedure amongst marquetarians to protect contamination by wood dust of a contrasting colour.
Gill
Assemble your box, paint all the bare wood with sanding sealer, let it dry (about 20 minutes) then sand/scrape/plane as normal. You have to seal all the wood because light dust can spoil the finish on dark wood just as much as dark dust can spoil the finish on light wood.
Sanding sealer is a cloudy liquid which dries clear and blocks the open pores on bare wood so dust cannot be trapped. It's advisable to apply further coats of sanding sealer as you proceed if you begin to expose more bare wood, but as a general rule you'll be getting such a smooth finish there shouldn't be any open pores anyway.
Gill
OPJ
Established Member
Don't get any sealer actually in the groove though, or else you may find the inlay won't stick! :? :wink:
Erhm. Its called sealer because it seals the wood pores. The sanding part denoted that after drying is easy to sand. There are many substances to seal wood. Others are: shellac, urea glue, CA glue, Epoxy, PVA glue, hide/bone glue.George_N":23r3tsth said:is that why it's called sanding sealer?
I would recommend against PVA, its may dull and unevenly discolour the grain and may cause cracking when using veneer as an inlay on some woods. I would also stay away from expoxy since its very hard to get is sanded / scraped or planed. If your not set and used to working with hide and bone glues its not worth the effort also prone to acting to heat or moister at a later date.
Shellac deepens the grain on most woods but may cause blotches and an odd yellow/orange/red or brown (dep on the type of shellac) hue. But this is mostly my fav choose. I also prefer scraping instead of sanding.
when people mention using a scraper, are they talking about this sort of thing :
http://www.axminster.co.uk/product.asp?pf_id=460356&name=scraper&user_search=1&sfile=1&jump=44
http://www.axminster.co.uk/product.asp?pf_id=460356&name=scraper&user_search=1&sfile=1&jump=44
OPJ
Established Member
That's it, Paul! 
In the long term though, you would surely benefit from using one of these. It will save you from getting 'burnt thumbs' - you'll know what I mean once you've done a lot of scraping! :wink: With this small box though, you should be alright flexing the scraper by hand. I didn't realise the price of these things were now so high! :shock:
If the Yandles show was this coming weekend, you would probably be buying yourself one of these, knowing what you now know! :wink:
In the long term though, you would surely benefit from using one of these. It will save you from getting 'burnt thumbs' - you'll know what I mean once you've done a lot of scraping! :wink: With this small box though, you should be alright flexing the scraper by hand. I didn't realise the price of these things were now so high! :shock:
If the Yandles show was this coming weekend, you would probably be buying yourself one of these, knowing what you now know!
Similar threads
- Replies
- 11
- Views
- 1K
- Replies
- 50
- Views
- 2K


