How to print on wood

UKworkshop.co.uk

Help Support UKworkshop.co.uk:

This site may earn a commission from merchant affiliate links, including eBay, Amazon, and others.
Well - I tried one of those Weller burners and I'm a little disappointed. It just gets too hot to use. You have to literally be moving it all over the shop, as it almost instantly burns right through the paper. I tried dissipating some of the heat to a bit of scrap wood as is shown in the linked video, but it didn't really do much for me. Still far too hot.

The only difference I can see is that mine is 30w, not 25w, but I doubt that would make that much of a difference.

Having said that, I have had a few successful transfers by using it after it's unpluged and cooled down a bit.
 
I decided to try the acetone/thinner approach again with a different solvent and got excellent results.

- I used 'Cellulose Thinner'. The one I used was from Wilko, Cellulose Thinners 125ml £2.75 http://www.wilko.com/wallpaper-paste+pr ... vt/0182560
- Print your template using a laser printer (try and set the toner settings to 'Extra Dark' if you can)
- Stick your template face down firmly using tape so that it can't move and smudge
- Using a paint brush, apply a VERY minimal amount of the thinner to the back of the template, just enough to soak through. It's very easy to apply too much which will be too strong and create a blurred transfer.
- Using the back of a spoon, apply a lot of pressure, rubbing over the template several times.
- peel off the template and you should have a very clear, very sharp transfer

It took a few attempts to work out how much thinner to apply, but am very pleased with the results.
 
I assume that 'Using a paint brush, apply a VERY minimal amount of the thinner to your template,' means to the back of the template- since it is stuck down, ink to wood. could you please confirm though?

Can we see the results?
 
marcros":2kvdqh8k said:
I assume that 'Using a paint brush, apply a VERY minimal amount of the thinner to your template,' means to the back of the template- since it is stuck down, ink to wood. could you please confirm though?

Yes, that's right.

Here is one of my better results. Still experimenting (as you can see by the failure on the left :) )

IMG_0924.JPG
 

Attachments

  • IMG_0924.JPG
    IMG_0924.JPG
    220.5 KB
Eric The Viking":c64msjg7 said:
I know a little bit about both laser and inkjet technologies, having worked for a major US manufacturer of both for some years. That said, technology moves on, so don't assume what was right in the 1990s still necessarily applies!

Transfer with a Laser

Mechanically, lasers print in a two-stage process.

1. The toner is a fine carbon-based dust and it is transferred to the final surface by contact (or very nearly contact). The drum (with the reversed image on it) comes very close or touches the surface and toner moves across. at that stage the toner isn't bound to the paper (or whatever), and if you remove a paper jam from that part of the machine, you'll see you can literally blow the toner away (don't - it's slightly hazardous, similar to MDF dust).

2. The paper then goes through a fuser unit. This applies heat and pressure to bind the toner into the surface.

Why mention all this? Because on most good lasers, you can alter the behaviour of the fuser unit* to optimize printing on different materials. Usually that's limited to altering the temperature it works at, because some media, e.g. cellulose transparency film, need less heat than others (e.g. rough, vellum-type papers) to fuse the toner onto the surface.

At a guess, for transfer to wood, you want the fuser to stick the toner in place just enough to get the paper out and turn it over onto the wood. That's hardly at all.

So the trick would be to tell the laser printer it has the wrong type of medium ("paper"), and actually use something that needs high heat to fuse properly. A few experiments will show what works best, but my guess would be using heavyweight, rough paper (not shiny card) and telling the laser you're printing onto transparency film. The 'economy mode' might also have an effect, but I'm not sure if that'll be good or bad! You'll never get extreme detail this way - forget 300 DPI etc. Print on the laser at it's highest resolution and highest 'quality' setting (probably! - 'quality' also affects the crucial fuser temp.). That should get you the most toner on the paper and the highest contrast result on the wood. The transfer to wood, though, will inevitably blur the result a lot (microscopically, at least), so expect a loss of sharpness.

I can see no reason why it shouldn't work (theoretically) with a colour laser, too, BUT I think they glaze the paper in the fuser system, and thus may well fuse the toner too well for transfer. I have no direct experience of them (other than as a user). Obviously, too, if it works at all, you'll get a significant colour change on the wood, as they're intended to print onto a specific white paper.

An idea about fixing the image to the wood:

For years, I've done a party trick with my big photographic flashguns to demonstrate the physics of them to children: All decent flashguns emit a HUGE amount of power (watts), albeit for a very short time.

My biggest portable flashgun will do around 300,000 watts. Really. No exaggeration. But that's for only 1/10,000 of a second (with 30 Joules of energy emitted). It is plenty, however, to make a piece of black laser-printed paper start to smoke, if you hold it in front of the flashgun and fire at full power.

The more toner, the more smoke. DO try this at home folks, but eyes tight shut until after the flash! (Much like a nuclear detonation really.). It doesn't work half as well with inkjet paper.

My point? Do the transfer, then fire a flashgun on the surface of the wood (will probably need a few flashes each doing a small area at a time, and ON the wood, not close to it). You'll cook the toner you've transferred, and hopefully the wood itself will reflect enough energy not to scorch.

Caveats: 1. You need a powerful flashgun (my biggest reliable one is about 45J). The on-camera things won't cut it or even come close. 2. It's mechanically hard on tube and reservoir capacitor, so you may kill the flashgun if you do this too much (hint: speed isn't important, so leave some time between full flashes for the system to 'heal' itself). 3. Don't even think about doing this with normal AA batteries in the gun - they won't last. Even NiCd and Li-ion will heat up significantly.

FWIW, I use these:
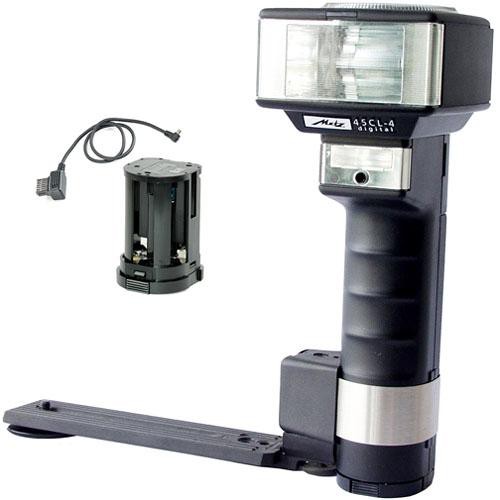
metz-45-ct-1-professional-flash-set-29.99-8312-p.jpg
Metz_MZ_45140_mecablitz_45CL_4_Digital_TTL_1236092473000_602998.jpg

Both are about 45J officially, but it depends on how you're using them. 30J is a more realistic figure.

regards,

E.

*The service manual for my printer is several hundred dense pages I'll look when I remember where I put it!

Fascinating Eric.

For anyone wishing to play I found, while trying a B&W glossy print with my Laser Printer, that toner does not fuse to glossy 'photo paper. That is at least on 'normal' settings.
xy
 
dickm":2u9dfihv said:
The Samsung domestic level colour lasers say very firmly "do not use photo paper"

I wonder if some damage might happen or if it's because the image falls off the paper.
By the way my HP still works.

xy
 
Here is another result. This one has a little bit of smudging, but it doesn't seem to be caused by the solvent. I believe it's caused by the rough open grain at that location of the piece of wood (Lime Wood).

It would be interesting to see someones results with freshly smoothed hand planed wood.

IMG_0927.JPG
 

Attachments

  • IMG_0927.JPG
    IMG_0927.JPG
    181.6 KB
Eric,

The flash unit in the picture - Metz Mecablitz 45 CL-4

Is this the unit which is capable of heating the laser toner to smoking point ?

More importantly at what distance from the paper is effect caused ?

They seem to sell for around £50 or less on ebay used - would these used items be any good or is it possible to buy a unit in which the flash bulb is beyond usefulness.

Thanks Matt.
 
I haven't tried it yet for the purpose described (sticking toner to wood). I will do, and I'll be using the old CT-1 probably. I think printing onto clear cellulose, then holding it down on clean well sanded wood might work, BUT having seen the results that Transatlantic is getting (above), it might be a complete waste of time as his are very good.

It also relies on the toner being black, whereas the solvent method should be just as good with colour laser toners.

You could get away with the much cheaper 45 CT1 (only one tube and much simpler electronics). They're like the proverbial brick outhouses. I have one that just refuses to give up. Drawback: high voltage trigger circuit, so will damage some modern cameras. Fine if you're just using it for fun'n'games.

The rechargeable battery packs do die, and they are engineered to work better on rechargeables than "dry" AA cells. You can re-cell them but all the older ones can only use tagged AA NiCds - anything else won't fit (been there). You can't use NiCds in the disposable battery holder, either, as the connections are different (because the voltage is different). It will just about work but take forever to recharge the gun between flashes. If you can find something with a mains power adaptor (or a proper studio flash unit) that might be best of all, but studio units are usually diffused, so you'll need to focus it.

If playing about, the 'ready' light on all these things usually comes on well before the capacitor is fully charged. For maximum wallop, wait at least 30secs more before firing. Less time necessary on mains power though.

I've never had a flash tube go on the older models (although they do, and the main capacitors fail too). They're supposed to be good for at least 10,000 flashes, which is rather a lot, but the main tube on my very expensive & newest one (45CL-4 digital) did fail recently and the repair was more than a lot of flashguns cost new. I got it done though, as the unit is brilliant and there's nothing comparable out there presently. I don't know why it failed - I suspect a faulty component, as there's little to go wrong or wear out in them normally. Capacitors do fail though, as there's significant mechanical shock to them when the gun fires. Caps for flashguns are usually special order and hard to find, not least because they are lethal when fully charged.

Can't experiment for a day or two as trying to paint/waterproof the house presently. This is displacement activity!

Later,

E.
 
Thanks for the reply Eric.

You are right, the toner fusing idea is probably a dead end.

Those solvent transfer are very nice.

I have achieved the same effect on glass using:

- An old household iron on on the wool setting

- Polaroid brand photo glossy inkjet paper from Poundland (the Polaroid brand name was sold off ages ago)

- A laser printer.

The heated glossy injet paper can be burnished onto the surface of the glass and then peeled off shortly afterwards to leave behind a laser toner image and a few paper fibres.

The fibres can be carefully brushed away with a damp paintbrush.

One thing I would say about wood and the toner method, it's important to decide when in the project to put the image onto the wood or if it should be done using a prepared insert.

If it goes wrong after a lot of woodworking then that could be disappointing.

If anyone is thinking of batch logoing their wood or offering this as a custom service to customers then I would advise typing " Slide Decals" into google.

A few printable sheets of that product would probably be a better option.

Matt.
 
I have ordered a few sheets of water slide decals for my laser printer.

I have a colour Dell and access to a mono Brother printer.

I'll report back with some photos.

Matt.
 

Latest posts

Back
Top