Hexagon Wall Shelves...Finished

UKworkshop.co.uk

Help Support UKworkshop.co.uk:

This site may earn a commission from merchant affiliate links, including eBay, Amazon, and others.

PeteG

Established Member
Joined
9 Jun 2013
Messages
998
Reaction score
2
Location
Manchester
They're up for now with some temporary plants in place, but our lass can feel a trip to the garden centre coming on for some trailers...I'm just waiting for the spray finish to arrive, I've chosen a dark grey stone effect for the outside, plain white for the inside...Anyone else have a great dislike for drilling lots of holes in walls?

I'll get some piccies of the fittings and jigs used to mark the wall out, the final image of spray finish with plants will be a week or so!

Hexagon 7 Ready For Spraying.jpg
 

Attachments

  • Hexagon 7 Ready For Spraying.jpg
    Hexagon 7 Ready For Spraying.jpg
    647.6 KB
A little info on their making. I made two jigs this time, one to cut the wood at 210 mm and the second to give the finished length of 200 mm. Width is 140 mm.

Bevel Jig 4.jpg


Once all the Hexagons were made, holes from the Brad nailer filled, and after a little sanding, it was time to mark out where all the holes fort he Concealed brackets would fit. I used a piece of ply with a couple of small of lengths of MDF stuck down with double sided tape, then used a 3 mm bit to drill two holes. I used the same drill bit pushed through these holes to make where the 12 mm hole would be for the brackets.

Hole Marker Jig.jpg


Placing the first Hexagon was easy once we had decided where it was going. In total I made nine Hexagon boxes, we laid these out on the living room floor in varying patterns. One pattern was 2.4 metres long, another 1.5 metres high. Eventually we decided nine was too many and settled on seven...

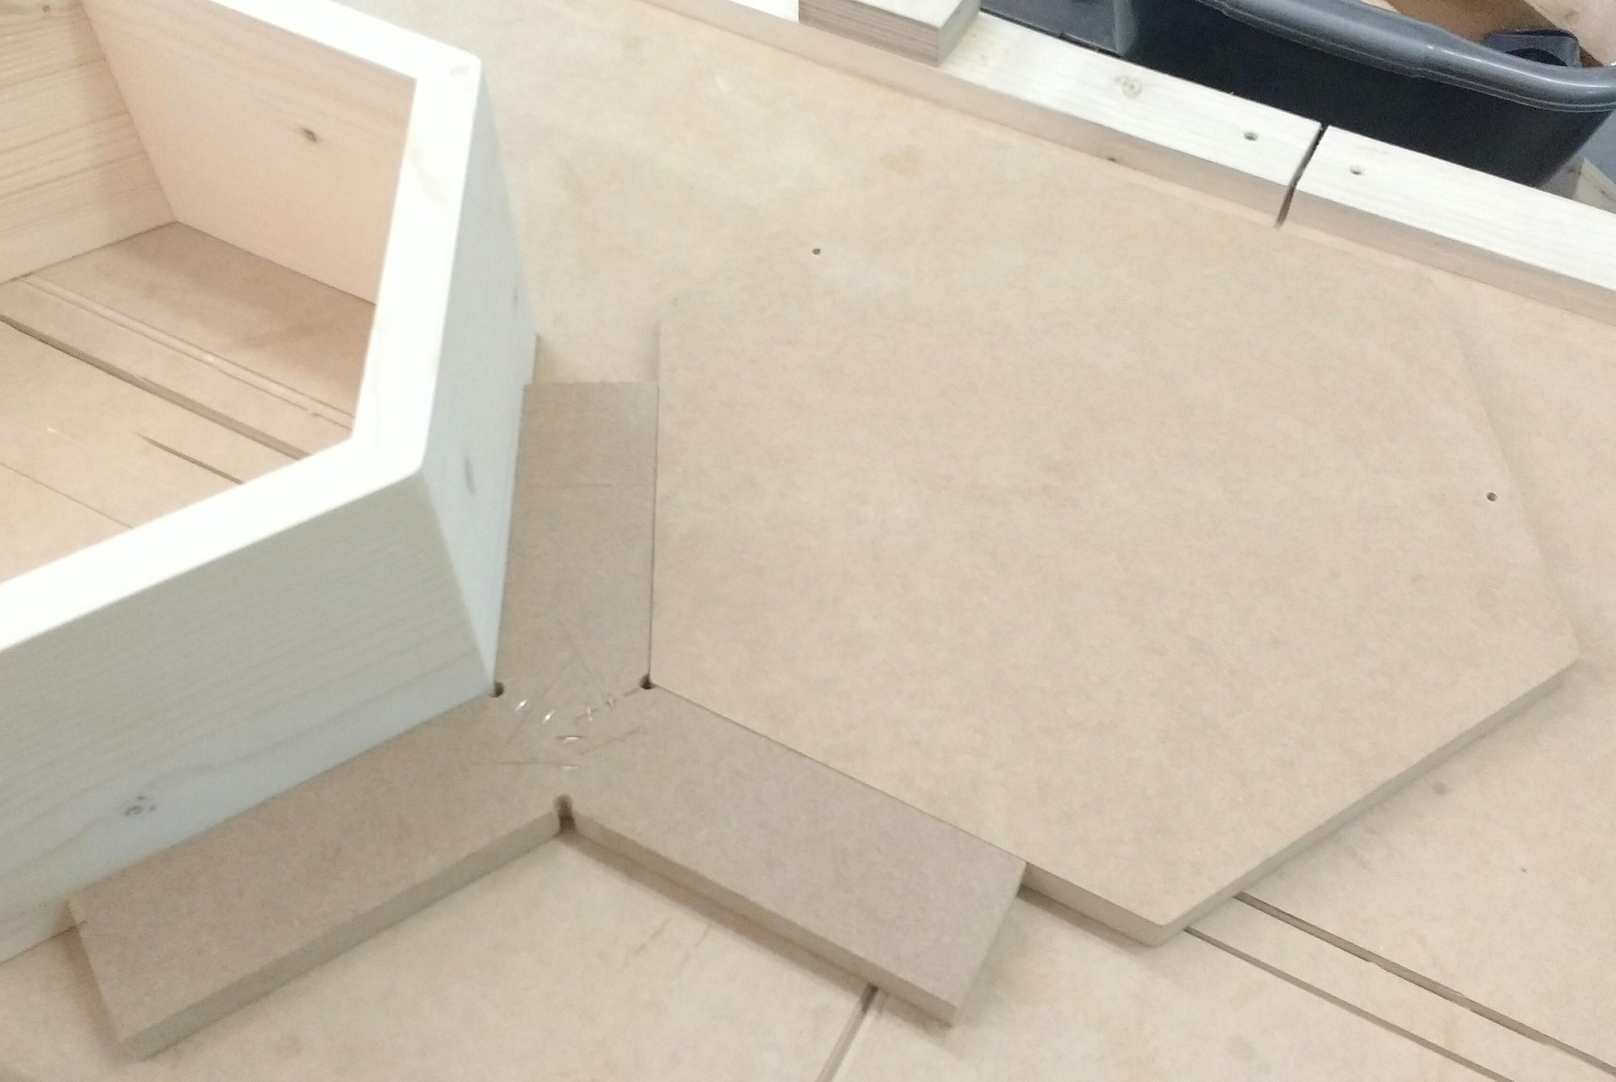
I cut the ends of three pieces of MDF at 30 degrees points then stapled all three together. I'd already made one from Pine and tried to joint the ends with the Domino, sadly this turned out to be very inaccurate. The MDF jig was spot on. So once the first Hexagon was on the wall, I put the spacing jig in place, followed by a Hexagon shape made from MDF. I made this using a bearing guided cutter on the router, the MDF was stuck to one of the Hexagon boxes with double sided tape. The jig I used to mark the holes for the brackets was then used to make two 3 mm holes in the Hexagon shape. Thankfully, everything worked out quite well. The Concealed brackets for anyone who hasn't used them before, are 120 mm x 12 mm or 11.79 mm as these were. The double ended screw thread is separate from the bar, and the bar has a small flat section to use a 10 mm spanner. The screw is also off set from the centre of the bar to give a Cam action when using the spanner. This helps once the boxes are in place to level them up a little.

Wall Template.jpg


Concealed Brackets.jpg
 

Attachments

  • Bevel Jig 4.jpg
    Bevel Jig 4.jpg
    506.1 KB
  • Hole Marker Jig.jpg
    Hole Marker Jig.jpg
    870.2 KB
  • Wall Template.jpg
    Wall Template.jpg
    726.8 KB
  • Concealed Brackets.jpg
    Concealed Brackets.jpg
    535.1 KB
Now that the jigs are made, how long would it take you to make a second set?
 
marcros":3ig2yggs said:
Now that the jigs are made, how long would it take you to make a second set?

Hello Marcos :D I think it took me about four/five days from planing the wood to sanding.
It depends on my health, I can only do so much at a time. Our lass is looking at some more
but I'm out of timber for the moment. I buy off cuts which are sold as fire wood, there's usually
a few good lengths in there for projects, and they come in two thicknesses. I made these boxes
from the thickest, thankfully there was just enough. It'll be a while before I buy another pallet
though as I need to burn all the off cuts to make space. It's piled up everywhere at the moment.

Still, It'll give me time to finish the original six Hexagon boxes I made for her craft room,
they're going to be yarn holders.

Off Cuts 10.jpg
 

Attachments

  • Off Cuts 10.jpg
    Off Cuts 10.jpg
    953.9 KB
They look really smart, the jigs look like a real time saver !

Sent from my SM-G960F using Tapatalk
 
I think that they would sell very well at the right price. The picture at the top is very contemporary and wouldn't look out of place in a magazine or a facebook ad. https://www.google.com/search?q=wooden+ ... 80&bih=627

you could even sell the reclaimed wood angle.

Alternatively, but some planed PSE timber good enough that you only need to finish sand it.
 
ColeyS1":3exo4eik said:
They look really smart, the jigs look like a real time saver !

Sent from my SM-G960F using Tapatalk

Cheers Coley :D They're a doddle once you've made the jigs. The first one of the first set I made,
I was holding on to the wood with my left hand still bandaged up. It was that that made me think
I needed to make a life a bit easier and a lot safer! Once the jig is clamped by the mitre saw, and the
wood clamped by the jig, it's literately a one handed operation.
I could have done with a jig to help me drill holes square to the wall :lol:
 
marcros":35bfiyqn said:
I think that they would sell very well at the right price. The picture at the top is very contemporary and wouldn't look out of place in a magazine or a facebook ad. https://www.google.com/search?q=wooden+ ... 80&bih=627

you could even sell the reclaimed wood angle.

Alternatively, but some planed PSE timber good enough that you only need to finish sand it.


They seem to vary in price by quite a lot, I've seen slightly smaller ones made from Oak, painted
on the inside, £50.00 each. Fittings can be nearly a fiver a box depending up on quality.
I think the timber cost me less than a tenner, the fittings were nearly £18.00, being broke I went
cheap. The spray paint for three cans will around the £25.00 mark, that's hoping three will be
enough to do the outside, £8.00 should cover a plain white finish on the inside.
Making them is fun and I like using spray cans, not right keen on hanging them though!
 
The boxes came off today so I could start spraying, and the wall needed a new coat of paint. I'd had to fill a couple of holes from a canvas print that had been there originally, and didn't think just a touch
up was doing a proper job.

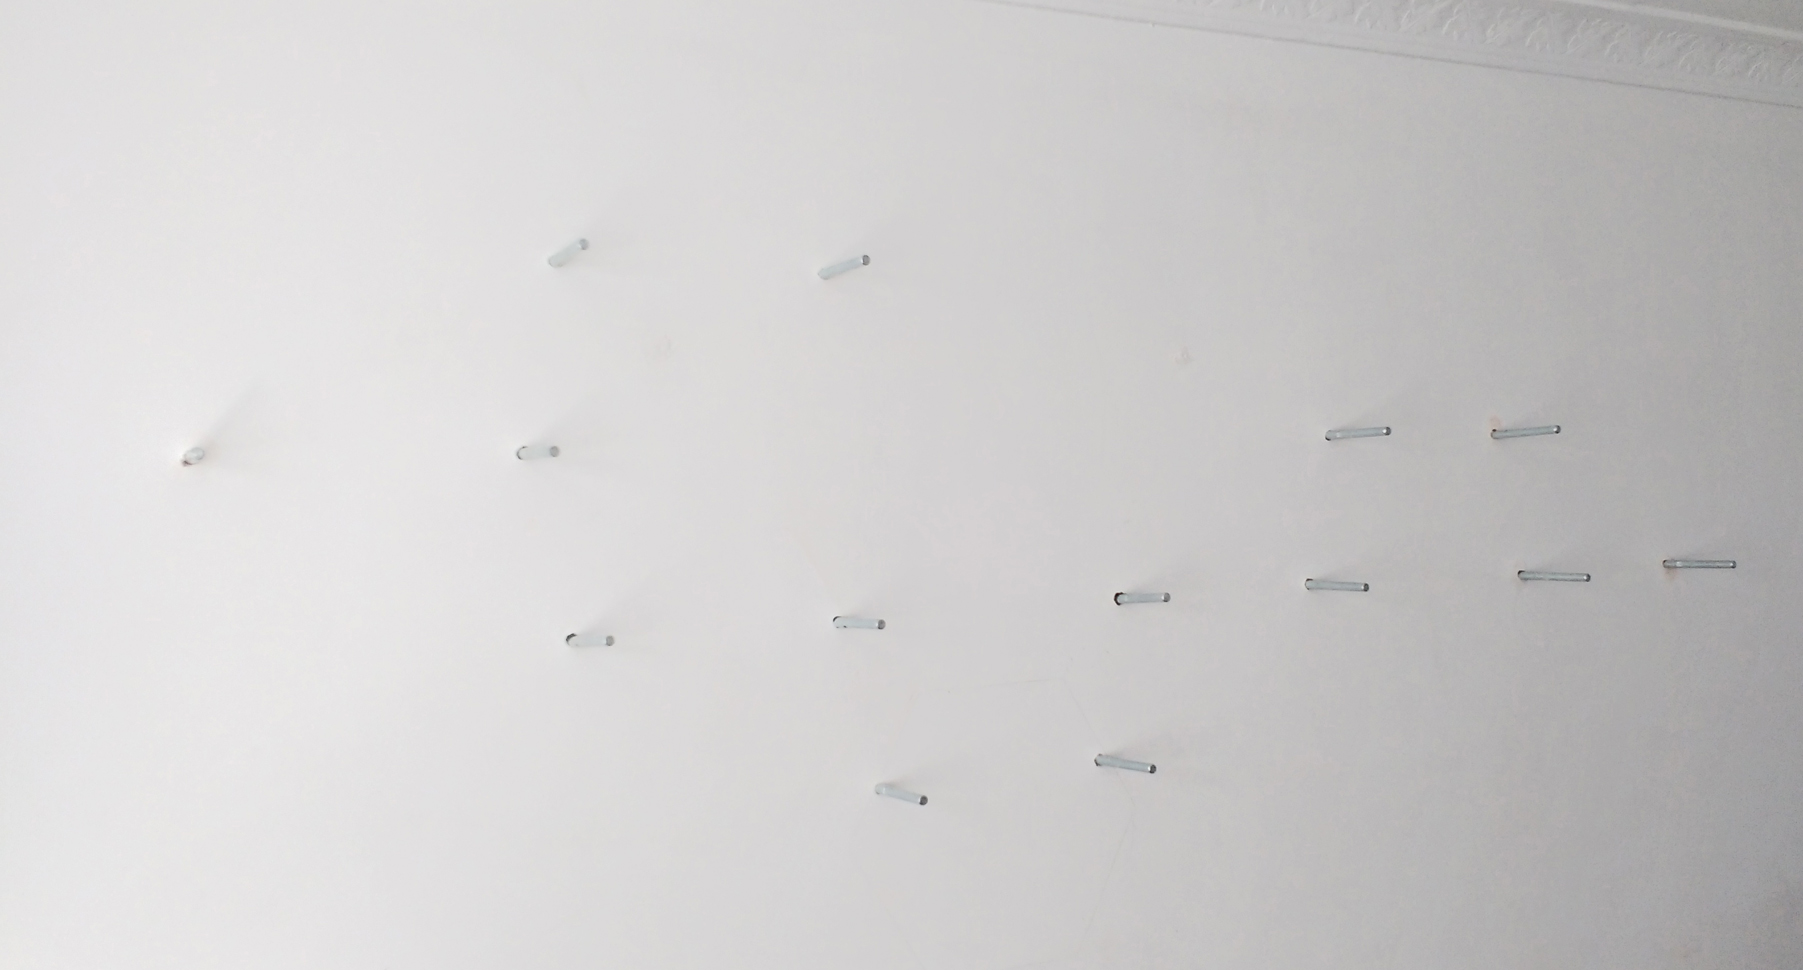
Here's a piccy of the concealed brackets, all fourteen of them. With luck, I'll have the first box finished tomorrow and back up.

Concealed Brackets Set.jpg
 

Attachments

  • Concealed Brackets Set.jpg
    Concealed Brackets Set.jpg
    449.8 KB
Really nice!
PeteG":18mlccdx said:
Anyone else have a great dislike for drilling lots of holes in walls?
Is the problem drilling "enough" holes or getting the hole alignment "just right" with its neighbour?

Would using one of these (or a similar "metal" one) help when marking the walls - inserted into the holes in the box and given a tap or marked with a felt pen: https://www.axminster.co.uk/faithfull-d ... s-ax911311

If you mount one to the wall, you could clamp two/three hexagons together with a spacing block between them and mark the other holes, repeating until they are all in place?

To drill the holes in the wall, could you use a block of wood with a perpendicular hole through it as a guide (with a slightly wider exit hole nearest the wall e.g. if using a masonry bit to clear the points)?
 
Simon_M":228typ1i said:
Really nice!

Is the problem drilling "enough" holes or getting the hole alignment "just right" with its neighbour?

Much appreciated Simon :D Hole alignment with the two jigs was easy, I used the Hexagon plate and a spirit level knowing the two holes in the plate were perfect with the boxes. Once the first box was up and using the "Y" shaped spacer jig with the Hexagon shape, again placed all the holes for the brackets perfectly. Any slight adjustment can then be made with the Cam movement of the concealed bracket.

I usually start drilling with an old or cheap brad point bit to get a clean hole in the plaster, and as I only used a 3 mm brad point to mark the hole, the points of the drill bit are great to help accuracy. The problem I had , some of the bricks were so hard it was throughing the 10 mm SDS bit off. On a couple of them I dropped to a 5 mm SDS to make a Pilot hole first, and even then it wasn't easy. Some of the brackets look completely out of square to the wall but once the boxes are in place, all of them are level.
 
My work here is complete :D Our lass is making some crochet napkins and Saturday we have a trip planned to a new plant shop for a few trailing plants. Hopefully, this time next year everything will look a lot fuller. The smile on her face when she came home from work last night, priceless :D
All I have to do now is finished the original six I made for her yarn!

H7 FFLR.jpg


HCBox.jpg
 

Attachments

  • H7 FFLR.jpg
    H7 FFLR.jpg
    658 KB
  • HCBox.jpg
    HCBox.jpg
    797.3 KB
marcros":3hdny3zx said:
I think that they would sell very well at the right price. The picture at the top is very contemporary and wouldn't look out of place in a magazine or a facebook ad. https://www.google.com/search?q=wooden+ ... 80&bih=627

you could even sell the reclaimed wood angle.

Alternatively, but some planed PSE timber good enough that you only need to finish sand it.

I'm all for supporting small businesses, but I do have a bit of info on this. Earlier in the year I bought a UKJ router top and some other stuff from one of our members - when I visited his shop which he was closing down, I asked why, and he pointed to a stack of hexagon shelves just like these. He had an etsy store and was selling them, but after the labour, costs etc he just wasn't making anywhere near enough to continue to pay the rent for the shop - which was only £250 a month for a large workshop among some farm buildings. He also had almost no other work from his store at all.

As we've often discussed here - this sort of thing, unless you can batch them out in decent quantity with minimal labour, and get the timber and everything else at very reasonable costs, AND then find a place to sell tham at a good markup - then and only then is it worth it.

The thread about maker faires and such pretty much summed up how the market is for these sort of things.
 
Thanks for the info on how to make these. I particularly like segmented projects - I like woodturning segmented projects but I’m motivated to give it a go with these.

I appreciate that it can be difficult to produce these and sell and make a reasonable return. We probably gave the industrial revolution to thank for that (and now China and our appetite for all things cheap).

You can’t argue that everyone has the right to buy a pair of shoes which thanks to the industrial revolution can be bought by anyone - tried making a pair from scratch and you will realise the progress that has been made. Of course not everyone thinks throwaway fashion is as justified.

Perhaps the solution to making these, is to make them on more of an industrial scale e.g. why not make a hex that uses the complete length of an MDF board and then slice it up on the bandsaw?

The bottom line is that this is an Interesting topic for making at home for one’s own amusement/challenge. Thanks.
 
Simon_M":3howc8iz said:
Thanks for the info on how to make these. I particularly like segmented projects - I like woodturning segmented projects but I’m motivated to give it a go with these.

You're very welcome Simon :D It was a fun project, from making the jigs to spraying, and I was very happy to see all the sides come together nicely when putting them together. The main thing for me was seeing our lass smile, made it all worth while :D

Simon_M":3howc8iz said:
Perhaps the solution to making these, is to make them on more of an industrial scale e.g. why not make a hex that uses the complete length of an MDF board and then slice it up on the bandsaw?

The bottom line is that this is an Interesting topic for making at home for one’s own amusement/challenge. Thanks.

I don't make anything to sell anymore, tried it once, and as my accountant said, " You don't have a business, just a very expensive hobby"...I do have an order for five of the Hexagon boxes, but they'll be made as a gift. Although the person in question doesn't know that yet.

Interesting you mention MDF. I reckon if the local timber yard cut a sheet of 8 x 4 in to strips, leaving you to cut the segments, bevels and glue up, you could make 16 boxes. Personally, I'd be looking to sell an unfinished box for a tenner, and there's the problem. The buyer has to finish them, so if they buy seven boxes it'll cost them around £30.00 on spray paint plus £18.00 on brackets, and they still have to hang them. You'd have to sell them a spacer and template for hanging, may another tenner, but they'll be in for £130.00. I can't see many folk paying that when they have to put a few hours work in to it themselves, I might be wrong, but I think most would want to buy finished boxes and have them hung for that money.
 

Latest posts

Back
Top