Hello newbie here, timber frame log store project

UKworkshop.co.uk

Help Support UKworkshop.co.uk:

This site may earn a commission from merchant affiliate links, including eBay, Amazon, and others.

RossJarvis

Established Member
Joined
20 Aug 2013
Messages
1,227
Reaction score
1
Location
Petersfield, Hampshire
Hello there, this is my first post.

I have just started working on a project to make a log store for my neighbour, based on a design I made a few years ago, which is loosely based on traditional timber framing techniques. I have tried to post some pictures but can't get the image thingy to work :( , maybe it's because I've not made enough posts?

Anyone interested in watching my progress? Any one know how I can post a picture without linking through to Photobucket?

cheers :D

Ross
 
Thanks CHJ :D Thanks for the encouragement Richard :D

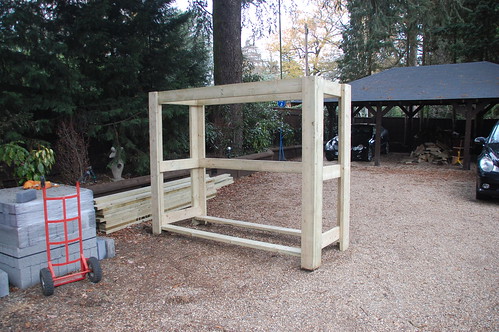
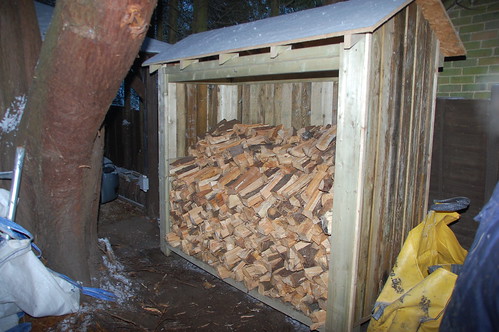
This is the log store I made a few years ago;

_DSC2724copy.jpg
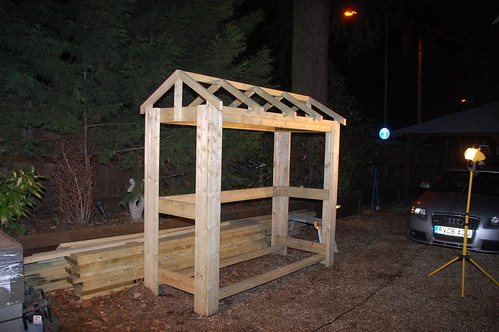
Now trying the picture thingy

_DSC2725copy.jpg


I think these should be all the tools I'll need, though see note below :roll: ;

tools.jpg


I'm going to see if I can do it without tape measures or such like, but I will be using a bench mortiser as I've not got the will to chop 32 mortises by hand (plus I completely knackered my only proper mortice chisel :cry:)

This is my plan mainly to help remember which joint to put where, it's a bit of a bodge as I am simplifying it from a jowl post design, if anyone can see any obvious problems, please chirp in;

plans2small.jpg


I made a cutting list (well two actually, one metric for the woodyard and one in proper measurements for me) and popped to the local hardware shop, where I cut all the lengths I needed and bunged them into the neighbour's hatchback (ooh we can't cut that sir and we can't deliver till at least Wednesday!), So I now have one flat packed log store in the back garden. What you see is 150 quids worth of "high quality?" wet, knotty, pressure treated slightly twisted deal? spruce? pine? fir?;

flatpack.jpg


And today I laid out the front frame, levelled it and checked for square with a pointy stick. Then I spent several hours looking at it whilst drinking tea, then I numbered the joints.

layout.jpg


Tomorrow I hope to mark out the tenons and if we're really lucky I might start cutting them, If miracles do happen, I might even mark out the mortices and chop them out.
 

Attachments

  • _DSC2724copy.jpg
    _DSC2724copy.jpg
    62.4 KB
  • _DSC2725copy.jpg
    _DSC2725copy.jpg
    64.3 KB
  • tools.jpg
    tools.jpg
    51.2 KB
  • plans2small.jpg
    plans2small.jpg
    47.7 KB
  • flatpack.jpg
    flatpack.jpg
    51.9 KB
  • layout.jpg
    layout.jpg
    55.6 KB
Good luck, I do like following a WIP. I'd be lost without a tape measure!

In the picture of the tools you will use you forgot the packet of 'Hobnobs' to go with the tea :lol:

Regards Keith
 
Thanks for the reminder keith, :-D Must remember to pick up some hob-nobs when I pop to the shops, hmm chocolate hob-nobs, mmmmmmmm (homer) . I did try to find my decent tape measure, but only found the other tape measures I'd bought the last few times I tried to find it #-o

Anyway, yesterday morning I'd laid out the front frame. I selected the best face of each timber, which will be what the neighbour will have to look at, and these are facing down, this means I can number the joints in pen on the "back". There was probably another reason for this, as there was a reason for levelling the whole lot and arranging the timbers in such an order, however I'm b******d if I can remember what these were :-k

By yesterday evening I'd numbered the joints and added a few more bricks so today we have;

_DSC2739.JPG


The top of the far post is showing some twist (or wind I think some people call it);

_DSC2737.JPG


The others are laying much flatter so those timbers are probably straighter. This brings up the problem of how to cut the joint. If there was going to be a tenon on the top "beam" I could cut the mortice "square" to the face of the post. When joined the joint would force the post square, straightening it. (or it would if I was good at these things and didn't leave massive gaps :oops: ) However this puts tension into the thing which could be a problem. I could trim the face of the twisted post to be square to the beam, or cut the tenon "shoulders" to the angle of the post face. However, this is all too brain numbing so I'll just blunder in regardless and see what happens (hammer) .

As it is, for this joint the tenon is going to be at the top of the post. As the beam doesn't extend beyond the top of the post It's going to be either like a square peg with all the sides trimmed off, or more likely to have three sides trimmed off, leaving enough room for the wooden peg which'll hold the joint together. I'll still have the problem of how to deal with the twist. I think I'll "scribe" the tenon up from the top face of the beam. Which means that I'll mark the end of the tenon on the top of the post, parallel to the beam rear face.

Confused, have I lost you? Well I'm now more clueless than I was when I started, we'll just see what happens shall we :shock:
 

Attachments

  • _DSC2739.JPG
    _DSC2739.JPG
    87.6 KB
  • _DSC2737.JPG
    _DSC2737.JPG
    52.8 KB
Interesting! Do you work as a timber framer?

I find that I'm most likely to make mistakes in measurement if I use numbers - I much prefer to put similar pieces alongside each other and mark them together directly, which I think is what you intend to do.
 
AndyT":r6qwkk4c said:
Interesting! Do you work as a timber framer?

I find that I'm most likely to make mistakes in measurement if I use numbers - I much prefer to put similar pieces alongside each other and mark them together directly, which I think is what you intend to do.

No, I'm just an idle hobbiest, I did a short timber framing course a few years ago at the Weald and Downland museum, which was brilliant, but I didn't follow it up with any practice. Essentially I'm doing this to see how much I can remember, oh yes and to give the neighbour a nice(ish) log store :D .

I think the marking stuff together technique is much better than marking out separately using measurements and I think it's how things were done traditionally. Like a lot of things in life, what works for you is "the best way".

Consider this an silly person's guide to "timber framing", me being the silly person :shock: and I hope some others will find it interesting. Now to go get those hob-nobs :D
 
Not to hijack this thread and so.

But firstly you'r timbers look a bit on the thin side, i would have at least used 4*2. In the one that I build I used 5*2, and that is still showing some small flex.

I like it that you want to build it traditional with m&t's

This is the one i build

Her a picture of the frame


DSC_2290 by mcluma, on Flickr

With the roof


DSC_2300 by mcluma, on Flickr

and loaded up


DSC_2320 by mcluma, on Flickr
 
Good to learn of another new member, welcome

Interesting project.

That made the timber £125 plus £25 vat. !!!!!!!!!!!!!!!!

Perhaps it was the roofing bits where the money went?
 
McLuma; that certainly is a nice BIG wood store :shock: , I like how you've clad the outside and the pitched roof. I've found with my Mk1 store, which is smaller than yours, that it is generally pretty solid, even though you could park a bus in the gaps at the joints, maybe it's because it's smaller the 2x2 seems to work. I've braced the corners with 45 degree timbers which seem to do the trick, the only movement is at the top, which I think is because I didn't put braces in "flat" at those corners. I'll probably do that on Mk2.

DevonWoody; I didn't see the itemised bill so who knows where the money went :?: Had it been a proper wood yard and not Travesty P*****s it might have been cheaper.

I've started to mark out the joints, first I'd numbered them (well with letters actually) and written which bit were wot and which way up it goes to save confusion later;

_DSC2740.JPG


Then I started to mark out the tenons at the top;

_DSC2742.JPG


I'm resting the mortice chisel on the "beam" as this is pretty square and straight. The chisel is close to a third the thickness of the wood so is a good measure to get it to work. I marked with a knife first, then pencil so I can actually see the line :shock: On this joint, there is twist in the tenon piece so on one side the tenon will be closer to the edge than the other. It'll look "on the p***" but hopefully it'll be in line with the mortice (famous last words #-o ). I can plane the twisted face later to make it look straight!! :mrgreen:

The next piccie shows me using a square off the back face of the timber to mark the ends of mortices and shoulders of tenons. This also shows up any twist in the "beams" which are the lower timbers;

_DSC2745.JPG


The good thing about using a knife to mark is that you can hold it flat on the edge of the chisel to get your mark dead on (that's my story anyway, and I'm sticking to it :roll:

Next I'm marking in the waste, so that I don't cut out the wrong bit of the wood #-o ;

_DSC2741.JPG


_DSC2744.JPG


Finally, I managed to get to Tesco to add an essential part to the tool kit, following an earlier suggestion, guess what it is? :D

_DSC2746.JPG


Next step is putting the parts on the bench, using the chisel to mark the width of the tenons and mortice's and then starting to cut holes in myself, I think I'll put 999 on speed dial.
 

Attachments

  • _DSC2740.JPG
    _DSC2740.JPG
    52.1 KB
  • _DSC2742.JPG
    _DSC2742.JPG
    48.6 KB
  • _DSC2745.JPG
    _DSC2745.JPG
    52.4 KB
  • _DSC2741.JPG
    _DSC2741.JPG
    49.9 KB
  • _DSC2744.JPG
    _DSC2744.JPG
    50.9 KB
  • _DSC2746.JPG
    _DSC2746.JPG
    78.4 KB
A very interesting and entertaining read.
I don't really get on with tape measures. Everyone I've owned has a loose bit on the end! It only moved a bit about it's own thickness.
 
richard56":17w3xu2h said:
A very interesting and entertaining read.
I don't really get on with tape measures. Everyone I've owned has a loose bit on the end! It only moved a bit about it's own thickness.

Aha, there's a reason for that (or so the makers say), probably a problem with their rivet gun :lol: )!

Doing this the traditional way you only need pointy sticks and bits of string, I've searched and searched and can find no string :( , however I have found five tape measures, all bought when I couldn't find the others, I've managed to make a pointy stick, but am having trouble finding some flax to make the string :wink: .
 
Right then, Now I've collected the bits up and put them on the bench, I've just remembered two bits of advice; 1, when selecting the good face of the wood and putting downward to mark out, remember to look at it first #-o #-o #-o . 2, which is similar, when building something like this, which is going to be against a wall, whether it be a log store, side cabinet, kitchen, whatever, build the back first. You can hide all your mistakes against the wall and the bit that people look at will hopefully be a bit better :D

Just popping out for a ream of sandpaper and some filler, must also remember to cut on the waste side of the line :roll:
 
Hi Ross

You've got a very entertaining writing style, I've been laughing all the way through this excellent thread, and I think you've done really well in cracking some of the classic framing problems. I like your design and your marking out methods and considering your experience you're doing a grand job. I think common sense isn't that common these days and you seem to have it in spades!

Now...where are those hob nobs :)
 
Step the next. Marking out on the bench.

As the tenons are going into a hole cut by a mortice chisel, you can mark the thickness of the tenon with the aforementioned chisel, just remember, this works for both traditional mallet powered ones (hammer) and the new fangled hollow ones with a drill down the middle wot a motor turns. If using a proper mallet powered one don't lay the chisel on it's side as it's got a taper on it :oops: Additionally don't lay the chisel down on the edge of the bench or anywhere where it can fall on a flagstone floor hopefully you don't need to ask why, but I did this twice #-o #-o #-o

_DSC2748.JPG


Once you've marked out both sides (ends?) of the tenon you can join them together with the chisel.

_DSC2749.JPG


Once marked in, you can mark the waste, I use a soft pencil for this, but a marker pen or paint roller are just as good, make sure it's OBVIOUS which bit of wood you need to keep and which bit gets cut out :D This is the tenon, which is on the twisted end of the post, so it's actually supposed to be on the p*** (at an angle!) honest!

_DSC2750.JPG


Now then, when you find you can't find your marking knife because you put it down somewhere safe, you may be lucky enough to have an American Carpenters Square and you can always use the scriber in the base.

_DSC2751.JPG


I'm not sure why the Americans have carpenters squares like this, as it is very very similar to an engineers combination square, the only difference being that you have to fettle it first to make it work =D>

Next marking out the lap joint (I think that's what this is called, though I suppose it might be a halved joint or halving joint, I'm relatively sure it's not a housing joint). For this I'm joining two timbers cut to about midway. To get the middle line of the wood, I'm using a marking gauge. First off set it to about the middle of the timber and mark a dot in from each side;

_DSC2752.JPG
If lucky or skilled (or both) you'll either have two dots very close together or one dot. If you've one dot you're spot on. Look at the point on the gauge and if it is set wider than midpoint then narrow the gap, if shorter than midpoint open the gap. I was taught that you do the thumbscrew up till it just bites first and tap the thin bit of the gauge on the bench to adjust the gap. When right, tighten the thumbscrew a bit more.

"Tapping the gauge" (Dear me I could do with tapping a firkin right now!!);

_DSC2753.JPG


Mark the midline in from what will be the front face of the post, then square the edges of the joint and mark the waste.

Next mark the joint in the beam. You don't need to reset the gauge and it's actually better if you don't. If the two timbers are different thicknesses, this'll cause problems. Just remember to mark in from the front face of this timber too.;

_DSC2754.JPG


I don't see the need to mark the other side of the mortices as The lines marked are off the datum, plus with the morticer the chisel, cutty, drilly thing takes care of the other side.

If anyone's still watching, please tell me if I'm going on too much, or giving information you already know. If any moderators are watching please feel free to rename the thread as "How not to build a log store in 135 easy steps" :lol:
 

Attachments

  • _DSC2748.JPG
    _DSC2748.JPG
    47.6 KB
  • _DSC2749.JPG
    _DSC2749.JPG
    39.5 KB
  • _DSC2750.JPG
    _DSC2750.JPG
    40.2 KB
  • _DSC2751.JPG
    _DSC2751.JPG
    53.7 KB
  • _DSC2752.JPG
    _DSC2752.JPG
    38.9 KB
  • _DSC2753.JPG
    _DSC2753.JPG
    65.8 KB
  • _DSC2754.JPG
    _DSC2754.JPG
    54.1 KB
Random Orbital Bob":1wz7q3cn said:
Hi Ross

You've got a very entertaining writing style, I've been laughing all the way through this excellent thread, and I think you've done really well in cracking some of the classic framing problems. I like your design and your marking out methods and considering your experience you're doing a grand job. I think common sense isn't that common these days and you seem to have it in spades!

Now...where are those hob nobs :)

Thanks for your kind words Bob, you've cheered me up no end. It may be amusing, but I call it "being honest with a bit of a smile".
 

Latest posts

Back
Top