Fun with 'Y' levers.....

UKworkshop.co.uk

Help Support UKworkshop.co.uk:

This site may earn a commission from merchant affiliate links, including eBay, Amazon, and others.

woodbloke

Established Member
Joined
13 Apr 2006
Messages
11,770
Reaction score
1
Location
Salisbury, UK
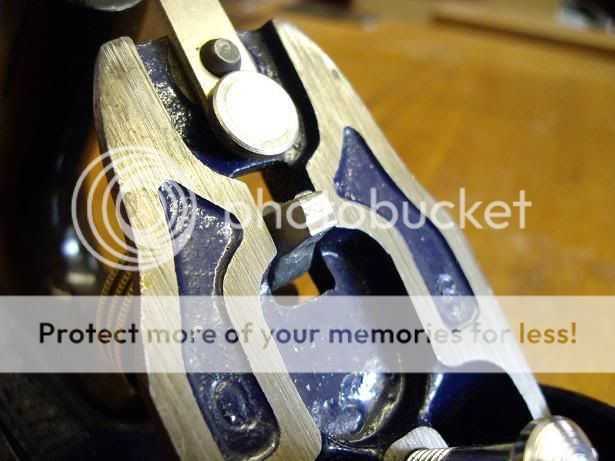
One of the things that came out of our very enjoyable Microbash yesterday (that Philly couldn't get to but is coming to the next one :D ) was the vexing question of 'Y' levers on Record and Stanley planes. There's no question that fitting a better blade, of whatever breed, makes a huge difference to the way the plane performs but, and here's the rub, they're generally much thicker than the standard offering and so the 'Y' lever barely engages on the CB. Here's a pic of Pauls' No4 which he's fitted with a 3.1mm iron and two-part chipbreaker. You can see that the top of the lever has been mangled where it's just engaging the CB:
joaweijujndi.jpg


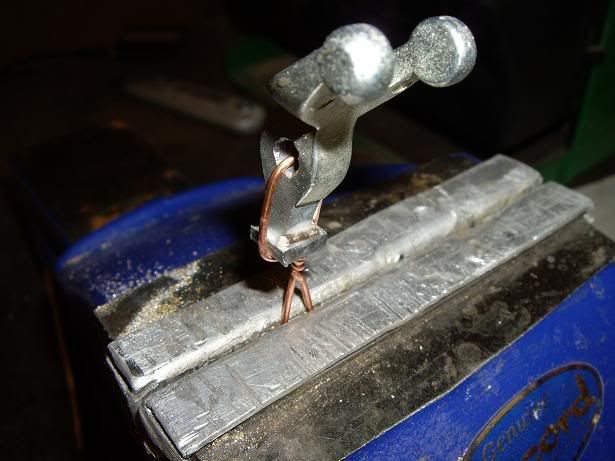
The solution is quite straight forward and that's to silver solder a small lump of steel onto the top of the existing 'Y' lever, so here's a shot of the set up in the vice and you can see the little piece of silver solder:
nowieirjwoduj.jpg


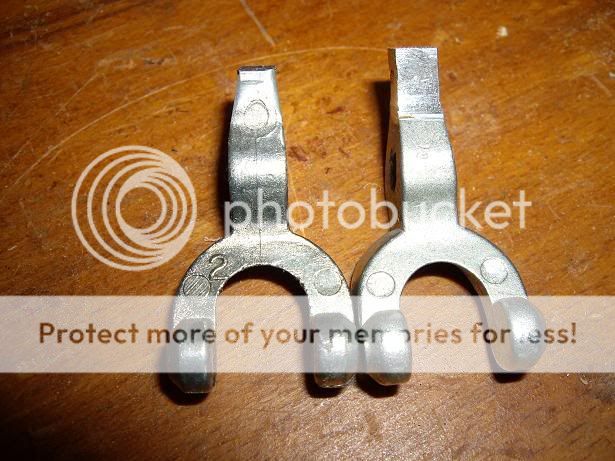
Apply the heat from a gas torch and then.......DISASTER (but easily remedied Paul)......the Clifton 'Y' lever (which this is) is made from an alloy with a lower melting point than the Record 'Y' lever and the top, well....erm melted a bit. There is a quaint term that my dad used to use about describing softer mild steel but it's not for delicate ears or a mild disposition :lol: What I then did was to clean up the debris and soft-solder a piece of steel onto the top (using a large soldering iron and some 60/40 tin/lead solder) and the result is this:
jnowjjcjemwek.jpg


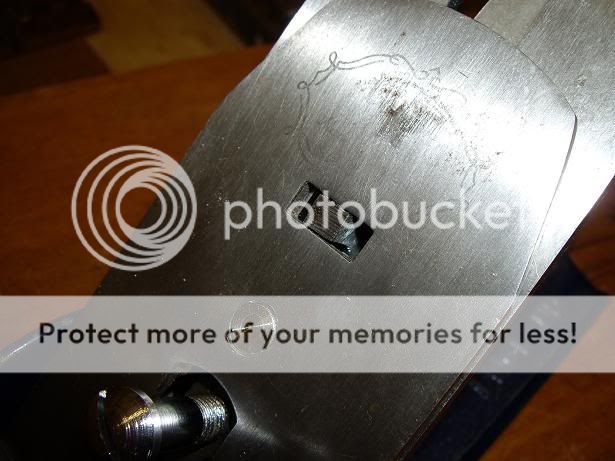
This is the modified 'Y' lever shown against another one of Pauls' standard levers. When the new lever is put into the plane it no longer just catches but fully engages in the slot on the chipbreaker

,
mlawekjjawlkmflxco.jpg


..so a very useful and quite easy mod to do - Rob
 
Blimey, thanks Rob - that looks terrific. I was wondering what the Clifton 'Y' levers were made from :? :oops: Fabulous job - thanks very much 8) 8) 8)

Cheers :wink:

Paul
 
I've just finished doing all the 'Y' levers that you left me (only takes about 10 mins to do and clean up).... can do some more on 09 Jun. Now I know what I'm doing :roll: it's a piece of cake. The material is unquestionably not very impressive, it seems to be very soft which is why it was getting mangled so easily in your No4....might be worth a word with Mike Hudson at Clifton to see if they can be cast from something a bit more robust.....coffee time now :lol: - Rob
 
Thanks a lot Rob - I'm really grateful to you for that. Yes, good idea about having a word with Mike Hudson. Next time I go to a show I will take up one of the modified levers and discuss it all with him - he's a nice bloke and always keen to get customer feedback.

Thanks again - hope its all helped in the process of clarifying your thoughts about which blade and cap iron combination to get for your refurbished Record #4.

Cheers :wink:

Paul
 
Hmm, interesting stuff, Rob. I know it's wondering a trifle off-topic but I'm reminded; for those of us who were made to do Home Economics instead of something useful - where would I, er, they find something like "Soldering for Twits". Or in my case "Soldering for the criminally inept"? :oops:

Cheers, Alf
 
Soldering and Brazing by Tubal Cain. Nexus Special Interests, Workshop Practice series. ISBN 0-85242-845-6
 
Alf,

The concepts are the same as home economics:

Everything must be got very clean before you start.
Ensure you reach & maintain the correct temperature (either electric or gas)
Don't get work too hot or things burn and are no good.
Wipe down all surfaces when you have finished
 
Yes but I failed Home Ec. :lol:

Thanks Nick. I find it slightly worrying that it needs a whole book... 8-[

Cheers, Alf
 
Alf - wot Lurker said is basically correct, all surfaces clean and grease free, use a suitable heat source (soldering iron or gas torch), suitable flux (which keeps the metal from oxidising as the heat is applied) and a joining material (silver solder is probably the strongest after braze welding which needs requires an oxy-acet flame). Tin/lead solder used for electrical work has its own flux built into the solder but the stuff used for plumbing needs a separate paste flux, same sort of solder tho....show you how it's done on 09 Jun - Rob
 
Alf, it's simple once you have seen it done and had a go, a quick demo will put you right.

piece of cake really :oops: :oops: :oops: Sorry just realised you failed HE :lol: :lol: - was there smart A***ed remarks about you burning cakes?? or did that handle evolve later?

Rob, I was surprised to see that solder is strong enough & hard enough to do what you did.

Talking soldering & cooking - I nicked the SWMBOs brulee flame gun - nice small & hot flame
 
Just to ruin what's left of my reputation, I also have the book Nick recommended. Well worth the lettuce next time you want to top up an Axminster order...... :wink:
Cheers
Philly :D
 
Ah, but Phil, have you got the complete set? Now that's how to ruin a reputation. :lol:
 
When I was an apprentice we were shown how to weld and how to solder, it is one of those disciplines that you either take to quite quickly or never. It was quite sad to see keen young lads trying to do it but failing, either everything was to hot or not hot enough. Mind you there are soldered joints that are functional but look bad and those that are functional and look the dogs *******. I can tell you a story on the 9th but not on here.
 
Alf":dg8fvttv said:
That's how to fill a bookshelf - there are 39 of them, aren't there? :shock: :lol:
How would I know? :whistle:
Come to that, how do you know? :twisted:
 
Nick W":3mb5nv41 said:
Alf":3mb5nv41 said:
That's how to fill a bookshelf - there are 39 of them, aren't there? :shock: :lol:
How would I know? :whistle:
Come to that, how do you know? :twisted:
Erm... Ah... You see... Well actually I have a shameful secret. Yes, carefully quarantined from the woodworking bookmarks are the <gasp> metalworking ones - this one amongst them.

I'm going to go and wash my mouth out with honest wood shavings now. :oops:

Cheers, Alf
 
Wouldn't it be more elegant from an engineering point of view, to solder two ~3mm slips to the back of the cap iron, about 10mm sq., to drop into the blade's long slot? This also keps the length of the lever short, so the blade adjustment does not coarsen as a result of the modifcation. This method also allows modest adjustment of bladeEdge-to-adjuster length (greater with thicker iron)

Moreover, you can sucessfully bond them in place with (industrial) superglue (lasted 5 yrs so far, allows use of a 5mm blade)
 
Wouldn't it be more elegant from an engineering point of view, to solder two ~3mm slips to the back of the cap iron, about 10mm sq., to drop into the blade's long slot? This also keps the length of the lever short, so the blade adjustment does not coarsen as a result of the modifcation. This method also allows modest adjustment of bladeEdge-to-adjuster length (greater with thicker iron)

That is the method I used, fairly tricky trying to solder them especially as I had real trouble securing the pieces with copper tie wires. The Epoxy sounds easier.
 

Latest posts

Back
Top