daft sketchup question

UKworkshop.co.uk

Help Support UKworkshop.co.uk:

This site may earn a commission from merchant affiliate links, including eBay, Amazon, and others.

LarryS.

Established Member
Joined
20 Nov 2007
Messages
1,072
Reaction score
24
Hi,

Couple of days ago I decided to have a look at the design forum (been using the others for a couple of months already). I then discovered Sketchup which has become a revalation. I've been through most of the video tutorials on google and done a bit of a search on the forum but havent found the answer to a simple question :

How do I join two boxes together so that one sits on top of another and their centrelines are aligned ? (I'm building a design of my tablesaw for a cabinet I want to build for it and had done the saw top and cabinet separately).

Any help would be greatly appreciated (I've been trying to work it out for the last 3 hours !)

cheers


paul
 
Hi Paul,

If I've understood your question... I had a similar problem for ages accurately aligning stuff. Then I read a thread on here and it all became apparent (was probably one of Dave R's very helpful posts)

I assume both boxes are components/groups... If select one and grab hold of the centre point with the move tool (+) it should move. The trick which I missed for ages is now to move it to the point you want it to be in line with on the other part.

I was getting really annoyed with aligning stuff until I worked this out. The program is very smart (if you use it right!) This works for all the points - if you grab hold of a corner on a component and drag it with move to the other it will snap into place. So simple (once you know).

HTH
David
 
Dave,

thanks for the quick + excellent reponse, I've tried it with a little bit of success but come up against 2 problems :

1. I want to put on box on top of the other but whichever angle i look from i can only see the bottom of one or top of the other ? How do I get to see both so can join them ?

2. I want to put the top box on the middle of the top of the bottom box (if that makes sense !!) but the top of the bottom box doesn't seem to have a marker which says centre ? or something similar ?

thanks again

paul
 
Hi Paul,

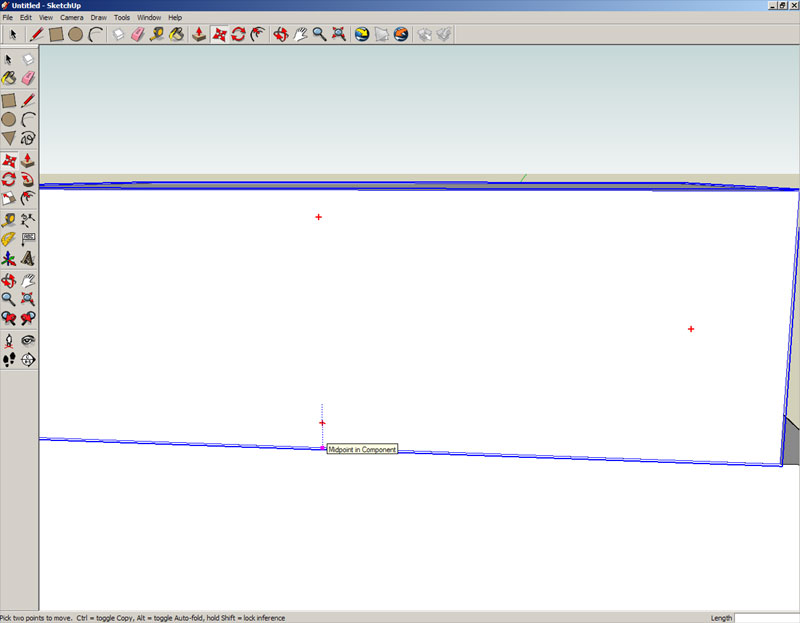
Just did a very quick screenshot - getting late here! :D
Sketchup.jpg


I grabbed the midpoint of the bottom box on its face and headed for the midpoint of the other. I had my view side on if that makes sense.

As I can't see what your looking like I'm just guessing.. are you trying to align it concentrically? If so you might be better making a guide point at a corner with the Tape Measure tool to use it for alignment. If you could post a screendump of your task it might be easier to advise.

Good luck!

David
 
Hi Paul,

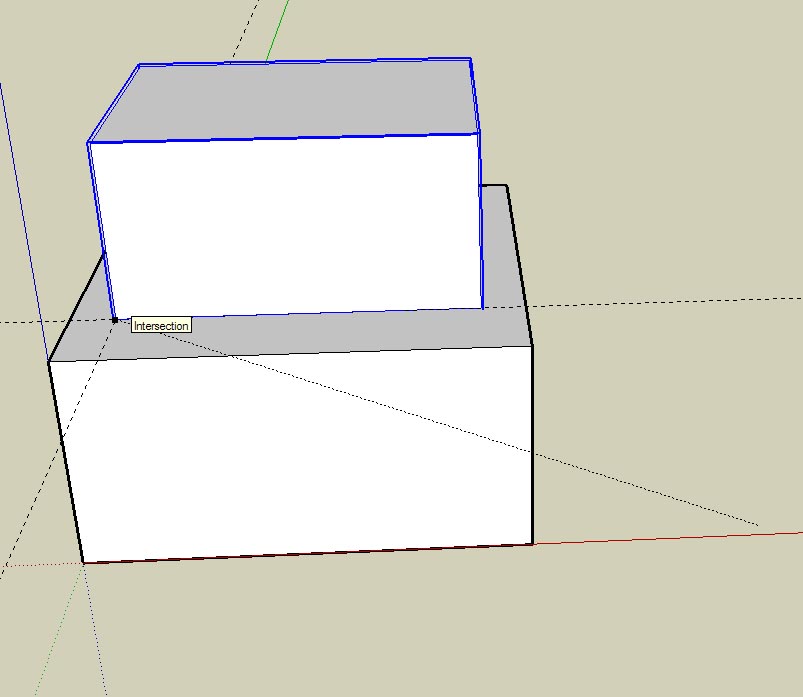
I've done a further sketch to explain what I mean. First, I must note I imagine there is a more cunning way of doing this (that I don't know) and hopefully one of our resident Sketchup gurus will help out.

Anyway this works even if it is long winded. In this case the bottom box is 1000 x 1000mm and the top 800 x 600. I wanted to align them on their middle centre lines.

So I drew two guidelines from the edge of the bottom box, one 100mm in the other 200mm. Then I picked the bottom corner of the top box up and dragged it to the intersection of the two dotted lines - and Sketchup does the rest.

Sketchup2.jpg

Cheers
David
 
DavidE has supplied two good anwsers. In his first he shows grabbing the component at the midpoint of an edge and then aligning it with the midpoint of the corresponding edge of the other. Youcould then orbit around and repeat the process for the other direction. Once you have the component moving in the right direction, hold the SHift keey to lock the direction. That way you can refence a point (midpoint in this case) that is not in the path of the move.

Guides are certainly a good way to establish a reference point to which you could move the component.

Genghis, (I want to see your yak hide cloak. :D) you mentioned you couldn't see everything you wanted. Get friendly with the mouse wheel. Rolling it zooms the view; holding it down while moving the mouse orbits and Shift with the center mouse button gives you Pan. You should practice getting around the model until you find it natural to do so. When you are working with SketchUp you are a sculpter, not a painter. You have to work all around your project. You'll know when you've gotten comfortable with the camera tools in SketchUp. Someone will send you a picture in an e-mail. You'll open it and immediately try to orbit round to the opposite side. :lol: You think I'm having you on but it happens to most SketchUp users. :wink:

Good work DavidE
 
Dave R":quk7svyl said:
You'll know when you've gotten comfortable with the camera tools in SketchUp. Someone will send you a picture in an e-mail. You'll open it and immediately try to orbit round to the opposite side. :lol: You think I'm having you on but it happens to most SketchUp users. :wink:

:lol: I thought it was just me. I'm always disapointed when I realise its just a picture. :D
 
Hi Dave,

Thanks for your input as I have learnt from this too (Use of the shift key). While we're on the topic - one question I've never found an answer to is... Can you force Sketchup to change the axis you're trying to move? Sometimes it can be hard work convincing the UI of the direction you'd really like to move? (other than panning round to give it a clue from the camera view)

I was only passing the knowledge on Dave - I read most of what I wrote in one of your posts. I couldn't remember which one so it was easier to write it out :D

Cheers
David


Dave R":1o89gdwm said:
Youcould then orbit around and repeat the process for the other direction. Once you have the component moving in the right direction, hold the SHift keey to lock the direction. That way you can refence a point (midpoint in this case) that is not in the path of the move.
 
David, I'm glad you found it useful.

As to your question about forcing a move direction, yes, you can. You can lock the movement to the red direction by hitting the right arrow (cursor) key, green with the left and blue with either the up or down arrows.

I rarely use that function perhaps because I've been using SketchUp much longer than that feature has been available but also because I usually want to see where I'm going with the component. Orbiting, zooming and panning for me is very fast and I like being able to see what I'm doing. I also have a Space Navigator hooked up to the PC at home which I enjoy using for moving around the model.
 
I forgot to add something else. You don't have to actually grab the component you are moving to move it. Although it is long, you can see what I mean in the video at this link.
 
Dave R":23d1obos said:
As to your question about forcing a move direction, yes, you can. You can lock the movement to the red direction by hitting the right arrow (cursor) key, green with the left and blue with either the up or down arrows.

Another useful tip :)

There do seem to be odd occasions where the object is determined to move on the wrong axis. Now I have a way to fight back!
 
Do keep in mind that it is possible to have a component that is glued to a surface or will only glue to, say horizontal surfaces. They can be difficult to move in any direction but along the gluing surface. I can't think of many reasons why you would create a component for a woodworking project with a gluing plane set but it is possible. If you download components from 3D Warehouse, it is entirely plausible that the creator of that component has done this. It could make things tough for you.

Actually, if you want to see an example of what I'm talking about, take a look at the sink and window components included with SketchUp.
 
As to the original problem - my approach would be slightly different.

I only draw components. There are no lines or surfaces that are not part of a component in my drawings now. That means I can draw temporary lines on the components surface to provide reference points, move the components and line, then hide all components and delete the stray lines left visible.

So I'd draw a diagonal on the two surfaces to be aligned then move one component and diagonal line using the midpoint as reference, on to the other component and lines' midpoint. Hide the components and delete the lines.

Well I know what I mean :lol:
 
RobertMP":k8c5udvg said:
I only draw components. There are no lines or surfaces that are not part of a component in my drawings now.

You've learned well, my friend. :wink:

RobertMP":k8c5udvg said:
So I'd draw a diagonal on the two surfaces to be aligned then move one component and diagonal line using the midpoint as reference, on to the other component and lines' midpoint. Hide the components and delete the lines.

Well I know what I mean :lol:

I think I know what you mean as well. Do remember to use the Inferencing tools in SketchUp. They'll save you a lot of work. Also you might be able to use guides (maybe intersecting guides) instead of drawing lines. Then you can simply delete the guides when finished. You can either go to Edit>Delete guides or you can do as I have done and set a shortcut key to do it. I use guides very frequently and need to clean them up to clear the clutter that can develop. I can't find most of the keys on the keyboard without looking but I can find the E key because it is my shortcut for this. :D
 
Dave R":799ms0ok said:
Do remember to use the Inferencing tools in SketchUp. They'll save you a lot of work.

I'd say the inferencing aspect is the only bit of Sketchup I have not really understood. I understand what it should do.... I don't yet understand how to make it do what I want it to. It seems to pick up on an inference but then lose it again some times. Consequently I don't trust it and find alternative strategies.
 
Ahhr that is brilliant - thanks Dave. This has been a very useful thread. I suspect there will be less blue air now when I am trying to position components in weird places :wink:

Cheers
David

Dave R":1q9zmb4c said:
As to your question about forcing a move direction, yes, you can. You can lock the movement to the red direction by hitting the right arrow (cursor) key, green with the left and blue with either the up or down arrows.
 
Just had an idea and a play.

draw 2 cubes
make each a group
switch to x-ray mode
select move
************
put pointer on one side of cube
move to find mid point
hit shift key - locks inference
move pointer on to adjacent side of cube
move to find mid point
hit shift key - locks inference
move pointer towards centre of cube keeping axis dotted line visible
when pointer reaches centre second axis will appear
click and release mouse button
*************
this locks the cube to the pointer
repeat between******* on top of other cube

this positions the two cubes over the centre of each face

Hope this helps

Stefan
 
thanks everyone for the responses, I've just managed to put two boxes onto each other !! (how sad is that ?)

I'll try and post what I've been working on (flickr is off the air at the moment)

Two other questions :

1. how do you create guidelines, is it using the tapemeasure or is there another way ?

2. do you all use compnonents over and over, or do you create things like joints every time you do a new drawing (just wondering how to organise things)

cheers again


Paul

P.s don't own a yak hair cloak but have got a pringle jumper if that counts
 
Stefan, that works, too. It is possible when using the Move tool to get hold of the center of a face and move it to the center of another face if desired. Using X-ray helps you be able to see that. Be aware that on some computers, mine at work for example, X-ray mode really taxes the video card and performance can be sluggish. You all probably have much more powerful computers though and this won't be a problem.

Paul, a pringle jumper will just have to do I suppose. It won't really go with the hat though. :)

To answer your questions,

1. Yes and yes. :p

Guides are created with the Tape Measure tool and the Protractor tool. There are guide lines and guide points. Guide points are created by clicking on a point (end point of a line or other guide point) with the Taape Measure tool and then dragging out to set the point. Lines are created by clicking on a line (Axis, edge or other guideline) with the Tape Measure tool and dragging out. This will create a guideline parallel to the reference line.

Alternatively you can create guide lines at angles to other lines using the Protractor tool.

Regarding components, I do make components of every part I draw. I almost never use groups. I don't make a component of things like joints, they are part of the geometry of components.

Think of a component or group as a collection of geometry (lines, faces and textures/materials/colors) wrapped in cellophane as you might wrap a sandwich. With the wrapping on it other things won't stick to or modify the sandwich inside. You can, however, open up the wrapper to edit the sandwich--add cheese or a tenon or paint it with a material.

Components have the added benefits of accepting names and attributes which groups can't. In addition, all instances of a component in a model receive the same editing done to any one instance. So if you have a cabinet with a number of identical doors and you've drawn them as instances of the same component, you can change the style of the door in one instance and all the others are updated simultaneously. (You can make a component unique if you don't want it to receive the same changes applied to others.

If you have a component such as a piece of hardware or a molding profile, you can save that for later reuse if you'd like. Simply select the component, right click and choose Save as... and file it away where you can find it.

One last thing for now about components, if you delete a component from your drawing window it is still part of the model file (and thus adds to file size) unless you purge it from the In Model Component Library. To get rid of them you need to go to Window>Components>In model. Fromthe flyout menu (black arrow pointing to the right) choose Purge Unused to get rid of those components you aren't using in your model.

There's more but I don't want to put your brain into an overload state. I'll let you digest that first. Besides, I have to go feed my yak. :D
 

Latest posts

Back
Top