Cutting decorative cornices in English Oak - help please.

UKworkshop.co.uk

Help Support UKworkshop.co.uk:

This site may earn a commission from merchant affiliate links, including eBay, Amazon, and others.

RogerM

Established Member
Joined
4 Mar 2006
Messages
1,280
Reaction score
35
Location
Devon
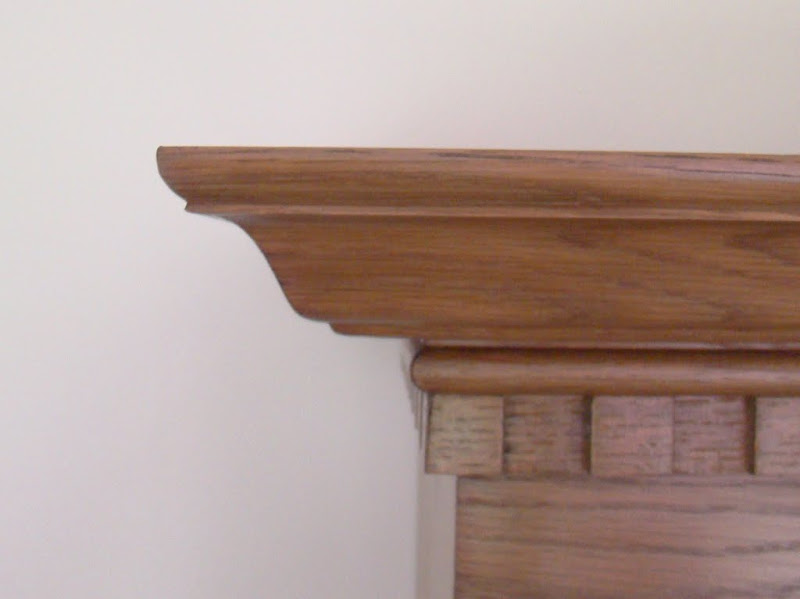
I'm about to build a traditional bookcase in English Oak (there will be a WIP thread with piccies) but one thing that is puzzling me is how to create a cornice. I would like something similar to this..........
DSC05819.JPG


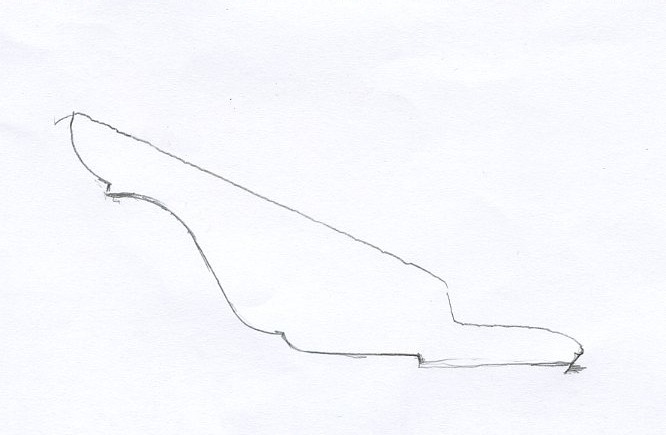
...... which is on an existing piece of furniture. The dentition and rounded part below is no problem, but I can't work out how the cornice itself is cut. I've looked at the cornice cutters on Wealden's site but none seem to match. This is a profile of the complete cornice.
Cornice%20%20018.jpg


I have a router table but not a spindle moulder. The end result doesn't have to be an exact match for the one shown - just something in the same style. I don't want to buy it in as I want to ensure the wood matches what I already have.

Any ideas?
 
I go to a local joinery shop that has a large spindle and get them to run my materials through, they just charge me machine time.
If I want a custom moulding I have to pay to get the cutters made.
I have also bought stuff in at the request of an interior designer and this is sometimes cheaper if you need a large quantity.

Simon
 
When making a complicated moulding, it's not necessary to cut it in one piece. You could divide it up into a series of simpler mouldings and glue it together.

Don't know if you are into hand tools, Roger, but you could do it by hand using various planes - rebate, combination, moulding, scrapers, etc - which can be good fun :)

Cheers :wink:

Paul
 
Trend do a cornice bit that would produce the ogee part of teh moulding and then just use a roundover bit to to the top part.

http://www.trend-uk.com/en/UK/product/9 ... utter.html

If its just for one bit of furniture then you could run it my hand, its not that difficult, I did the bit on the top of this wardrobe in timber to match the plaster cornice. If you con't have a moulding plane to produce the concave part then the end wheel on a belt sander run at right angles to the work make s a good substitute.

Jason
 
What the others have said are good suggestions, I agree that you could make the top and bottom sections separately using ogee style cutters. The centre section with the large single radius curve could be made by using the slant technique on the tablesaw - though only if you're comfortable doing so and get the set up right so that it's safe.

If you do then it's just joining the 3 up together to make your cornice
 
Roger, never done anything like that before, but we can have a natter about it on Saturday...bring along any examples if it'll help - Rob
 
I asked a similar question back in 2004 in this thread

https://www.ukworkshop.co.uk/forums/rout ... t2712.html

I got some terrific ideas and maybe some may help. Interesting to note that the two links to the Axminster site are, of course, now defunct. A blunt chisel to the person who can fill in the missing links !

And just noticed that my own link also has gone.... :oops: ...but Aragorn, bless him, has kept his going.
 
Blimey, that's an old one. I think the links were to things such as this steel profile gauge and this plastic one. (What size is that blunt chisel anyway...? :wink: ) Needless to say I stand by my comment later in the thread - for the amount you need, you could do the same thing with a coupla planes. Maybe a scraper. Starting like this. (Which you could do with a tailed device, if you really feel the need)
 
Last year at Westonbirt, John Lloyd gave a demonstration of how to cut mouldings using just hand planes. From memory he used a skew rebate plane, a shoulder plane a jack plane and an old wooden round-bottom plane. The moulding he was cutting was cross grain, so more diffucult than yours, but well within your capabilities I would have thought. If you're going to this year's show, he could tell you how to do it, but basically you just draw the shape on the ends of the wood and plane down to the lines :)

Cheers :wink:

Paul
 
Yes, great link Alf. That's basically how John Lloyd did it at the demo. Surprisingly fast once you've worked out how to do it and it requires only very basic tools. It would probably be possible to modify some old wooden moulding planes if the correct shapes were not available.

Cheers :wink:

Paul
 
Guys - thank you so much for all your ideas. I only need about 5 ft of cornice so not inclined to invest in expensive specialist cutters that I may not use again.

I'm tempted to go to the workshop that made the unit with the cornice I'm trying to copy and just pay them to produce a another piece using wood I supply so it matches what I have. But somehow that seems like a bit of a cop out.

Rob - as you say, something to talk about on Saturday!

Alf - terrific links - thanks. Whilst I don't have a plough plane, I think I could use a variety of router cutters already owned to rough cut to shape, and finish off with my Clifton curved scrapers. Might give that a try on a short piece first.
 
Ah, this was the link I had in mind. Same gist, but a bit more detail. No reason at all not to use a router to waste off the bulk and scrapers to fair it up. Not as much fun of course, but eminently doable. :D
 
Norm (NYW) made a variety of cornices on his projects and usually built them from multiple pieces shaped and cut using the router table and table saw. He built complex shapes from simple shaped components.

Misterfish
 
Back
Top