Bowl Bases - How I do it...

UKworkshop.co.uk

Help Support UKworkshop.co.uk:

This site may earn a commission from merchant affiliate links, including eBay, Amazon, and others.

Richard Findley

Established Member
Joined
3 Feb 2008
Messages
1,508
Reaction score
1
Location
Leicester
Hi all,

After the recent thread about the bases of bowls I thought I'd put up a little "How To..." on how I do it. I will say now that this is not the only way but it's how I do it.

This particular bowl is made from Ash and is a small fruit bowl so needs a bigger foot that the 56mm spigot I use so I set out the spigot and then the foot:

P8130026.JPG


Notice the tiny mark in the centre to help re-mounting later.

You may be able to make out that, because the foot is slightly concave, the spigot doesn't take up much wood:

P8130027.JPG


I then flip it and turn the inside:

P8130031.JPG


My method of hollowing the centre of a bowl is probably worth a seperate thread but I use the step method, working from the top down:

P8130029.JPG


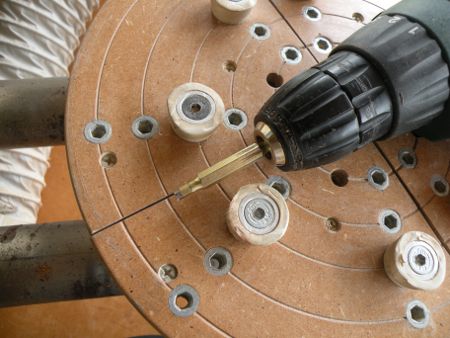
Anyway, I then re-mount the bowl on an MDF disc which is fixed to a faceplate, with a piece of Router Matt to protect the rim and bring the tail centre up into the mark I made earlier:

P8130032.JPG


Close up:

P8130033.JPG


I then cut away the spigot until all that's left is a tiny pip (as small as you dare/feel comfortable with is fine :wink: )

P8130034.JPG


Sand and clean up as usual. In this case by hand as a drill wont fit in the space! And because I'm a turner and I just couldn't resist, I add a couple of rings :oops: :oops: :lol: :lol:

P8130035.JPG


It's then a simple job of removing the pip with a carving gouge or similar:

P8130036.JPG


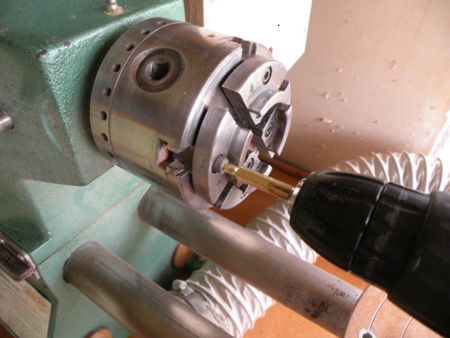
I then sand it with the last grit (400) on the lathe, with a drill chuck in the headstock:

P8130037.JPG


Not enough hands to give an action shot on that one, sorry!! :roll: :oops:

The finished bottom:

P8130038.JPG


And the finished bowl, no finish at this point:

P8130039.JPG


I hope you enjoyed this How To, questions and comments welcome as usual!!

Cheers

Richard
 
Thanks for posting that Richard. I just watched a demo by Bob Chapman at Northumbria Woodturners this morning and his technique is similar to yours.

I must admit I prefer a set of Cole jaws or Longworth Chuck for reverse chucking, but that method certainly is cheap and effective.

Bob also demonstrated his vacuum chuck which is another useful piece of kit.

Regards

Walter
 
Thanks for taking the time Richard, a picture is worth a thousand words as they say.
 
Great "How To", Richard. I normally use home-made Cole Jaws when reversing bowls, but your system would be a lot easier to make and actually looks much faster to use.

When ever I go to use my Cole Jaws, the darned buttons are always in the wrong place, so that's 8 chuck screws I have to undo & do up, plus 8 Cole jaw button screws that also need undoing and doing up.... By which time Richard has probably completed another bowl!!! :D

tekno.mage
 
tekno.mage":1a21x71b said:
...., the darned buttons are always in the wrong place, so that's 8 chuck screws I have to undo & do up, plus 8 Cole jaw button screws that also need undoing and doing up........
tekno.mage

Try a long series Hex drive bit (or a chopped off allen key) in a small cordlesss hand drill/driver with torque rachet.
Just need to be careful with starting not to cross the threads but it speeds up Jaw and button changes no end.

DSCN2055.JPG

DSCN2054.JPG

DSCN2052.JPG


Sorry for the hijack Richard.
 
Haven't tried this yet but rather than use/tie up a faceplate I'm thinking that turning a small piece of mdf (with suitable dust extraction/protection) to fit the normal chuck jaws, and then glueing and screwing to a larger piece like your's Richard, could allow you just to mount the board in your normal chuck and speed it up a little bit more and free up a faceplate ?

Will give that a go soon I think and see how it goes. Will have less bearing surface than a faceplate but if I make it for the larger of my two chucks and to fit the large jaws I normally use with that it should hopefully be okay.

How best to attach the router mat, doublesided tape or copydex or similar I wonder ?

I have a set of cole jaws for my small vicmarc chuck but never use them as I can't be bothered fiddling around changing the jaws over and I use that chuck too much to leave them on permanently.

Cheers, Paul :D
 
CHJ":1rpwttbg said:
Try a long series Hex drive bit (or a chopped off allen key) in a small cordlesss hand drill/driver with torque rachet.
Just need to be careful with starting not to cross the threads but it speeds up Jaw and button changes no end.

Now that's a good idea.. Especially as I have a small makita drill beside the lathe for power sanding :D Obvious when someone else points it out to you!!!!

tekno.mage
 
paulm":5iz2hl2k said:
.....I'm thinking that turning a small piece of mdf (with suitable dust extraction/protection) to fit the normal chuck jaws, and then glueing and screwing to a larger piece like your's Richard, could allow you just to mount the board in your normal chuck and speed it up a little bit more and free up a faceplate ? Cheers, Paul

Paul, instead of using MDF for the chuck jaw mounting ring I would suggest you use some sound Beech or Oak, be far more durable than MDF, agree MDF fine for the plate though.
I have several such mountings on the back of discs and even my Longworth Chuck to speed things up and avoid having to remove the chuck.
 
Good idea Chas, probably longer lasting to use a hardwood spigot.

Interested in hearing more about the stepped hollowing approach Richard if and when you get the time, haven't come across that before and not sure of the benefits, although perhaps they might include rechucking ability and keeping the piece more in balance and stable while hollowing ?

Cheers, Paul :D
 
Thanks for your comments guys. Glad you enjoyed it/found it useful.

The router matt is just lose, sandwiched between the bowl and the MDF. As you say, you don't have to use MDF on a faceplate. Some sort of disc on the chuck would be fine. In fact, if I make a thinner bowl where I'm not happy about putting so much pressure entirely on the rim I would turn up a smaller dome to fit inside the bowl which puts the support right behind the running centre.

I have also got a set of homemade Cole Jaws but like you I got fed up of moving the rubber bungs around so I stick with the above method.

I will do another post re: hollowing a bowl, possibly tomorrow.

Cheers

Richard

P.s, I like the way Bob Chapman works, I've found we share a lot of the same techniques and he even grinds his bowl gouge to the same sort of profile as me!!
 
Richard Findley":25k6fizb said:
.....
I have also got a set of homemade Cole Jaws but like you I got fed up of moving the rubber bungs around so I stick with the above method.....
One thing that helps on the Cole Jaw front is if you can acquire a 125mm (5") Chuck.
The extra travel you get with the jaws means that most of those niggling instances of your bowl being an in-between size don't occur and each button position gives you a bigger range to cover similar sized pieces.

But I agree the plain MDF disc wins hands down on the cost front if you can't locate a bargain basement chuck and also on time if you have to change the chuck for a one-off piece.
 
Hi Richard

I hope you are well and keeping busy.

Good thread and it was nice to see your method not because I do it the same way as it is much quicker and easier than cole jaws but it is great to see methods being used and shown that dispel the myth that people have to rush out and pay vast sums of money for the latest jaw set or gadget.

There is no doubt that when I started full time and speed and money come into the equation for the end product the simplest method is normally the best.
 

Latest posts

Back
Top