Bending hardened A2 steel

UKworkshop.co.uk

Help Support UKworkshop.co.uk:

This site may earn a commission from merchant affiliate links, including eBay, Amazon, and others.

Eric The Viking

Established Member
Joined
19 Jan 2010
Messages
6,599
Reaction score
74
Location
Bristle, CUBA (the County that Used to Be Avon)
Heeeelp!

I can't go into detail, as it really needs pictures, but does anyone know if it's possible to soften and bend A2 steel that's been hardened and tempered.

I've a chisel-type plane iron I need to put a slight bend in, about 1" back from the edge (on the narrow bit). It seems to be tough as old boots, and the whole thing seems to be hardened and tempered, rather than just the pointy end. I don't want to just start cooking it up as I'll destroy both edge and temper (and probably my own temper too!).

So if someone has an idea how to soften, harden and re-temper it I'll have a go. I've done it successfully with tool steel, but I realise this is rather different!

Any thoughts?
 
I would have though that you could anneal it to take out the temper by heating to red and holding it there for a couple of mins then allow to cool slowly.

Once you have bent it re-harden and temper

Jason
 
If you anneal the steel, how will you harden and temper it? A2 = air hardened steel.

I stick to modifying O1 steel in the workshop.

Regards from Perth

Derek

It's not exactly by choice.

After much fiddling about, I've finally realised that the #92 I wrote about earlier has its geometry/design very wrong.

In particular, the plane iron upper surface becomes concave in use (caused by the set screw of the cap iron pushing on it!). This lifts the cutting edge away from the back edge of the mouth, and causes chatter and surprisingly poor cutting. I've filed and scraped the back of the 'frog' down as much as I dare, but it's a low angle plane, and quite small and consequently there isn't much metal to work with. There were other machining faults on components, causing poor geometry, and fixing these by grinding them square takes off metal and makes the first problem worse too.

The best solution, as a practical move to get it working properly, would be a bend in the plane iron, in the thinner part just behind the 'shoulders' where it widens to full width, pointing the edge down by about three degrees (possibly even less -- it doesn't need to be much). It would then bear on the edge of the mouth properly, and not chatter and be properly square to the sides.

My #90 came with a blade bent in this way, so that tightening up the cap screw reduces chatter. Derek, I know you have a few of these older Stanleys: is that bent iron a feature common to all of them - the #90, #92& #93s that you have?

Right now, the setup of this 'premium' #92 gets worse as you tighten things up. At a guess, the sharp end of the blade rings like a tuning fork in use. It's rough on softwood and horrible on hardwood, unless you're almost parallel with the grain, in which case it's basically acting like a miniature splitting axe!

I'm contemplating trying eBay for an old #92 iron to put in . That'll just be O-something or W- tool steel, which I can bend, and re harden+temper.

It's a shame as the A2 blade supplied is the best thing about the plane - it's obviously well ground (although now slightly nicked where it's abruptly 'discovered' the sliding nose of the thing!), but I'm struggling to find a way to make it work properly.

I know I was advised just to send it back. Next time I"ll pay heed!

. . .

So to come back to bending/hardening/quenching/annealing, etc.: I've read the Wikipedia entry on Tool steels and Mushet steel.

I assume one reason for air quenching is to avoid the extreme initial thermal shock of oil or water. I wonder if a warm oil bath might work? With a couple of MAPP gas burners I can (theoretically) heat just the middle of the steel, and keep the edge reasonably cool, so I might manage not to destroy the working hardness/temper. It also occurs to me that I might bend it even further back. The bend on the #90 one is near the front, but in this case it doesn't have to be.

I've also used Mole grips and copper pieces clamped on as a heatsink. This works, but much depends on how low the tempering temperature is for A2 - I could still anneal the edge by accident, as it's a far from perfect solution.

I don't want to do this really (it's hard enough doing the process at home with less demanding steels!), but if I can find a way of putting a bend in the blade, so I can use it with the plane, I'd like to try.

Cheers,
 
A2 sounds like a bit of a nightmare - from what I've read about blades being 64r - that's too hard, that's too brittle.
And now I hear it's air hardening .... this isn't something you can play around with like a respectable, clean-living English tool steel.
Air hardening steels are used for bits and peices that need to stay hard even though they get hot - blacksmith cutting tools especially - and I can't see the point of making tools like chisles/plane irons from AHS except they can be stamped out hot with no further heat treatment to save time, no skill required ?
Trying to imagine your plane E the V, even if you could successfully bend an iron the right ammount and re harden it uniformly, I can't imagine it being very solid. A normal tool steel would behave like an over-hard spring, and something that was 64r would be brittle and maybe break under pressure. Also the top of the bend would move foreward with wear..
I know it might sound naff (and is) but wouldn't a better plan be to attempt to fill the blade bed concave with something you could sand down flush, like araldite ?
I may have imagined your plight completely wrong - if so, ignore all of the above.
RT
 
aha, I re read, I see, me dumpkoff - the blade bed becomes concave with downward locking pressure.
(caused by the set screw of the cap iron pushing on it!)
Without pictures I can only guess but shouldn't the cap iron be applying the pressure rather than a set screw?
 
Is there an alternative solution by shimming? A trad method was a little bit of leather - but you could maybe get by with a bit of insulating tape or similar, just to provide a different point of support for the blade.
 
Richard T":3ljwsulv said:
aha, I re read, I see, me dumpkoff - the blade bed becomes concave with downward locking pressure.
(caused by the set screw of the cap iron pushing on it!)
Without pictures I can only guess but shouldn't the cap iron be applying the pressure rather than a set screw?

I started a drawing last night, but TBH I'm up to my neck in DIY tasks today.

You're right, sort-of. Think of the cap iron as an upside-down see-saw. The cap screw should push the other end down to clamp the blade against the frog. But this is where the poor design and manufacture have got me: The sliding block at the back is well behind where the cap screw bears on the plane iron, and the front of the cap iron is too far back (in other words, the cap iron is too short). So both ends of the cap iron push down on the middle part of the blade.

Couple this with an incorrectly ground frog, such that it's high at the back, and the back edge of the frog becomes a fulcrum on which the iron can pivot. It's pushed down behind, and the cutting edge of the blade levers up and away from the mouth. The more pressure you put on with the cap iron, the worse it gets.

So the bodges applied are as follows:

1. grind back the back of the frog to a shallower angle, such that the blade only touches it at the front edge. This makes it rather thin, IMHO, but certainly helps.

2. The sliding block for plane iron projecction is *very* out of square with the sides. It has to be true, but making it so inevitably lowers the back of the plane iron - the opposite of what's needed. So I"m going to try shimming under the block, on its slide-ways, to lift it slightly. I'll probably try cutting up a Stanley knife blade to fit (oh the irony!), as I've got a mini diamond saw for the Proxxon. 1/2mm might do it, but I've no idea how to stop it coming loose - super-glue possibly.

3. Finally, if I can put a bend in the blade in a controlled way, it will arch up, and cap-iron pressure will push it flat, rather than concave on top.

I"m running out of metal in the various machinings, with all the squaring-up etc., hence the original question. If I get a moment tonight I'll finish that drawing and post it up...
 
I just re-read this and realised you are talking about the 92 plane in your review - I'm sure a little sliver of aluminium (eg from an empty beer can if you can find one...) would make the effective shape of the back of the blade into the curve you want.
 
AndyT":3e7vuw4j said:
I just re-read this and realised you are talking about the 92 plane in your review - I'm sure a little sliver of aluminium (eg from an empty beer can if you can find one...) would make the effective shape of the back of the blade into the curve you want.

That is a very good idea indeed!

Later (he said with a big grin!)...
 
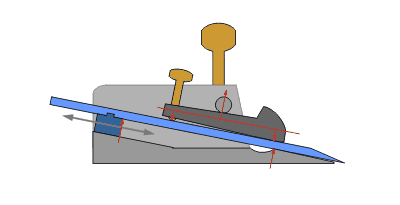
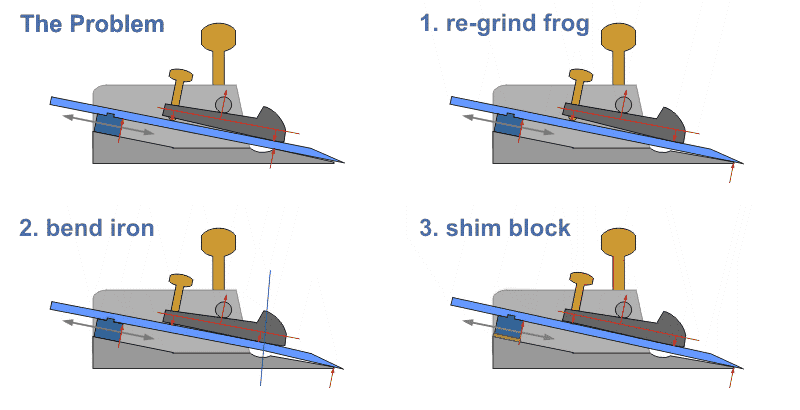
Right! Sorted an animation out (at the end of this post), so that you can easily see the differences in the setup. The images change after about 10 secs and it cycles, so you'll see the images in order, eventually.

. . .

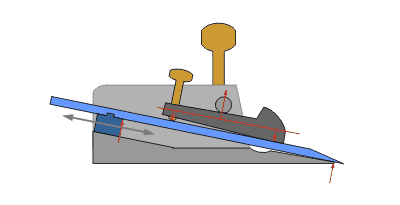
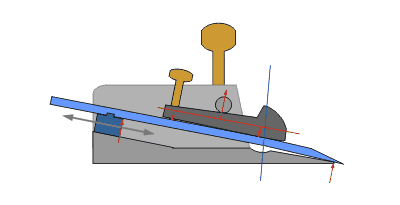
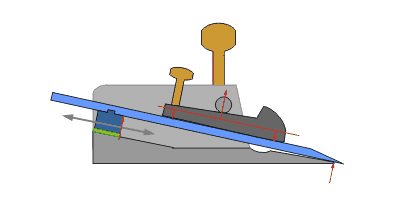
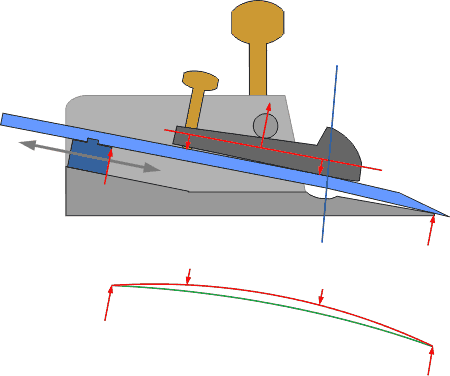
The red arrows show where the points of contact are, and the red line is to help give an idea of the forces on the blade. I've tried to get the dimensions in proportion to the real thing as much as possible. I've omitted the adjuster screw and its anchor point for clarity, also the other notches in the blade. The nose contributes nothing to this issue, so I couldn't be bothered to draw it!

4549939475_c3ab816bae_o.gif


The problem: you can see (I hope!) that the blade is only supported at the back of the frog. This means it can vibrate (chatter) at the front when cutting, like a clarinet reed. The effect is roughness and possibly digging in. It's partly because the cap iron can't apply pressure in the right place, because of the long front bevel. you can see too that tightening the cap iron screw makes matters worse, by causing it to bend downwards in the middle, lifting the cutting edge further.

4550578412_f8861c2790_o.gif


Fix #1 is to re-grind the frog to a lower angle. This closes up the gap under the iron. It doesn't help the cap screw issue though.

4549939513_8f04bfaed8_o.gif


Fix #2 is to bend the plane iron, just behind where the cap iron bears on it. The blue line in the diagram shows the point of the bend. This makes a rough arch (see below), and although the cap iron will flatten it, the blade now pivots on the front of the frog, and doesn't open up a gap.

4549939535_aed4ef088b_o.gif


Fix #3 is Andy T's idea, to put a shim under the adjuster block. This will also help hugely, as it tips the iron forwards and moves the contact point to the front of the mouth. I'm going to try this today, as it's very quick to do, reversible, and doesn't damage anything if I mess it up!

The other reason I like Andy T's idea is I've been forced to thin the adjuster block already, for this reason:

4550555964_d64b8ef758_o.gif


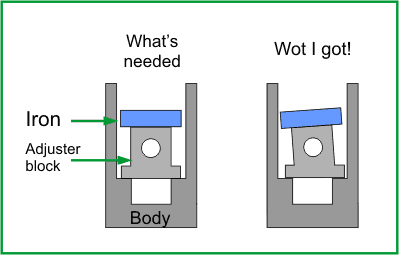
The frog was also out of true (wedge-shaped, sideways!), and initially I couldn't understand why truing it up still left the blade projection squiffy. The adjuster block is such an easy thing to machine (it should be square and requires no odd angles at all), that it never occurred to me that they cocked this up too. It was HUGELY out of true - about 10 degrees.

Grinding it straight reduces its height, of course, so shimming is good!

And finally...

4549883547_cbffa6ba8b_o.gif


The image above shows what I mean about making an arch with an intentionally bent blade. As the cap iron pressure increases, it flattens, but the points of contact don't change (much). You can really lock down the cap iron without upsetting the geometry.

. . .

There are a couple of givens in this: that the actual angle of attack isn't critical (within, say, a couple of degrees either way), and that I can get the cap iron to behave properly.

Right now the bottom surface of the cap iron is concave at the front, which applies maximum pressure to the front of the blade, but limits the leverage and control available from the cap screw (it's not currently shaped as drawn, but the distances between pressure points are correct: it is almost an even see-saw). I think what's needed is a gentle convex curve at the front end of the cap iron. The #90 has this, and it rolls on the blade, applying good clamping force and allowing a lot of control with the cap screw.

4549965223_85514133de_o.gif


Do I regret buying it? A bit, if I'm honest. But I've learned a huge amount so far about steels and plane geometry, and now I am resolved to beat this thing into submission!

Can I recommend one to anyone else - I'll leave you to guess [-X
 
I'm glad you've got it working right!

And along the way you have given one of the clearest explanations of what really makes up good quality in a plane. There is almost nothing in the established good designs that isn't there for a good reason. Copies made by people who don't understand those reasons will be disappointing. I guess it's surprising that Stanley could appear to be making an effort with this new range, but actually get it so far short.
 
Back
Top