Bench Design - Please do a critique

UKworkshop.co.uk

Help Support UKworkshop.co.uk:

This site may earn a commission from merchant affiliate links, including eBay, Amazon, and others.
The material is andira which is the left over from an exterior timber cladding project i worked on. Yes its a full width planing stop. Just for decoration as it doesnt need to be full width. Its rag bolted in place with a treaded end M8 or 10 can't recall now. Wing nuts are temporary until i make some propper knobs to use. I use a lot of power tools, so i don't use extensively to plane down timber as i have a P/T machine. But its effective for what i use it for. it could easily be improved with another bolt.
 
The bench looks great. For £40 it's exceptional.

Please forgive the stupid question but what is racking?
 
Racking - if the front and back of the vice were perfectly parallel,when something was put in it a pivot would be created as the screw below it was tightened, and the vice would only touch the item at the bottom. By making the faces out of parallel in the first place, the screw then tightens the vice onto the item with the pivot on the top edge, the faces pull back to being parallel because the screw is below them, thereby holding the top and bottom, not just the bottom. It doesn't matter that the faces aren't parallel when the vice is loose, as long as it pulls tight parallel.
 
quote " The challenge was to build a cheap bench. The screws came from the from axmister York versions as linked earlier in thread. It does exactly what i need it to do. i did look at the Veritas and metal versions which address racking, but i thought these were too expensive for what i wanted. I'm just a weekend DIY'er. " Quote

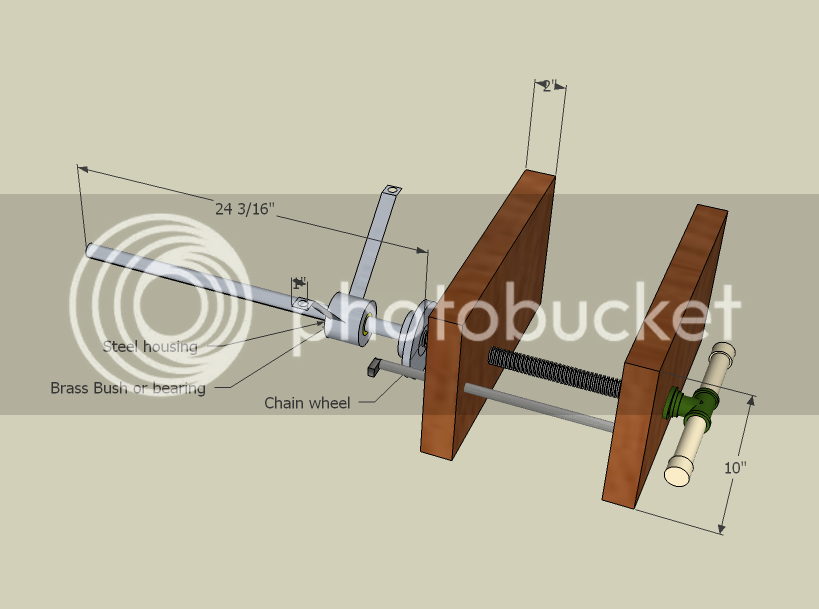
I am using the same York screws to make a twin screw vice in a new bench build. Man are they thick and indestrucible !! I will be using a metal side bar to stop racking running in a brass sleeve and I might use my metal lathe to put some needle bearings in the front shaft housing to take out the slack in the york screw boss, where the handle fits.

ShoulderViseScrewmod2_zps4481ed94.png
 
DM,
I'm on the hunt for a metal lathe, but no luck yet, as someone who first learned metalwork not woodwork, if i had the kit, i think i probably would do the same. I must admit if you can reduce/omit racking, then that is definately the way to go. I did see this drawing that you posted, does the screw slide down the steel housing. thus it can't rack as its inside a steel tube?
I might PM you for the drawing if you don't mind?
 
kinsella":3oh7fiw3 said:
DM,
I'm on the hunt for a metal lathe, but no luck yet, as someone who first learned metalwork not woodwork, if i had the kit, i think i probably would do the same. I must admit if you can reduce/omit racking, then that is definately the way to go. I did see this drawing that you posted, does the screw slide down the steel housing. thus it can't rack as its inside a steel tube?
I might PM you for the drawing if you don't mind?

Hi
the end of the screw is turned and fitted inside a thick walled tube and pinned, the steel tube fits inside the brass bush in the mount, which is fixed to the underside of the bench. So when the vice moves the rod slides in the housing, eliminating rack on the screw. To stop racking on the outer face, a bar or tube is fitted each end and that runs in a housing behind the side of the bench. I haven't measured up to see if its possible, but if it is, I will also fit some needle bearings to the screw shaft, for the outer cast fixing to run on. Giving a tight fit, but easy rotation. Again eliminating rack on the vice chop. Belt and braces you might say. Do you have sketchup, I can let you have the full 3d model or if not you can have a few 2d pictures from different angles. PM me.
 
Latest progess, sliding deadman finished, dogs now complete, a few glueing up with leather patches on the clamping surface. Bench now in use. Finally some under storage to start.
 

Attachments

  • IMG_3411.JPG
    IMG_3411.JPG
    116.1 KB
  • IMG_3412.JPG
    IMG_3412.JPG
    118.5 KB
you may have covered this, but what are the star handles on the end for?
 
It's a full width planing stop. It's full width for decoration more than practicality. The knobs clamp the stop to the end, as the is a threaded inset in the end.
 
Update. Memo to self, don't weld on your newly completed timber work bench. Never mind, planed another 3mm off the top to fix. How i ever managed without one of these i'll never know. I'm using every bit. Bench hooks, tail vice, front vice, dogs, planing stop. If i was to change anything, i think i'll add more holes in the bench for the bench hooks.

Ripping large board by hand with a proper Diston rip saw.
 

Attachments

  • IMG_4254.JPG
    IMG_4254.JPG
    59.1 KB
kinsella":xk7866jo said:
Latest progess, sliding deadman finished, dogs now complete, a few glueing up with leather patches on the clamping surface. Bench now in use. Finally some under storage to start.

Sorry to necro an old thread but...

Dunno If you're still on the forum Kisella, but if you are I'm curious about your wheel attachments on your bench, as I need to be able to move mine about too, then plant it firmly on its leg bases in use.

Looks like they are on some 2 x 2's with a piano hinge, but how do you make them stay down to move the bench; through bolt pins or some other device?

Great bench by the way, got some good ideas from it.
 
See attached the photos. Without the wheels my workshop would be unworkable. I have everything on wheels and i end up doing a waltz as its only a garage size. See attached the photos. The wheels are fixed to a batten, which is hinged and then the timber flap acts as a support. To move you lift the bench, kick the timber flap, wheels fall down. To enagage you lift and gravit drops the flap down again. Perfect! :)
 

Attachments

  • IMG_3024.JPG
    IMG_3024.JPG
    20.2 KB
  • Workbench June 2012-rev3.jpg
    Workbench June 2012-rev3.jpg
    9.3 KB
kinsella":3oyrvsj4 said:
See attached the photos. Without the wheels my workshop would be unworkable. I have everything on wheels and i end up doing a waltz as its only a garage size. See attached the photos. The wheels are fixed to a batten, which is hinged and then the timber flap acts as a support. To move you lift the bench, kick the timber flap, wheels fall down. To enagage you lift and gravit drops the flap down again. Perfect! :)

Sorry for late reply - I'd forgotten about this question :oops:. but... I'm being thick - I don't get it.. I was thinking of something similar, but I can't decipher your wording :S

Any chance you could enlarge those photo's please?
 
You can only move one thing at a time so it could be simpler to get just one set of wheels - a pallet truck. Not cheap but very powerful and come in all shapes and sizes. e.g.

AC25(4).gif
 
aha i see ty.

That Matthias doesn't half have some good ideas.

Pallet truck wouldn't be practical for the few feet I will need to move my bench. - A good sized workshop to make space for large jobs... sure.
 
Back
Top