Beading with Multiplane - work holding question

UKworkshop.co.uk

Help Support UKworkshop.co.uk:

This site may earn a commission from merchant affiliate links, including eBay, Amazon, and others.

aesmith

Established Member
Joined
31 May 2006
Messages
271
Reaction score
21
Location
Aberdeenshire
Hi,

I'm making up some internal trim for round hatchways in the house. The trim will be 50mm wide by 9mm thick, and the parts are 500 or 600mm long at the moment before cutting to exact size. I want to run a bead along one edge, then the other edge will be rounded over. I've been practising on some offcuts, but I'm struggling to work out how to hold the work and still allow clearance for the plane to run past. I have the normal DIY options available, conventional woodworking vice, B&D workmate and various clamps. And ideas or suggestions welcome. I normally don't need to clamp the work at all when I'm using a bench plane, just set it on the bench against the stop. Obviously that won't work in this case, but I'm struggling. Any suggestions welcome.

Thanks, Tony S
 
Work on the edge of a plank, then cut off to thickness.
In your case, start with a plank 50mm wide, 700mm long, but 200-250mm deep.
Grip on edge, in vice, high enough to allow the fence to run along unhindered.
Only when the moulding is done, do you cut off to 9mm thick.
Repeat as many times as required, plus at least 2 spare lengths.

Bod
 
Hello,

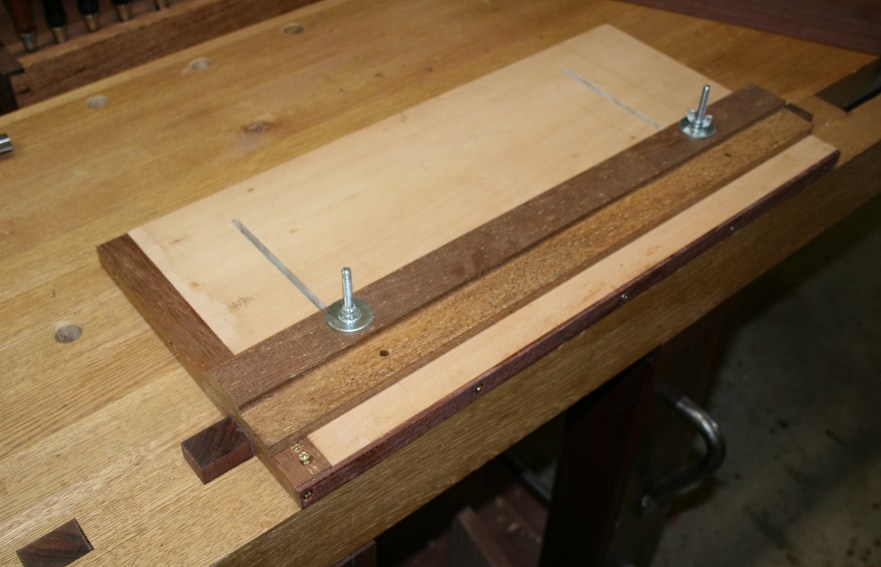
A sticking board is what you need. Basically a board a bit longer than your work, with a fence running the length of it to hold the work from moving sideways under planing pressure and a stop to prevent forward movement of the work. A batten nailed underneath to fit into your workmate or bench vice. Just google sticking board and you'll get plenty of ideas, if my description is lacking.

Mike.
 
I built an adjustable sticking board for this ..

http://www.inthewoodshop.com/ShopMadeTo ... Board.html

AdjustableStickingBoard_html_6e549f5a.jpg


Regards from Perth

Derek
 
woodbrains":1pnqxeub said:
A sticking board is what you need. ...
Thanks, that was exactly the nudge I needed to get thinking in the right direction. I was at a loss earlier, and even thinking about doing it on the router (not that I have a cutter at the moment).

Good suggestion from Bod as well, except that I don't have stock of that sort of size to hand. Turning the suggestion around, if I hadn't already cut the components down to width, I could have nailed down the side opposite the bead, then cut to width afterwards. I'll maybe do it that way next time.
 
If you haven't cut to length yet, and the pieces are long enough to sacrifice a bit off the end, then a panel pin through the end, driven below the surface, may be enough to hold the stock? A proper sticking board is ideal for shorter lengths, but doesn't seem to work for me with stock much over a metre.
 
Cheers. They're not to length yet, although one hasn't got much spare. However they're going to be mitred with the bead on the outside, so there's a bit of waste in any case, so long as I don't lose the place and forget which way round the mitre's being cut.
 
xy mosian":39yzllgg said:
If you are going to pine the mouldings in place, an extra hole won't matter too much.
xy
True enough, and it's going to be a painted finish in any case.
 
Thanks everyone. Sticking board works for me, although I've only practised on scrap not yet on the real components. However I must be going bonkers, the reason I didn't remember having these issues last time was because I wasn't even using the combi plane, I was using a home made beading plane that doesn't need the same sort of clearances but just runs along a batten clamped on top of the work. I can't believe I'd forgotten about that. It doesn't work very well so will be sticking with the combi for this job.
 
aesmith":3hxuo5lt said:
Hi,

I'm making up some internal trim for round hatchways in the house. The trim will be 50mm wide by 9mm thick, and the parts are 500 or 600mm long at the moment before cutting to exact size. I want to run a bead along one edge, then the other edge will be rounded over. I've been practising on some offcuts, but I'm struggling to work out how to hold the work and still allow clearance for the plane to run past. I have the normal DIY options available, conventional woodworking vice, B&D workmate and various clamps. And ideas or suggestions welcome. I normally don't need to clamp the work at all when I'm using a bench plane, just set it on the bench against the stop. Obviously that won't work in this case, but I'm struggling. Any suggestions welcome.

Thanks, Tony S

DickM, above, is correct: Leave workpiece over-length. Nail it to your workbench in what will be the scrap with a finish nail (love softwood workbench tops!). A portion will need to overhang the workbench edge, obviously, so the plane can run. Punch the nail slightly below the surface. Run the bead. Gently pry the workpiece off the top -- you should be able to wriggle it up by hand. Saw off the waste which contains the nail holes. Continue with project.

Shaped pieces are always run on overlength stock anyway so that the ends can be sawn off, with the result hopefully being a very neat and clean shaping left. Problems with beads and moulded edges are almost always at the start and finish of the cut, hence the advice to run them on long pieces and trim both ends to size.

If you need narrow, moulded workpieces run them on wider stock and then rip the moulded piece off the wider (and over-length) piece.

Unless for some reason it is absolutely unavoidable, never cut a piece to finished length before running your profile - machine or by hand, doesn't matter.

There are a few circumstances where a sticking board has to be used but this isn't one of them, especially given the length of the workpiece.

The other alternative is to hot-melt a piece of scrap on the hidden side and then clamp it in your front vise. Chisel it off when you're done. If you use the right glue a blow or two with a hammer would actually probably release it very cleanly. You can also glue a piece on with a brown Kraft paper backing and chisel it off when you're done (like making half-turnings).
 
Although my bench is old and battered, it has a solid beech top which I don't feel like nailing stuff directly onto. I did think now and again about making a sacrificial top surface, but that might be better on a different bench.
 
aesmith":3u6z8c6x said:
Although my bench is old and battered, it has a solid beech top which I don't feel like nailing stuff directly onto. I did think now and again about making a sacrificial top surface, but that might be better on a different bench.

That's not a problem, nail it into the work surface you use when applying finishes and paints.

Having a precious benchtop (nothing wrong with it!) makes one long for one more suitable for rough treatment. I'm pressed for space so my main bench top sees all sorts of nails, paints, etc. An occasional scraping and sanding keeps it smooth and it's softer than most species I use for projects and therefore less apt to cause a dent if something is trapped between a workpiece and the top. See how I just cleverly justified a really crappy bench? :)

Google 'Art Espenet Carpenter' and take a look at his bench. Mine's getting there. Wish my work was.
 
Hello,

A sticking board, in reality, is a false bench top for banging nails into. Save your bench top and make a sticking board from scrap. You can mould as long as you like, since you start the moulding from the furthest end and work backwards. It is easy to advance long mouldings forward as you complete a section. I've made 10 foot long mouldings on a 3 foot sticking board. It is how it is done. Joiners nail things to benches and replace the tops often. Furniture makers never abuse their bench tops and it lasts their entire life. And their kids.

Mike.
 
Funny, isn't it, that the project the OP is working on is of a joinery nature.

Nail away!

Given room, one rarely regrets having an additional bench to nail into, paint on top of, run sanders and routers on, draw on, nail battens to, swing a radius on, Just generally let it all hang out without worry. Mine has a lawnmower sitting on it at the moment. Love it.

Save the show bench for clients. Squirrel the real one away in an adjacent room, or throw a drop cloth over it when expecting guests.
 
Hello,

He said he doesn't want to use nails! Joiners have made millions of feet of sash mould, staff bead, astragal etc. etc. with sticking boards. I have 2 benches and would rather put nails in my head than ruin what I've made, for the sake of a sacrificial board. It is good sense, especially in these days of limited resources, to conserve what we already have.


Mike.
 
These pristine, lone bench tops are largely a modern, hobbyist phenomenon as far as I can tell. I agree that people usually didn't put nails in their fine benches but other work surfaces were available that saw much more robust usage -- assembly tables, finishing tables, etc. Tails didn't tend to wag dogs.

A few people in this thread have advised leaving the board long and nailing it down. If the OP uses one bench for everything- painting, finishing, assembly, machining operations, etc. then one would assume he already has a strategy to protect the top and it should be employed here.

If all I had was a fine bench (perish the thought!) I'd nail the job to a piece of 1x12 whitewood a few feet longer than the longest workpiece I needed to mould and then clamp that to my fine bench. Under no circumstance would I run the moulding on already cut to finished length stuff unless for some reason it absolutely could not be avoided. And in a circumstance like this workholding really becomes paramount as the profile has to start and finish perfectly.

Otherwise, there's the Art Carpenter approach:

http://www.finewoodworking.com/FWNPDFFree/011037062.pdf
 
CStanford":2tau8idw said:
Given room, one rarely regrets having an additional bench to nail into, paint on top of, run sanders and routers on, draw on, nail battens to, swing a radius on,

Indeed. Given room.

BugBear
 
I had a great bench, one with a terrific maple top. At that time it was the only work surface I had. It drove me batty worrying about it. I discovered an inevitable truth -- one needs to do much, much more on a bench than plane wood and cut fine joints.

In essence it became a plywood workbench because I always had a sheet on top of it to 'protect' it.
 
woodbrains":1i3f0b4k said:
Hello,

A sticking board, in reality, is a false bench top for banging nails into. Save your bench top and make a sticking board from scrap. You can mould as long as you like, since you start the moulding from the furthest end and work backwards. It is easy to advance long mouldings forward as you complete a section. I've made 10 foot long mouldings on a 3 foot sticking board. It is how it is done.

Mike.

All the sticking boards I've seen have some kind of end stop. This means that you cannot work pieces longer than the board (George Ellis mentions sticking boards being as long as 9 feet, for this reason).

Link to sample sticking board with end stop

Your device sounds slightly different (no bad thing) to what's normally call a sticking board. Could you describe it?

BugBear
 

Latest posts

Back
Top