Bandsaw fettling

UKworkshop.co.uk

Help Support UKworkshop.co.uk:

This site may earn a commission from merchant affiliate links, including eBay, Amazon, and others.
woodbrains":1abhnd81 said:
Can't you shim one of the mounting bolts of the blade guide post, to bring it parallel to the blade? I'm not familiar with your particular machine, but I should think a thin washer between the BS case and the blade guide mounting plate would do the trick.

I think this is exactly what would correct the issue, but I won't jump the gun and do it in the first few days. Thanks.
 
Check out the manual first so you can identify the parts then have a look at the rise and fall mechanism. It may be loose or incorrectly mounted or even have a loose cover. Any of these things could cause your problem. Ultimately it may need removing from the machine and checking but if it's a new machine you may prefer to have someone from Record to do this to preserve your warranty.
 
I've had a play today and either my 10mm guess was way off or things aren't as bad as they were after levelling the whole saw and fettling things a bit. More like 4 or 5mm maybe now.

I still have to pull the guides and thrust out of the way if I want to change the height more than say 50% of its full travel but I can probably live with that. If I set it all up nicely near full height, then wind it down, the guides end up not close enough to the blade gullet and the thrust bearing not close enough to the back of the blade.

The whole rise and fall is loose until it's tightened into a position but I don't know if that's normal. The guide post is clearly not perfectly perpendicular to the blade and I've found a few articles which talk about this specifically, saying you can live with it but you shouldn't have to etc.

Here's a quote from "American Woodworker" just in case anyone still wasn't sure what the exact issue is:

"On a well-tuned saw, the guide post runs parallel to the blade. When you raise or lower the guidepost to accommodate material of different thickness, the blade guides and thrust bearing are always in the correct position relative to the blade. If the guide post doesn’t run parallel to the blade, you’ll have to readjust the positions of the side guides and thrust bearing each time you move the guidepost up or down to saw wood of different thickness. That’s a situation you can live with, but you don’t have to."

Thanks all.
 
The guide post on my BS300E is a bit wobbly as well until it's locked in place. It's not exactly a piece of precision engineering but rather built to a price we can afford. I've checked the post on my machine and once locked there is a difference of about half a mm difference between the upper and lower positions. I suggest your 4 or 5 mm is too much and should be eliminated or at least reduced to something much smaller. I'm wondering if there is some swarf or excess paint around the mechanism? As a quick fix you could try undoing the four mounting bolts on the outside of the machine a little, shake the post a bit and then re tighten the bolts. Can't help thinking this is likely to be something quite simple in the end.
 
Hi Pike, I do suggest that you speak with Record before trying anything radical, so that you can get their assurance to take action before they make an inspection. You should not have that much difference, so something is wrong and Record would be happy to make sure YOU are happy with your purchase and not get fed up and send iot back in a year or so.

Alex
 
woodpig":wiv3vtfr said:
The guide post on my BS300E is a bit wobbly as well until it's locked in place. It's not exactly a piece of precision engineering but rather built to a price we can afford. I've checked the post on my machine and once locked there is a difference of about half a mm difference between the upper and lower positions. I suggest your 4 or 5 mm is too much and should be eliminated or at least reduced to something much smaller. I'm wondering if there is some swarf or excess paint around the mechanism? As a quick fix you could try undoing the four mounting bolts on the outside of the machine a little, shake the post a bit and then re tighten the bolts. Can't help thinking this is likely to be something quite simple in the end.

I agree. However I won't do too much if anything before I hear back from Record (as Alex said). Thanks for the suggestions.
 
Good news. Record have replied and pointed out that there are grub screws on the rise and fall guidepost for adjustment. I'm really pleased that is the case. You just loosen the bolts holding it all to the frame, then make the grubs push out a bit if needed. I have started to make the adjustment but haven't finished as it was just my lunch break. Will confirm it sorts it out asap.
 
Always like to find out new things and I hadn't known about that grub screw.

I have just been out to check for mine but cannot see it. Can you explain or post a photo of it's location please. It must be that mine is set correctly as I have not had the problem that Pike has had

Alex
 
Carl
Sorry it's taken me so long to chip in, but I have been away for the weekend. Your DVD is in the post box, you should get it tomorrow.

I realise that you are probably fixed up now, but just in case anyone else finds this thread in the future:

The blade guide needs to move in the same direction as the blade if you are to eliminate this discrepancy. On cheaper machines, there is no adjustment, the guide just slides around a couple of rivets. But if you have a grub screw, use it.

The reason it may not be the same for all blades is that you may find that to get the blade tracking perfectly for zero drift, it is running on slightly different parts of the curve on the upper and lower wheels. If that is the case, the blade itself will not be vertical, front to back, so the guide supports to be out by the same amount. It's not a fault, it's just getting everything to sing from the same hymn sheet.

As to where the blade should ride on the top wheel:
The blade is in tension and hugs the wheel. The wheel is usually curved, but even with a flat wheel, it behaves as if it is curved because it is tilted. You will see that in the video I explain it down the pub. Any excuse, eh? Once you understand why the angle of the wheel affects the angle of cut, it will make perfect sense and you will not need to get hung up on where it is riding, it's how it behaves that counts. It's just that for most of us, using most blades on most bandsaws, having the gullet somewhere near the centre, as opposed to hanging off the front edge, allows us to cut in a straight line without skewing the rip fence (which screws up any kind of cross-cutting operation) or twisting the whole table (easy on Mr Snodgrass's BS, even though he glosses over it, but very difficult, to the point of being impractical, on mine, and indeed, on most European BSs). Fortunately, once you do everything in the right order, it is easy to eliminate drift without having to rebuild your BS...

You'll soon be singing.
 
Cheers Steve. Everything you've just said makes perfect sense. Look forward to more words of wisdom when the DVD arrives :)

Now that I understand a bit more about blade/guidepost alignment (and particularly that my bandsaw has grubs for adjusting), I'm happy.

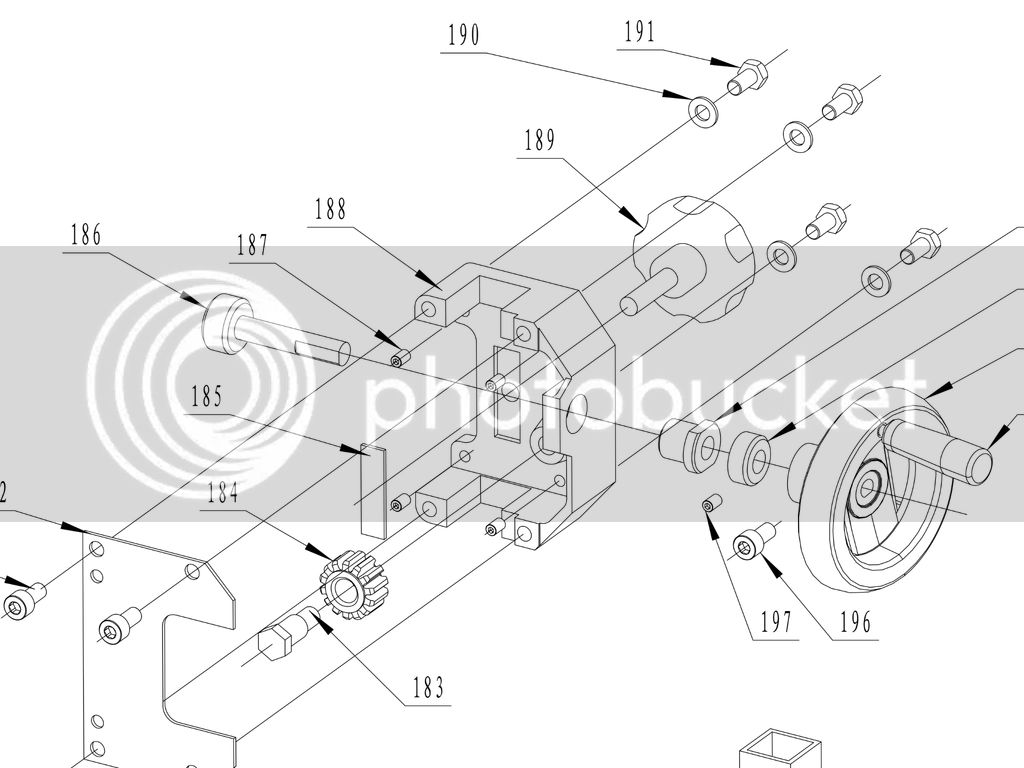
Alex, if you look at the guidepost housing where the cogs are. The four little grub screws are actually in each corner of the back plate of that. There are holes to reach them through the front cover. They take a small allen key. So that if you turn them they will try to push against the bandsaw case (changing the front to back alignment), which is why you have to loosen the outside bolts which fix the whole assembly first, then tighten again when done.

Of course I'm not saying anyone should do this without talking to the manufacturer first. You could end up making things worse. It's great to see they included the adjusting grubs on this model though.
 
Alexam":358sq1y7 said:
Always like to find out new things and I hadn't known about that grub screw.

I have just been out to check for mine but cannot see it. Can you explain or post a photo of it's location please. It must be that mine is set correctly as I have not had the problem that Pike has had

Alex


Here you go mate, item number 187. There are four of them, the two on the left are accessed through a couple of holes in the cover plate. The two on the right can be seen to the right of the cover.

5ebfc03fa4868882761488449b7e338c_zpsddrhpovr.jpg
 
Sorry, forgot to add. The manual says they are M6 x 12mm on the BS400 so should take a 3mm hex key. :wink:
 
Well it works :) I've now got no more than 1 or 2mm change in thrust bearing gap to back of blade from full low to high positions. It only takes very slight alterations to make a big difference over the travel the BS400 has. I could make it perfect but that'll do for now. Thanks all.
 
Thanks for the explanation Pike and thanks for the diagram woodpig. I saw those but thought they were ends of rivets ( should have gone to specsavers).

Have made a note though and stored the diagram, as well as Steve's explanation.

Much appreciated
 

Latest posts

Back
Top