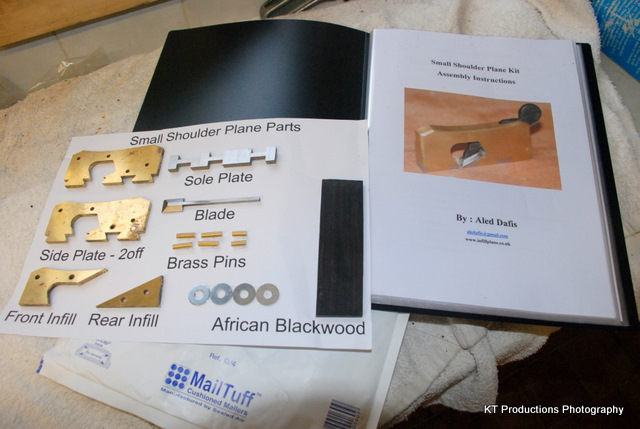
Aled's Plane Kit WIP - Finished

UKworkshop.co.uk

Help Support UKworkshop.co.uk:

This site may earn a commission from merchant affiliate links, including eBay, Amazon, and others.
Aled Dafis":15mkzap0 said:
Following the previous requests for a PDF version of the instructions for this plane, I've now resized all the pics in the document and managed to produce a PDF uzing Bullzip.com Thanks guys for your kind offers and advice.

If anybody would like a copy, just drop me a PM or e-mail.

Cheers

Aled

If it's not too late, I would recommend leaving the pics hi-res in the original document, and using the PDF creation tool to perform the subsampling.

In this way your original doc stays high enough quality for printing, and the PDF can be either screen quality or print quality, as a deferred decision.

I can offer more advice if needed - I work in the print/prepress industry.

BugBear
 
Thanks for the advice Lurker - I used the wrong tool to countersink the pin holes - finished up too wide!

Pete - nice plane. Going to have a last go today washing it between each grade. Some clock makers use a sonic water bath.

It's been an interesting project and I have learned a lot by my mistakes! :)
Not blaming Aled's instructions though - they are great.

Rod
 
Nice work Rod.

That shiny finish looks great, but be warned, it will show every single finger mark and you'll spend ages polishing it after each use, don't ask how I know. I only finish mine to 400 grit now, and just try my best to ensure that the sanding marks are parallel to the sole. This is in my mind a more workmanlike finish that wont show the blemishes so easily.

As lurker mentioned, it's probably best to have a practice with the wedge using a piece of scrap first, and be very carefull of the grain direction in the African Blackwood, there is a reason why I include enough wood for two goes at the wedge. :wink:

Thanks for the compliments regarding the instructions, it's the part of the project that I found most difficult.

Carry on with the good work Rod, I can't wait for the next installment.

Cheers

Aled
 
bugbear":3m9e5zh4 said:
Aled Dafis":3m9e5zh4 said:
Following the previous requests for a PDF version of the instructions for this plane, I've now resized all the pics in the document and managed to produce a PDF uzing Bullzip.com Thanks guys for your kind offers and advice.

If anybody would like a copy, just drop me a PM or e-mail.

Cheers

Aled

If it's not too late, I would recommend leaving the pics hi-res in the original document, and using the PDF creation tool to perform the subsampling.

In this way your original doc stays high enough quality for printing, and the PDF can be either screen quality or print quality, as a deferred decision.

I can offer more advice if needed - I work in the print/prepress industry.

BugBear

Thanks for the advice Bugbear. Thankfully I kept the original version, but I'm quite happy with the picture quality of the PDF. I'll e-mail you a copy so that you can have a look.

Cheers

Aled
 
Finished - workmanship on my part, not 100% perfect but I learnt a lot and enjoyed making it.
Bring on another one Aled?

shoulderplane6.jpg


Rod
 
Lovely work Rod. Now that's what I call shiny!!

The chamfers are very neatly defined, nice work!

I'm sure that there's something missing from that pic however. Have you tried the plane out yet???

I still have the small smoother project "on the go" but unfortunately other jobs keep popping up and pushing the smoother further down the que. I promise that I'll get it done by the end of the year, honest!

Cheers

Aled

P.S. It's a nice touch that you used a "welsh" pound coin as your size reference. I'm sure that it was totally intentional.
 
I bought my first hand plane yesterday, A Veritas LA Block, I just keep looking at it :lol:

I looked at this thread a while back, and 'm really impressed, it's a great idea for an adult construction piece, especially as it's topical to the site.

A skill you must be proud of Aled :D

Rod....Cracking job, the last pic says it all, the finish is beautifull, I don't think I'd use it :lol: you ned to make a perspex box to display it in.

I might be getting one of these for Xmas :wink:

Cheers

Jed
 
I just received my plane kit and the only word out of my mouth when I opened the Jiffy bag was - WOW!!

DSC0002.JPG


I have received and built many kits in my time for all sorts of things but the care which has been put into this particular kit is second to none by far!

Aled - the amount of work and attention to detail that you have put into this kit is amazing and you should be really proud of your efforts.

Sadly I am going on shift now as I long to play with my new toy...but alas that will have to wait until my next day off on Monday. I think even my understanding wife would think it weird of me to take it to bed to read tonight...mmm....nah! :D

I will close by saying a big thank you to you Aled...you have made my week mate!

Jimi
 
Ummm not sure what to say. Thanks jim.:oops: :eek: :oops:

The card backing idea was suggested by one of my first customers, I think it may have actually been Rod (Harbo). As regards the instruction manual, I just typed what I did, trying to steer you guys away from the possible pitfalls.

I'm glad that you're pleased with the kit, and can't wait to see your finished plane.

Cheers

Aled
 
Hi Aled

I certainly wouldn't be modest about your description...it makes perfect sense and is very understandable.

I made some cock-ups which I fully expected to do...the peining is and has always been a weak point of mine...getting the right size hammer...not hitting it too hard...being patient....knowing when to carry on and when to stop...but I will show later...

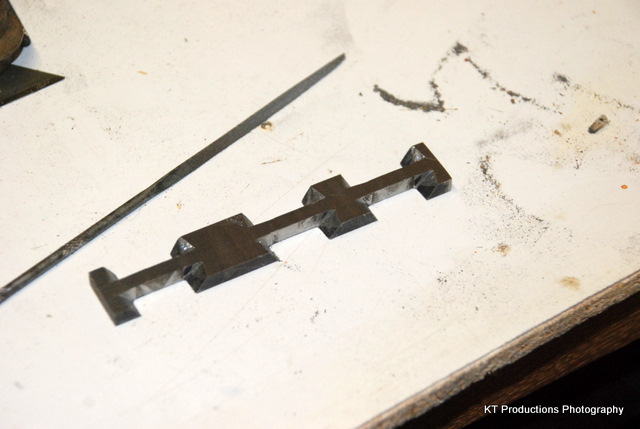
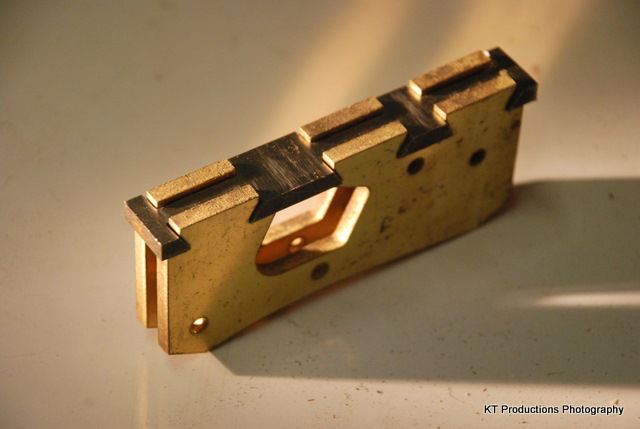
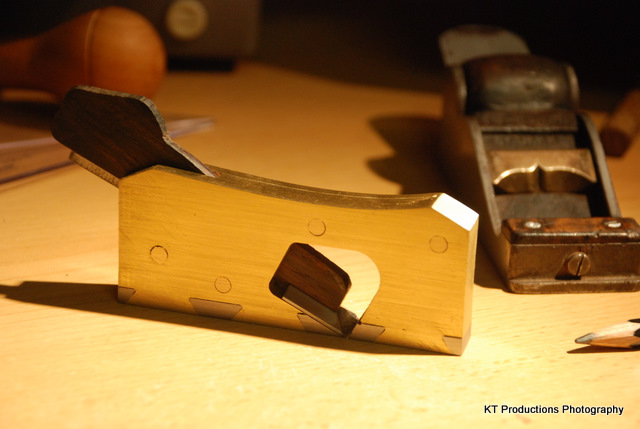
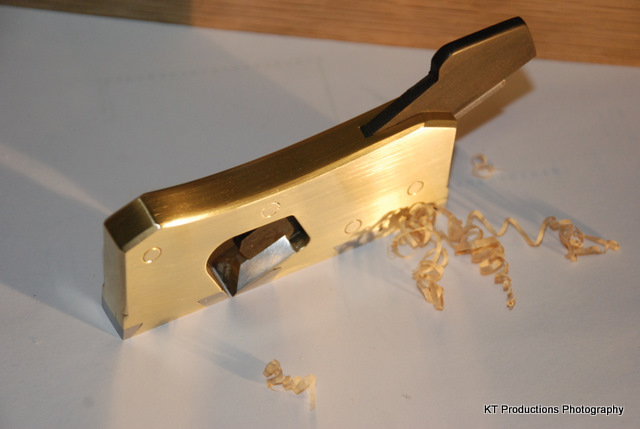
In the meantime some progress shots...the dovetails...

DSC_0002.JPG


This I thought would be the difficult bit but it turned out to be the easiest bit....

DSC_0012.JPG


I screwed up one side of one dovetail...near one end at the sawing stage....I thought it could be filled by peining but it was not so...I therefore have a tiny bit not filled in which we shall see at the finished...

But generally it came through this stage ok...

DSC_0011.JPG


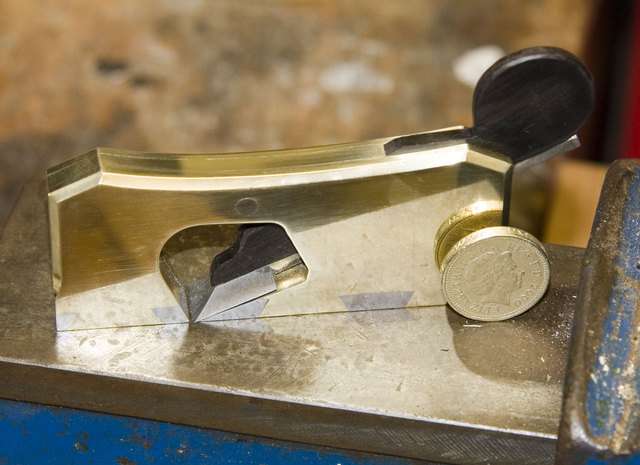
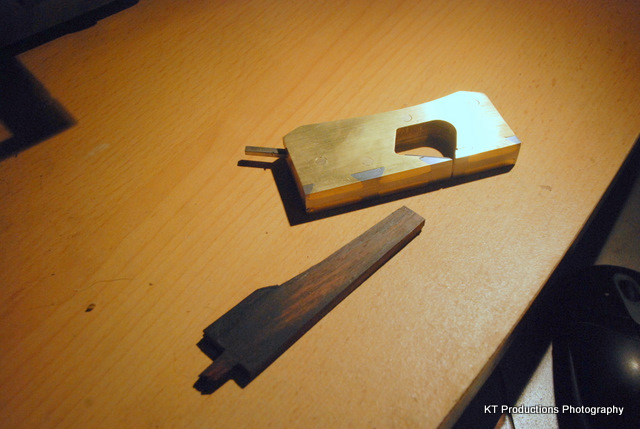
I didn't get any shots of the pin peining stage as I was too busy trying to get them right...but we shall see how good/bad they are later. I am not overly worried as I want this to be a working instrument so I was more worried about getting the iron at the right angle and the best mouth I could.

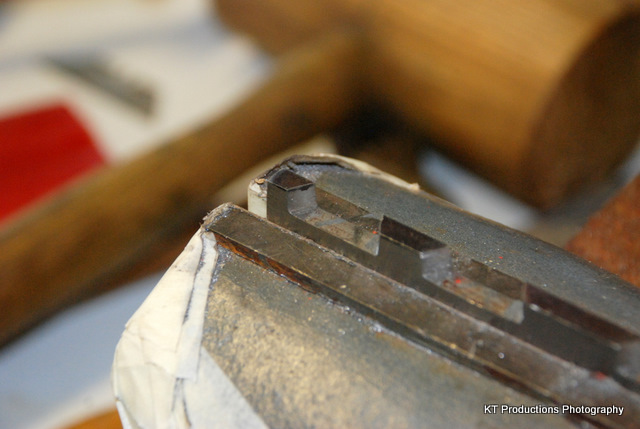
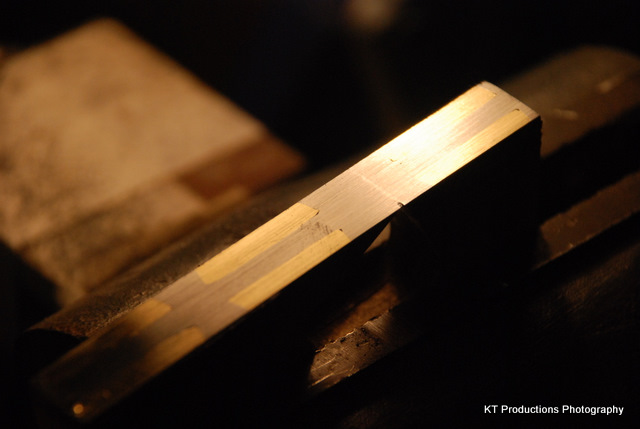
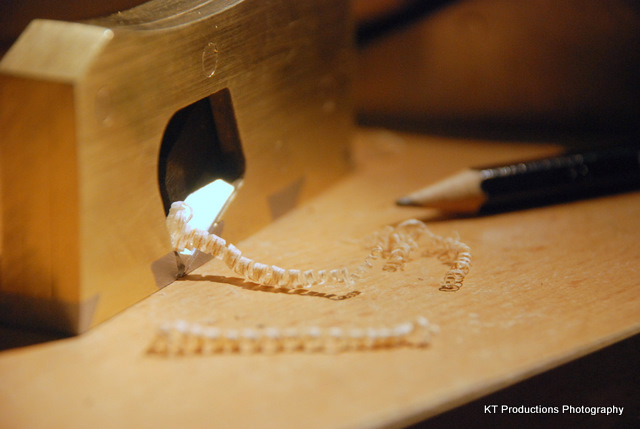
Getting it flat and square was something that Aled says is a "make or break" part...and it surely is...this bit made me think and take super care...but here is the breakthrough at the right angle and exactly where it should be....(this is almost atomic level breakthrough...there is no pencil line here...that is a ridge!)

DSC_0014.JPG


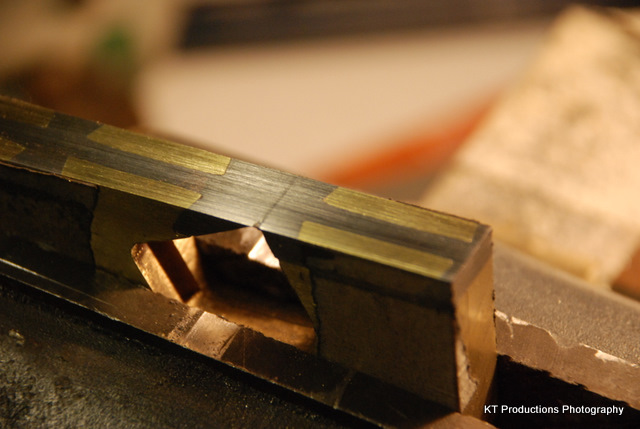
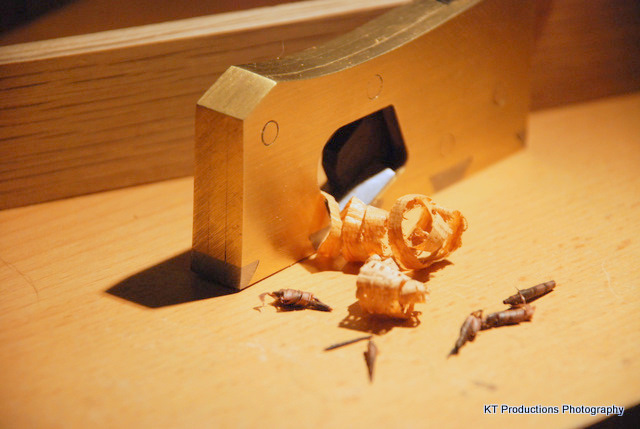
See the void where I simply could not tease enough brass into the gap...it won't affect the operation but it is a PAIN! (no pun intended!)

There are also some tiny voids again were peining has not been aggressive enough at the corner of the dovetails...but what I wanted was the breakthrough to be correct and that worked a dream....

DSC_0017.JPG


At this stage some more tips for those coming along...go buy a new bastard file....I tried to make do with my old one and it was knackered...just a few quid but BOY...did it help. Take the peining SLOWLY and patiently...not a major problem only from an esthetic point of view but none the less...it should be done slowly.

Back later with some more pictures....I have some work to do to get this baby square!

Jim
 
Nice work Jim, can't wait to see it finished.

What you said about new files is so true, I don't understand people that use blunt files. Files are cutting tools, and therefore will, by default, get blunt with use. Nobody in their right mind would use the same blunt plane for years on end, so why do it with files??? A good, sharp file is a pleasure to use, a blunt file isn't!!!

Sorry, rant over.

Cheers

Aled
 
Dammit this looks good!

I really need to make a start on mine, but the longer I go without starting, the more the FEAR (of making an utter c0ck and balls of it) is building in me and stopping me! :roll:

How do I beat the FEAR chaps? Help me, Aled Wan, help me! :wink:
 
Crisis of confidence. Plagues me all the time. I guess that if you mess up it's important to remember that you haven't killed anyone. Puts it into some perspective.
 
Hi Mark

Trust me...I am just getting my head around the intricacies of wood and it is simply YEARS since I wielded a file...I had so much fun walking into the local tool shop and calling across to the counter..."where d'ya keep yer bastard files mate??!"

Seriously....each part of Aled's instructions should be taken as a task to complete...end to end...before progressing and then it does not seem so daunting at all.

Clearly there are some master worksmiths here....evidenced by the finished examples....and what you have to firstly put in your mind is....this is not a competition to see who can complete this gem the best....

The first thing to realise is that you want a tool that does the job. If you concentrate on this element....the rest seems to fall into place. Aled has taken great care in ensuring the parts are meant to fit...simply and efficiently. I will shortly show my cock-ups in full and document how to avoid them...in my case by having much more patience!

Hopefully my version will cut like a razor....which is my target...then the next time I make one...which I will...I won't make the same mistakes again!

Cheers mate

Jim
 
Before I started on the squaring of the sides...I thought I would test the seating of the blade...the flatness and squareness of the blade seat and make a test wedge to do this test....

DSC_0020.JPG


I chose a nice piece of Rio's best to get to grips with the sizing and that illusive "all you must have is an INCLUSIVE 8 degree angle...." bit from Aled's instructions...

For those who are unclear about what this means I have done a little overlay on my picture....

eightdegreeinclusiveangle.jpg


See in that shot Mark my peining is dreadful...the countersinking was too aggressive...this despite Aled warning not to be....I see why now!! I am hoping that the squaring of the sides which will require quite a bit of material removal will lower the whole lot down to remove the gaps around the pins a tad but I really don't mind seeing them....

Then I moved on to the shape of the end of the wedge....this took a lot of thinking about...but then it hit me...SYMMETRY of COURSE!!! :D

DSC_0024.JPG


I was looking at the rounded end like Aled's but then I thought...why not copy the curve on the inner cavity front side...and see what it came out like...

I think this echo of that curve is very pleasing to the eye...whether it turns out to be as comfortable and practical in use remains to be seen but I like that change.

Also I have been thinking about other slight changes. The idea of moving the blade in a controlled fashion pleases me. I was thinking about cutting the back edge in line with the back edge of the inner cutout and at 90 degrees to the blade so that I can insert a knurled thumbscrew in there with a flange on it which would engage with a cutout in blade.

What do you think Aled?

It's coming along fine...and I am really happy with it...the blade even CUTS shavings even though it is completely blunt and not honed yet! Wonderful...

I am off to hone the blade now....see how she performs before I tune her further...I think I shall keep the rosewood wedge...I LOVE that smell!!

Jim
 
I decided that the rosewood wedge was the shape I wanted and it certainly held the blade ok in shaving tests so I also cut one from the African Blackwood and that is some nice stuff too...so now I have two wedges...

Anyway...on to the tests....

I tested the plane before I will attempt to finish it and the blade was partially honed...I intend to get it razor sharp but it is getting late in the day and I don't have the patience tonight...I needed to see how it performed so this is the blade before "hair shaving" stage...IMPRESSIVE!

DSC_0039.JPG


I tried it with rosewood which just rolled up beautifully...

Oak produced the transparent shavings in the foreground and finally...

Beech just came off in one big spiral....

I can't imagine what the plane will do when I finally hone the blade to "scarey sharp"!!!

I am confident I have got the setup sorted...now to square it and finish it...later!

Jim
 
Yeh...go for it Mark...

I just noticed that my old Issac plane has rivets which are just about as bad....(trying to find any excuse to my screw ups!!) :lol: :lol:

Anyway....a bit more tuning and beech pigtails!

DSC_0045.JPG


:D

Jim
 
I am all there but the final finishing....

DSC_0060.JPG


Guys this is a NICE plane. :shock:

I honed the blade to that scary stage even used some new Micromesh in honour of the occasion...it shaves like a cut-throat now.

I love the weight...it is really deceptively heavy...but the balance is perfect...it fits perfectly in my hand and the added design bit with the back tab on the wedge allows me to simply flip it off with my thumb...I like that!

I haven't had time tonight to try it on end grain but I will tomorrow before I have to go back to work again...

I decided not to polish but to cut with abrasive pads....almost to the white one and that gives a nice satin sheen which does not show fingerprints.

I quite like the rings around the rivets when polished...(well I have to excuse my useless peining SOMEHOW)....

It was not an easy project by any definition but if you follow the steps closely and take your time (I didn't quite do this!) then it is achieveable....

Thanks again Aled...I SHALL be picking it up A LOT!!

Jim
 
Back
Top