Advice required on turning a box

UKworkshop.co.uk

Help Support UKworkshop.co.uk:

This site may earn a commission from merchant affiliate links, including eBay, Amazon, and others.

kasandrich

Established Member
Joined
26 Sep 2009
Messages
311
Reaction score
1
Location
Braintree Essex UK
As per title, I fancy having a go at a little box, what I am looking for is confirmation of the order of events.


It will be from seasoned branch stock cherry if that is okay?

My approach would be

1. Turn between centres, a spigot to suit my chuck on the tailstock end
2. Fit the chuck and mount the spigot turned in 1. in the chuck.
3. Rough it to cylindrical and turn another spigot on the other end.
4. Part off the free spigot end leaving enough to form the lid
5. Turn the lip for the lid to sit on
6. Hollow it out
7. Part the box from the scrap in the chuck remove the scrap and mount the lid
8. turn the lip to match the box
9. turn the inside of the lid
10. part the lid off from the spigot
11. Mount the box back in the chuck and fit the lid with a couple of layers of tissue......hopefully it will be a good fit!
12. finish turn the top of the lid

How does that sound as a plan?

Of course sanding and finishing has to be fitted in along the way
 
Have a search for Cornucopias Box WIP. Best set of photos you'll find online for box making.

L
 
I'm not an 'expert' but this is how i do it...... (i'm sure others will come along with add-ons or instead-of's etc....)


IMG_2756.jpg


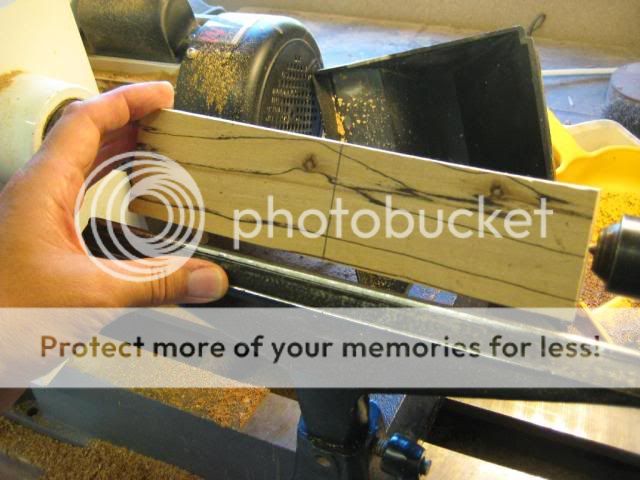
start with your chosen piece of wood....


IMG_2757.jpg


turn to round, square up and put a dovetail on each end.
this piece i have decided will make two box's so part off in the middle


IMG_2758.jpg


mount in chuck, and now put a dovetail on the end just parted in the middle. Decide where the base/lid intersection is to be (i use roughly 1/3 - 2/3rd division....) and again part off....


IMG_2760.jpg


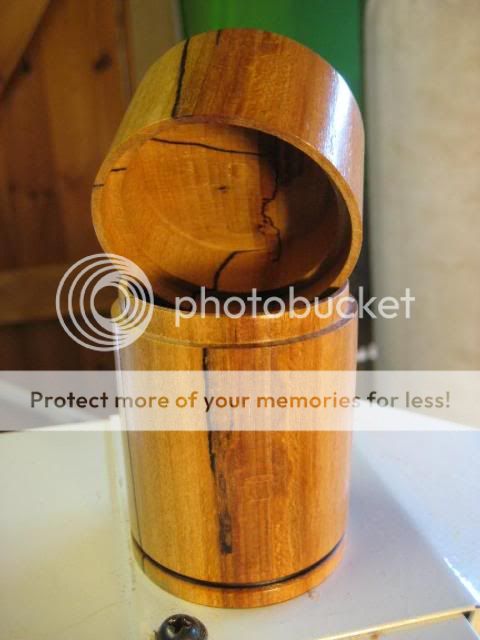
hollow out..... it's then after hollowing i put the 'lip' on (no pic sorry), others may do it round the other way...


The next bit (no pics again...) is an absolute MUST i find... BEFORE taking wood from chuck... put an index mark on it..!! that way it goes back in the chuck in the same place as before. Simply put a bit of masking tape on the chuck (anywhere), then put a good pencil mark on your wood that lines up with the masking tape... when you come to put the wood back in the chuck line the two up, tighten the chuck, spin it up and it shouldn't 'wobble'.... i.e. it's back in the same place...


IMG_2761.jpg


put the lid in and hollow out. again pencil the index mark on your wood just in case you might need it later (i have a piece of masking tape permanently stuck on the chuck...).


IMG_2765.jpg


Make the opposite lip for the top of the box... making sure its a good tight fit... this can be eased later.


Somewhere in-between my pics don't quite marry up as you can see i've played around with a bit of finish on the base part.

Then take both parts out of the chuck and take them indoors for a few days so that the wood can finish 'relieving' itself and settling down to its new shape. DON'T be tempted to try and finish it all in one go.... i used to, and wondered why the lids suddenly got all sloppy and loose and the lid didn't match the base etc.


Then you go back to your shed and you can now remount either part in the chuck (using the non-patented) indexing system... and each should spin up with no or hardly noticeable wobble.

Finish the insides of both. Then with the base in the chuck... ease gently with a bit of sandpaper until you're happy with the fit of the lid (i prefer a little tight to a little loose...).

Finish the outsides of both. Put the lid on and secure with some masking tape around the join. Then (gently) proceed to shape the top taking the dovetail off at the same time.


IMG_2766.jpg


If you want... put a 'witness' line on the join... i.e. gently radius the two faces where they meet with a bit of sanding.


Then when you're happy with all you've done/got, choose a finished length and part off. I finish mine using a fine belt sander (linisher), a bit of sealer and wax on the base... all done......


IMG_2767b.jpg


IMG_2771b.jpg


IMG_2777b.jpg


Like i said... this is how i do it..... i'm sure there will be comments or add-ons from others..... i'm newish to this lark, so am open to other/better ways of doing things too.....


Nick
 
This is how I do a box with an over-fitting lid...

1. Rough the blank to a cylinder between centres. Cut a chucking spigot on each end.

2. Mount in chuck and part off lid part from base part.

3. Roughly hollow bothe the base & lid parts.

4. Set aside both to relax/dry - takes anything from a few days (with dry wood) to several months (with greener timber).

5. Mount lid part in the chuck, turn, sand and finish the inside of the lid.

6. Mount base part in the chuck, cut a flange for where the lid will fit, leaving it slightly too large. Finish turn the inside of the box.

7. Now cut the flange so the lid is a very tight fit.

8. Jam on the lid and finish turn the outside of the box (not the top of the lid at this stage - leave on the chucking spigot).

9. Detail the base/lid join. If necessary, rechuck the lid to tidy up the shape. Sand & finish any lid rim detail you'd be unable to reach with the lid jammed on.

10. Rechuck the base, and jam on the lid again. Finish turn the top of the lid & remove the chucking spigot.

11. Sand and finish the outside of the box & lid.

12. Remove the finished lid. Gently recut the flange so the lid is now your desired fit.

13. Sand & finish the inisde of the box. Only lightly sand the flange (if at all). Finish the flange.

14. Reverse chuck the base to complete the box.

tekno.mage
 
NikNak":2j62lxlc said:
:oops: hope i didn't tread on any toes.....?

no- not at all- as loz say's the more the merrier
we all have our own ways of going about things, i think its good to look at as many ways as possible and come to your own conclusion.
 

Latest posts

Back
Top