Advice on how to cut a chamfer on a chair back

UKworkshop.co.uk

Help Support UKworkshop.co.uk:

This site may earn a commission from merchant affiliate links, including eBay, Amazon, and others.

AndyBoyd

Established Member
Joined
22 Nov 2002
Messages
556
Reaction score
0
Location
Heiloo The Netherlands
For a while now I have been making a copy of the David Savage Love Chairs IV
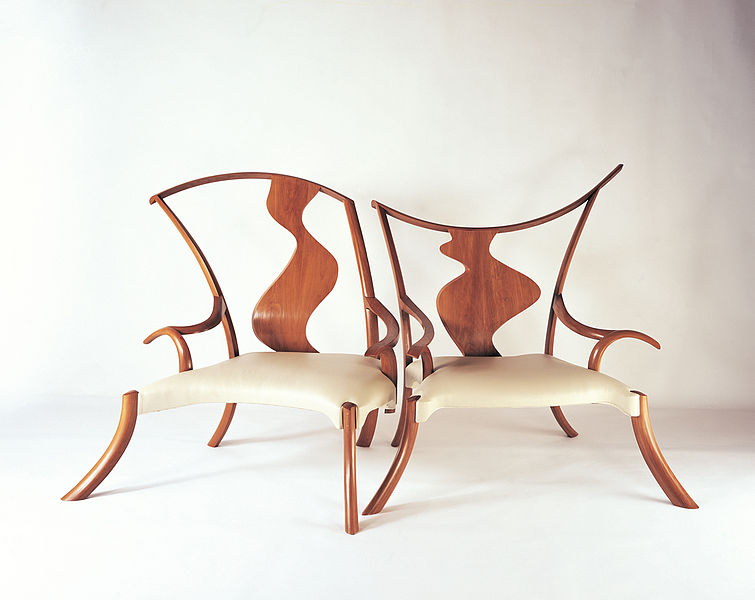
755px-Love_chairs_david_savage.jpg


Here is where I'm at so far (paper cut out showing one of the back designs)
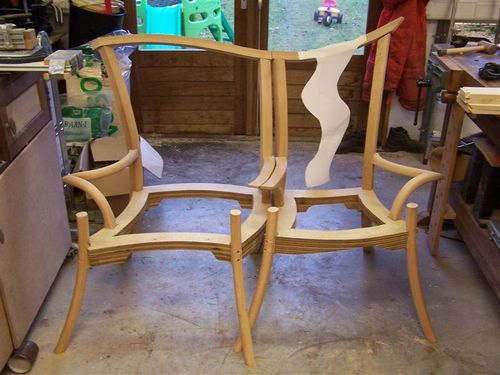
100_2807.jpg

(lots more photos there is people are interested http://croeso.typepad.com/photos/furniture_making_love_cha/index.html)

I have been waiting for my large piece of London Plane to dry so I can make the chair backs. After 18months of drying I can start again!!!!

I will cut 2mm planks from the London plane which will then be cut to the curved shape, then glued in a vacuum bag to achieve the secondary curve to match the sitters back.

My question is: There is a very nice chamfer on each side, what will be the best way to cut that once the pieces come out of the vacuum bag?

A router seems best but how to guide it along a doubly curved piece is a bit of a challenge, As the chafer is also fully cut across the wood, a guide bearing is tricky to use as I guess I'll have to fix a temporary guide rail along the chair back but of course this is not straight but quite curvy in 2 dimensions.

I saw from the good woodworking article that David wrote on these chairs that he and his people used a spokeshave, but I'm afraid my spoke shave skills are not that good (never really mastered those tricky tools)

Any advice on how to do this would be very gratefully received

Andy

and a very merry christmas everyone
 
The thing about a spokeshave versus a router is that you can approach the finished shape slowly and gradually.
I guess he/they would have used a very tightly curved or even cigar shave?
 
not sure doing it before gluing would work as when it curves all the angles will change.
Maybe a bandsaw with the table set at the required angle would do it, then I can glue the pieces oversize and bring them to the final size and cut the chamfer using the band saw, then bring it flat with a spokeshave or sand paper.

Still seems hard to cut a double wavy thing well on the bandsaw.......

But good call I'll mull that over
 
thanks Richard, maybe your right I just need to buy myself a high quality shave and practice a bit

What's the latest thinking on high quality fine adjustable spoke shaves - the Vertias ones always seem popular especially the low angle one

Any other recommendations?
 
AndyBoyd":2v54p565 said:
thanks Richard, maybe your right I just need to buy myself a high quality shave and practice a bit
What's the latest thinking on high quality fine adjustable spoke shaves - the Vertias ones always seem popular especially the low angle one
Any other recommendations?
My advice is much the same as Richard's. You won't beat a couple of spokeshaves, a scraper or two and some sandpaper for a job like that. You could play around for a day or two trying to design some sort of jig to do the job with a router, but whilst you were doing that I'd have all the shaping done in an hour or so with the tools I've just listed.

You don't really need premium spokeshaves and a couple of Stanley 151s will do the job very satisfactorily, ie, one each of a flat base and convex base, and will cost you £37.10 plus shipping from Axminster: http://www.axminster.co.uk/stanley-stan ... prod23344/ Of course higher priced spokeshaves from the same source (Axminster) will be better quality, but if you need to spend money carefully those 151s are more than adequate. I base that recommendation on my experience of using lots of different spokeshaves, including maybe two or three dozen of the Stanley 151s and several of the premium brands listed at the Axminster site my link should send you to. Slainte.
 
If appropriate it can help to work to lines, so you don't lose control free hand forming shape. Pencil in lines on the top and the sides and spokeshave down to them leaving a flat bevel. Then more lines to take the edge off the bevels etc. You end up with flat facets (micro bevels?) which you then sand off smooth.
 
Hey, Andy. I'm with the spokeshave vote on this one. The time you take trying to jig up something for a one off with a tailed tool would be much better spent getting comfortable with a shave - and you'll have that confidence and skill with it for ever after. I agree you don't need a premium shave (but, y'know, what the heck if you fancy one - it's Christmas...) but I wouldn't buy a new Stanley one. No point; you're just paying for new and very likely a rather less well made example. If you see one, an adjustable mouth model (Such as the Stanley #53/54) often finds favour with those who try one, fwiw.
 
Ok thanks Jacob and Sgian, I'll go for Spokeshaves, lines and scrapers, very good advice - thanks, will keep you posted on how I get on with this tricky but quite enjoyable puzzle

But first I have to figure out exactly what curves are comfortable, luckily I have a ready supply of 2mm plywood that we can test various shapes out with , and the upholsterer will fit the leather for me first, then I'll make the mounting places for the back and then finally I'll bend away till the family think we have got it, then finally we'll make the backs out of the London Plane (more accurately mine is French)
 
.


It seems to me that a battery of blades will come in handy and there have been a lot of good recommendations.

As an occasional carver, I find that it is not always possible to shape a tight, free-hand curve with chisels or shaves, because of accessibility; this is where rasps come in handy for roughing work, followed by a succession of abrasives to achieve the final finish.

May I also add a suggestion that Iwasaki Japanese rasps may do what you need and are capable of quite controlled, fine work with a good finish that you can take to the next stage with scrapers and abrasives.

I recall that Pedder, who makes saws , has posted about them in this forum, and they are available from Rutland’s in the UK, as well as Pedder’s supplier in Germany. This page describes the sizes and curves available.
http://www.fine-tools.com/carvingfile.html


Worth a look - they work very well.


.
 
Cheap alternative to rasps (besides cheap rasps from B&Q which work perfectly well BTW), is bits of dowel or broom handle with sandpaper wrapped around. You can usually just hold it in place, not stuck or anything. And you can work through the grits.
151s are good BTW, no great need to seek out the rarer varieties. The two adjusters are particularly useful, compared to others with just one.
 
Wouldn't want to discourage anyone from learning how to use more tools, but there shouldn't be a problem chamfering with a router before steam bending. The change in shape might, in theory, make the chamfer slightly steeper on the inside of a curve, and less so on the outside, but for the amount of shaping involved in this case, it would almost certainly be undetectable.
 
I'm with the hand tool tribe for this. What no one has mentioned is that you will really enjoy doing it that way. Take your time and enjoy the absence of a screaming router and vac and the fear that inevitably comes with any high risk router activity and savour the quiet satisfaction to be had from this sort of job.

Jim
 
yetloh":nosg9oqk said:
I'm with the hand tool tribe for this. What no one has mentioned is that you will really enjoy doing it that way. Take your time and enjoy the absence of a screaming router and vac and the fear that inevitably comes with any high risk router activity and savour the quiet satisfaction to be had from this sort of job.

Jim
Absolutely. Remember you can only do it downhill - cut down into the hollows, not up the other side.
Happy Christmas!
 

Latest posts

Back
Top